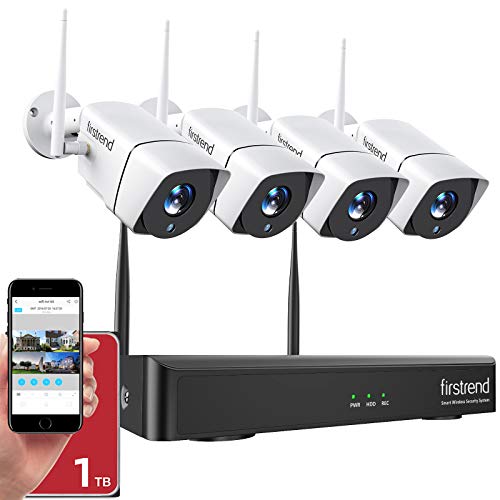
Ensuring the safety and security of your property is crucial in today’s world. Installing security cameras is a smart choice to deter potential intruders and keep an eye on your surroundings. However, before you start setting up your security cameras, you need to drill a hole to properly route the cables and mount the cameras.
Drilling a hole for a security camera may seem like a daunting task, but with the right tools and techniques, it can be done easily. This guide will walk you through the step-by-step process of drilling a hole for your security camera, ensuring a clean and professional installation.
Here are the steps to drill a hole for a security camera:
1. Determine the location: First, you need to decide where you want to install your security camera. Consider the best vantage points and areas that need surveillance. Once you have determined the location, mark it with a pencil.
2. Gather the necessary tools: To drill a hole, you will need a power drill, drill bits of suitable size, a tape measure, a pencil, and a stud finder (if drilling through a wall).
3. Prepare the area: Before drilling, it’s important to ensure that there are no electric wires, water pipes, or any other hidden obstacles in the wall or ceiling. Use a stud finder to locate any studs or beams that may prevent drilling. This will help prevent any damage or accidents.
4. Drill the hole: Once you have prepared the area, use the correct drill bit size for your camera’s cable and mount. Start drilling slowly and steadily, applying even pressure. Be sure to keep the drill perpendicular to the surface to avoid any slanted or crooked holes.
5. Secure the cable: After drilling the hole, run the camera’s cable through it. Use cable clips or staples to secure the cable along the wall or ceiling, keeping it neat and out of the way. This will prevent any accidental disconnection or damage to the cable.
6. Mount the camera: Now that you have drilled the hole and routed the cable, it’s time to mount the camera. Follow the manufacturer’s instructions to properly install and secure the camera. Ensure it is positioned correctly and offers the desired view angle.
That’s it! You have successfully drilled a hole for your security camera. Remember to test the camera’s functionality and adjust the settings as needed. By following these steps, you will have a professional-looking installation that provides you with the peace of mind that comes with an effective security system.

Preparing for Installation
Before drilling a hole for your security camera, it is important to take the necessary precautions and plan accordingly. Below are the steps you should follow to ensure a successful installation.
| Step | Description |
|---|---|
| 1 | Determine the optimal location for your security camera. Consider factors such as the field of view, proximity to power outlets, and hiding the camera from intruders. |
| 2 | Double-check the positioning of the camera by setting it up temporarily without drilling any holes. This will allow you to test the camera’s field of view and ensure it captures the desired area. |
| 3 | Gather the necessary tools, including a drill with a masonry bit, a power source for the drill, a level, and a tape measure. |
| 4 | Locate the power source for the camera. If it requires an electrical outlet, ensure there is a nearby socket, or plan to install a weatherproof outlet box if needed. If the camera is battery-powered, make sure you have spare batteries available. |
| 5 | Measure and mark the exact location where you want to drill the hole. Use a level to ensure that the hole will be straight. |
| 6 | Put on safety goggles and use the appropriate sized masonry bit for your camera’s mounting hardware. Start drilling slowly and steadily, applying light pressure. |
| 7 | Remove any debris created during drilling and test the size and depth of the hole to ensure it is suitable for the camera’s wiring or mounting bracket. |
By following these steps, you will be well-prepared to drill a hole for your security camera and ensure a proper installation.
Choosing the Right Location
When it comes to installing a security camera, choosing the right location is crucial. The placement of your camera will greatly impact its effectiveness in capturing relevant footage and deterring potential intruders. Here are some factors to consider when selecting the perfect spot:
Determine Potential Vulnerabilities
Start by assessing your property to identify vulnerable areas that may require additional surveillance. This could include entrances, windows, driveways, or any blind spots where someone could potentially gain unauthorized access. By focusing on these areas, you can optimize the effectiveness of your security camera system.
Consider Camera Range
Before installing the camera, consider its range and field of view. Make sure that the location you choose allows the camera to capture the desired area effectively. Cameras with adjustable lenses or pan-tilt-zoom capabilities can be particularly useful in covering a larger area with a single camera.
It’s important to ensure that the camera is positioned at the right distance from the intended target. Too close, and the image may be distorted or overexposed. Too far, and the details may be too small to recognize. Take some test shots from different distances to find the optimal range.
Keep in mind that the camera’s field of view may change depending on lighting conditions. It’s helpful to test the camera’s performance during different times of the day to account for any variations.
Consider Power and Connectivity
Choose a location that provides easy access to power outlets or consider using a wireless camera that runs on batteries. Additionally, ensure that the camera can connect to your network or video recorder from the chosen location. Verify the signal strength or install a Wi-Fi extender if needed.
You may also want to consider protecting the camera and its cables from tampering or weather damage. Look for weatherproof or vandal-resistant camera models and install them at a height or position that makes it difficult for intruders to interfere.
By carefully considering these factors, you can choose the right location for your security camera installation and enhance the overall safety of your property.

Gathering the Necessary Tools
Before you start drilling a hole for a security camera, it is important to gather all the necessary tools to ensure a successful installation. Here are the tools you will need:
- A power drill
- Drill bits suitable for the material you will be drilling into (such as wood, metal, or concrete)
- Tape measure or ruler to measure the desired location for the hole
- Marker or pencil to mark the drilling spot
- Safety goggles to protect your eyes from flying debris
- Anchors and screws to secure the camera mount in place
- A screwdriver or screw gun to attach the camera to the mount
- A level to ensure the camera is straight
- A cable or conduit to run the camera’s wiring through the hole
- Fish tape or a wire snake to help guide the wiring through the wall or ceiling
- A silicone sealant or caulk to seal the hole and prevent water damage
Having these tools readily available will make the installation process smoother and more efficient. Make sure to double-check that you have all the necessary tools before starting the camera installation.
Checking Local Regulations
Before drilling a hole for your security camera, it is important to check with your local authorities and adhere to any regulations that may be in place. These regulations can vary depending on your location, so it is crucial to do your research beforehand to avoid any legal issues.
Permits and Approvals:
Contact your local building department or city council to inquire about permits or approvals required for the installation of security cameras on your property. Some areas may require you to obtain a permit before installing any surveillance equipment.

Placement Restrictions:
There may be specific restrictions on where you can place your security camera. For example, it might be prohibited to install cameras in certain public areas, such as parks or sidewalks. Make sure to familiarize yourself with any restrictions to ensure compliance.
Privacy Laws:
It is important to respect the privacy of others when installing security cameras. In some regions, there may be laws governing where and how cameras can be positioned to avoid invading the privacy of individuals. Be aware of these laws and adjust your installation accordingly.
Neighborhood Associations:

If you live in a neighborhood or community with a homeowners’ association or neighborhood watch program, they may have specific guidelines or regulations regarding security camera installation. Consult with your association or program to ensure compliance with any existing rules.
By being aware of and following local regulations, you can ensure that your security camera installation is legal and does not infringe on the rights of others.
Drilling the Hole
Before drilling the hole for your security camera, it’s important to carefully choose the right location. Consider factors such as visibility, angle, and potential obstructions. Once you have decided on the ideal spot, follow these steps to drill the hole:
1. Gather the necessary tools: Before you begin, ensure you have all the tools you’ll need. This typically includes a power drill, appropriate drill bits, a level, and safety goggles.
2. Mark the spot: Use a pencil or a marker to make a small dot on the location where you want to drill the hole. Double-check the position and make sure it aligns with your initial plan.
3. Measure and check: Use a level to ensure that your mark is level and straight. This step is crucial to ensure that your security camera will be mounted correctly.
4. Start the drilling: Choose an appropriate drill bit based on the type of surface you are drilling into. For example, if you are drilling into brick or concrete, use a masonry drill bit. Wear safety goggles to protect your eyes from any debris.
5. Steady drilling: Place the drill bit tip on the marked spot and apply steady, even pressure as you start drilling. Hold the drill firmly and keep it perpendicular to the surface as you work.
6. Check progress: Periodically stop drilling to check the depth and progress of the hole. This will help prevent drilling too deep or damaging any hidden wires or pipes.
7. Clean the hole: Once you have reached the desired depth, remove the drill bit and clean out the hole. Use a vacuum or a brush to remove any debris or dust that may have accumulated.
8. Install the camera: Now that you have drilled the hole, you can proceed with installing the security camera. Follow the manufacturer’s instructions to mount the camera securely and connect it to your surveillance system.
9. Test the camera: After installation, test the camera to ensure it is functioning properly and capturing the desired area. Make any necessary adjustments to achieve the best angle and view.
Important Tips:
1. Before drilling, always ensure there are no electrical wires or plumbing behind the chosen location. Use a stud finder if necessary.
2. If you are unsure about drilling into certain surfaces, such as concrete or stone, consult with a professional or seek advice from the manufacturer.
Marking the Spot
Before you start drilling a hole for your security camera, it’s important to accurately mark the spot where you want to install it. This will ensure that you drill in the correct location and avoid any unnecessary mistakes.
Here are some steps to help you mark the spot for your security camera:
1. Choose the Right Location
First, consider the best location for your security camera. You’ll want to choose an area that provides optimal coverage of the desired surveillance area. Look for a spot that is easily accessible and provides a clear view.
2. Measure and Align
Using a measuring tape, carefully measure and mark the spot where you want to install your security camera. Make sure it is aligned properly to ensure accurate placement.
3. Use a Level
To ensure that your camera is mounted straight, use a level to double-check the alignment. This will help avoid any crooked installations that could affect the camera’s performance.
4. Mark the Drilling Points
Once you have determined the correct location and alignment, use a pencil or marker to mark the drilling points on the wall or surface. These marks will serve as your guide when drilling the holes for the camera’s mounting bracket.
By following these steps to accurately mark the spot for your security camera, you can ensure a successful installation and optimal performance of your surveillance system.
Selecting the Proper Drill Bit
When drilling a hole for a security camera installation, it is important to use the proper drill bit to ensure a clean and accurate hole. Here are some tips for selecting the right drill bit:
- Size: Choose a drill bit size that matches the diameter of the camera’s mounting hole. This will help ensure a snug fit and prevent any movement or vibration.
- Type: For drilling through most common materials such as wood, plastic, or drywall, a standard high-speed steel (HSS) drill bit will work well. However, if you are drilling through harder materials like metal or concrete, consider using a carbide drill bit or a masonry bit respectively.
- Length: If you need to drill a deep hole, make sure to use a drill bit that is long enough to reach the desired depth without bottoming out. Alternatively, you can use an extension rod to extend the reach of a shorter drill bit.
- Quality: Invest in a good quality drill bit that is designed for the specific material you are drilling into. Cheap or low-quality drill bits may not last as long and can cause the hole to be less precise.
- Speed: Use the appropriate drill speed for the material and drill bit you are using. For example, when drilling into metal, it is generally best to use a slower speed to prevent overheating and ensure a cleaner hole.
By carefully selecting the proper drill bit, you can ensure a successful and professional-looking installation of your security camera.
Drilling the Hole
Once you have determined the best location for your security camera, it’s time to start drilling the hole for the mounting bracket. Follow these steps to ensure a successful drilling process:
- Mark the spot: Use a pencil to mark the exact spot where you want to drill the hole. Make sure it is at the right height and angle for optimal camera visibility.
- Prepare the drill: Attach a masonry bit to your power drill. Ensure that the bit is the appropriate size for the mounting bracket screws.
- Put on safety gear: Before you start drilling, put on safety goggles and ear protection to protect yourself from any debris or noise.
- Drill the hole: Position the drill bit on the marked spot and apply steady pressure to begin drilling. It may be necessary to switch to a hammer drill if you encounter any particularly tough surfaces, such as concrete or brick.
- Clear the debris: As you drill, periodically stop and remove any debris that has accumulated in the hole. This will help ensure a clean and precise hole.
- Test fit the mounting bracket: Once the hole is drilled, test fit the mounting bracket to ensure it fits securely. Adjust the size of the hole if necessary.
- Secure the mounting bracket: Use screws and wall anchors to secure the mounting bracket in place. Make sure it is level and tightly secured to provide a stable base for the security camera.
Remember to exercise caution when drilling and follow all safety guidelines provided by the manufacturer. If you are unsure about any step of the process, considering consulting a professional installer. Now that the hole is drilled and the mounting bracket is secured, you are one step closer to installing your security camera.
Running the Cable
Once you have determined the ideal location for your security camera, the next step is to run the cable from the camera to the recording device. Follow these steps to ensure a clean and professional installation:
1. Measure the Distance
Start by measuring the distance between the camera and the recording device. This will help you determine the length of the cable you will need. It is always better to have a cable that is slightly longer than needed, as you can always secure any excess length.
2. Choose the Right Cable
Select the appropriate cable for your security camera installation. It is recommended to use a high-quality cable specifically designed for outdoor use, as it will be more resistant to environmental factors such as rain and UV rays. Look for cables that are labeled “weatherproof” or “outdoor rated.”
3. Run the Cable
Begin by drilling a hole through the wall or ceiling at the desired location of the camera. The size of the hole should be slightly larger than the diameter of the cable. Feed the cable through the hole, ensuring that there is enough slack on both sides to easily connect it to the camera and recording device.
Use cable clips or adhesive-backed mounting bases to secure the cable along the wall or ceiling, keeping it neat and tidy. Avoid running the cable near any electrical wires, as this could cause interference.
If you need to run the cable through a larger area, such as a crawl space or attic, consider using conduit to protect the cable and keep it organized. This will also provide additional protection against potential damage.
Once the cable is securely in place, connect it to the camera and recording device according to the manufacturer’s instructions. Test the connection to ensure that both devices are properly communicating.
Following these steps will help you run the cable for your security camera installation efficiently and professionally, ensuring a clean and reliable system.
Securing the Cable
Once you have drilled the hole for your security camera, it’s important to properly secure and protect the cable. This will help prevent any damage or tampering that could compromise the effectiveness of your camera system.
Here are some steps to follow to secure the cable:
1. Use Conduit
One option is to run the cable through a conduit. This is a protective tube that will shield the cable from the elements and potential tampering. The conduit can be attached to the wall or the surface where the cable is running, using conduit clips or brackets.
2. Use Cable Clips
Another option is to use cable clips to secure the cable along its route. These clips can be attached to the wall or the surface using screws, nails, or adhesive. Make sure to space the clips evenly along the cable’s path to provide adequate support and prevent any sagging.
It’s important to avoid any sharp bends or kinks in the cable, as this can cause signal degradation. If necessary, use cable ties or Velcro straps to neatly bundle any excess cable length and keep it out of the way.
Remember to check and tighten any connections along the cable run to ensure a secure and stable connection. This will help maintain the quality of your camera’s video feed.
By properly securing the cable for your security camera, you can help ensure its longevity and reliability. This will allow you to effectively monitor and protect your property.
FAQ,
What tools do I need to drill a hole for a security camera?
To drill a hole for a security camera, you will need a power drill, a drill bit appropriate for the camera’s mounting bracket, a marker or pencil to mark the location of the hole, and a level to ensure the hole is straight.
What is the best location to drill a hole for a security camera?
The best location to drill a hole for a security camera is usually near the entrance points of your property, such as doors or windows, as well as areas with high foot traffic. It is important to choose a location that provides a clear view of the area you want to monitor and that is not easily accessible to potential intruders.