Apple’s iPhone is renowned for its high-quality camera, capable of capturing stunning photos and videos. However, there are several techniques and tips that can further enhance the camera quality on your iPhone, allowing you to take even better shots and videos.
1. Keep your iPhone lens clean: One of the simplest yet most effective ways to enhance camera quality on your iPhone is to ensure that the lens is clean. Overtime, your iPhone’s lens can accumulate dirt, dust, and fingerprints, which can result in blurry or hazy photos. Use a soft, lint-free cloth to gently clean the lens before taking any photos to ensure optimal clarity and sharpness.
2. Adjust exposure and focus: The iPhone camera app allows you to manually adjust exposure and focus, giving you more control over the final image. To adjust exposure, simply tap on the screen and slide your finger up or down to increase or decrease brightness. To adjust focus, tap on the subject you want to focus on and hold for a moment until the autofocus lock icon appears.
3. Experiment with different shooting techniques: To enhance camera quality on your iPhone, don’t be afraid to experiment with different shooting techniques. For example, try using the Grid feature to ensure that your photos are well-composed, or utilize the Burst mode to capture fast-moving subjects with precision. Additionally, explore different camera modes such as Portrait Mode or Night Mode to capture stunning portraits or low-light shots.
4. Utilize third-party camera apps: While the native camera app on your iPhone is already excellent, there are numerous third-party camera apps available that can further enhance camera quality. These apps often provide additional features and settings that allow for greater customization and control over your photos and videos. Do some research and find a camera app that suits your preferences and needs.

5. Edit your photos: Even with the best camera quality, editing your photos can take them to the next level. There are various photo editing apps available that offer a wide range of editing tools and filters. Experiment with different adjustments such as exposure, contrast, saturation, and sharpness to make your photos more vibrant and impactful.
By following these tips and techniques, you can enhance camera quality on your iPhone and capture stunning photos and videos that showcase your creativity and vision. Whether you’re a professional photographer or just a casual snapshooter, these simple steps can make a noticeable difference in the quality of your iPhone camera output.
Understanding the Camera Hardware
Before diving into ways to enhance the camera quality on your iPhone, it’s important to understand the camera hardware that is responsible for capturing those stunning photographs. The camera hardware on the iPhone plays a crucial role in determining the image quality, so let’s take a closer look at its components:
Lens
The lens is the most vital part of the camera hardware. It allows light to enter and focuses it onto the image sensor. The lens quality determines the sharpness, clarity, and overall image quality captured by your iPhone’s camera. Apple uses high-quality lenses in their iPhones, and advancements in lens technology have significantly improved the camera capabilities in recent models.
Image Sensor
Next, we have the image sensor. The image sensor is responsible for converting the light focused by the lens into an electrical signal, which is then processed to create a digital image. The quality of the image sensor directly impacts the amount of detail, sharpness, and color accuracy in your photographs. Apple has made significant improvements in the image sensor technology over the years, resulting in better low-light performance and overall image quality.

Image Signal Processor (ISP)
The image signal processor, or ISP, is a crucial component that works alongside the image sensor. It processes the electrical signals from the image sensor and applies various algorithms and enhancements to create the final image. The ISP is responsible for adjusting exposure, color balance, noise reduction, and other image processing tasks. Apple’s advanced ISP is designed to deliver excellent image quality and accurate color reproduction.
OIS (Optical Image Stabilization)
Some iPhone models are equipped with optical image stabilization, which helps in reducing motion blur caused by hand movement or vibrations. OIS compensates for camera shake, resulting in sharper and clearer images, especially in low-light conditions or when capturing fast-moving subjects.
In conclusion, understanding the camera hardware of your iPhone is essential as it directly affects the image quality. The lens, image sensor, ISP, and OIS are critical components that work together to capture stunning photographs. Knowing how these components function will help you make informed decisions when it comes to enhancing the camera quality on your iPhone.

Optimizing Camera Settings
When it comes to enhancing the camera quality on your iPhone, optimizing the camera settings can make a significant difference in the quality of your photos. Here are some tips on how to optimize your camera settings:
1. Clean the camera lens: Before taking any photos, make sure to clean the lens of your iPhone’s camera. Smudges or dirt on the lens can affect the clarity of your images.
2. Adjust exposure: The exposure setting determines the amount of light that enters the camera. To optimize exposure, tap on the area of the screen where you want to focus, and then slide your finger up or down to adjust the exposure level.
3. Enable HDR: HDR stands for High Dynamic Range, and it can help improve the dynamic range of your photos, making them appear more vibrant and detailed. To enable HDR, go to your iPhone’s camera settings and toggle on the HDR option.
4. Use the grid: The grid feature helps you compose your photos more accurately. It divides the screen into thirds, allowing you to align your subjects or use the rule of thirds for better composition. To enable the grid, go to your camera settings and toggle on the grid option.

5. Turn on the camera grid: When taking photos of landscapes or buildings, using the camera grid can help you ensure that your photos are straight and level. To turn on the camera grid, go to Settings > Camera > Grid and toggle it on.
6. Use burst mode: Burst mode allows you to capture a series of photos in quick succession, which is useful for capturing moving subjects or getting the perfect shot. To use burst mode, simply press and hold the shutter button, and your iPhone will take a rapid series of photos.
By optimizing these camera settings on your iPhone, you can significantly enhance the quality of your photos and capture memorable moments with clarity and precision.
Keeping the Lens Clean
One overlooked aspect of enhancing your iPhone camera quality is keeping the lens clean. A dirty lens can significantly impact the clarity and sharpness of your photos. Here are some tips to ensure your lens remains free from dust, fingerprints, and smudges:
Avoid touching the lens: It’s best to avoid touching the lens directly with your fingers. Oils and dirt from your hands can easily transfer to the lens, resulting in blurry or hazy images. If you do need to touch the lens, use a microfiber cloth to clean it gently.

Use a lens cleaning solution: For more stubborn stains or fingerprints, you can use a lens cleaning solution specifically designed for camera lenses or eyeglasses. Apply a small amount of the solution to a microfiber cloth and gently wipe the lens in a circular motion.
Remove any debris: Dust and other debris can accumulate on the lens over time, impacting the quality of your photos. Use a small brush or a can of compressed air to remove any particles from the lens surface before cleaning it.
Keep your iPhone in a clean environment: Avoid using your iPhone’s camera in dusty or dirty environments whenever possible. If you find yourself in such conditions, protect your iPhone by using a protective case and cleaning the lens regularly.
Regularly clean your phone case: Dust and debris can also accumulate on the phone case, which can, in turn, transfer to the lens. Clean your phone case regularly to prevent any unwanted particles from affecting your photo quality.
Check for moisture: Moisture can also impact the quality of your photos. If your iPhone has been exposed to water or high humidity, ensure that both the lens and the surrounding area are completely dry before using the camera.

By following these simple tips and keeping your iPhone’s lens clean, you can ensure that your photos always turn out clear and sharp, enhancing the overall quality of your camera experience.
Using Third-Party Camera Apps
If you’re not satisfied with the default camera app on your iPhone and want to enhance the camera quality, you can consider using third-party camera apps available on the App Store. These apps often offer additional features and settings that can improve the overall camera experience.
Here are some popular third-party camera apps that you can try:
- VSCO: VSCO is known for its powerful editing tools and filters. It also offers advanced camera controls, allowing you to adjust focus, exposure, and white balance manually.
- ProCamera: ProCamera offers advanced features like manual controls, RAW shooting, and HDR mode. It also provides various shooting modes and editing tools.
- Halide: Halide is a manual camera app that gives you full control over settings like focus, ISO, and shutter speed. It also offers powerful editing tools and RAW support.
- Camera+ 2: Camera+ 2 offers various shooting modes, manual controls, and advanced editing tools. It also provides features like slow shutter and burst mode.
- ProCam 7: ProCam 7 offers manual controls, RAW shooting, and various shooting modes. It also provides features like time-lapse and slow-motion video recording.
By using these third-party camera apps, you can unlock the full potential of your iPhone’s camera and capture stunning photos and videos with enhanced quality.
Adjusting Exposure and Focus
To enhance the camera quality on your iPhone, it is important to understand how to adjust exposure and focus settings. The exposure determines the brightness of your photo, while the focus ensures that the subject of your photo is sharp and clear.

To adjust the exposure, simply tap on the area of the screen where you want to set the exposure. A yellow box will appear, indicating that the exposure is locked. You can then slide your finger up or down to adjust the exposure level. If your photo appears too bright or too dark, you can manually adjust the exposure until you achieve the desired result.
To improve focus, you can tap on the screen to set the focus point. A yellow box will appear to indicate that the focus is locked. You can also use the AE/AF lock feature to ensure that the exposure and focus remain locked in place while you compose your shot. This is especially useful when capturing subjects that are not in the center of the frame.
Additionally, you can use the grid feature on your iPhone to help with composition and ensure that your subject is aligned correctly. To enable the grid, go to “Settings,” then “Camera,” and toggle on the “Grid” option.
Experimenting with exposure and focus settings can greatly enhance the quality of your photos. By adjusting these settings, you can capture well-balanced and sharp images that truly showcase your subject.
Using Different Shooting Modes
One of the ways to enhance the camera quality on your iPhone is to learn how to use different shooting modes effectively. The iPhone offers various shooting modes that can help you capture stunning photos in different scenarios.
1. Portrait Mode
Portrait mode is great for taking professional-looking photos with a blurred background effect. This mode works by utilizing the dual-camera system on certain iPhone models to create a depth-of-field effect. To use portrait mode, simply open the camera app and swipe left until you reach the “Portrait” option. Once in portrait mode, focus on your subject by tapping on it and wait for the depth effect to appear. You can also adjust the intensity of the bokeh effect by using the slider at the bottom of the screen.
2. Night Mode
When shooting in low light conditions, the Night mode on your iPhone can significantly enhance the quality of your photos. It allows for more light to be captured and processed to produce bright and detailed night-time shots. To enable Night mode, open the camera app and look for the moon icon at the top-left corner of the screen. When the Night mode is activated, hold your iPhone steady and wait for the camera to automatically adjust the exposure time. Avoid moving the device to prevent image blurring.
Note: Night mode is available on iPhone 11, iPhone 11 Pro, iPhone 11 Pro Max, iPhone 12, iPhone 12 mini, iPhone 12 Pro, and iPhone 12 Pro Max.
3. Burst Mode
Burst mode is useful when you want to capture a series of shots in rapid succession. It can be handy for action shots, sports photography, or capturing moments with unpredictable movement. To use burst mode, simply press and hold the shutter button on the camera app. Your iPhone will capture a rapid sequence of photos until you release the button. Afterward, you can select the best shot from the burst or keep the entire sequence.
By mastering these different shooting modes, you can take full advantage of your iPhone’s camera capabilities and enhance the overall quality of your photos. Experiment with these modes in different scenarios to discover the best settings for each situation.
Utilizing HDR for Better Quality Photos
One of the features that can greatly enhance the camera quality on an iPhone is HDR (High Dynamic Range). HDR allows the camera to capture a greater range of light and color, resulting in more detailed and vibrant photos.
What is HDR?
HDR is a technique that combines multiple exposures of the same scene to capture a wider range of light and shadow. It works by taking three or more photos at different exposure levels, and then blending them together to create a single, well-exposed image.
How to Enable HDR on iPhone
To enable HDR on your iPhone, follow these steps:
- Open the Camera app on your iPhone.
- Tap on “HDR” at the top of the screen.
- Select “On” to enable HDR.
By default, the iPhone’s HDR setting is set to “Auto”, which means that the phone will automatically determine whether HDR should be used based on the scene. However, you can also manually enable or disable HDR as needed.
It’s worth noting that when HDR is enabled, the iPhone will capture both the HDR version and the normal version of the photo. You can view and compare both versions in the Photos app to see which one you prefer.
Overall, utilizing HDR on your iPhone can significantly improve the quality of your photos, especially in high-contrast scenes where there are bright highlights and deep shadows. It’s a simple setting to enable and can make a noticeable difference in the final image.
Editing Photos with Image Enhancement Apps
After capturing high-quality pictures with your iPhone camera, you can further enhance them using image enhancement apps. These apps offer various tools and features to help you improve the overall look and feel of your photos.
1. Adjustment Features
Most image enhancement apps provide adjustment features such as brightness, contrast, saturation, and exposure sliders. These tools allow you to tweak the settings of your photos to achieve the desired level of brightness, color richness, and overall balance. Experimenting with these adjustments can significantly enhance the quality of your pictures.
2. Filters and Effects
Another exciting feature of image enhancement apps is the wide range of filters and effects they offer. Filters can add a different tone or mood to your photos, while effects like vignette, blur, and tilt-shift can bring focus or artistic flair to certain areas. These tools can help you transform ordinary photos into stunning visual masterpieces.
It’s important to use filters and effects wisely, as excessive use can make your photos look over-edited and unnatural. Experiment with different options and find the ones that best complement the subject and style of your photos.
Overall, image enhancement apps provide a convenient way to edit and enhance your photos directly on your iPhone. They offer a multitude of tools and features that can take your pictures from good to great. Whether you’re a professional photographer or just a casual snapper, these apps can help you unleash your creativity and make your photos stand out.
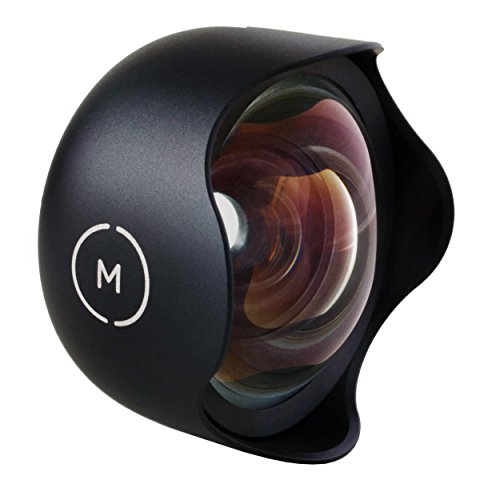
Upgrade iPhone Camera with External Lenses
If you are looking to enhance the camera quality on your iPhone, one of the best ways to do so is by using external lenses. While the built-in camera on iPhones is already impressive, adding an external lens can take your photography skills to a whole new level.
Why Use External Lenses?
External lenses offer several benefits that can greatly improve your iPhone camera performance. They allow you to capture a wider angle, zoom in on distant objects, and even achieve stunning macro shots. These lenses can be easily attached to your iPhone’s camera with a clip or a special case, making them portable and convenient for everyday use.
Types of External Lenses
There are several types of external lenses available in the market, each offering a unique shooting experience:
Wide Angle Lens
A wide angle lens is perfect for landscape photography as it allows you to capture a wider field of view. It helps in capturing more details in a single frame and is great for group shots or capturing architectural wonders.
Telephoto Lens
A telephoto lens is ideal for those who enjoy wildlife or sports photography. It enables you to zoom in on distant subjects without compromising on image quality. With a telephoto lens, you can capture clear and crisp shots even from a distance.
Macro Lens
If you are interested in capturing the intricate details of small objects, a macro lens is a must-have. It allows you to focus on subjects up close, revealing the smallest details that are often missed by the naked eye. From capturing the fragile beauty of flowers to capturing the texture of insects, a macro lens can truly transform your photography.
Choosing the Right Lens
When selecting an external lens for your iPhone, consider factors like lens quality, compatibility, and ease of use. Look for lenses made from high-quality materials and ensure they are compatible with your iPhone model. Additionally, opt for lenses that are easy to attach and remove for hassle-free photography.
Conclusion
Upgrading your iPhone camera with external lenses can unlock a world of creative possibilities. With a wide-angle lens, telephoto lens, or macro lens, you can capture stunning photos that rival those taken with professional cameras. So, don’t limit your photography skills – invest in external lenses and watch your iPhone camera quality soar!


