
Having a digital camera is an incredible opportunity to capture memorable moments and create stunning photographs. However, one common issue that many photographers face is a malfunctioning camera sensor. A damaged or dirty sensor can result in unwanted spots, dust, or smudges appearing in your images, affecting their overall quality. Fortunately, there are several steps you can take to fix your digital camera sensor and get back to capturing beautiful photos.
The first step in fixing a digital camera sensor is to make sure that the issue is indeed with the sensor and not something else. Sometimes, spots or marks in your images can be caused by dirt or smudges on the camera lens rather than the sensor itself. Cleaning the lens with a soft, lint-free cloth is a good place to start. If the issue persists, then it’s likely that the sensor is the problem.
Once you have determined that the sensor needs to be fixed, the next step is to engage the camera’s manual sensor cleaning function. This function is designed to remove any dust or particles that may have accumulated on the sensor. Consult your camera’s manual to find out how to access and activate this feature. It is important to mention that this method might not work for tough, sticky dirt or smudges, in which case further action will be required.
For more stubborn dirt or smudges on the sensor, you may need to physically clean it using specialized tools. One method involves using a blower to gently blow away particles or dust from the sensor surface. Another method involves using a sensor cleaning swab with a small amount of cleaning fluid to carefully wipe the sensor. It is important to follow the manufacturer’s instructions and guidelines when performing any physical cleaning to avoid causing any damage to the sensor.
What is a Digital Camera Sensor?
A digital camera sensor is a key component in the capturing of images. It is responsible for converting light into electrical signals, allowing for the creation of digital photographs. The sensor is part of the camera’s image sensor system, which also includes the lens and the image processor.
There are two main types of digital camera sensors: CCD (Charge-Coupled Device) and CMOS (Complementary Metal-Oxide-Semiconductor). Both types serve the same purpose of capturing light, but they differ in their construction and operation.
CCD Sensor
A CCD sensor uses a complex manufacturing process that results in high-quality image capture. It works by using a grid of light-sensitive cells (pixels) to convert light into electrical charge. The charge is then read out and processed to create a digital image. CCD sensors are known for producing low-noise images and accurate colors but can consume more power compared to CMOS sensors.
CMOS Sensor
A CMOS sensor is a more recent technology that has become popular in digital cameras. It uses a different construction method that allows for smaller pixel sizes and lower power consumption. Each pixel on a CMOS sensor contains a photodiode, an amplifier, and a digital converter. When light hits the sensor, the charge is converted directly into a digital signal by each pixel, resulting in faster image processing compared to CCD sensors.
Both CCD and CMOS sensors have their advantages and disadvantages. CCD sensors are generally better suited for applications that require high image quality, such as professional photography. CMOS sensors, on the other hand, are more commonly found in consumer cameras and offer benefits such as lower power consumption and faster readout speeds.
Overall, the digital camera sensor plays a crucial role in capturing high-quality images. Understanding the differences between CCD and CMOS sensors can help photographers choose the right camera for their specific needs and preferences.
Methods for Cleaning
To fix a digital camera sensor, you may need to clean it to remove dust, smudges, and other particles. Here are some methods you can use:
1. Blower Bulb
A blower bulb is a simple and effective tool for removing loose dust particles from the camera sensor. To use it, gently squeeze the bulb to expel a burst of air onto the sensor. Make sure not to touch the sensor or use excessive force, as this could damage it.
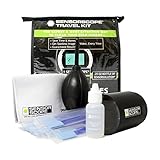
2. Sensor Cleaning Kit
A sensor cleaning kit contains specialized tools and materials designed for cleaning camera sensors. These kits typically include sensor swabs, cleaning solution, and sensor cleaning pads. Follow the instructions provided with the kit to clean the sensor properly.
Before using any cleaning method, it’s important to ensure the camera’s battery is fully charged and that you are working in a clean and well-lit environment. Carefully follow the manufacturer’s instructions and use caution to avoid causing further damage to the sensor.
Using a Blower
If you notice that there are specks of dust or other particles on your digital camera sensor, one simple and effective method to clean it is by using a blower. A blower is a tool specifically designed to blow air and remove dust from sensitive electronic devices like cameras.

To use a blower, follow these steps:
- Make sure your camera’s battery is fully charged or that it is connected to a power source.
- Turn off your camera to prevent any accidental movements or damage.
- Remove the lens from your camera.
- Hold the camera with the sensor facing downwards to prevent any loose particles from falling back onto the sensor.
- Position the blower’s nozzle close to the camera’s sensor, but make sure it does not touch the sensor.
- Squeeze the blower gently to release a burst of air. Aim the air directly at the sensor, moving the blower in a sweeping motion across the surface.
- Repeat this process a few times, pausing occasionally to inspect the sensor for any visible improvement.
- Once you are satisfied with the results, replace the lens and turn on your camera to test if the sensor is clean.
It’s important to note that using a blower alone may not be sufficient to remove stubborn or sticky particles. In such cases, it is recommended to take your camera to a professional for a thorough cleaning.
Regularly cleaning your camera sensor can help ensure that your images are free from unwanted specks and improve the overall quality of your photographs.
Using a Sensor Cleaning Kit
When dealing with a dirty or dusty camera sensor, using a sensor cleaning kit is often the most effective solution. These kits are specifically designed to safely and effectively remove debris from the sensor surface, helping to improve the overall image quality of your digital camera.
Gather the Necessary Supplies
Before you begin the cleaning process, make sure you have all the necessary supplies. Sensor cleaning kits typically include a sensor cleaning solution, sensor cleaning swabs, and a blower or brush for removing loose particles.

It’s important to note that different camera models may require different types of cleaning kits, so be sure to check your camera’s manual or consult with the manufacturer to ensure you are using the correct kit for your specific camera model.
Prepare your Workspace
Find a clean and dust-free area to perform the sensor cleaning. A well-lit room with a clean table is ideal. Make sure to turn off your camera and remove the lens before starting the cleaning process.
Place the camera on the table with the sensor facing upwards, and ensure that the area is free from any airborne particles or debris that could potentially contaminate the sensor during the cleaning process.
Follow the Instructions
Each sensor cleaning kit will come with specific instructions on how to use the cleaning solution and swabs. It is important to carefully read and follow these instructions to ensure that you do not damage the sensor or other delicate components of your camera.

The general process typically involves applying a small amount of cleaning solution to the swab and gently wiping the sensor surface in a single direction. It’s important to use gentle, even pressure to avoid smearing or scratching the sensor.
After cleaning, use a blower or brush to remove any loose particles or fibers that may have been dislodged during the cleaning process. Be careful not to touch the sensor with your fingers or any other objects, as this can introduce additional debris or oils.
Repeat the Process if Necessary
If the sensor is still not clean after the first attempt, you may need to repeat the cleaning process. However, be cautious not to over-clean the sensor, as excessive cleaning can also cause damage.
Once the sensor is clean, carefully reattach the lens and turn on your camera to test the image quality. If you still notice any dust or debris, you may need to consult a professional camera repair technician for further assistance.

Regularly cleaning your camera sensor using a sensor cleaning kit can help maintain optimal image quality and prevent the need for costly professional cleaning. Taking proper care of your camera equipment will ensure that you can continue capturing high-quality photographs for years to come.
Precautions to Take
When attempting to fix a digital camera sensor, it is important to take certain precautions to avoid causing further damage. Here are some key steps to follow:
1. Gather the necessary tools
Before starting the repair, make sure you have all the required tools, such as a sensor cleaning kit, a bulb blower, cleaning solution, and a microfiber cloth. Using the wrong tools can lead to scratches or other damage to the sensor.
2. Work in a clean environment
Find a dust-free and well-lit area to work on your camera. Even the tiniest speck of dust can cause issues when dealing with a camera sensor. Clean the workspace and ensure proper lighting to have a clear view of the sensor.
3. Remove the camera battery
Before attempting any repairs or sensor cleaning, it is crucial to remove the camera battery. This will prevent any accidental power surges or damage to the camera’s circuitry.

4. Read the camera manual
Refer to the camera’s manual for specific instructions on handling and cleaning the sensor. Different camera models may have different procedures, so it’s essential to follow the manufacturer’s guidelines.
5. Use caution when handling the sensor
When cleaning or inspecting the sensor, avoid touching it directly with your fingers. The oils and dirt on your skin can damage the delicate surface. Instead, use a cleaning tool or a cotton swab specially designed for sensor cleaning.
Remember:
Be gentle and take your time when fixing the camera sensor. Rushing the process or using excessive force can lead to more problems. If you’re uncertain or uncomfortable with the repair, it’s best to seek professional help.
Following these precautions will help you minimize the risk of causing further damage and increase your chances of successfully fixing the camera sensor issue.
Avoid Touching the Sensor
While attempting to fix your digital camera sensor, it is crucial to avoid touching the sensor directly. The sensor is a delicate component that is highly sensitive to any form of contact. Touching the sensor can result in permanent damage or the accumulation of dust and debris, which can further affect image quality.
To prevent touching the sensor, follow these guidelines:
| 1. Handle the camera with clean hands | Make sure your hands are clean and free from oils or dirt before handling the camera. Any contaminants on your hands can transfer onto the sensor, causing smudges or spots. |
| 2. Use a blower or air bulb | If you notice dust or debris on the sensor, use a blower or air bulb specifically designed for camera sensors to gently blow the particles away. Avoid using compressed air cans as they may have a high-pressure output that could damage the sensor. |
| 3. Employ sensor-cleaning tools | Consider using sensor-cleaning tools like sensor swabs or sensor-cleaning brushes to safely remove stubborn dirt or smudges from the sensor surface. Follow the instructions provided by the manufacturer to ensure proper usage. |
| 4. Seek professional assistance if unsure | If you are uncertain about how to clean the sensor or lack experience in camera maintenance, it is recommended to seek professional assistance. Camera service centers or professional photographers can safely clean the sensor and offer valuable advice. |
By avoiding direct contact with the sensor and taking necessary precautions, you can maintain the integrity of your camera sensor and ensure optimal image quality.
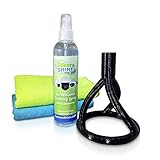
Use Proper Cleaning Tools
When it comes to cleaning your digital camera sensor, it is important to use the right tools to avoid causing any damage. Here are some essential tools you should have:
- Sensor cleaning swabs: These swabs are specifically designed to remove dust and particles from the sensor without scratching or leaving residue.
- Sensor cleaning solution: A solution specifically made for sensor cleaning can help to remove stubborn stains and oil smears.
- A blower brush: This tool can be used to gently blow away any loose dust or particles before using the swabs.
- Sensor cleaning gel stick: A gel stick can help to remove sticky dirt or stains from the sensor surface.
- A magnifying loupe: This tool can help you to inspect the sensor and see any remaining dirt or smears.
Before using any of these tools, it is important to read the manufacturer’s instructions and follow the proper cleaning techniques. Remember to handle the sensor with care and avoid touching it with your fingers or other objects.
Additionally, it is recommended to clean the camera sensor in a clean and dust-free environment to minimize the risk of introducing new particles.
By using the proper cleaning tools and techniques, you can effectively clean your digital camera sensor and maintain its optimal performance.
When to Seek Professional Help
If you have attempted the solutions mentioned above and your digital camera sensor is still not functioning properly, it may be time to seek professional help. There are several signs that indicate it’s time to consult a professional:
1. Persistent Dust or Dirt:
If you notice that there is persistent dust or dirt on your camera’s sensor, despite your best efforts to clean it yourself, it may be necessary to take it to a professional technician who has the necessary tools and expertise to remove the debris without damaging the sensor.
2. Sensor Damage:
If your camera’s sensor has been physically damaged due to a fall or any other accident, it’s best to have it inspected and repaired by a professional. They will be able to assess the damage and provide an appropriate solution, which may involve replacing the sensor altogether.
Remember, attempting to fix a damaged sensor on your own without the proper knowledge and equipment can lead to further damage and may void any warranty you have on your camera.
Overall, if you are unsure about how to fix your digital camera sensor or if your attempts have not been successful, it is always recommended to seek the assistance of a professional. They have the necessary expertise and tools to diagnose and solve the problem effectively, ensuring that your camera sensor functions optimally.
Signs of Sensor Damage
If you suspect that your digital camera’s sensor may be damaged, there are a few signs to look out for. These signs can help you identify the problem and decide whether it can be fixed or if you need to replace the sensor.
| Sign | Description |
|---|---|
| Dead Pixels | If you notice small, bright dots in your images that don’t go away, you may have dead pixels on your sensor. Dead pixels can be caused by age, heat, or impact, and they cannot be fixed by cleaning. |
| Stuck Pixels | Stuck pixels are similar to dead pixels, but instead of being permanently off, they are stuck on one color. Stuck pixels can sometimes be fixed by using pixel remapping tools, but if the issue persists, it may be a sign of sensor damage. |
| Image Artifacts | If you see strange patterns, lines, or spots appearing in your images, it could be a sign of sensor damage. These artifacts can be caused by a variety of issues, such as dust, scratches, or even a malfunctioning sensor. |
| Soft Focus | If your images consistently appear blurry or out of focus, it may indicate sensor damage. This can be caused by a misalignment of the sensor or a physical damage to the sensor itself. |
| Strange Colors | If the colors in your images appear distorted or unnatural, it may be a sign of sensor damage. This can be caused by a faulty color filter array or other sensor-related issues. |
If you experience any of these signs, it is recommended to consult a professional technician who can assess the damage and advise you on the best course of action.
When DIY Cleaning Fails
While cleaning your digital camera sensor on your own can be a cost-effective option, there are instances where it may fail to produce satisfactory results. Here are some situations where DIY cleaning may not be sufficient:
Heavy Dust and Debris
If your camera sensor has accumulated a significant amount of dust and debris, a basic DIY cleaning method may not be enough to remove it entirely. In such cases, professional cleaning services that utilize specialized equipment and techniques may be necessary.
Oily or Sticky Substances
If you notice oily or sticky substances on your camera sensor, it is crucial not to attempt cleaning it by yourself. These substances can be challenging to remove effectively without causing damage. Instead, seek professional assistance to ensure the proper cleaning and maintenance of your camera sensor.
Remember, improper cleaning techniques can potentially cause irreparable damage to your digital camera sensor. Therefore, it is essential to assess the severity of the issue and consider consulting a professional technician if needed.
Question-answer:
How can I fix a dirty sensor on my digital camera?
If you have a dirty sensor on your digital camera, you can clean it using a sensor cleaning kit. These kits typically include a sensor cleaning solution and a special tool, such as a swab or brush, designed for sensor cleaning. Follow the instructions provided with the kit to safely clean your camera’s sensor.
What should I do if my digital camera’s sensor is scratched?
If you notice scratches on your digital camera’s sensor, it is recommended to take your camera to a professional technician for repair. Attempting to fix a scratched sensor on your own may cause further damage, so it’s best to seek professional help in this situation.


