
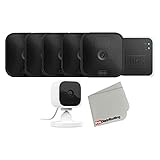
Ensuring the safety and security of your home or business is of utmost importance, and one effective way to achieve this is by installing blink security cameras. Blink cameras are easy to set up and provide 24/7 surveillance, giving you peace of mind knowing that your property is always protected.
Before you start the installation process, it’s important to gather all the necessary tools and equipment. You will need a Wi-Fi-enabled smartphone or tablet, a stable internet connection, a power source for the cameras, and the Blink camera system itself. Once you have everything ready, follow these simple steps to hook up your blink security cameras.
First, download and install the Blink Home Monitor app on your smartphone or tablet. This app is available for both iOS and Android devices. Once installed, open the app and create an account using your email address and a secure password. Log in to your account and follow the prompts to add your Blink camera system to the app. Make sure your smartphone or tablet is connected to the same Wi-Fi network that you want to use for your cameras.
Next, plug in the Sync Module that comes with your Blink camera system. This module acts as the central hub for your cameras and connects them to your Wi-Fi network. Use the included USB cable to connect the Sync Module to a power source. Wait for the module to power on and connect to your internet network. Once the module is powered on and connected, you will see a blue light indicator.
Importance of Home Security
Ensuring the security of your home is of paramount importance in today’s world. With the rise in crime rates, it has become essential to take proactive measures to protect your property and loved ones. Installing a reliable home security system, such as Blink security cameras, can help deter criminals, provide evidence in the event of a crime, and give you peace of mind.

Here are some reasons why home security should be a top priority:
1. Crime Prevention:
Visible security cameras act as a deterrent for potential burglars and intruders. A video surveillance system can make your home less attractive to criminals and reduce the chances of a break-in. Knowing that your property is monitored can discourage criminals from targeting your home.
2. Surveillance Evidence:
In the unfortunate event of a break-in or theft, having security cameras can provide valuable evidence to law enforcement authorities. High-quality footage can help identify culprits, increase the chances of recovering stolen items, and aid in the prosecution process.

3. Remote Monitoring:
With Blink security cameras, you can remotely monitor your home from anywhere using a smartphone or computer. This feature allows you to keep an eye on your property while you’re away, ensuring that everything is in order and giving you peace of mind.
4. Fire and Safety Protection:
Some home security systems, including Blink, offer additional features such as smoke and carbon monoxide detectors. These integrated safety sensors can alert you and emergency responders in case of a fire or gas leak, providing an additional layer of protection for your home and family.
5. Insurance Benefits:

Having a robust home security system can often lead to reduced insurance premiums. Insurance companies recognize the value of having security measures in place and may offer discounts to homeowners who invest in reliable security systems like Blink cameras.
Overall, investing in a home security system such as Blink cameras is a wise decision. Protecting your home, loved ones, and belongings should be a top priority, and having a visible security presence can go a long way in deterring criminals and providing you with a sense of security.
Features of Blink security cameras
Blink security cameras are equipped with a wide range of features to ensure the safety and security of your home or office. Here are some of the key features that make Blink cameras stand out:
1. Motion detection: Blink cameras are equipped with advanced motion sensors that can detect any movement within their field of view. This feature ensures that you are immediately alerted whenever any suspicious activity is detected.
2. Live view: With the Blink app, you can easily access live video feeds from your cameras anytime, anywhere. This allows you to monitor your property in real-time and keep an eye on things even when you are away.

3. Easy installation: Setting up Blink cameras is a breeze. They can be easily mounted on walls or ceilings, and with the help of the Blink app, you can have your cameras up and running in no time.
4. Wireless design: Unlike traditional security cameras that require messy wiring, Blink cameras are completely wireless. This makes installation hassle-free and allows you to place the cameras anywhere you want without any restrictions.
5. Cloud storage: Blink cameras come with free cloud storage that allows you to store and access recorded clips. This ensures that you never miss any important moments and provides an extra layer of security in case your camera gets damaged or stolen.
6. Two-way audio: With the built-in microphone and speaker, Blink cameras allow you to communicate with people near the camera. This feature is especially useful for remotely talking to delivery personnel or warning intruders.
7. Battery-powered: Blink cameras are powered by long-lasting batteries, eliminating the need for constant charging or wiring. This makes them incredibly versatile and allows you to place them in areas where power outlets are not easily accessible.

8. Customizable settings: You can easily customize the settings of your Blink cameras according to your preferences. This includes adjusting the sensitivity of motion detection, setting up activity zones, and configuring alerts and notifications.
Overall, Blink security cameras offer a wide array of features that make them an excellent choice for keeping your property safe and secure. Whether you are looking for a camera for your home or office, Blink has a solution that fits your needs.
Getting started with Blink security cameras
Setting up your Blink security cameras is quick and easy. Follow these simple steps to get started:
Step 1: Unboxing
Begin by unboxing your Blink security camera package. Inside, you should find the camera itself, along with any necessary cables and mounting accessories.
Step 2: Download the Blink app
To use your Blink security cameras, you will need to download the Blink app onto your smartphone or tablet. The Blink app is available for both iOS and Android devices.
Step 3: Create a Blink account
After downloading the Blink app, open it and create a new account. This will require entering your email address and creating a password. Make sure to choose a strong and secure password to protect your account.
Step 4: Add your cameras
Once your account is set up, follow the on-screen instructions in the Blink app to add your cameras. This will typically involve scanning a QR code on the camera or entering a serial number. Make sure to place each camera within range of your Wi-Fi network during this process.
Step 5: Customize your settings
Once your cameras are successfully added, you can customize your camera settings in the Blink app. This includes adjusting motion detection sensitivity, setting up recording schedules, and enabling other features such as two-way audio.
That’s it! You are now ready to use your Blink security cameras. Keep in mind that you may need to repeat these steps for each additional camera in your package. Enjoy the peace of mind that comes with having a reliable home security system.
Choosing the right Blink security camera model
When it comes to selecting a Blink security camera for your home or business, it’s important to consider your specific needs and requirements. Blink offers a variety of camera models, each with its own unique features and capabilities. Understanding these differences will help you make an informed decision and find the perfect camera for your security needs.
Indoor vs Outdoor Cameras
One of the first decisions you’ll need to make is whether you need an indoor or outdoor camera. Blink offers both options, so it’s essential to consider where you plan to install the camera. Indoor cameras are designed to be used inside your home or office, while outdoor cameras are built to withstand the elements and provide surveillance for the exterior of your property.
Resolution and Video Quality
The resolution and video quality of a security camera are crucial factors in capturing clear and detailed footage. Blink offers various camera models with different resolution options. The higher the resolution, the clearer the image and video will be. If you require sharp and detailed footage, consider choosing a model with a higher resolution.
Additionally, some Blink camera models offer enhanced features such as night vision and motion detection. These features can greatly improve the camera’s performance and ensure that you capture important events, even in low-light conditions or when there is movement detected in the camera’s field of view.
Connectivity and Storage Options
Blink security cameras are designed to be wire-free, which means they are easy to set up and install without the need for complex wiring. They connect to your home’s Wi-Fi network, allowing you to access the camera’s live feed and recordings remotely through the Blink mobile app.
Furthermore, Blink offers various storage options for recorded footage. Some models come with cloud storage, allowing you to store and access your videos securely online. Other models may offer local storage options, where you can use a USB drive or an SD card to store your recordings directly on the camera.
It’s crucial to consider your internet connection reliability and storage preferences when choosing a Blink camera model, as it will impact how you access and store your videos.
Conclusion
Choosing the right Blink security camera model depends on several factors, including whether you need an indoor or outdoor camera, the desired resolution and video quality, as well as connectivity and storage options. By carefully evaluating these features, you can select a camera that best suits your security requirements and provides peace of mind.
Installing Blink Security Cameras
Installing Blink security cameras is a straightforward process that requires a few simple steps. Follow the instructions below to set up your cameras and start monitoring your property.
Step 1: Choose the Camera Locations
Before installation, determine the optimal locations for your Blink security cameras. Consider areas that require monitoring, such as entrances, driveways, and backyards. It’s important to place the cameras where they can capture clear footage and have a wide field of view.
Step 2: Mount the Cameras
Using the provided mounting brackets and screws, securely attach the cameras to the desired locations. Make sure the cameras are positioned at the appropriate angle to capture the desired areas. Keep in mind that mounting the cameras at a higher level can help prevent tampering.
Step 3: Sync with the Blink Sync Module
Connect the Blink Sync Module to a power outlet and your home Wi-Fi network. Follow the instructions provided in the Blink app to complete the sync process. This will allow the cameras to communicate with the sync module and your smartphone or other devices.
Step 4: Test the Cameras
Once the sync process is complete, test each camera to ensure they are capturing the desired areas. Use the Blink app to view the camera feed and make any necessary adjustments to the camera positions if needed.
Additionally, you can customize settings such as motion detection sensitivity, scheduling, and notifications within the Blink app to fit your specific needs.
Installing Blink security cameras is a simple and effective way to enhance the security of your property. By following these steps, you can have your cameras up and running quickly and start monitoring your home or business with ease.
Setting up the Blink Home Monitor app
The Blink Home Monitor app is a crucial part of setting up and managing your Blink security cameras. By following these simple steps, you can easily set up the app and start monitoring your home.
Step 1: Download the app
Start by downloading the Blink Home Monitor app from the App Store or Google Play Store. Make sure to download the latest version of the app for optimal performance.
Step 2: Create a Blink account
Once the app is downloaded, open it and sign up for a Blink account. Provide the required information and create a strong password to protect your account.
Note: If you already have a Blink account, simply log in using your existing credentials.
Step 3: Add your Blink cameras
After creating an account or logging in, click on the “+” icon in the app to add your Blink cameras. Follow the on-screen instructions to connect your cameras to the app.
Step 4: Connect to your home Wi-Fi network
During the setup process, you will be prompted to connect the Blink cameras to your home Wi-Fi network. Make sure you have the correct Wi-Fi credentials handy.
Step 5: Set up motion detection and alerts
Once your cameras are connected, configure the motion detection settings and alerts. This will allow you to receive notifications whenever motion is detected by the cameras.
Step 6: Explore advanced features
Take some time to explore the other features offered by the Blink Home Monitor app. This includes features such as scheduling, live view, and cloud storage options.
Pro Tip: Consider setting up a custom name for each camera to easily identify different areas of your home.
With the Blink Home Monitor app successfully set up, you can now enjoy the peace of mind that comes with knowing your home is being monitored by reliable and easy-to-use security cameras.
Connecting Blink security cameras to your Wi-Fi network
Once you have purchased a Blink security camera, the next step is to connect it to your Wi-Fi network. This process is relatively simple and can be done in just a few steps.
- Start by downloading and installing the Blink app on your smartphone or tablet. The app is available for both iOS and Android devices.
- Launch the Blink app and create a new account or log in to your existing Blink account.
- Tap on the “Add a System” button in the app and select “Blink Wireless System”.
- Connect the Blink Sync Module to your Wi-Fi router using the included Ethernet cable.
- Plug in the Blink Sync Module to a power outlet.
- The Blink app will guide you through the process of connecting the Sync Module to your Wi-Fi network. Make sure you have your Wi-Fi network name and password handy.
- Follow the on-screen instructions to complete the setup process. This may involve scanning a QR code on the Sync Module or entering a verification code.
- Once the Sync Module is connected to your Wi-Fi network, it will automatically detect any Blink security cameras within range.
- Place your Blink security cameras in desired locations within range of the Sync Module.
- Use the Blink app to add the cameras to your Blink system.
- Once the cameras are added, you can adjust their settings and view live footage from the app.
By following these steps, you will be able to successfully connect your Blink security cameras to your Wi-Fi network and start monitoring your home or property.
Configuring motion detection settings
Once you have successfully set up your Blink security cameras, the next step is to configure the motion detection settings. This allows your cameras to detect any movement in their field of view and trigger recording.
Step 1: Accessing the camera settings
To start configuring the motion detection settings, open the Blink app on your smartphone or tablet. From the home screen, select the camera you want to configure.
Step 2: Enabling motion detection
In the camera settings, locate the option to enable motion detection and tap on it to turn it on. This ensures that your camera will start detecting any motion in its range.
Step 3: Adjusting motion sensitivity
Next, adjust the motion sensitivity level according to your preferences. You can increase or decrease the sensitivity to avoid false alarms caused by pets, trees, or other factors. Keep in mind that higher sensitivity may result in more frequent recordings.
Note: It’s recommended to test the sensitivity settings by moving around in front of the camera to ensure accurate detection.
Step 4: Setting up motion zones
Blink cameras allow you to define specific motion zones within their field of view. This feature helps you focus on detecting motion in key areas and ignore non-essential areas. Use the app to draw the desired motion zone on your camera’s live view screen.
Step 5: Customizing recording length and retrigger time
You can also customize the recording length and retrigger time. The recording length determines how long the camera records after detecting motion, while the retrigger time sets the minimum delay between successive recordings. Adjust these settings to suit your needs, from a few seconds to several minutes.
Once you have completed these steps, your Blink security camera will be fully configured to detect motion and record video footage whenever any movement is detected within its defined motion zones.
Remember to save your settings and test the motion detection functionality periodically to ensure optimal performance.
Monitoring and managing Blink security cameras remotely
One of the great advantages of Blink security cameras is the ability to monitor and manage them remotely. Whether you’re at work, on vacation, or simply away from home, you can stay connected to your Blink system from anywhere in the world. Here are some tips on how to effectively use the Blink app to monitor and manage your security cameras remotely:
- Download and install the Blink app: Start by downloading and installing the Blink app on your mobile device. The app is available for both iOS and Android platforms. Once installed, log in to your Blink account or create a new one if you don’t have an account already.
- View live video streams: With the Blink app, you can easily view live video feeds from your security cameras. Simply open the app and select the camera you want to monitor. You’ll be able to see what’s happening in real-time, allowing you to keep an eye on your property no matter where you are.
- Adjust camera settings: The Blink app gives you full control over your security cameras. You can adjust various settings such as motion detection sensitivity, camera recording length, and camera arm/disarm schedule. These settings can be accessed and modified remotely, ensuring that your Blink system is tailored to your specific needs.
- Receive instant alerts: Stay informed about any activity detected by your Blink security cameras by enabling push notifications on your mobile device. Whenever motion is detected, you’ll receive an instant alert, allowing you to take appropriate action if needed.
- Share access with others: If you want to grant access to your Blink system to friends, family, or trusted individuals, you can easily do so through the app. Simply invite them via email, and they’ll be able to view and manage your security cameras remotely.
Monitoring and managing your Blink security cameras remotely has never been easier. With the Blink app, you can stay connected and in control no matter where you are. Take advantage of these features to ensure the safety and security of your home or business.


