
Are you tired of constantly checking your security cameras on a separate monitor or laptop? With advancements in technology, you can now easily connect your Zmodo cameras to your iPhone and monitor your home or office from anywhere. Whether you want to keep an eye on your property while you’re away or simply want to enhance the security of your surroundings, connecting your Zmodo cameras to your iPhone is a convenient and effective solution.
Connecting your Zmodo cameras to your iPhone is a straightforward process that doesn’t require any technical expertise. By following a few simple steps, you can have your security cameras up and running on your iPhone in no time. This article will guide you through the process, ensuring that you’re able to monitor your cameras and stay connected to your surroundings from the palm of your hand.
If you’re an iPhone user, you’re in luck. With the Zmodo app available on the App Store, you can easily connect and configure your Zmodo cameras on your iPhone. To begin, download the Zmodo app from the App Store and install it on your iPhone. Once installed, open the app and create a new account or log in to your existing Zmodo account.
After logging in, you will need to add your Zmodo cameras to the app. To do this, make sure your cameras are properly connected to power and the internet. Then, on the Zmodo app, tap on the “Device” or “Add Device” option. The app will guide you through the process of adding your cameras to the app, which usually involves scanning a QR code on your camera or entering the camera’s ID and password.
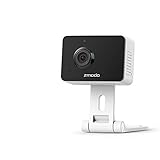
Zmodo cameras: an overview
Zmodo cameras are a popular choice for home security and surveillance. These cameras offer a wide range of features and capabilities that make them easy to connect and use with an iPhone.
One of the key advantages of Zmodo cameras is their easy setup process. With just a few simple steps, you can connect your Zmodo camera to your iPhone and start monitoring your property in no time.
First, you need to download the Zmodo app from the App Store and install it on your iPhone. Once installed, open the app and create an account or log in to your existing account.
Next, you will need to connect your Zmodo camera to your Wi-Fi network. This can be done by following the instructions provided with your camera or using the Zmodo app. Once connected, you should see a live feed from your camera on your iPhone screen.
Zmodo cameras offer a variety of features that enhance your surveillance experience. These include motion detection, night vision, two-way audio, and cloud storage options. You can customize these settings through the Zmodo app to suit your specific needs.
With the Zmodo app, you can also access your camera’s live feed from anywhere, as long as you have an internet connection. This allows you to keep an eye on your property even when you are away.
In conclusion, Zmodo cameras provide a convenient and reliable solution for home security and surveillance. With their easy setup process and a range of features, connecting them to your iPhone is a breeze.
So, if you are looking for a reliable and user-friendly camera system, consider Zmodo cameras. They offer excellent performance and compatibility with your iPhone for ultimate peace of mind.
Connecting Zmodo cameras to your iPhone
If you have Zmodo cameras and an iPhone, you can easily set up and connect your cameras to your iPhone for remote monitoring and access. Follow these steps to get started:
Step 1: Install the Zmodo app
First, you need to download and install the Zmodo app from the App Store on your iPhone. Simply search for “Zmodo” and download the official Zmodo app.

Step 2: Create a Zmodo account
After installing the app, open it and sign up for a Zmodo account. You will need to provide your email address and create a password. Once done, you can log in to the app using your new account credentials.
Step 3: Connect your cameras to your Wi-Fi network
Next, you need to connect your Zmodo cameras to your Wi-Fi network. Make sure the cameras are powered on and within range of your Wi-Fi router. Follow the instructions provided with your cameras to connect them to your network.
Step 4: Add cameras to the Zmodo app
Once your cameras are connected to your Wi-Fi network, open the Zmodo app on your iPhone and tap the “+” icon to add a new device. Select “Add a device manually” and then choose “IP camera” as the device type. Follow the on-screen instructions to add your cameras to the app by entering the required information, such as the camera’s IP address and port.
Step 5: View and access your cameras
After adding your cameras to the Zmodo app, you can now view and access them from your iPhone. Simply open the app and select the camera you want to view from the list. You can also adjust settings, view recorded footage, and receive motion alerts through the app.
With your Zmodo cameras successfully connected to your iPhone, you can now monitor your home or property remotely, ensuring peace of mind and security at all times.

Setting up the Zmodo app
To hook up your Zmodo cameras to your iPhone, you will need to set up the Zmodo app first. Follow these steps to get started:
1. Open the App Store on your iPhone and search for “Zmodo”.
2. Download and install the Zmodo app on your iPhone.
3. Once the app is installed, open it.
4. Sign in to your Zmodo account. If you don’t have an account, tap on “Sign Up” to create one.
5. After signing in, tap on the “+” icon on the top right corner of the app to add a camera.
6. On the next screen, select “Add Device” and choose the type of camera you have (e.g., indoor camera, outdoor camera).
7. Follow the on-screen instructions to connect your camera to the app. This may involve scanning a QR code on the camera or entering the camera’s serial number.
8. Once your camera is connected, you can give it a name for easier identification.
9. Repeat steps 5-8 for each camera you want to connect to the app.

10. Once all your cameras are set up, you can view the live feed from your cameras on your iPhone by tapping on the respective camera’s icon in the app.
With the Zmodo app set up, you can now monitor your Zmodo cameras from your iPhone anytime, anywhere.
Creating a Zmodo account
In order to connect your Zmodo cameras to your iPhone, you will need to create a Zmodo account. This account will allow you to access your cameras from anywhere using your iPhone.
Step 1: Download the Zmodo app
The first step is to download the Zmodo app from the App Store on your iPhone. Simply search for “Zmodo” and install the app onto your device.
Step 2: Create an account
Once you have downloaded the app, open it on your iPhone. On the login screen, tap on the “Sign Up” button to create a new account.

Enter your email address and create a password for your account. Make sure to choose a strong password that includes a combination of letters, numbers, and special characters.
After entering your account information, tap on the “Sign Up” button to create your account.
Step 3: Confirm your email address
After creating your account, Zmodo will send a confirmation email to the email address you provided. Open your email inbox and look for an email from Zmodo.
Open the email and click on the confirmation link to verify your email address. This step is necessary in order to activate your Zmodo account.
Note: If you do not receive the confirmation email, check your spam or junk folder.

Once you have confirmed your email address, you will be able to log in to your Zmodo account using your email and password.
Now that you have created a Zmodo account, you can proceed to connect your Zmodo cameras to your iPhone using the app and start monitoring your home or property remotely.
Adding your cameras to the Zmodo app
To hook up your Zmodo cameras to your iPhone, you will need to follow these steps to add your cameras to the Zmodo app:
- First, ensure that your Zmodo cameras are properly set up and connected to your home network. Make sure they are powered on and functioning correctly.
- Next, download and install the Zmodo app on your iPhone from the App Store. Make sure you have a stable internet connection.
- Once the app is installed, open it on your iPhone and create a new account. You will need to provide some basic information like your email address and create a secure password.
- After creating your account, log in to the Zmodo app using your credentials. You will be prompted to allow the app to access your device’s location, microphone, and camera. Grant the necessary permissions for the app to function properly.
- In the Zmodo app’s main interface, tap on the “+” icon or the “Add Device” button to start adding your cameras.
- Choose the “Wireless Device” option since you want to connect your cameras wirelessly.
- On the next screen, the Zmodo app will search for available cameras on the same network as your iPhone. Make sure your cameras are properly connected and powered on.
- The app should detect your cameras and display them in a list. Select the cameras you want to connect to the app.
- Follow the on-screen instructions to complete the camera pairing process. This may involve scanning a QR code on the camera or entering the camera’s serial number manually.
- Once the pairing process is complete, your cameras will be added to the Zmodo app. You can now remotely view and control your cameras from your iPhone.
By following these steps, you should be able to successfully add your Zmodo cameras to the Zmodo app on your iPhone. Enjoy the convenience of monitoring your cameras from anywhere with just a few taps on your phone!
Accessing live footage on your iPhone
Once you have set up your Zmodo cameras, you can easily access the live footage on your iPhone. Follow these simple steps to start monitoring your home or business:
- Download and install the Zmodo app from the App Store on your iPhone.
- Launch the app and sign in to your Zmodo account or create a new one if you don’t have an account yet.
- Tap on the “Devices” tab at the bottom of the screen.
- Tap on the “+” button to add a new device.
- Select the type of camera you have from the list of available options.
- Follow the on-screen instructions to connect your camera to the app.
- Once your camera is successfully connected, you will see a live feed of the camera’s footage on your iPhone screen.
- You can use various features of the Zmodo app to control and customize your camera’s settings, such as adjusting the resolution, enabling motion detection, or scheduling recording times.
- To view multiple camera feeds, simply tap on the “Devices” tab and select the camera you want to monitor.
- You can also use the app to access previously recorded footage or take screenshots of the live feed.
With the Zmodo app on your iPhone, you can conveniently monitor your Zmodo cameras from anywhere at any time. Whether you’re at home, at work, or on vacation, you can have peace of mind knowing that you can always keep an eye on what’s happening at your property.
Reviewing recorded footage on your iPhone
One of the great features of the Zmodo camera system is the ability to review recorded footage directly on your iPhone. This can be extremely useful for monitoring activity in your home or office while on the go.
To access the recorded footage on your iPhone, you will need to download the Zmodo app from the App Store. Once the app is installed, you can log in using your Zmodo account credentials. If you don’t have an account, you can easily create one within the app.
Once logged in, you will be able to see a list of all your connected Zmodo cameras. Simply select the camera that you want to review footage from. The app will then display a timeline of recorded events for that camera.
To view a specific event, simply tap on the corresponding timestamp on the timeline. The app will then load the video footage from that event. You can pause or play the video, as well as adjust the volume and video quality settings.
If you want to quickly navigate through the footage, you can use the app’s scrubbing feature. Simply slide your finger left or right on the timeline to quickly jump to different points in the recording.
Additionally, the app allows you to take screenshots of the recorded footage by tapping on the camera icon. This can be useful if you want to save a specific frame or share it with others.
It’s important to note that the recorded footage is stored securely in the Zmodo cloud. This means that even if your camera is damaged or stolen, your footage will still be accessible through the app on your iPhone.
With the ability to review recorded footage on your iPhone, you can have peace of mind knowing that you can always keep an eye on your home or office, no matter where you are.
Managing camera settings through the Zmodo app
The Zmodo app provides a convenient and user-friendly interface to manage the settings of your Zmodo cameras directly from your iPhone. With the app, you can easily customize the camera’s configuration to suit your specific needs.
1. Download and install the Zmodo app
First, you need to download and install the Zmodo app from the App Store on your iPhone. Open the App Store, search for “Zmodo”, and tap the “Get” button to start the installation process. Once the app is installed, you can find it on your home screen and open it.
2. Connect your Zmodo cameras to the app
To connect your Zmodo cameras to the app, make sure that your cameras are properly set up and connected to a power source. Launch the Zmodo app and follow the on-screen instructions to add your cameras to the app. This usually involves scanning the QR code on the camera or entering the camera’s serial number.
3. Access camera settings
Once your Zmodo cameras are successfully connected to the app, you can access the camera settings by tapping on the camera thumbnail or navigating to the camera’s live view. From there, you can find the settings icon or menu, which will grant you access to various camera configuration options.
4. Customize camera settings
Within the camera settings menu, you can customize various aspects of your Zmodo camera’s functionality. Common settings include camera name, video quality, motion detection sensitivity, notification preferences, and more. Each setting usually comes with a description or help text to guide you in making the appropriate adjustments.
It’s important to note that specific camera settings may vary depending on the model and features of your Zmodo camera. Refer to the user manual or help documentation provided with your camera for more detailed information about the available settings.
5. Save and apply changes
After customizing your camera settings, make sure to save and apply your changes. This will ensure that the new settings are being used by your Zmodo camera. In the settings menu, look for a “Save” or “Apply” button to confirm your adjustments.
By managing your camera settings through the Zmodo app, you can optimize the performance and functionality of your Zmodo cameras to better suit your surveillance needs.
Troubleshooting common issues
If you are experiencing difficulties connecting your Zmodo cameras to your iPhone, here are some common issues and troubleshooting steps you can take:
1. Check the network connection: Ensure that both your iPhone and the Zmodo cameras are connected to the same Wi-Fi network. If they are not, make sure to connect them to the same network before attempting to connect the cameras to your iPhone.
2. Restart your devices: Sometimes, a simple restart can solve connectivity issues. Try restarting both your iPhone and the Zmodo cameras. After they have restarted, attempt to connect them again.
3. Update firmware and app: Make sure that both your Zmodo cameras and the Zmodo app on your iPhone are running the latest firmware and software versions. Outdated firmware or app versions can cause compatibility issues. Check for updates and install them if available.
4. Reset the cameras: If the cameras are still not connecting, you can try resetting them to their factory settings. Consult the camera’s user manual or the Zmodo website for specific instructions on how to reset your cameras.
5. Check for Wi-Fi interference: Other devices or networks in your area might be causing interference with your Wi-Fi signal. Try moving your cameras and iPhone closer to the Wi-Fi router or minimizing the number of devices connected to the Wi-Fi network to see if that improves connectivity.
6. Contact customer support: If none of the above troubleshooting steps work, it is recommended to reach out to Zmodo customer support for further assistance. They can provide more specific guidance or help with any potential hardware issues.
By following these troubleshooting steps, you should be able to resolve common issues when hooking up your Zmodo cameras to your iPhone.
FAQ
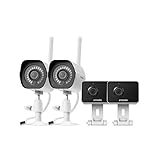
Can I connect multiple Zmodo cameras to my iPhone?
Yes, you can connect multiple Zmodo cameras to your iPhone. The Zmodo app allows you to add and manage multiple cameras. Simply follow the same steps mentioned earlier to connect each camera to your iPhone. Once connected, you will be able to view the live feeds from all the cameras on your iPhone. You can also configure settings and access recorded footage from each camera through the Zmodo app.


