
The camera on an iPhone is already known for its high quality and advanced features. However, there are several tips and tricks that can help you enhance the performance and quality of your iPhone camera even further. Whether you’re looking to take better photos, improve low-light performance, or enhance the overall image quality, these tips will help you get the most out of your iPhone camera.
1. Clean the lens: One of the simplest yet most effective ways to improve the quality of your iPhone camera is to clean the lens. The lens can easily accumulate dirt, fingerprints, and smudges, which can result in blurry or hazy photos. Use a soft microfiber cloth or lens cleaning solution to gently wipe the lens. This will ensure that your photos are sharp and clear.
2. Adjust exposure and focus: When taking a photo, tap on the screen to adjust the exposure and focus of the image. This will allow you to highlight specific areas and ensure that the subject is properly focused. You can also use the exposure slider to manually adjust the brightness of the image. Experiment with different exposure settings to find the perfect balance for your photos.
3. Use HDR mode: HDR (High Dynamic Range) mode can significantly improve the quality of your photos, especially in high-contrast situations. When enabled, HDR mode captures multiple images at different exposures and combines them to create a single well-exposed photo. This can help you capture more details in shadows and highlights, resulting in a more balanced and vibrant image.
4. Use a third-party camera app: While the native camera app on the iPhone offers a range of features, using a third-party camera app can further enhance your photography experience. These apps often provide additional manual controls, advanced editing options, and filters that can take your photos to the next level. Explore different camera apps available on the App Store to find one that suits your preferences.

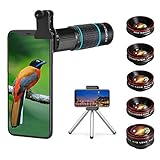
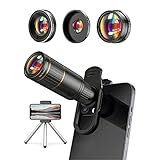
5. Invest in lenses and accessories: If you’re looking to improve the versatility and quality of your iPhone camera, consider investing in additional lenses and accessories. External lenses can provide wider angles, macro capabilities, and telephoto zoom, allowing you to capture a variety of shots. Other accessories, such as tripods and stabilizers, can help you capture steady and professional-looking photos. These investments can significantly enhance the capabilities of your iPhone camera.
By following these tips and utilizing the advanced features of your iPhone camera, you can elevate your photography skills and capture stunning images. So, grab your iPhone, explore its camera settings, and start capturing the world around you with the best possible quality.
Choosing the Right Lighting
When it comes to taking high-quality photos with your iPhone camera, lighting plays a crucial role. The right lighting can enhance the details, colors, and overall quality of your photos. Here are some tips on choosing the right lighting for your iPhone photography:
- Natural Light: Whenever possible, try to utilize natural light for your photos. Natural light is soft, diffused, and more flattering compared to artificial lighting. Look for well-lit areas, such as near windows or outdoors, and avoid harsh shadows.
- Golden Hour: The golden hour refers to the period shortly after sunrise or before sunset when the natural light is warm and soft. During this time, the lighting conditions are ideal for capturing stunning photos with a beautiful golden glow.
- Backlighting: Experiment with backlighting to add depth and drama to your photos. Position your subject in front of a light source, such as the sun or a lamp, to create a silhouette effect or to highlight certain elements.
- Diffused Light: To achieve a soft and even lighting, use diffusers or light modifiers. These can be as simple as a thin white fabric or a piece of paper held between the light source and the subject. Diffused light helps to minimize harsh shadows and create a more balanced exposure.
- Artificial Lighting: In situations where natural light is limited or not available, consider using artificial lighting. You can invest in a portable LED light or attachable camera flash that can provide additional light sources for your photos.
Remember, the quality of the lighting directly affects the quality of the photos taken with your iPhone camera. Experiment with different lighting conditions and techniques to find what works best for your subjects and desired outcome. With practice and attention to lighting, you can significantly improve the overall quality of your iPhone photography.
Cleaning the Camera Lens
The camera lens on your iPhone is an essential component for capturing high-quality photos. Over time, it can accumulate dirt, dust, fingerprints, and smudges, which can negatively affect the image quality. To ensure that your iPhone camera delivers the best results, it’s important to regularly clean the lens. Here are some steps you can follow:

Step 1: Gather the necessary materials
Before you begin cleaning the camera lens, gather the following materials:
- A microfiber cloth or lens cleaning cloth
- A lens cleaning solution or isopropyl alcohol
- Cotton swabs or a lens cleaning pen (optional)
Step 2: Power off your iPhone
Before cleaning the camera lens, it is recommended to power off your iPhone to prevent any accidental touches or damage to the device.
Step 3: Wipe the lens with a microfiber cloth
Gently wipe the camera lens with a clean microfiber cloth to remove any loose dirt or dust particles. Make sure to use gentle circular motions, and avoid applying too much pressure on the lens.
Step 4: Use a lens cleaning solution or isopropyl alcohol
If there are stubborn fingerprints or smudges on the lens, you can dampen a corner of the microfiber cloth with a lens cleaning solution or isopropyl alcohol. Again, use gentle circular motions to clean the lens, and avoid getting any liquid into the camera or other openings of your iPhone.
Step 5: Clean the edges and corners
Pay attention to the edges and corners of the lens, as dirt and smudges can often accumulate in these areas. Use a cotton swab or a lens cleaning pen (if available) to gently clean these hard-to-reach spots.

By regularly cleaning your iPhone’s camera lens, you can ensure that it stays free from dirt and smudges, resulting in sharper and clearer photos. Remember to perform this cleaning process in a well-lit and dust-free environment for the best results.
Adjusting the Exposure
The exposure settings of your iPhone camera can greatly impact the overall quality of your photos. By adjusting the exposure, you can control the brightness and darkness of your images, ensuring that they are well-lit and balanced.
To adjust the exposure, follow these steps:
1. Launch the Camera app: Open the camera app on your iPhone to access the camera interface.
2. Tap on the screen: Tap on the area of the screen that you want to adjust the exposure for. This will also set the focus point for your photo.

3. Slide up or down: After tapping on the screen, you will see a yellow square and a sun icon appear. To adjust the exposure, slide your finger up to increase the brightness or down to decrease it.
4. Preview the changes: As you adjust the exposure, the image on the screen will change accordingly. This allows you to see the impact of the exposure adjustments in real time.
5. Take the photo: Once you are satisfied with the exposure settings, simply press the shutter button to capture the photo.
Note: It’s important to find the right balance when adjusting the exposure. Too much brightness can result in overexposed photos, while too little brightness can result in underexposed photos. Experiment with different exposure settings to find the optimal level for your desired effect.
Using Camera Apps
One of the easiest ways to improve the quality of your iPhone camera is by using third-party camera apps. These apps offer a range of features and settings that can help you capture better photos.

Here are some popular camera apps that you can consider:
- Halide: This app offers advanced manual controls, allowing you to adjust settings such as exposure, focus, and white balance. It also supports shooting in RAW format, which gives you more flexibility in post-processing.
- ProCamera: ProCamera offers a wide range of shooting modes, including a lowlight mode for capturing better photos in dark conditions. It also has a built-in HDR feature and a depth capture mode for creating stunning portrait shots.
- Camera+: With Camera+, you can take advantage of features like manual controls, RAW shooting, and image editing tools. It also offers a range of shooting modes and filters to enhance your photos.
- VSCO: While primarily known as a photo editing app, VSCO also offers a camera feature with manual controls. It has a wide selection of filters and editing tools that can help you enhance your photos after capturing them.
By using these camera apps, you can have more control over your iPhone camera settings and take advantage of features that are not available in the default camera app. Experiment with different apps and find the one that suits your photography style.
Mastering Manual Focus
One of the key aspects of improving the quality of your iPhone camera is mastering manual focus. Auto-focus can be unreliable in certain situations, resulting in blurry or out-of-focus photos. By utilizing manual focus, you can have more control over the sharpness and focus of your images.
1. Understand the Focus Ring
Most iPhone camera apps feature a focus ring that allows you to manually adjust the focus. The focus ring is a circular slider that appears on the screen when you tap to focus. It allows you to move the focus point to the desired area of your frame.
2. Tap to Focus
To access the manual focus feature, simply tap on the area of the frame that you want to focus on. The focus ring will appear, and you can then use it to adjust the focus manually. Experiment with tapping on different areas of the frame to see how it affects the focus.
3. Fine-tune the Focus
Once you have selected the general focus point, you can fine-tune the focus by sliding your finger on the focus ring. Move the ring clockwise or counterclockwise to adjust the focus until you achieve the desired level of sharpness.
It’s important to note that manual focus is particularly useful in situations with complex or challenging lighting conditions, such as low light or backlighting. By manually adjusting the focus, you can ensure that the subject is sharp and clear, even in difficult lighting situations.
Remember to practice and experiment with manual focus to become more comfortable using it. With time, you’ll be able to capture stunning, high-quality images by taking control of the focus on your iPhone camera.
Enhancing with Editing Software
While the hardware of the iPhone camera plays a significant role in capturing high-quality photos, the editing software available on the device can also improve the final outcome. Here are some tips to enhance your iPhone photos using editing software:
1. Adjusting Exposure and Contrast
Exposure: Editing software allows you to adjust the exposure of your photos, which can significantly improve the overall brightness and lighting. Experiment with different exposure levels to find the perfect balance for your image.
Contrast: Increasing the contrast can add depth to your photos by making the dark areas darker and the bright areas brighter. This adjustment can make your images pop and appear more vibrant.
2. Correcting Colors and White Balance
Colors: Use the editing software to adjust the saturation and vibrancy of the colors in your photos. This can make them more vivid and lifelike. You can also experiment with different color tones to create a specific mood or atmosphere.
White Balance: Incorrect white balance can result in a photo with unnatural color casts. Editing software allows you to correct the white balance, ensuring that whites appear white and colors look true to life.
3. Sharpening and Noise Reduction
Sharpening: Fine-tune the sharpness of your photos to bring out details and make them appear crisper. However, be careful not to over-sharpen, as it can introduce unwanted artifacts.
Noise Reduction: When shooting in low-light conditions, noise or graininess can be apparent in your photos. Editing software can help reduce this noise and enhance the overall image quality.

By utilizing the editing software available on your iPhone, you can take your photos to the next level and improve their overall quality. Experiment with different adjustments and settings to find your preferred editing style and enhance your photos to their fullest potential.
Utilizing Portrait Mode
One of the key features of the iPhone camera is the Portrait Mode. This feature uses the dual lenses on the device to create stunning photos with a shallow depth-of-field effect. By blurring the background and keeping the subject in focus, Portrait Mode adds a professional touch to your photos.
To use Portrait Mode on your iPhone, follow these steps:
Step 1: Open the Camera App
Launch the camera app on your iPhone by tapping on the camera icon from the home screen or by swiping left on the lock screen.
Step 2: Select Portrait Mode
Swipe left or right on the camera screen until you reach the Portrait Mode option. The icon looks like two overlapping circles.
Step 3: Frame Your Subject
Position your subject in the frame and make sure they are well-lit. Portrait Mode works best when there is a clear distinction between the subject and the background.
Step 4: Adjust the Depth Effect
After framing your subject, you can adjust the depth effect by moving closer or further away. A slider will appear at the bottom of the screen, allowing you to control the intensity of the background blur.
Tip: Experiment with different levels of blur to find the desired effect.
Step 5: Capture the Photo
Once you are satisfied with the framing and depth effect, press the shutter button to capture the photo. Make sure to keep the camera steady to avoid any blurriness.
Note: Portrait Mode is available on select iPhone models, such as the iPhone 7 Plus, iPhone 8 Plus, iPhone X, and newer models.
By utilizing Portrait Mode, you can take stunning photos with a professional touch, elevating the quality of your iPhone camera. Experiment with different subjects and environments to unleash your creativity and capture beautiful moments.
Investing in Lens Attachments
One effective way to significantly enhance the quality of your iPhone camera is by investing in lens attachments. These aftermarket lenses are designed to be attached to your iPhone camera, providing additional functionality and improving the overall image quality.
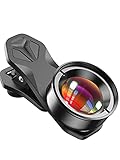
There are a variety of lens attachments available in the market, each offering unique features and benefits. Some popular lens attachments include telephoto lenses, wide-angle lenses, and macro lenses.
Telephoto lenses are designed to magnify the subject, allowing you to capture distant objects with greater detail. These lenses are perfect for landscape and wildlife photography, as well as capturing sporting events from a distance.
Wide-angle lenses on the other hand, provide a broader field of view, allowing you to capture more in a single frame. These lenses are great for landscape photography, architectural shots, and group photos where you want to include more people or scenery in the frame.
Macro lenses have the ability to capture extreme close-up shots, revealing intricate details that are not visible with the naked eye. These lenses are perfect for capturing detailed shots of flowers, insects, and small objects.
When selecting lens attachments, it’s important to consider factors such as lens quality, compatibility with your iPhone model, and the specific needs of your photography. It’s also worth investing in high-quality lens attachments from reputable brands to ensure optimal performance and image quality.
Attaching and detaching lens attachments is usually a straightforward process, as most lens attachments are designed to be easily clipped onto your iPhone camera. They are also compact and portable, making them convenient to carry around and use whenever you want to enhance your photography.
In conclusion, investing in lens attachments is a great way to increase the quality of your iPhone camera. Whether you want to zoom in on distant objects, capture a wider field of view, or reveal intricate details with macro photography, there is a lens attachment available to suit your needs.
FAQ
Why is the quality of my iPhone camera not very good?
The quality of your iPhone camera may not be very good due to a number of reasons. It could be due to outdated software, a dirty lens, or even a hardware issue. There are several steps you can take to try and improve the quality, such as keeping your software updated, cleaning the lens with a microfiber cloth, and checking for any potential hardware issues.
Can I increase the quality of my iPhone camera?
Yes, there are ways to increase the quality of your iPhone camera. You can start by making sure your software is up to date, as updates often include improvements for the camera. Additionally, keeping your lens clean and free from smudges or dirt can help improve image quality. You can also try using third-party camera apps that offer advanced features and settings for better control over your photos.
Are there any accessories that can help improve the quality of my iPhone camera?
Yes, there are various accessories available that can help improve the quality of your iPhone camera. One popular option is a lens attachment that can enhance the capabilities of your camera, such as a wide-angle lens or a telephoto lens. Additionally, there are external flashes and tripods that can help stabilize your shot and provide better lighting conditions. It’s important to research and choose accessories that are compatible with your specific iPhone model.


