
In today’s digital age, capturing high-quality video has become easier than ever thanks to the advancements in digital cameras. However, one aspect of video production that is often overlooked is sound quality. Poor sound quality can ruin even the most visually stunning video, leaving viewers distracted and unsatisfied. In this article, we will explore some tips and techniques to help you improve the sound quality of your videos using a digital camera.
1. Invest in a high-quality microphone
The built-in microphones in most digital cameras are not designed to capture professional-grade audio. To achieve better sound quality, it is highly recommended to invest in an external microphone. There are various types of microphones available on the market, including shotgun microphones, lavalier microphones, and handheld microphones. Choose the one that best suits your needs and budget.
2. Use a windscreen or furry cover
When recording audio outdoors, wind noise can be a major issue. To minimize the impact of wind noise on your recordings, consider using a windscreen or a furry cover. These accessories are designed to reduce the wind’s impact on the microphone and can make a significant difference in the sound quality of your videos.

3. Optimize your camera’s audio settings
Most digital cameras offer various audio settings that allow you to customize the sound recording process. Experiment with these settings to find the best balance between audio quality and file size. For example, tweaking the microphone sensitivity or adjusting the audio levels can help you achieve clearer and more balanced sound.
By following these tips and techniques, you can greatly enhance the sound quality of your videos and create a more immersive experience for your viewers. Don’t neglect sound when capturing footage with your digital camera, as it is an essential part of the storytelling process.
Tips for Enhancing Sound Quality with a Digital Camera
In today’s digital era, capturing high-quality videos with good sound is essential for creating compelling content. If you’re using a digital camera to shoot videos, here are some tips to improve the sound quality:
1. External Microphone
Consider investing in an external microphone for your digital camera. Built-in microphones on most cameras can pick up a lot of unwanted noise, resulting in poor sound quality. An external microphone can help isolate the audio you want to capture and reduce ambient noise.
2. Windshield
If you frequently shoot outdoors, wind noise can be a significant issue. Attach a windshield or a windscreen to your microphone to reduce the effect of wind on the audio. This accessory can greatly improve the sound quality and clarity in outdoor recordings.
3. Check Levels
Before you start recording, check the audio levels on your camera. Adjust them accordingly to avoid clipping or distortion. By monitoring the levels, you can ensure that the sound isn’t too low or too high, resulting in clear and balanced audio.
4. Distance from the Subject
If you’re filming someone speaking or an audio source, try to position the camera and microphone as close as possible to the subject. This helps capture a clear and direct audio signal, minimizing background noise and reverberation.
5. Avoid Automatic Gain Control (AGC)
Many digital cameras have an Automatic Gain Control (AGC) function that automatically adjusts the audio levels. While this feature can be helpful in some situations, it can also introduce unwanted noise and fluctuations. Disable AGC and manually control the audio levels for better sound quality.
6. Use a Tripod or Stabilization
Handling noise is a common issue when using a digital camera’s built-in microphone. To avoid this, use a tripod or stabilization device, like a gimbal or steadicam, to minimize camera movement and unwanted vibrations. This not only improves the visual quality but also enhances the sound quality.

7. Post-Processing
After recording, consider using audio editing software to further enhance the sound quality. Remove background noise, adjust levels, and apply equalization if necessary. This post-processing step can greatly improve the overall audio experience of your videos.
By implementing these tips, you can significantly enhance the sound quality of your digital camera recordings. Remember, good sound quality is just as important as good visuals in creating engaging content.
Importance of Sound Quality in Digital Camera Videos
The sound quality in digital camera videos plays a crucial role in ensuring a high-quality viewing experience. While the visual aspect is often the main focus when capturing videos, audio can greatly impact the overall presentation and engagement of the content.
Enhanced Immersion
Clear and crisp sound enhances immersion, allowing viewers to feel like they are part of the scene. By capturing high-quality audio, digital cameras can recreate realistic audio environments, making the viewers feel like they are experiencing the moment firsthand.
The importance of sound quality becomes even more apparent in videos that rely heavily on audio, such as interviews, vlogs, or documentary-style content. In these cases, the audio becomes the primary source of information and can significantly affect the viewer’s understanding and emotional connection to the content.

Improved Professionalism
High-quality sound adds a professional touch to digital camera videos. If the audio is muffled, distorted, or filled with background noise, it can create a negative impression on the viewers and detract from the overall professionalism of the video.
Whether it’s a personal video or a professional production, capturing clear and balanced audio demonstrates attention to detail and enhances the overall production value. Achieving high-quality sound is especially important when videos are intended for sharing on social media platforms or professional websites.
In situations where the video is meant to convey a message or promote a product or service, poor sound quality can undermine the effectiveness of the content. Viewers may become distracted or disinterested, resulting in a missed opportunity to communicate the intended message.
Conclusion:
When capturing videos with a digital camera, it is essential to pay attention to the audio quality. By using external microphones, eliminating background noise, and ensuring proper audio levels, the sound quality can be greatly improved. Investing time and effort in improving sound quality will result in a more engaging and professional viewing experience.

Choosing a Digital Camera with High Sound Quality
When it comes to capturing memories, a digital camera with high sound quality can make a significant difference. Not only does it enhance the overall experience, but it also adds depth and richness to your videos. If you are looking to upgrade your digital camera and want to prioritize sound quality, here are a few factors to consider.
1. Microphone Type
One of the key factors that contribute to sound quality is the type of microphone used in the digital camera. A camera with a built-in stereo or directional microphone can capture sounds with precision and clarity. These microphones are designed to pick up audio from the desired direction, reducing background noise and improving the overall sound quality.
2. Audio Recording Formats
Another important factor to consider is the audio recording format supported by the digital camera. Look for cameras that support uncompressed or lossless audio formats, such as WAV or FLAC. These formats retain the original quality of the sound, resulting in clearer and more detailed audio recordings.
Some cameras also offer additional features like manual audio controls, adjustable gain levels, and wind noise reduction. These features allow you to fine-tune the audio settings according to your preference and environment, ensuring optimal sound quality in different recording conditions.
Choosing a digital camera with high sound quality doesn’t have to break the bank. Many cameras in the market offer excellent sound recording capabilities at affordable price points. By considering these factors and doing thorough research, you can find a camera that meets your requirements and delivers exceptional sound quality.

Adjusting Settings for Improved Sound Recording
When recording sound with a digital camera, there are several settings you can adjust to improve the quality of your recordings. By making these adjustments, you can capture clear and crisp audio to enhance your videos and photos. Here are some tips to help you optimize your camera’s sound recording settings:
1. Microphone Sensitivity
One of the most important settings to consider is the microphone sensitivity. This determines how sensitive your camera’s microphone is to sound. Adjusting the sensitivity can help reduce background noise and improve the clarity of the audio. Experiment with different sensitivity levels to find the optimal setting for your specific recording environment.
2. Wind Noise Reduction
When recording outdoors, wind noise can interfere with the clarity of the audio. Many digital cameras have a wind noise reduction feature that can help minimize this issue. Enable this setting to reduce the impact of wind noise on your recordings and ensure clearer sound quality.
3. External Microphone
If you require professional-grade audio or are recording in a noisy environment, consider using an external microphone. Digital cameras often have a dedicated audio input for connecting an external microphone. This allows you to capture higher quality sound and reduce any unwanted background noise.
When using an external microphone, make sure to adjust the camera’s audio input settings accordingly. This may involve selecting the correct input source and adjusting the audio levels to avoid clipping or distortion.

4. Monitoring and Testing
Before you start recording, take the time to monitor and test your audio. Use headphones to listen to the sound being captured by your camera’s microphone. This will help you identify any issues, such as low volume, distortion, or unwanted background noise.
Consider conducting test recordings in different environments to ensure your camera’s sound settings are optimized for each situation. This will allow you to make any necessary adjustments before capturing important moments.
Remember, adjusting the sound settings on your digital camera may take some trial and error. Take the time to experiment with different settings and environments to find the setup that works best for you. With practice, you can achieve improved sound quality and enhance the overall audio experience in your videos and photos.
| Setting | Description |
|---|---|
| Microphone Sensitivity | Adjusts the sensitivity of the camera’s microphone to sound. |
| Wind Noise Reduction | Reduces wind noise interference when recording outdoors. |
| External Microphone | Allows for the use of an external microphone to capture higher quality sound. |
| Monitoring and Testing | Listen to and test the audio quality before recording. |
External Microphone Options for Better Sound
When it comes to improving sound quality with a digital camera, one of the most effective options is to use an external microphone. Built-in camera microphones are often low quality and do not provide the clarity and depth of sound that an external microphone can offer. Luckily, there are several external microphone options available that can enhance your audio recording capabilities.
Here are some popular external microphone options:
| Microphone Type | Description |
|---|---|
| Shotgun Microphone | A shotgun microphone is a highly directional microphone that captures sound from a specific direction. It is ideal for capturing audio from a distance while minimizing background noise. |
| Lavalier Microphone | A lavalier microphone, also known as a lapel microphone, is a small microphone that can be clipped to the clothing of the person speaking. It is commonly used in interviews or presentations. |
| Wireless Microphone | A wireless microphone allows you to move freely while recording audio. It can be especially useful for capturing sound during live events or while filming in dynamic environments. |
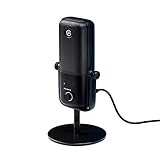
| USB Microphone | A USB microphone can be directly connected to your camera or computer. It offers convenience and high-quality audio recording, making it a popular choice for podcasting or voiceovers. |
Before purchasing an external microphone, it is important to consider your specific needs and the capabilities of your camera. Some cameras may have limited compatibility or require additional adapters for external microphones. Additionally, it is advisable to read reviews and compare the specifications of different microphones to ensure you choose the best option for your recording needs.
By investing in an external microphone, you can significantly improve the sound quality of your digital camera recordings. Whether you opt for a shotgun microphone, lavalier microphone, wireless microphone, or USB microphone, the enhanced audio capture will greatly enhance the overall viewing experience for your audience.
Importance of Proper Positioning for Audio Capture
When it comes to capturing high-quality audio with a digital camera, one of the most important factors to consider is the positioning of the microphone. Proper microphone placement can significantly improve the sound quality of your recordings, ensuring that you capture clear and crisp audio.
1. Distance from the sound source
The distance between the microphone and the sound source is crucial for obtaining clear audio. It is essential to position the microphone close to the sound source, but at the same time, maintain a comfortable distance to prevent distortion or capturing unwanted background noise. Experimenting with the microphone placement can help you find the optimal distance for your specific recording environment.
2. Directionality of the microphone
The directionality of the microphone plays a significant role in capturing high-quality audio. Different microphones have varying polar patterns, such as omnidirectional, cardioid, or shotgun. Understanding the directionality of your microphone and aligning it properly with the sound source can greatly enhance the clarity of the audio capture.
3. Avoiding physical obstructions
When positioning your microphone, it is crucial to ensure that there are no physical obstructions between the microphone and the sound source. Objects like walls, furniture, or even the camera itself can cause reflections, echoes, or muffled audio. Choose a location that provides a clear path for the sound waves to reach the microphone, resulting in cleaner and more accurate sound capture.
4. Eliminating background noise
Noise pollution can greatly affect the overall sound quality of your recordings. To minimize background noise, it is important to choose a location with minimal ambient noise, such as traffic, crowds, or machinery. Additionally, using a microphone with good noise-cancelling capabilities or a windscreen can help to eliminate unwanted noise, further enhancing the clarity of the audio capture.
By paying attention to proper microphone positioning, considering the distance from the sound source, utilizing the correct directionality, and minimizing physical obstructions and background noise, you can dramatically improve the sound quality of your digital camera recordings. Taking the time to optimize audio capture can result in professional and immersive audio that complements your video footage and enhances the overall viewer experience.
Using Windshields and Noise Reduction Techniques
When filming outdoors, one of the main challenges for getting good sound quality with a digital camera is dealing with wind noise. Wind can create a lot of unwanted noise in your audio recordings, making it difficult to hear the intended sounds clearly. Fortunately, there are some techniques you can use to minimize wind noise and improve the overall sound quality of your videos.
1. Windshields
One effective way to reduce wind noise is by using a windshield, also known as a windscreen or a dead cat. A windshield is a cover that you place over the microphone of your digital camera, designed to reduce the impact of wind on the audio recordings.
There are different types of windshields available, ranging from foam covers to furry windjammers. Foam covers are ideal for light wind conditions, while furry windjammers are more suitable for strong winds. The windshield acts as a barrier, diffusing the wind and preventing it from directly hitting the microphone. This helps to minimize the unwanted noise caused by wind.
2. Positioning the Microphone
Another effective technique to improve sound quality is by positioning the microphone properly. When filming outdoors, try to position the microphone in a way that it is shielded from direct wind exposure. For instance, if you are using an external microphone, you can position it behind a solid object or use your body to block the wind.
Additionally, you can try angling the microphone downwards, so that it is facing away from the direction of the wind. This can help in reducing wind noise while capturing the desired sounds more clearly. Experiment with different microphone positions to find the best setup for minimizing wind noise.
Along with windshields and proper microphone positioning, it is also important to consider noise reduction techniques during post-production. Using audio editing software, you can apply filters to reduce background noise and enhance the overall sound quality of your recordings.
In conclusion, by using windshields and proper microphone positioning techniques, you can significantly improve the sound quality of your videos recorded with a digital camera. These techniques help to reduce wind noise and allow the desired sounds to be captured more clearly, enhancing the overall viewer experience.
Post-Production Tips for Enhancing Sound Quality
While capturing high-quality audio is important, post-production is equally crucial in optimizing the sound quality of your digital camera recordings. Here are some tips to help you enhance the sound quality during post-production:
1. Remove Unwanted Noise
Noise reduction is an important step in improving sound quality. Use audio editing software to eliminate any background noise or unwanted sounds. This can include equipment hum, wind noise, or echoes. By removing these distractions, you can ensure that the focus remains on the desired audio.
2. Equalize the Audio
Equalization (EQ) is the process of adjusting the balance of frequencies in your audio. Use a parametric equalizer to boost or lower specific frequencies as needed. This can help improve clarity, reduce muddiness, and enhance the overall tonal balance of the sound.
3. Enhance Dynamic Range
Dynamic range refers to the difference between the softest and loudest parts of your audio. Compression and limiting techniques can be used to control the dynamic range and make the audio levels more consistent. This will ensure that the sound is clear and well-balanced, even in situations with varying volume levels.
4. Apply Reverb and Delay
If your audio lacks depth or feels too dry, adding a touch of reverb or delay can help create a sense of space. Experiment with different settings and presets to find the right balance, ensuring that the effect enhances the audio without overpowering it.
5. Use Audio Effects Judiciously
While audio effects can be a great way to enhance your recordings, it’s important to use them judiciously. Avoid excessive use of effects that may distract or distort the original sound. The goal is to enhance the audio quality, not overpower it with unnecessary effects.
6. Normalize the Audio Levels
Normalize your audio levels to ensure a consistent volume throughout the recording. This can prevent sudden jumps or drops in volume and create a more pleasant listening experience for your audience.
By following these post-production tips, you can significantly improve the sound quality of your digital camera recordings. Remember to always listen to the audio critically and make adjustments accordingly to achieve the desired results.
| Need Help? |
|---|
| If you need assistance with post-production techniques or audio editing software, consider seeking advice from professionals or online forums dedicated to sound engineering. |
Question-answer:
What are some tips for improving sound quality with a digital camera?
There are several tips you can follow to improve sound quality with a digital camera. First, make sure you are in a quiet environment without excessive background noise. Secondly, get as close as possible to the sound source to minimize any ambient noise. Thirdly, consider using an external microphone for better audio capture. Finally, adjust the camera’s audio settings to optimize the sound quality.
Can I improve the sound quality of my digital camera without using an external microphone?
While using an external microphone can greatly improve sound quality, there are still some things you can do without one. Firstly, make sure you are recording in a quiet environment with minimal background noise. Secondly, get closer to the sound source to reduce any ambient noise. Additionally, you can try adjusting the camera’s audio settings to enhance the sound quality. Keep in mind that using an external microphone will always yield the best results.


