
Welcome to our detailed guide on how to install Blink Outdoor Security Cameras! Whether you want to enhance the security of your home or keep an eye on your property while you’re away, installing outdoor security cameras is a smart choice. Blink cameras offer an affordable and easy-to-use solution, allowing you to monitor your surroundings and have peace of mind.
Step 1: Choose the Perfect Location
Prior to installation, it’s crucial to select the appropriate locations for your Blink Outdoor security cameras. Consider areas where you want maximum coverage and visibility. You may want to focus on entry points, driveways, backyards, or any vulnerable areas that would benefit from constant surveillance. Make sure that your cameras have a clear line of sight and aren’t obstructed by vegetation or other objects.
Pro Tip: Placing cameras at a height of around 9 feet guarantees a better view while keeping them out of reach.
Step 2: Mounting the Cameras

Once you have chosen the locations, it’s time to mount your Blink Outdoor security cameras. The package typically includes the necessary mounting brackets and screws. Using the provided tools, attach the brackets securely to the desired surfaces, such as walls, ceilings, or wooden posts. Ensure that the brackets are level and firmly in place to prevent any movement or instability.
Pro Tip: For added convenience, you can purchase additional mounting accessories, such as suction cup mounts or adjustable brackets, to achieve your desired camera angles.
Step 3: Syncing with the Blink App
After mounting the cameras, it’s crucial to sync them with the Blink App on your smartphone or tablet. Download the app and create an account if you haven’t already. Follow the step-by-step instructions provided by the app to connect your cameras to your home Wi-Fi network. Once successfully synced, you can customize the settings, including motion detection, recording duration, and notifications according to your preferences.
Pro Tip: Ensure that your Wi-Fi network is strong and stable to guarantee a seamless connection and uninterrupted monitoring.

Now that you’re equipped with the knowledge of how to install Blink Outdoor security cameras, you can enjoy the benefits of having a reliable surveillance system in place. Remember to regularly check the cameras for optimal performance, including the battery levels and camera angles, and make any necessary adjustments to ensure maximum security.
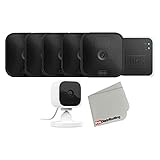
Benefits of using Blink outdoor security cameras
Installing Blink outdoor security cameras can provide numerous benefits to homeowners or business owners looking to enhance their security measures. These cameras offer the following advantages:
1. Remote monitoring: With Blink outdoor security cameras, users can monitor their property remotely from anywhere using the Blink Home Monitor app. This feature allows homeowners to keep an eye on their house and surroundings even when they are away.
2. Enhanced deterrence: Blink outdoor security cameras act as a visible deterrent for potential burglars or intruders. The presence of security cameras alone can discourage malicious individuals from attempting any unlawful activities.
3. High-definition video quality: These cameras capture high-quality videos in 1080p resolution, ensuring clear and detailed footage. This is crucial for identifying people or objects in case of any suspicious activities or incidents.

4. Weatherproof design: Blink outdoor security cameras are specifically designed to withstand various weather conditions. They are resistant to rain, snow, and extreme temperatures, ensuring uninterrupted monitoring regardless of the weather.
5. Easy installation: Setting up Blink outdoor security cameras is a straightforward process that can be done by anyone. These cameras are wireless and require minimal wiring, making the installation process hassle-free and convenient.
6. Affordable options: Blink offers cost-effective outdoor security camera options without compromising on quality. Compared to other brands, Blink cameras are reasonably priced, allowing homeowners to enhance their security within a budget.
7. Motion detection: Blink outdoor security cameras are equipped with motion sensors that trigger recordings whenever motion is detected. This feature eliminates the need for continuous recording and saves storage space.
8. Cloud storage: The footage captured by Blink outdoor security cameras can be stored securely in the cloud. Users can access and review the recorded videos at any time, providing additional evidence or information if required.

Overall, Blink outdoor security cameras offer convenience, peace of mind, and advanced security features, making them an excellent choice for anyone looking to protect their property.
Choosing the right Blink outdoor security camera model
When it comes to choosing the right Blink outdoor security camera model for your needs, there are a few factors to consider. Each model offers its own unique features and capabilities, so it’s important to understand what you’re looking for before making a decision. Here are some things to consider when choosing a Blink outdoor security camera:
- Resolution: Blink outdoor security cameras are available in different resolutions, with higher resolutions generally providing clearer and more detailed images. Consider your specific surveillance needs and the level of detail you require.
- Power source: Some Blink outdoor security camera models are battery-powered, while others require a wired power connection. This will impact where and how you can install the cameras, so think about whether you prefer the flexibility of battery power or the reliability of a wired connection.
- Field of view: Different Blink outdoor security camera models offer varying degrees of field of view. A wider field of view allows you to monitor a larger area, so consider the size of the area you want to cover and choose a camera with an appropriate field of view.
- Weather resistance: Since the cameras will be installed outdoors, it’s important to choose a model that is weather-resistant. Look for cameras labeled as “outdoor” or “weather-resistant” to ensure they can withstand the elements.
- Connectivity: Blink outdoor security cameras offer different connectivity options, such as Wi-Fi or cellular. Consider your internet connection and the availability of a reliable network in your area when choosing a camera model.
- Additional features: Some Blink outdoor security camera models offer additional features such as night vision, two-way audio, and motion detection. These features can enhance the security and functionality of your camera system, so think about which features are important to you.
By considering these factors, you can choose the right Blink outdoor security camera model that suits your specific surveillance needs and provides the level of security you desire. Remember to compare the specifications and features of different models to make an informed decision.
Required tools for installation
Before you begin the installation process for your Blink outdoor security cameras, make sure you have the following tools on hand:
- Drill and drill bits
- Screwdriver
- Level
- Tape measure
- Stud finder
- Pencil or marker
- Ladder or step stool (if installing cameras on high walls or ceilings)
Having these tools ready will help ensure a smooth and efficient installation process. It is important to have the proper tools to accurately mount and secure your Blink outdoor security cameras.

Mounting and positioning the Blink outdoor security cameras
Once you have unboxed your Blink outdoor security cameras, the next step is to mount and position them properly. Proper mounting and positioning of the cameras is essential to ensure optimal performance and coverage of your property. Follow the steps below to mount and position your Blink outdoor security cameras:
1. Choose suitable mounting locations
Before mounting the cameras, it is important to choose suitable locations that provide the best coverage of your property. Consider the following factors when choosing the locations:
- Visibility: Ensure that the camera’s view is not obstructed by any objects, such as trees or walls, that may block the camera’s field of view.
- Height: Mount the camera at a height that provides a clear view of the area you want to monitor, while keeping it out of reach from potential tampering.
- Angle: Position the camera at an angle that covers the desired area of surveillance without any blind spots.
- Weather resistance: Ensure that the camera is mounted in a location that is protected from harsh weather conditions to prevent damage to the camera.
2. Attach the mounting bracket
Each Blink outdoor security camera comes with a mounting bracket that allows you to easily attach the camera to various surfaces. To attach the mounting bracket, follow these steps:
- Select a suitable location for mounting the camera and mark the spots where you will be attaching the mounting bracket.
- Using the provided screws, attach the mounting bracket to the marked spots securely.
- Make sure the mounting bracket is level and stable before proceeding to the next step.
3. Mount the camera
Once the mounting bracket is securely attached, you can now mount the Blink outdoor security camera. Follow these steps to mount the camera:
- Place the camera onto the mounting bracket.
- Ensure that the camera is properly aligned and securely attached to the mounting bracket.
- Tighten any screws or locking mechanisms on the mounting bracket to secure the camera in place.
- Adjust the camera’s position and angle, if necessary, to achieve the desired coverage.
Repeat the above steps for each Blink outdoor security camera you have. Once all the cameras are properly mounted and positioned, you can proceed with the installation and setup process as outlined in the manufacturer’s instructions.
Setting up the Blink Sync Module
The Blink Sync Module is a crucial component of the Blink Outdoor security camera system. It acts as the central hub that connects your cameras to the Blink cloud servers and allows you to receive notifications and access your camera footage remotely. To set up the Blink Sync Module, follow the steps below:
Step 1: Find a suitable location for the Blink Sync Module, preferably close to your Wi-Fi router. Make sure there is a power outlet nearby.
Step 2: Connect the power adapter to the Blink Sync Module and plug it into the power outlet.
Step 3: Wait for the LED on the Sync Module to start blinking blue. This indicates that it is ready to be set up.
Step 4: Download the Blink app on your mobile device (available for iOS and Android) and create a Blink account if you haven’t already.
Step 5: Open the Blink app and tap on the “+” icon to add a new sync module.
Step 6: Follow the on-screen instructions to connect the Blink Sync Module to your Wi-Fi network. Make sure you enter the correct Wi-Fi password.
Step 7: Once the Sync Module is connected to your Wi-Fi network, it will automatically start detecting any nearby Blink cameras. Wait for the app to show the detected cameras.
Step 8: Select the cameras you want to pair with the Sync Module and tap on “Add” to complete the setup process.
Step 9: Wait for the app to confirm that the cameras have been paired successfully. You can now access and manage your Blink Outdoor security cameras through the Blink app on your mobile device.
With the Blink Sync Module properly set up, you can now enjoy the benefits of a reliable and secure security camera system for your home or business.
Connecting the Blink Outdoor Security Cameras to the Sync Module
Once you have set up your Blink outdoor security cameras, the next step is to connect them to the Sync Module. The Sync Module acts as the central hub that allows you to control and monitor your Blink cameras from your smartphone or computer.
Step 1: Position the Sync Module
Find a suitable location for the Sync Module near your router. Make sure it is within range and has a stable internet connection. You can use the included power adapter to plug in the Sync Module or use a USB port on your router if available. Once connected to power, the blue LED light on the Sync Module should start flashing.
Step 2: Open the Blink App
Open the Blink app on your smartphone and log in to your account. If you don’t have the app installed, you can download it from the App Store or Google Play Store.
Step 3: Add a System
In the Blink app, tap on the “Add a System” button. Follow the on-screen instructions to set up a new system. Make sure to select “Blink Outdoor Security Cameras” as the device type.
Step 4: Sync the Cameras
After creating a new system, the app will prompt you to sync your cameras. Press and release the small button on top of each camera until the blue LED light starts flashing. This will put the camera in sync mode. Once the camera is in sync mode, it will automatically connect to the Sync Module.
Step 5: Confirm Camera Connection
Once the camera is successfully connected to the Sync Module, the LED light on the Sync Module will turn solid blue. In the app, you should see the camera listed under the system you just created. Tap on the camera to view the live feed and adjust any settings as needed.
Congratulations! You have successfully connected your Blink outdoor security cameras to the Sync Module. You can now enjoy the benefits of monitoring your property and receiving alerts directly to your smartphone whenever motion is detected.
Configuring the Blink mobile app to monitor your cameras
After successfully installing your Blink outdoor security cameras, the next step is to configure the Blink mobile app on your smartphone or tablet. This will allow you to monitor and control your cameras from anywhere and at any time. Follow the steps below to set up the Blink mobile app:
Step 1: Download the Blink app
To begin, open the app store on your mobile device and search for the Blink app. Once you find it, tap on the “Download” or “Install” button to start the installation process. Wait for the app to finish downloading and installing on your device.
Step 2: Sign in or create a Blink account
Once the app is installed, open it and you will be prompted to sign in or create a new Blink account. If you already have a Blink account, enter your login credentials and tap “Sign In”. If you don’t have an account, tap on “Create Account” and follow the on-screen instructions to set up a new account.
Step 3: Add your cameras to the app
After signing in to your Blink account, you will be taken to the app’s home screen. Tap on the “+” button or the “Add Device” option to add your cameras to the app. The app will guide you through the setup process, which usually involves scanning a QR code on your camera or entering the device’s serial number.
Step 4: Connect your cameras to Wi-Fi
Once your cameras are added to the app, you will need to connect them to Wi-Fi. Follow the instructions on the app to select your Wi-Fi network and enter the network password. The app will then initiate the Wi-Fi connection process, which may take a few moments.
Step 5: Customize your camera settings
After the Wi-Fi connection is established, you can customize your camera settings to suit your needs. The app allows you to adjust settings such as motion detection sensitivity, camera naming, and recording length. Take some time to explore the app’s settings and make any necessary adjustments.
Once you have completed these steps, your Blink outdoor security cameras are ready to be monitored and controlled through the Blink mobile app. You can now access live video feeds, receive motion alerts, and even arm or disarm your cameras remotely from the comfort of your smartphone or tablet.
Troubleshooting common installation issues
If you are having trouble installing your Blink outdoor security cameras, don’t worry! Here are some common installation issues and how to troubleshoot them:
- Camera not connecting to Wi-Fi network:
- Make sure you are within range of the Wi-Fi router and the signal strength is strong enough. Try moving the camera closer to the router.
- Check your Wi-Fi credentials and make sure you are entering the correct password.
- Restart your Wi-Fi router and try connecting the camera again.
- If the issue persists, contact Blink customer support for further assistance.
- Poor video quality:
- Check the positioning of the camera and make sure it has a clear line of sight. Remove any obstacles that may be blocking the view.
- Ensure that the camera lens is clean and not obstructed by dirt or debris. Use a soft cloth to wipe the lens if necessary.
- If the issue continues, try adjusting the camera settings to improve video quality.
- Camera not detecting motion:
- Check the motion detection sensitivity settings and make sure they are not set too low. Increase the sensitivity if needed.
- Ensure that the camera is positioned correctly to capture the intended area of motion.
- Make sure there are no moving objects, pets, or trees that could be triggering false motion alerts.
- Camera offline:
- Check the power source and make sure the camera is properly connected.
- Ensure that your Wi-Fi network is functioning properly. Restart the router if necessary.
- Try resetting the camera by removing and reinserting the batteries or power cable.
- If the camera remains offline, contact Blink customer support for further assistance.
By following these troubleshooting steps, you should be able to resolve most common installation issues with your Blink outdoor security cameras. If you still encounter problems, don’t hesitate to reach out to the Blink customer support team for additional help.
FAQ,
What are Blink outdoor security cameras?
Blink outdoor security cameras are wireless cameras that can be installed outside your home or office to monitor the surroundings and provide surveillance.
How do I install Blink outdoor security cameras?
To install Blink outdoor security cameras, you need to first choose a suitable location for the camera, ensure that it is within range of a Wi-Fi connection, and then follow the instructions provided in the Blink app to connect the camera to your Wi-Fi network and mount it securely.
What tools do I need to install Blink outdoor security cameras?
You don’t need any special tools to install Blink outdoor security cameras. The cameras come with all the necessary mounting hardware and you can easily install them using a few basic tools like a screwdriver and a drill.
Can I install Blink outdoor security cameras on my own?
Yes, you can install Blink outdoor security cameras on your own. The installation process is simple and straightforward, and the cameras come with easy-to-follow instructions. However, if you’re not comfortable with DIY installations, you can also hire a professional to install the cameras for you.


