
Installing dome security cameras is an essential step towards enhancing the security of your home or business premises. These cameras offer a discreet and efficient way to monitor activities and deter potential intruders. Whether you’re an experienced DIY enthusiast or a novice, this guide will walk you through the steps of installing dome security cameras.
Step 1: Planning and Placement
Before you begin the installation process, it’s crucial to plan where you want to position your dome security cameras. Consider areas of high traffic or vulnerable entry points. Additionally, ensure that your cameras are mounted out of reach to prevent tampering. strategic placement is key to maximizing their effectiveness.
Step 2: Mounting
Once you’ve determined the ideal locations, you need to mount the cameras. Most dome security cameras come with a mounting bracket that can be fixed to the ceiling or wall. Use the provided screws to securely attach the bracket. Ensure that the camera is level and facing the desired direction.
Step 3: Wiring
After mounting the cameras, you’ll need to connect them to your recording device or monitoring system. Dome security cameras generally use either Ethernet cables or BNC cables. Carefully route the cables from the cameras to the recording device, ensuring they are hidden and protected from accidental damage. Remember to test the camera feeds and make any necessary adjustments before finalizing the wiring.
By following these steps, you can successfully install dome security cameras and enjoy the peace of mind that comes with having a reliable surveillance system. Remember to check the manufacturer’s instructions for specific installation requirements and seek professional assistance if needed.
Learn Why Dome Security Cameras Are a Must-Have
Dome security cameras have become increasingly popular in recent years due to their numerous advantages and benefits. Whether you are a homeowner or a business owner, investing in dome security cameras is a must to ensure the safety and security of your property.
1. Discreet Design
One of the main reasons why dome security cameras are preferred over other types of cameras is their discreet design. The compact and dome-shaped construction of these cameras allows them to blend seamlessly into the surroundings, making them less noticeable and less likely to be tampered with. This is especially important for business owners who want to monitor their premises without creating an intimidating atmosphere for their customers or employees.

2. Wide Coverage
Dome security cameras are designed to provide extensive coverage and capture a wide range of angles, making them ideal for surveillance purposes. These cameras can be easily adjusted and positioned to monitor large areas, such as parking lots, warehouses, or retail stores. With dome cameras, you can enjoy a 360-degree view of your property, ensuring that no blind spots are left unmonitored.
In addition to their wide coverage, dome security cameras are also equipped with advanced features such as pan, tilt, and zoom capabilities, allowing you to remotely control the camera and focus on specific areas of interest.
Overall, dome security cameras offer superior functionality, flexibility, and ease of use. By investing in these cameras, you can have peace of mind knowing that your property is protected and under surveillance 24/7.
Assess Your Security Needs
Before installing dome security cameras, it’s crucial to assess your security needs to ensure you choose the right camera system for your specific requirements. This assessment will help you determine the number of cameras you need, the ideal locations for installation, and the features you should prioritize.
1. Identify Vulnerable Areas
Take a comprehensive look at your property and identify the areas that are most susceptible to threats or criminal activity. This could include entrances, parking lots, blind spots, or high-value areas. By focusing on these vulnerable spots, you can strategically position your dome security cameras to maximize surveillance coverage.

2. Determine Camera Coverage
Consider the field of view you want each camera to cover. Determine whether you need a wide-angle lens to capture a larger area or a narrow focus lens for capturing fine details. Take into account the distance each camera needs to cover and any obstructions that may affect its view. This will help you in selecting the right type and number of cameras.
Additionally, consider whether you need cameras for indoor or outdoor surveillance. Outdoor cameras typically require weatherproof and vandal-proof features to withstand harsh environmental conditions.
Tip: Mapping out the camera coverage areas and creating a floor plan can be helpful in visualizing your surveillance strategy.
3. Assess Lighting Conditions
Take note of the lighting conditions in the areas where you plan to install dome security cameras. Low-light or nighttime conditions may require cameras with infrared capabilities or low-light sensitivity. Bright, direct sunlight or intense backlighting may call for cameras with adjustable exposure settings to optimize image quality.
4. Consider Additional Features
Think about any additional features you may need for your dome security cameras. These could include two-way audio communication, motion detection, facial recognition, or remote access capabilities. Determine which features are essential for your security needs and prioritize them accordingly.

By thoroughly assessing your security needs, you can make informed decisions when selecting and installing dome security cameras, ensuring optimal surveillance coverage and protection for your property.
Choose the Right Dome Security Camera
When it comes to securing your property, choosing the right dome security camera is crucial. With so many options available in the market, it can be overwhelming to make the right choice. Here are some factors to consider when selecting a dome security camera:
- Resolution: Look for a camera with high resolution, preferably 1080p or higher, to ensure clear and detailed footage.
- Field of View: Consider the field of view you need based on the area you want to cover. A wider field of view can help reduce blind spots.
- Night Vision: If you require surveillance during the night, choose a camera with excellent night vision capabilities. Look for cameras with infrared LEDs for better visibility in low-light conditions.
- Weather Resistance: If you plan to install the dome security camera outdoors, make sure it is weather-resistant and capable of withstanding harsh weather conditions.
- Power Source: Determine whether you want a wired or wireless camera. Wired cameras require a power source, while wireless cameras run on batteries or solar power.
- Storage: Consider how much footage you need to store and choose a camera with sufficient storage options. Some cameras have built-in memory, while others allow for external storage through a microSD card or cloud-based solutions.
- Additional Features: Explore additional features such as motion detection, two-way audio, remote access, and smartphone integration that can enhance the functionality of your dome security camera.
By considering these factors, you can select a dome security camera that meets your specific requirements and provides the best level of security for your property.
Selecting the Ideal Location for Installation
When it comes to installing dome security cameras, selecting the right location is crucial for maximizing their effectiveness. Here are some important factors to consider when choosing the ideal spot:
1. Coverage Area
Determine the area you want to monitor and choose a location that provides complete coverage. Consider the camera’s field of view and ensure it covers all the important areas, such as entrances, walkways, and vulnerable spots.

2. Height and Angle
The height and angle at which the camera is installed are essential for capturing clear footage. Mount the camera at a height that keeps it out of reach and offers a wide perspective. Avoid placing it too high or too low, as it may reduce image quality and hinder facial recognition.
3. Lighting Conditions
Take into account the lighting conditions in the chosen location. Avoid placing the camera directly facing bright lights or reflective surfaces, as it may cause overexposure or glare. Ensure the area is well-lit during nighttime or consider cameras with built-in infrared capabilities.
4. Accessibility and Vandalism Risk
Consider accessibility for installation and maintenance purposes. Select a spot where the camera can be easily mounted and adjusted. Additionally, evaluate the risk of vandalism in the chosen location and opt for a durable camera that can withstand tampering.
5. Wiring and Connectivity
Ensure the chosen installation location has easy access to power and network connections if required. Plan the route for running the cables and make sure they are hidden or protected to prevent accidental damage or tampering.
By considering these factors and carefully selecting the installation location for your dome security camera, you can enhance the overall effectiveness of your surveillance system.
Gathering the Necessary Tools
Before you begin installing dome security cameras, it’s important to gather all the necessary tools. Having everything ready beforehand will ensure a smooth and efficient installation process.
Here are the essential tools you will need:
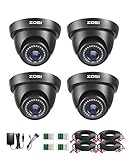
| 1. | Dome security camera(s) |
| 2. | Screws for mounting |
| 3. | Power cables |
| 4. | Drill |
| 5. | Screwdriver |
| 6. | Ladder or step stool |
| 7. | Cable clips |
| 8. | Monitor or display device |
| 9. | Network cables (if applicable) |
Make sure to check the package of your dome security camera(s) to ensure you have all the necessary components, such as mounting brackets or power adapters. Additionally, it’s a good idea to have a flashlight handy in case you need additional lighting during the installation.
By gathering all the necessary tools in advance, you’ll be well-prepared to install your dome security cameras efficiently and effectively.
Mounting and Securing the Camera
Properly mounting and securing your dome security camera is essential to ensure optimal performance and coverage. Follow these steps to install your camera:
- Select a suitable location for your camera. It should provide an optimum field of view and coverage of the area you want to monitor.
- Ensure the mounting surface is sturdy and can support the weight of the camera.
- Use the provided template to mark the spots for drilling holes.
- Drill holes into the mounting surface according to the marked spots.
- Insert the screws or anchors into the holes, ensuring a secure fit.
- Place the camera base onto the mounting surface, aligning the holes on the base with the drilled holes.
- Secure the camera base to the mounting surface using the provided screws.
- Attach the camera to the base, ensuring it is securely mounted.
- Adjust the camera’s position and angle as needed.
- Connect the camera’s cables to your recording device or power source according to the manufacturer’s instructions.
- Test the camera to ensure it is working properly and capturing the desired footage.
- Finally, make sure to conceal and protect any exposed cables to prevent tampering or damage.
By following these steps, you can effectively mount and secure your dome security camera, providing you with enhanced security and peace of mind.

Wiring the Dome Security Camera
Wiring the dome security camera is an essential step in the installation process. Proper wiring ensures that the camera receives power and sends video signals to the recording device. Here is a step-by-step guide on how to wire your dome security camera:
1. Gather the necessary materials:
| – Dome security camera |
| – Power supply |
| – Coaxial cable |
| – BNC connectors |
| – Screwdriver |
2. Mount the camera:
Choose a suitable location for your dome security camera and mount it securely. Make sure the camera is facing the desired area for monitoring.
3. Prepare the power supply:
Identify the power cables on the dome security camera and the power supply. Connect the positive and negative wires, ensuring they are securely attached.
4. Connect the video signal:
Take the coaxial cable and attach one end to the video output port on the dome security camera. Connect the other end to the video input port on the recording device.
5. Secure the connections:
Use BNC connectors to secure the coaxial cable connections. Ensure the connectors are tightened properly to avoid any loose connections that may affect video quality.
6. Test the camera:
Once all the wiring connections are in place, power on the camera and recording device. Check if the video signal is being transmitted successfully and adjust the camera’s position if needed.
Following these steps will help you wire your dome security camera correctly, ensuring optimal performance and reliable surveillance. Remember to consult the camera’s manual for specific instructions related to your model.
Test and Adjust Settings
Once you have successfully installed your dome security cameras, it is important to test and adjust their settings to ensure optimal performance. Here are some steps to follow:
1. Power On the Cameras
Make sure that all cameras are properly connected to a power source and turned on. Check the LED indicator lights to confirm that each camera is receiving power.
2. Test the Video Feed
Access the video feed of each camera through your preferred monitoring device, such as a computer or smartphone. Make sure that you can view live footage from each camera without any issues.
3. Adjust the Field of View
You may need to adjust the field of view for each camera to capture the desired area. Use the camera’s pan, tilt, and zoom features to ensure that the camera covers the designated area effectively.
4. Check the Camera’s Night Vision
If your dome security cameras have night vision capability, test this feature to ensure that it works properly. Verify that the camera can capture clear images even in low light conditions.
5. Configure Motion Detection
Set up motion detection settings for each camera to receive alerts when any movement is detected. Adjust the sensitivity level based on your preferences and the specific requirements of your surveillance setup.
6. Test Remote Access
If you plan to access the camera feed remotely, make sure to test this feature. Install the necessary software or app on your computer or smartphone and ensure that you can view the live footage from your cameras outside of your local network.
7. Evaluate and Fine-Tune
After testing and adjusting the settings, evaluate the overall performance of your dome security cameras. Make any necessary fine-tuning adjustments to optimize their functionality and ensure efficient surveillance.
By following these steps, you can ensure that your dome security cameras are properly installed and adjusted to provide effective surveillance and peace of mind.
FAQ,
What are dome security cameras?
Dome security cameras are cameras that are installed in a dome-shaped housing. They are commonly used in surveillance systems for both indoor and outdoor locations.
Why are dome security cameras popular?
Dome security cameras are popular because they are discreet and less noticeable compared to other types of security cameras. They are also more durable and can withstand harsh weather conditions.
How do I install a dome security camera?
To install a dome security camera, start by choosing a suitable location where you want to mount the camera. Then, secure the camera housing to the desired surface using screws or mounting brackets. Next, connect the camera to a power source and attach it to a compatible recording device or monitor. Finally, adjust the camera’s angle and settings to optimize its performance.
Can I install dome security cameras indoors?
Yes, dome security cameras can be installed indoors. They are commonly used in homes, offices, retail stores, and other indoor environments for surveillance purposes.


