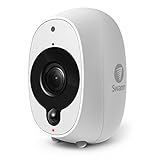
If you are looking to enhance the security of your home or business, installing a Swann Smart Security Camera is a great choice. These state-of-the-art cameras offer advanced features and reliable performance, giving you the peace of mind you deserve. However, the installation process may seem daunting at first. Don’t worry! In this article, we will guide you through the steps to successfully install your Swann Smart Security Camera.
Step 1: Choose the Ideal Location
Before starting the installation process, it’s crucial to determine the best location for your Swann Smart Security Camera. Consider areas that require the most surveillance, such as entrances, driveways, or backyards. Make sure to choose a spot where the camera has a clear view without any obstructions, providing maximum coverage. Additionally, ensure the camera is protected from harsh weather conditions, such as rain or extreme heat.
Step 2: Mount the Camera
Once you have chosen the perfect location, it’s time to install the camera. Start by attaching the mounting bracket to the desired surface using screws and anchors. Ensure that the bracket is securely fastened to prevent any movement or tampering. Next, carefully attach the Swann Smart Security Camera to the mounting bracket, making sure it is level and pointing in the right direction. Use a level and adjust the position if necessary.
Step 3: Connect the Camera
After mounting the camera, you need to connect it to your existing security system or set up a new one. Use the provided cables to connect the camera to a power source. Swann Smart Security Cameras usually have Power over Ethernet (PoE) capability, allowing you to transfer power and data through a single Ethernet cable. If your camera doesn’t support PoE, you may need to use separate power and data cables.
Step 4: Configure the Camera
Once the camera is connected, you will need to configure it to work with your security system. Access the camera’s settings through the Swann security app or web interface. Follow the on-screen instructions to set up the desired features, such as motion detection, night vision, or recording schedules. Make sure to customize the settings according to your specific needs and preferences.
Step 5: Test and Monitor

Finally, it’s time to test your Swann Smart Security Camera and ensure everything is working correctly. Check if the camera captures clear and high-quality footage. Adjust the position or settings if needed. Set up the monitoring system, so you can view the live feed or recorded videos remotely through your smartphone, tablet, or computer.
By following these steps, you will be able to install your Swann Smart Security Camera with ease. Remember to consult the user manual for specific instructions and troubleshoot any issues that may arise. Enjoy the added security and peace of mind that these cameras provide!
Overview of Swann Smart Security Camera
Swann Smart Security Camera is a cutting-edge surveillance system that provides advanced security features for your home or business. With its easy installation process and user-friendly interface, this camera allows you to monitor your property remotely and get instant notifications on your smartphone whenever there is any activity detected.
The Swann Smart Security Camera offers HD video recording with a wide-angle view, enabling you to capture every detail, both day and night. Its built-in motion sensors ensure that you receive accurate alerts only when necessary, reducing false alarms. The camera also has a two-way audio feature, allowing you to communicate with anyone on your premises.
In addition, the Swann Smart Security Camera is equipped with weatherproof housing, making it suitable for both indoor and outdoor use. Its wireless connectivity eliminates the need for messy cables and provides flexibility in camera placement. The camera can be easily mounted on walls or ceilings, ensuring optimal coverage of your property.

To access the camera’s features and settings, simply download the Swann Security app on your smartphone. The app allows you to view live footage, playback recorded videos, customize detection settings, and receive push notifications. You can also connect multiple cameras to create a comprehensive security system.
In conclusion, the Swann Smart Security Camera is a reliable and convenient solution for enhancing the security of your property. Its advanced features, easy installation process, and user-friendly interface make it an ideal choice for both homeowners and businesses. With this camera, you can have peace of mind knowing that your property is protected at all times.
Benefits of Swann Smart Security Camera
The Swann Smart Security Camera offers a range of benefits that make it an ideal choice for home or business surveillance. Here are some of its key advantages:
1. Easy Installation and Setup
The Swann Smart Security Camera is designed for easy installation and setup. With its wireless connectivity, you can quickly connect it to your home or business network without the need for complicated wiring. The camera also comes with a user-friendly interface that guides you through the setup process, making it simple for anyone to install and use.
2. Remote Viewing and Monitoring
One of the main advantages of a Swann Smart Security Camera is the ability to remotely view and monitor your property. Using the Swann Security app on your smartphone or tablet, you can access live video streams from the camera and receive instant notifications when motion is detected. This allows you to keep an eye on your property from anywhere, providing peace of mind and enhancing security.

3. High-Quality Video and Audio
The Swann Smart Security Camera offers high-quality video and audio recordings, ensuring clear and detailed footage. With its advanced sensor technology and HD resolution, you can capture sharp images and videos, even in low-light conditions. The camera also features a built-in microphone and speaker, allowing you to communicate with people in real time, making it useful for home security, childcare, or even checking in on pets.
4. Customizable Security Zones
With the Swann Smart Security Camera, you can customize security zones to focus on specific areas of your property. This allows you to monitor entry points, driveways, or any other location important to you. By setting up alerts and motion detection within these zones, you can ensure that you receive notifications and recordings only for relevant activity, reducing false alarms.
In conclusion, the Swann Smart Security Camera provides an easy-to-install and user-friendly solution for home or business surveillance. With its remote viewing capabilities, high-quality video and audio, and customizable security zones, it offers enhanced security and peace of mind.
Preparation
Before you begin installing your Swann Smart Security Camera, it is important to ensure that you have all the necessary tools and equipment. Here are a few things you will need:
Swann Smart Security Camera
First and foremost, you will need a Swann Smart Security Camera. Make sure you have the camera and all its components ready, including the camera itself, power adapter, Ethernet cable (if applicable), and any mounting hardware.

Internet Connection
In order to use the Swann Smart Security Camera, you will need a stable internet connection. Make sure your Wi-Fi network is working properly and that you have the network name (SSID) and password available.
Mobile Device
You will also need a mobile device to complete the installation process. Ensure that your device is compatible with the SwannSmart app, which can be downloaded from the App Store or Google Play Store.
Additionally, make sure your device is charged and has enough storage space for the app and any future recordings or updates.
Choosing the Right Location for Installation
When installing your Swann smart security camera, it’s important to choose the right location to ensure optimal coverage and functionality. Here are some factors to consider when selecting the installation spot:
1. Line of sight: Make sure the camera has a clear line of sight to the area you want to monitor. Avoid obstructions such as walls, trees, or large objects that may block the camera’s field of view.

2. Height and angle: Mount the camera at a height and angle that provides the best view of the area. Consider the camera’s field of view and adjust the tilt and pan to cover the desired area effectively.
3. Accessibility: Choose a location that allows easy access to the camera for maintenance or adjustments if needed. Avoid placing the camera too high or in hard-to-reach areas that may hinder maintenance tasks.
4. Lighting conditions: Take into account the lighting conditions of the area you want to monitor. Some cameras perform better in low light conditions, while others may require additional lighting. Consider the camera’s specifications and select an installation spot that matches its capabilities.
5. Power source: Ensure that the chosen location has a nearby power source for the camera’s power adapter or PoE (Power over Ethernet) connection if applicable. This will eliminate the need for long power cables or extensions.
By carefully selecting the right location for your Swann smart security camera, you can ensure effective surveillance and peace of mind. Remember to test the camera’s coverage and functionality before finalizing the installation.

Gathering the Necessary Tools
Before you begin the installation process for your Swann smart security camera, it’s essential to gather all the necessary tools and equipment to ensure a smooth and successful setup. Here are the tools you will need:
1. Swann smart security camera
Make sure you have purchased the Swann smart security camera that you want to install. Ensure it is compatible with your home network and meets your specific security needs.
2. Power adapter and cable
The camera will require a power source to function. Check the package to locate the power adapter and cable included. Make sure the cable is long enough to reach the power outlet nearest to where you want to install the camera.
3. Ethernet cable (optional)
If you prefer a stable wired internet connection, you may need an Ethernet cable to connect the camera directly to your router. This is an optional step as the camera can also connect wirelessly.
4. Smartphone or tablet
You will need a smartphone or tablet with the Swann companion app installed. Ensure the app is compatible with your device’s operating system (iOS or Android).
5. Wi-Fi network information
To connect the camera to your home network, you will need the Wi-Fi network name (SSID) and password. Make sure you have this information readily available.
Having these tools and information at hand will make the installation process smoother and more efficient. Now that you have gathered all the necessary tools, you are ready to move on to the next step: Setting up the Swann smart security camera.
Installation Steps
Follow these steps to install your Swann Smart Security Camera:
Step 1: Choose a suitable location
Select a location for your camera that provides a clear view of the desired area. Ensure that the camera is within Wi-Fi range and is protected from rain or direct sunlight.
Step 2: Mount the camera
Use the provided mounting bracket to securely attach the camera to a wall or ceiling. Make sure it is positioned at the desired angle for optimal coverage.
Step 3: Connect the camera to power
Plug the power adapter into an outlet and connect the other end to the camera. Ensure a stable power supply for uninterrupted surveillance.
Step 4: Download the Swann Security app
Visit the App Store (for iOS) or Google Play Store (for Android) and search for the Swann Security app. Download and install the app on your smartphone or tablet.
Step 5: Create a Swann account
Launch the Swann Security app and create a new account. Follow the registration process and ensure a strong password for security purposes.
Step 6: Connect the camera to the app
Open the Swann Security app and tap on the “+” symbol to add a device. Follow the on-screen instructions to connect your camera to the app via Wi-Fi connection.
Step 7: Configure camera settings
Once the camera is successfully connected, configure the camera settings as per your preferences. This may include adjusting motion detection sensitivity, setting up alerts, and enabling night vision.
Step 8: Test the camera
After configuring the settings, test the camera by viewing the live feed on the Swann Security app. Ensure that the camera provides the desired coverage and the video quality is satisfactory.
Congratulations! You have successfully installed your Swann Smart Security Camera. You can now monitor your desired area using the Swann Security app anytime, anywhere.
Mounting the Camera
Before proceeding with the installation of your Swann smart security camera, it is essential to choose the right location for mounting it. Here are the steps to mount the camera securely:
Step 1: Selecting the Mounting Location
To ensure optimal surveillance coverage, choose a location that provides a clear line of sight to the area you want to monitor. Consider factors such as the camera’s field of view, potential obstructions, and the height of the camera placement. Additionally, ensure that the mounting surface is sturdy enough to support the camera.
Step 2: Adjusting the Camera Angle
Once you have selected the mounting location, adjust the camera angle to achieve the desired viewing angle. Swann smart security cameras typically offer adjustable brackets or mounting plates that make it easy to position the camera at the desired angle.
Note: It is recommended to slightly tilt the camera downwards to prevent rain or other debris from obstructing the lens.
Step 3: Mounting the Camera
Using the appropriate mounting hardware provided with the camera, securely attach the camera to the chosen location. Make sure to follow the manufacturer’s instructions for proper installation.
Note: If you are mounting the camera outdoors, it is important to choose a weather-resistant enclosure or housing to protect the camera from the elements.
By following these steps, you can ensure that your Swann smart security camera is securely mounted and positioned for effective surveillance. Once the camera is mounted, you can proceed with the installation process to connect it to your network and configure the necessary settings for remote access and monitoring.
Connecting the Camera to Power
Before you begin the installation process, ensure that you have the necessary power source near the location where you want to install the Swann smart security camera.
To connect the camera to power, follow these steps:
- Locate the power adapter that came with the camera.
- Connect the power adapter to the camera’s power input port. Make sure it is firmly connected.
- Plug the other end of the power adapter into a nearby power outlet.
- Check that the camera’s power indicator light is illuminated or blinking, indicating that it is receiving power.
If the power indicator light does not turn on, double-check that the power adapter is securely connected and the power outlet is functioning properly.
It is essential to connect the camera to a continuous power source to ensure uninterrupted surveillance. You may choose to use an uninterruptible power supply (UPS) or battery backup system to prevent power outages from affecting your camera’s functionality.
Once you have successfully connected the camera to power, you can proceed with the next steps in the installation process, such as connecting it to your Wi-Fi network and setting it up using the Swann mobile app.
Setting Up the Camera’s Wi-Fi Connection
Before you can start using your Swann Smart Security Camera, you need to set up its Wi-Fi connection. Here are the steps:
1. Power on the camera by plugging it into a power source.
2. Download and install the Swann Security app on your smartphone or tablet. The app is available for both iOS and Android devices.
3. Open the app and create an account if you don’t already have one. Sign in to your account.
4. Tap on the “+” icon to add a new device.
5. Choose “Add Wi-Fi Camera” from the list of available options.
6. Follow the on-screen instructions to connect the camera to your Wi-Fi network. Make sure your smartphone or tablet is connected to the same Wi-Fi network.
7. Once the camera is connected to the Wi-Fi network, you can choose a name for the camera and customize its settings.
8. Test the camera by viewing the live feed on your smartphone or tablet. Make sure everything is working properly.
That’s it! You have successfully set up the Wi-Fi connection for your Swann Smart Security Camera. Now you can enjoy the benefits of remote viewing and monitoring.
FAQ,
What do I need to install Swann smart security camera?
To install Swann smart security camera, you will need the camera itself, a power source, a stable Wi-Fi network, and a smartphone or tablet with the Swann app installed.
Is it difficult to install Swann smart security camera?
No, installing Swann smart security camera is quite easy and can be done by following the step-by-step instructions provided with the camera or in the Swann app. It usually involves connecting the camera to a power source, connecting it to your Wi-Fi network, and setting it up in the app.
How do I connect Swann smart security camera to power?
Swann smart security cameras can be powered using a power adapter that comes with the camera. Simply plug the power adapter into a nearby power outlet and connect it to the camera.
Can I install Swann smart security camera outdoors?
Yes, Swann smart security cameras are designed to be used both indoors and outdoors. They are weatherproof and can withstand various weather conditions.
What features does the Swann app offer for the smart security camera?
The Swann app offers a range of features for the smart security camera, including live streaming, two-way audio, motion detection alerts, cloud storage for video recordings, and remote access to the camera from anywhere using your smartphone or tablet.