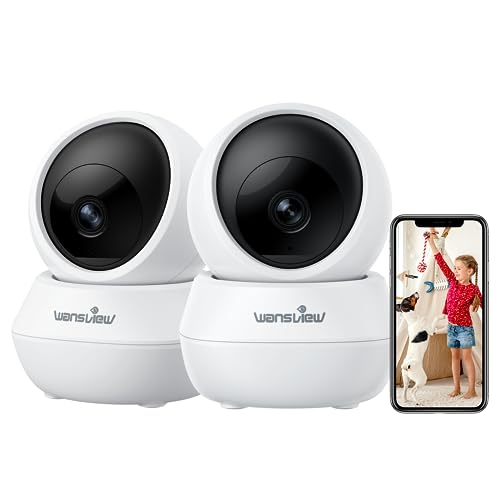
Are you looking for a discreet and convenient way to monitor your home or office? A bulb-like security camera might be the solution you’ve been searching for. With its inconspicuous design, it blends seamlessly into any environment while offering top-notch surveillance capabilities. In this article, we’ll guide you through the step-by-step process of installing Wi-Fi in a bulb-like security camera, allowing you to monitor your space remotely.
Step 1: Choosing the right bulb camera
Before you start the installation process, it’s crucial to select the right bulb camera for your needs. Look for a model that offers high-definition video quality, wide-angle lens, night vision capabilities, and motion detection features. Additionally, make sure it supports Wi-Fi connectivity, as this will be essential for remote monitoring.
Note: It’s recommended to purchase a bulb camera from reputable brands to ensure reliability and quality.

Step 2: Preparing for installation
Prior to installation, gather the necessary tools such as a ladder, power drill, screwdriver, and a Wi-Fi-enabled device like a smartphone or tablet. Locate a suitable spot for your bulb camera, ideally near a power source and with a clear view of the area you wish to monitor.
Caution: Ensure that the power source is turned off before beginning the installation process to avoid any electrical accidents.
Step 3: Installing the bulb camera
Now it’s time to install the bulb camera. Follow the manufacturer’s instructions to securely attach the camera to the chosen location. Typically, this involves screwing the base of the bulb camera into place. Ensure the camera is stable and positioned correctly to capture the desired angle.
Pro tip: Consider using a camera mount or bracket for added stability and adjustability.
Step 4: Connecting to Wi-Fi
To enable remote monitoring, connect your bulb camera to a Wi-Fi network. Most bulb cameras have a dedicated mobile app that guides you through the setup process. Download the app onto your smartphone or tablet, create an account, and follow the on-screen instructions to connect the camera to your Wi-Fi network.
Note: Make sure your Wi-Fi signal is strong in the area where the bulb camera is installed for optimal performance.
Step 5: Testing and adjusting settings

Once the Wi-Fi connection is established, test your bulb camera to ensure it’s functioning properly. Use the mobile app to view the live feed, adjust settings such as video quality and motion sensitivity, and familiarize yourself with the camera’s features and functions.
Now that you’ve successfully installed Wi-Fi in your bulb-like security camera, you can enjoy the peace of mind that comes with remote monitoring. Keep in mind that regular maintenance, such as cleaning the camera lens and updating the firmware, will help maintain its performance over time. Stay vigilant and keep an eye on your space effortlessly with your new Wi-Fi-enabled bulb camera!
Step-by-Step Guide: Installing Wifi in a Bulb-Like Security Camera
Installing Wifi in a bulb-like security camera might seem like a complex task, but with the right guide, it can become a straightforward process. This step-by-step guide will provide you with the necessary instructions to successfully install Wifi in a bulb-like security camera.
| Step | Instructions |
|---|---|
| Step 1 | Choose a suitable location for your bulb-like security camera. Make sure it is within the range of your WiFi network. |
| Step 2 | Remove the existing bulb from the socket and replace it with the bulb-like security camera. Ensure that it fits securely and is properly connected to the socket. |
| Step 3 | Switch on the power supply to the socket. The bulb-like security camera should now start receiving power. |
| Step 4 | Download the manufacturer’s mobile app for the bulb-like security camera on your smartphone. |
| Step 5 | Launch the mobile app and create an account if required. Log in to the app using your credentials. |
| Step 6 | In the app, go to the WiFi settings and select the option to add a new device. |
| Step 7 | Follow the on-screen instructions in the app to connect the bulb-like security camera to your WiFi network. This usually involves selecting your WiFi network name and entering the password. |
| Step 8 | Wait for the bulb-like security camera to establish a connection with your WiFi network. This may take a few minutes. |
| Step 9 | Once the connection is established, you can view the live feed from the bulb-like security camera through the mobile app on your smartphone. |
| Step 10 | Configure any additional settings or features available in the mobile app according to your preferences. |
| Step 11 | Congratulations! You have successfully installed WiFi in a bulb-like security camera. Enjoy monitoring your space with this innovative device. |
Following these steps will ensure a seamless installation process for your WiFi-enabled bulb-like security camera. Always refer to the manufacturer’s instructions for specific details related to your device.
Planning Your Installation
Before installing wifi in a bulb like security camera, it is important to plan out your installation to ensure smooth and effective implementation. Here are some key points to consider:

|
1. Determine your camera’s location: Identify the optimal location for your security camera. Consider factors such as desired viewing angle, coverage area, and accessibility for maintenance. |
2. Check wifi signal strength: Ensure that your chosen installation location has a strong and stable wifi signal. Weak signals may result in poor video quality or loss of connection. |
|
3. Power source: Determine the power source for your security camera. It can be wired to a nearby electrical outlet or powered by a battery, depending on your preferences and availability. |
4. Network compatibility: Check if your wifi network is compatible with the security camera. Ensure that you have the necessary credentials and access to configure the camera to connect to your network. |
|
5. Security considerations: Take into account any potential security risks associated with your installation. Consider using strong passwords, enabling encryption, and regularly updating firmware to protect your camera and network. |
6. Plan for data storage: Decide how you will store the recorded footage from your security camera. Options include cloud storage, an onboard SD card, or a dedicated hard drive connected to your network. |


By carefully planning your wifi installation in a bulb like security camera, you can ensure that it meets your specific needs and operates seamlessly to enhance your home or business security.
Choosing the Right Bulb-Like Security Camera
When it comes to installing a wifi-enabled security camera in a bulb-like design, it’s essential to choose the right one that meets your specific needs. Here are a few factors to consider when selecting a bulb-like security camera:
1. Camera Resolution: The resolution of the camera determines the clarity of the footage. Look for a camera that offers high-resolution video, such as 1080p or even 4K, to ensure crisp and detailed images.
2. Field of View: The field of view refers to the width of the area that the camera can capture. Consider the size of the room or space you want to monitor and choose a camera with a wide enough field of view to cover the entire area effectively.
3. Night Vision: If you want your security camera to provide surveillance during the night, ensure it has good night vision capabilities. Look for cameras equipped with infrared LEDs or other technologies that allow clear recording even in low-light conditions.
4. Two-Way Audio: Some bulb-like security cameras come with built-in two-way audio capability, allowing you to communicate with people on the other end. This feature can be useful for monitoring or even talking to family members or pets when you’re not at home.
5. Smart Home Integration: If you already have a smart home setup or plan to build one, choose a security camera that is compatible with your existing devices. This way, you can easily control and monitor your camera through your smart home system.
6. Mobile App: Look for cameras that offer a dedicated mobile app for easy control and monitoring. A well-designed and user-friendly app can make a significant difference in managing your security camera on the go.

7. Storage Options: Consider the storage options available for your security camera footage. Some cameras offer cloud storage, while others support local storage via SD cards or other means. Choose the one that suits your preferences and budget.
8. Installation Process: Finally, ensure that the installation process is straightforward and user-friendly. Look for cameras that come with clear instructions and all the necessary accessories for easy setup.
By taking these factors into consideration, you can choose the right bulb-like security camera that fits your requirements and provides reliable remote surveillance for your home or office.
Preparing Your Wifi Network
Before installing a wifi-enabled security camera in a lightbulb, there are a few steps you need to take to ensure your wifi network is ready to connect the camera:
1. Check your wifi signal strength:
Make sure the area where you plan to install the camera has a strong wifi signal. You can use a wifi analyzer app to test the signal strength in different locations. If the signal is weak, consider installing a wifi signal booster or moving your router closer to the camera’s location.
2. Secure your wifi network:
Protect your wifi network with a strong password to prevent unauthorized access. Use a combination of uppercase and lowercase letters, numbers, and special characters to create a secure password. Avoid using common words or personal information that could be easily guessed. Enable WPA2 encryption for added security.
3. Assign a static IP address:
While many security cameras have a dynamic IP address, it’s a good idea to assign a static IP address to your camera. This will ensure that the camera always has the same IP address, making it easier to connect and access remotely. Consult your camera’s user manual or manufacturer’s website for instructions on how to assign a static IP address.

4. Check for firmware updates:
Before installing the camera, check for any available firmware updates for both the camera and your router. Updating the firmware can improve performance, fix bugs, and enhance security. Refer to the camera’s user manual or the manufacturer’s website for instructions on how to update the firmware.
By following these steps, you will ensure that your wifi network is ready to connect and support a wifi-enabled security camera in a lightbulb. This will provide you with a reliable and secure surveillance solution for your home or business.
Connecting Your Security Camera to Power
Before you can install Wi-Fi in a security camera, you need to make sure it has a reliable power source. Here are the steps to connect your security camera to power:
Step 1: Find an appropriate power outlet
Locate a power outlet near the area where you want to install your security camera. Make sure it is easily accessible and within reach of the camera’s power cord.
Step 2: Check the camera’s power requirements
Refer to the user manual or specifications of your security camera to determine its power requirements. This will help you ensure that the power outlet can provide enough voltage and current to power the camera.
Step 3: Use a compatible power adapter
If the camera does not come with a power adapter, you will need to purchase one separately. Make sure the power adapter is compatible with your camera’s power requirements. It should match the voltage and current specifications mentioned in the user manual.
Step 4: Connect the power adapter
Plug the power adapter into the power outlet and connect the other end to your security camera. Make sure the connection is secure and the power cord is properly inserted.
Step 5: Test the power connection
Turn on the power outlet and check if the camera receives power. Look for any indicator lights or signs that indicate the camera is successfully connected to power.
Following these steps will ensure that your security camera has a reliable power supply, allowing you to proceed with the installation of Wi-Fi for remote monitoring and surveillance.
Setting Up the Wifi Connection
Before installing wifi in a bulb-like security camera, you need to make sure that your wifi network is set up and ready to connect the camera. Follow these steps to set up the wifi connection:
-
Ensure that the security camera is within range of your wifi network. The camera should ideally be placed in a location with a strong wifi signal.
-
Power on the security camera and wait for it to start up. Most cameras have indicator lights that indicate when they are ready to connect.
-
Access the camera’s settings or control panel. This can usually be done by downloading the camera’s companion app or accessing its web-based interface through a web browser.
-
In the camera’s settings, navigate to the wifi or network settings section.
-
From the list of available networks, select your wifi network.
-
If required, enter your wifi network’s password. Ensure that you enter it correctly, as wifi passwords are case-sensitive.
-
Wait for the camera to establish a connection with your wifi network. This may take a few moments.
-
Once the camera is connected to your wifi network, you can adjust additional settings or proceed with the installation process, depending on the specific camera model.
Following these steps will enable your bulb-like security camera to connect to your wifi network, allowing you to access its live feed and recorded footage remotely through your smartphone or computer.
Configuring Security Camera Settings
Once you have successfully installed the WiFi in your bulb like security camera, the next step is to configure its settings to ensure optimal performance and functionality. Here are some steps to guide you through the process:
1. Connect to the Camera
Open the security camera’s mobile app and connect to the camera through WiFi using your smartphone or tablet. Make sure your device is connected to the same WiFi network as the camera.
2. Access Camera Settings
Navigate to the settings section within the app to access the camera’s configuration options. This may be located under a menu or icon that resembles a gear or a wrench.
3. Set Up WiFi Connection
Within the camera settings, look for an option to configure the WiFi connection. This could be labeled as “WiFi settings” or “Network settings.” Select this option to proceed.
4. Scan for Networks
The camera will now scan for available WiFi networks in its range. Wait for the scan to complete, and a list of networks should appear on the screen.
5. Select the Desired Network
From the list of networks, select the WiFi network you want to connect the camera to. Make sure it is your home or office network with a strong and stable connection.
6. Enter WiFi Credentials
Once you have selected the network, you will need to enter the WiFi credentials, including the network name (SSID) and password. Carefully input the details and double-check for any errors.
7. Save the Settings
After entering the WiFi credentials, save the settings by selecting the “Save” or “Apply” button. The camera will now attempt to connect to the WiFi network.
8. Wait for Connection
Give the camera a few moments to establish a connection with the WiFi network. The camera’s status light or indicator should change to indicate a successful connection.
9. Test the Connection
Once the camera is connected to the WiFi network, test the connection by accessing the camera’s live feed or other features through the mobile app. Ensure that everything is working properly.
10. Adjust Additional Settings
Depending on the camera model and app, you may have additional settings to customize, such as motion detection sensitivity, recording options, or notification preferences. Take the time to explore these settings and adjust them as desired.
By following these steps, you can configure the settings of your WiFi-enabled security camera in a bulb shape, ensuring it is connected to your desired network and functioning as intended.
Testing Your Wifi Connection
Before installing a wifi bulb as a security camera, it is important to test your wifi connection to ensure it is strong enough to support the camera’s needs. Testing your wifi connection will help determine if there are any connectivity issues that need to be addressed before proceeding with the installation.
| 1. Position the wifi bulb near your wifi router. |
| 2. Connect your smartphone or computer to the wifi network you wish to test. |
| 3. Open a web browser on your device and search for a wifi speed test. |
| 4. Choose a recommended speed test website and click on it. |
| 5. Begin the speed test, which will measure your wifi network’s download and upload speeds. |
| 6. Wait for the speed test to complete and take note of the results. |
| 7. Compare the download and upload speeds to the minimum requirements of the wifi bulb’s manufacturer. |
| 8. If the speeds meet the minimum requirements, your wifi connection should be sufficient for installing the wifi bulb as a security camera. |
| 9. If the speeds are below the minimum requirements, consider upgrading your internet package or using a wifi extender to boost your wifi signal. |
By testing your wifi connection, you can ensure that your wifi bulb security camera will have a reliable and strong connection for optimal performance. Take the necessary steps to address any connectivity issues before proceeding with the installation.
Troubleshooting Wifi Connection Issues
When setting up a WiFi connection for a security camera installed in a bulb, you may encounter some common issues that can affect the connection. Here are some troubleshooting steps to help you resolve these problems:
1. Check your WiFi signal strength
The first thing you should do is to check the signal strength of your WiFi network in the area where the security camera is installed. Weak WiFi signals can cause connectivity issues. You can use a WiFi analyzer app or check your router’s built-in signal strength indicator to determine the signal strength. If the signal is weak, consider moving the router closer to the camera or using a WiFi extender.
2. Ensure correct WiFi credentials
Double-check that you have entered the correct WiFi network name (SSID) and password. Incorrect credentials can prevent the camera from connecting to your WiFi network. If you are unsure about the credentials, you can check them on your router or contact your internet service provider for assistance.
3. Reboot your WiFi router
Sometimes, simply rebooting your WiFi router can resolve connection issues. Power off your WiFi router, wait for about 30 seconds, and then power it back on. This can refresh the connection and solve any temporary problems that may be affecting the camera’s connectivity.
4. Check for conflicting devices
Other devices that use the same frequency as your WiFi network, such as cordless phones, microwave ovens, or baby monitors, can interfere with the WiFi signal. Make sure there are no such devices near your camera or router. If there are, try moving them or switching to a different WiFi channel to minimize interference.
5. Update firmware
Check if there are any firmware updates available for your security camera or router. Outdated firmware can cause compatibility issues and impact the camera’s ability to connect to the WiFi network. Visit the manufacturer’s website or refer to the user manual to find instructions for updating your camera or router’s firmware.
6. Reset camera settings
If none of the above steps work, you can try resetting the camera to its factory settings. This will remove any previous configuration and allow you to start the setup process from scratch. Refer to the camera’s user manual for instructions on how to reset the device.
By following these troubleshooting steps, you should be able to pinpoint and resolve any WiFi connection issues with your security camera installed in a bulb. If the problem persists, you may need to contact the manufacturer’s support team for further assistance.
FAQ,
Can I install Wi-Fi in a bulb for use as a security camera?
Yes, you can install Wi-Fi in a bulb to use it as a security camera. There are several smart bulbs available on the market that come with built-in Wi-Fi capabilities, allowing you to connect them to your home network and access the camera feed remotely through a smartphone app or a computer.
How can I install Wi-Fi in a regular bulb to turn it into a security camera?
To install Wi-Fi in a regular bulb and turn it into a security camera, you will need to use a Wi-Fi-enabled micro camera module that can fit inside the bulb. You will also need to make sure that the micro camera module can be powered by the existing electrical connections in the bulb. Once you have the necessary components, you can follow the manufacturer’s instructions to install the camera module and configure it to connect to your Wi-Fi network.
Are there any special requirements for installing Wi-Fi in a bulb as a security camera?
There are no special requirements for installing Wi-Fi in a bulb to use it as a security camera, but you will need to make sure that the bulb has a socket that can accommodate the micro camera module and that the electrical connections can power the camera module. Additionally, you will need to have a Wi-Fi network set up in your home to connect the camera to and access it remotely.
What are the advantages of using a Wi-Fi-enabled bulb as a security camera?
Using a Wi-Fi-enabled bulb as a security camera offers several advantages. First, it eliminates the need for additional wiring or power sources, as the camera can be powered directly from the existing electrical connections in the bulb. Second, it allows for remote access to the camera feed, so you can monitor your space from anywhere using a smartphone or computer. Lastly, a Wi-Fi-enabled bulb can blend in seamlessly with your existing lighting fixtures, making it less obvious that you have a security camera installed.