
Live streaming has become an increasingly popular way to connect with audiences, share experiences, and showcase talent. And with the rise of mirrorless cameras, it has never been easier to create high-quality live streams right from the comfort of your own home. Whether you’re a content creator, a gamer, or just someone looking to share your passions with the world, this article will guide you through the process of live streaming with a mirrorless camera.
One of the key advantages of using a mirrorless camera for live streaming is its superior image quality. Mirrorless cameras are equipped with large image sensors that capture more light and detail compared to traditional cameras. This means that your live stream will benefit from sharper images, vibrant colors, and better low-light performance. With a mirrorless camera, you can ensure that your viewers are getting the best possible visual experience.
In addition to image quality, another benefit of using a mirrorless camera for live streaming is its versatility. Most mirrorless cameras offer a wide range of features and settings that allow you to customize your live stream to suit your needs. You can adjust the aperture, shutter speed, ISO, and white balance to achieve the desired look and feel for your live stream. Furthermore, many mirrorless cameras come with built-in Wi-Fi or Bluetooth, which makes it easy to connect and stream directly to popular platforms like YouTube or Twitch.
However, before you start live streaming with your mirrorless camera, there are a few things you need to consider. Firstly, you will need a stable internet connection to ensure a smooth and uninterrupted live stream. Additionally, you may want to invest in a tripod or a camera mount to keep your camera steady during the stream. Lastly, it’s important to think about your audio setup. While mirrorless cameras have built-in microphones, they may not always offer the best audio quality. Consider investing in an external microphone or a dedicated audio setup to enhance the sound quality of your live stream.
Now that you’re aware of the benefits and considerations of live streaming with a mirrorless camera, it’s time to dive into the details. In this article, we will explore the step-by-step process of setting up your mirrorless camera for live streaming, the recommended settings, and some tips and tricks to make your live stream stand out. Whether you’re a novice or an experienced live streamer, this guide will help you take your live streaming game to the next level with a mirrorless camera.

Choosing the Right Mirrorless Camera for Live Streaming
Live streaming has become increasingly popular in recent years, and many content creators are turning to mirrorless cameras for their live broadcasts. These cameras offer several advantages over traditional DSLRs, including compact size, high-quality video capabilities, and the ability to change lenses.
When choosing a mirrorless camera for live streaming, there are several factors to consider. One of the most important is video quality. Look for a camera that can shoot in at least 1080p resolution, and preferably in 4K if your budget allows. Higher resolution video will provide a sharper and more professional-looking stream.
Another important factor is low-light performance. When live streaming, you may not always have perfect lighting conditions, so it’s crucial to choose a camera that can handle low-light situations well. Look for cameras with large image sensors and a wide ISO range for better performance in low-light environments.
The autofocus system is also crucial for live streaming. You want a camera that can quickly and accurately focus on the subject, especially if you’re moving around or have multiple subjects on screen. Look for cameras with advanced autofocus features, such as face and eye detection, as these can greatly improve the quality of your streams.
Connectivity options are another key consideration. You’ll need a camera that can easily connect to your computer or streaming platform. Look for cameras with HDMI or USB ports that allow for a direct connection. Wi-Fi and Bluetooth capabilities can also be useful for wireless streaming or remote control of your camera.

Finally, consider the overall usability of the camera. Look for features like a flip-out screen, which can be helpful for framing your shots while streaming. A lightweight and compact design can also make it easier to handle and transport your camera for streaming on the go.
| Camera | Video Resolution | Low-Light Performance | Autofocus Features | Connectivity Options | Usability |
|---|---|---|---|---|---|
| Sony Alpha a7 III | 4K | Excellent | Advanced | HDMI, USB | Flip-out screen, lightweight |
| Fujifilm X-T4 | 4K | Good | Advanced | HDMI, USB | Flip-out screen, compact |
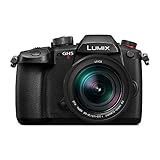
| Panasonic Lumix GH5 | 4K | Excellent | Advanced | HDMI, USB | Flip-out screen, lightweight |
In conclusion, when choosing a mirrorless camera for live streaming, consider factors such as video quality, low-light performance, autofocus features, connectivity options, and usability. By carefully evaluating these factors and researching the available options, you can find a camera that suits your needs and helps you create high-quality live streams.
Essential Equipment for Live Streaming with a Mirrorless Camera
Live streaming with a mirrorless camera requires more than just the camera itself. To ensure a smooth and professional-looking live stream, there are a few essential pieces of equipment that you will need:
1. Mirrorless Camera: The first and obvious piece of equipment you will need is a mirrorless camera. Mirrorless cameras are becoming increasingly popular among content creators due to their compact size, versatility, and high image quality. Look for a camera that has good low-light performance and can record in high-definition or even 4K resolution for optimal results.
2. Tripod or Gimbal Stabilizer: Keeping your camera steady during a live stream is crucial for maintaining a professional look. A tripod or a gimbal stabilizer will help you achieve stable shots and prevent shaky footage. Choose a tripod or gimbal that is compatible with your camera’s weight and size.

3. External Microphone: While mirrorless cameras generally have decent built-in microphones, an external microphone will greatly improve the audio quality of your live stream. Look for a microphone that can capture clear and crisp sound, such as a shotgun or lavalier microphone, and make sure it can be connected to your camera’s microphone input.
4. Lighting Equipment: Good lighting is essential for a high-quality live stream. Consider investing in lighting equipment, such as LED panels or softboxes, to ensure that your face is well-lit and shadows are minimized. This will make your live stream more visually appealing and enhance the overall quality of your video.
5. Capture Card or Video Encoder: To transmit the video signal from your mirrorless camera to your computer or streaming platform, you will need a capture card or a video encoder. These devices convert the camera’s HDMI output into a format that can be easily streamed over the internet.
6. High-Speed Internet Connection: A stable and high-speed internet connection is crucial for a smooth and uninterrupted live stream. Make sure you have a reliable internet service provider and consider using an Ethernet connection instead of Wi-Fi for a more reliable and consistent internet connection.
7. Streaming Software or Platform: Finally, to actually stream your live video, you will need streaming software or a streaming platform. There are many options available, such as OBS Studio, Streamlabs OBS, or popular social media platforms like YouTube Live or Twitch. Familiarize yourself with the chosen software or platform and set up your stream before going live.

Setting Up Your Mirrorless Camera for Live Streaming
If you have a mirrorless camera and want to share your live video content with the world, you are in luck. Mirrorless cameras are great options for live streaming due to their high-quality image sensors and their ability to change lenses. In this guide, we will walk you through the steps to set up your mirrorless camera for live streaming.
Step 1: Choose the Right Camera
Before you start live streaming, it is essential to ensure that your mirrorless camera supports this feature. Check the camera’s specifications or consult the manufacturer’s website to confirm if the camera has built-in live streaming capabilities. If not, you may need to purchase an external capture card or HDMI encoder to connect your camera to your computer for live streaming.
Step 2: Connect Your Camera to Your Computer
To live stream with your mirrorless camera, you need to connect it to your computer. Depending on your camera and computer, you have various options for connectivity, such as using USB, HDMI, or Wi-Fi. Refer to your camera’s manual or the manufacturer’s website for detailed instructions on how to establish a connection.
Step 3: Choose a Live Streaming Platform
Once your camera is connected to your computer, you need to choose a live streaming platform to broadcast your content. There are several popular options available, such as YouTube Live, Facebook Live, Twitch, and Instagram Live. Research these platforms to determine which one best fits your needs and follow their instructions for setting up your live stream.
Step 4: Adjust Camera Settings
Before you start your live stream, you should adjust the settings on your mirrorless camera to optimize the image quality and ensure the best performance. Set the correct exposure, white balance, and focus settings to capture clear and well-balanced footage. Experiment with different settings to find the ideal configuration for your live stream.
Step 5: Test Your Setup
Before going live, it is crucial to test your setup to avoid any technical difficulties during your live stream. Check the audio and video quality, as well as the internet connection speed. Run a few test streams on your chosen live streaming platform to make sure everything is working smoothly.
Step 6: Engage with Your Audience
Once you are live streaming, remember to engage with your audience. Respond to comments and questions in real-time, and make your live stream interactive and exciting. Take advantage of the features provided by the live streaming platform, such as polls and chat, to interact with your viewers.
| Step | Description |
|---|---|
| Step 1 | Choose the Right Camera |
| Step 2 | Connect Your Camera to Your Computer |
| Step 3 | Choose a Live Streaming Platform |
| Step 4 | Adjust Camera Settings |
| Step 5 | Test Your Setup |
| Step 6 | Engage with Your Audience |
Selecting the Ideal Lighting Setup for Live Streaming
When it comes to live streaming with a mirrorless camera, having the right lighting setup is crucial. The right lighting can greatly enhance the quality of your stream, making it more engaging and professional-looking. Here are some tips for selecting the ideal lighting setup for your live stream:
1. Natural light: One of the simplest and most cost-effective ways to light your live stream is by utilizing natural light. Position yourself near a window or any other natural light source to take advantage of this soft and flattering light. However, keep in mind that natural light can change throughout the day, so you might need to adjust your setup accordingly.

2. Ring light: A ring light is a popular choice among live streamers because it provides even and diffused lighting. This type of light is shaped like a ring with LED bulbs around the circumference, which helps to diminish any harsh shadows on your face. It can be easily mounted on a tripod or attached to your camera.
3. Softbox lights: Softbox lights are larger, rectangular light sources that produce a softer and more flattering light. They typically come with a diffuser that helps to scatter the light, minimizing harsh shadows. Softbox lights are commonly used in professional photography and videography setups and can be a great option for live streaming as well.
4. LED panel lights: LED panel lights are versatile and portable lighting options that you can adjust according to your specific needs. They come with adjustable brightness and color temperature, allowing you to create your desired lighting effect. LED panel lights are often used by vloggers and live streamers due to their flexibility and ease of use.
5. Backlighting: Adding a backlight can help to create depth and separation between you and the background, making your live stream more visually appealing. You can use a separate light source behind you to achieve this effect.
Ultimately, the ideal lighting setup for your live stream will depend on your specific requirements and budget. Experiment with different lighting options and find what works best for you. Remember, good lighting can significantly improve the overall quality of your live stream, so it’s worth investing time and effort into getting it right.
Optimizing Audio Quality for Mirrorless Camera Live Streams
When live streaming with a mirrorless camera, it’s important to ensure that the audio quality is optimized for the best viewer experience. Here are some tips to help you achieve great audio quality:
- Use an external microphone: While the built-in microphones on mirrorless cameras can capture sound, they often pick up a lot of background noise and lack the clarity of dedicated external microphones. Investing in a good quality external microphone will significantly improve the audio quality of your live stream.
- Position the microphone properly: Make sure the microphone is placed close to the sound source to reduce picking up unwanted noise. If you’re recording yourself, consider using a lapel or shotgun microphone for clearer audio.
- Adjust audio settings: Check and adjust the audio settings on your camera to ensure they are optimized for live streaming. You may need to adjust the volume levels, gain, or other audio settings to achieve the best sound quality.
- Monitor audio levels: Keep an eye on the audio levels during your live stream. Use headphones to monitor the audio and make sure it’s not too loud or too quiet. Adjust the levels if necessary to maintain a balanced and pleasant sound.
- Reduce background noise: Take steps to minimize background noise during your live stream. Choose a quiet environment for recording and consider using noise reduction tools or software to further enhance the audio quality.
- Consider using an audio mixer: If you have multiple audio sources, such as multiple microphones or instruments, using an audio mixer can help you balance and control the audio levels more effectively. This can result in a more professional and polished live stream.
- Edit and enhance audio in post-production: After your live stream, you can further improve the audio quality by editing and enhancing the audio in post-production. Use audio editing software to remove any remaining background noise, adjust levels, or add effects that can enhance the sound quality.
By following these tips, you can optimize the audio quality for your mirrorless camera live streams and provide an immersive and enjoyable experience for your viewers.
Configuring Live Streaming Software with Your Mirrorless Camera
When it comes to live streaming with a mirrorless camera, the right software is essential for a smooth and professional experience. Here are some steps to help you configure your live streaming software with your mirrorless camera:
1. Choose the Right Software
First, you need to choose the right live streaming software for your needs. There are several options available, both free and paid. Some popular choices include OBS Studio, Streamlabs OBS, and XSplit. Research each option and choose the one that best suits your requirements.
2. Install the Software
Once you have chosen your live streaming software, download and install it on your computer. Make sure to follow the installation instructions provided by the software developer.
3. Connect Your Camera
Next, connect your mirrorless camera to your computer using a USB cable. Ensure that your camera is turned on and set to the appropriate mode for live streaming. Refer to your camera’s manual if you are unsure how to do this.
4. Configure Video and Audio Settings
Open your live streaming software and navigate to the settings or preferences menu. Look for the video and audio settings section and select your mirrorless camera as the video input device. You may also need to adjust the video resolution and frame rate according to your preferences and streaming platform requirements.
5. Test Your Setup
Before going live, it’s crucial to test your setup to ensure everything is working correctly. Start a test stream and check if both the video and audio are being captured from your mirrorless camera. Make any necessary adjustments to the settings if needed.
Remember to also test your internet connection to ensure you have a stable and reliable connection for live streaming.
Final Thoughts
Configuring live streaming software with your mirrorless camera might seem overwhelming at first, but with the right steps, you can set up a high-quality live streaming experience. Take your time to understand the software and its settings, and don’t hesitate to reach out for support if you encounter any difficulties. Happy streaming!
Testing and Troubleshooting Your Mirrorless Camera Live Stream
Once you have set up your mirrorless camera for live streaming, it is essential to test and troubleshoot before going live. Here are some steps to ensure that your live stream runs smoothly:
1. Check Your Internet Connection
An unstable or slow internet connection can result in a poor quality live stream or even dropped frames. Make sure you are connected to a reliable and fast internet network. You can do a speed test using websites like Ookla to ensure that your upload speed is sufficient for streaming.
2. Adjust Camera Settings
Before going live, double-check your camera settings. Ensure that the resolution, frame rate, and exposure settings are appropriate for your live stream. Experiment with different settings and do a test recording to make sure the quality meets your expectations.
3. Test Audio
Audio is a crucial aspect of any live stream. Check that your microphone is properly connected and working as expected. Adjust the audio levels in your camera settings or external audio interface to avoid audio clipping or distortion. Do a test recording and playback to ensure that the audio is clear and balanced.
4. Test the Streaming Software
If you are using streaming software like OBS or Streamlabs OBS, make sure the settings are configured correctly. Check that the video and audio sources are set up correctly and that the streaming output settings match your streaming platform’s requirements.
5. Monitor Your Stream
During your test run, monitor your live stream on multiple devices to ensure that the video and audio quality remain consistent. Check for any dropped frames, buffering, or sync issues. It is a good practice to have a backup device, such as a smartphone or tablet, to monitor the stream from a viewer’s perspective.
6. Anticipate and Address Potential Issues
Even after thorough testing, technical issues can still arise during a live stream. Be prepared to troubleshoot common problems, such as network interruptions, software crashes, or equipment failures. Consider having a backup plan in case your camera or streaming software malfunctions. It is also advisable to have a stable power source and extra batteries on hand.
Remember to practice and test your live stream setup before any important event or broadcast. By diligently testing and troubleshooting, you can ensure a smooth and professional live streaming experience with your mirrorless camera.
Promoting and Monetizing Your Mirrorless Camera Live Streams
After setting up your mirrorless camera live streams, you may want to consider promoting and monetizing your content to reach a wider audience and potentially earn income from your efforts. Here are some tips to help you get started:
1. Promote on Social Media
Utilize the power of social media platforms such as Facebook, Instagram, Twitter, and YouTube to share your live streams. Post teasers, behind-the-scenes footage, or highlights from your streams to pique interest and drive traffic to your live events. Engage with your audience by replying to comments, liking and sharing relevant content, and using relevant hashtags to increase visibility.
2. Collaborate with Influencers
Partnering with influencers or popular content creators in your niche can help expand your reach and attract new viewers. Reach out to influencers who align with your brand and propose collaborations such as guest appearances, shoutouts, or joint live streams. This can introduce your content to their loyal audience and help you gain exposure to potential fans.
3. Offer Exclusive Content
Consider offering exclusive content or perks to your dedicated fans or subscribers. This could include special live streams, Q&A sessions, behind-the-scenes access, or early access to upcoming content. By providing exclusive benefits, you can incentivize your viewers to become loyal supporters and potentially even create a subscription-based revenue stream.
4. Monetize through Sponsorships and Advertisements
As your live streams gain popularity, you may have opportunities to secure sponsorships or run advertisements during your broadcasts. Reach out to relevant brands or companies in your industry and propose collaborations or partnerships. Additionally, you can explore platforms that allow you to monetize your live streams through ad revenue sharing.
Remember to consistently produce high-quality content and engage with your audience to build a strong and dedicated following. It may take time and effort, but with the right promotion and monetization strategies, you can turn your mirrorless camera live streams into a successful venture.
FAQ
What is a mirrorless camera?
A mirrorless camera is a digital camera that does not have a mirror reflex optical viewfinder like traditional DSLR cameras. Instead, it uses an electronic viewfinder (EVF) or the rear LCD screen to display the image.
Why would I want to live stream with a mirrorless camera?
Live streaming with a mirrorless camera offers several advantages. Mirrorless cameras typically have larger sensors and better image quality compared to smartphones or webcams. They also offer more flexibility in terms of lens options and manual controls. Additionally, mirrorless cameras can provide a more professional-looking live stream with better depth of field and low light performance.
What equipment do I need to live stream with a mirrorless camera?
To live stream with a mirrorless camera, you will need a few essential pieces of equipment. Firstly, you will need a mirrorless camera with a clean HDMI output. You will also need an HDMI capture device, such as an external capture card, to connect your camera to your computer. Additionally, you may need a tripod or other stabilisation equipment, as well as proper lighting and a microphone for better audio quality.
What software can I use to live stream with a mirrorless camera?
There are several software options available for live streaming with a mirrorless camera. Some popular choices include OBS Studio, Streamlabs OBS, and XSplit Broadcaster. These software programs allow you to easily capture and stream video from your mirrorless camera to platforms like YouTube, Twitch, or Facebook Live.
Are there any specific settings I should use on my mirrorless camera for live streaming?
Yes, there are a few recommended settings for mirrorless cameras when live streaming. Firstly, set your camera to manual mode to have full control over exposure settings. Use a low ISO to reduce noise, and set your white balance according to the lighting conditions. For the best live streaming quality, set your camera to its highest resolution and frame rate that is supported by your capture device and streaming platform.


