
In today’s digital age, security has become a top priority for many homeowners. One of the most effective ways to ensure the safety of your property is by installing a security camera system. However, commercial security cameras can be expensive and often come with limitations.
Luckily, there is an affordable and customizable solution available – a 4K Raspberry Pi security camera. Raspberry Pi is a small computer that can be turned into almost anything with the right components and a little bit of coding knowledge. By utilizing a Raspberry Pi and a high-quality camera module, you can create your own security camera system that matches the performance of expensive commercial options.
The process of creating a 4K Raspberry Pi security camera may sound complicated, but it is relatively straightforward. It involves setting up the Raspberry Pi, connecting the camera module, configuring the software, and creating a monitoring system. Whether you are a tech enthusiast or a beginner, this step-by-step guide will help you build your own 4K security camera system and enhance your home security.
What is a 4k Raspberry Pi security camera
A 4k Raspberry Pi security camera is a surveillance camera system that utilizes a Raspberry Pi computer to capture high-resolution 4k video footage. The Raspberry Pi is a small, single-board computer that can be easily integrated into various DIY projects, including security camera systems.
The 4k resolution refers to the level of video quality, with 4k cameras providing ultra-high-definition footage that is four times the resolution of standard high-definition cameras. This allows for incredibly detailed and crisp video recordings, making it easier to identify faces, license plates, and other important details in surveillance footage.
By using a Raspberry Pi as the main processing unit, users have the advantage of customizability and flexibility. They can choose from various camera modules that are compatible with the Raspberry Pi, allowing them to select the appropriate lens and features for their specific security needs. Additionally, the Raspberry Pi can be easily connected to other devices and sensors, such as motion detectors or alarms, to enhance the overall security system.
The Raspberry Pi also offers the advantage of being a cost-effective solution compared to traditional security camera systems. With its relatively low cost and open-source nature, users can create a high-quality security camera system without breaking the bank.
Furthermore, the Raspberry Pi’s software ecosystem is well-supported, providing access to various open-source projects and communities that can assist in setting up the security camera system. This makes it easier for users to find resources, tutorials, and troubleshooting assistance.
In conclusion, a 4k Raspberry Pi security camera is a versatile and cost-effective solution for individuals who want to create their own high-resolution surveillance system. By utilizing the Raspberry Pi’s computing power and customizable features, users can create a tailored security system that meets their specific needs.
Why use a 4k Raspberry Pi security camera
A 4k Raspberry Pi security camera offers several advantages over traditional security cameras. Here are some reasons why you should consider using a 4k Raspberry Pi security camera:

- High-resolution video: A 4k resolution (3840×2160 pixels) allows you to capture incredibly detailed footage. This level of resolution provides sharper images and more accurate color representation, which can be vital when identifying objects or individuals.
- Expanded field of view: The high-resolution sensors used in 4k cameras enable a wider field of view. This means you can capture larger areas with fewer cameras, reducing the number of devices required for comprehensive coverage.
- Enhanced digital zoom: The increased resolution of a 4k camera allows for more effective digital zoom capabilities. You can enlarge specific areas of interest without sacrificing image quality, providing greater flexibility in monitoring and investigating.
- Improved low-light performance: Many 4k cameras employ advanced image sensors and technologies to deliver better performance in low-light conditions. This ensures that your security camera can capture clear footage even in challenging lighting situations.
- Flexible storage options: Raspberry Pi security cameras often support various storage options, including local storage on microSD cards or cloud-based storage solutions. This flexibility allows you to choose the storage method that best suits your needs and budget.
- Cost-effective solution: Raspberry Pi cameras, including 4k models, are generally more affordable compared to dedicated security cameras. Their open-source nature also enables you to customize and expand their functionality at a lower cost.
In conclusion, a 4k Raspberry Pi security camera provides high-resolution video, expanded field of view, enhanced digital zoom, improved low-light performance, flexible storage options, and a cost-effective solution. These features make it an excellent choice for individuals and businesses looking to enhance their security systems.
Requirements
To create a 4k Raspberry Pi security camera, you will need the following:
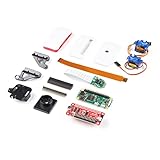
- A Raspberry Pi board (preferably the latest version for better performance)
- A microSD card with at least 32GB of storage capacity
- A 4k camera module compatible with Raspberry Pi
- A power supply for the Raspberry Pi
- An Ethernet cable or a Wi-Fi dongle for network connectivity
- A monitor or TV with HDMI input
- A keyboard and mouse
- An enclosure for the Raspberry Pi (optional but recommended for protection)
- A reliable internet connection for remote access and monitoring
- Accessories like HDMI cables, jumper wires, and connectors for setup
These are the basic hardware requirements to get started with your 4k Raspberry Pi security camera. Make sure to check the compatibility of the camera module with your Raspberry Pi version before purchasing. Additionally, ensure that you have all the necessary accessories to set up and connect your Raspberry Pi to your network and display device.
What you will need
To make a 4k Raspberry Pi security camera, you will need the following components:
| Raspberry Pi: | A Raspberry Pi board, preferably the latest model with better processor and RAM. |
| Camera module: | A camera module compatible with the Raspberry Pi board, capable of capturing 4k resolution video. |
| MicroSD card: | A high-quality MicroSD card with sufficient storage capacity to store the recorded footage. |
| Power supply: | A reliable power supply for the Raspberry Pi board, ensuring stable and continuous operation. |
| Network connection: | An Ethernet cable or a Wi-Fi dongle for connecting the Raspberry Pi to the network. |
| Enclosure: | An enclosure to protect the Raspberry Pi and camera module from the elements. |
| Mounting hardware: | Mounting hardware such as brackets and screws to securely mount the Raspberry Pi and camera module. |
| Software: | The necessary software, including an operating system for the Raspberry Pi, camera drivers, and security camera software. |
Once you have gathered all the required components, you will be ready to proceed with setting up your 4k Raspberry Pi security camera.

Software requirements
Before setting up your 4k Raspberry Pi security camera, you will need to ensure that you have all the necessary software installed. Here are the software requirements:
Raspberry Pi OS
The first step is to install the Raspberry Pi OS on your Raspberry Pi. You can download the latest version of the Raspberry Pi OS from the official Raspberry Pi website and follow the installation instructions.
Python 3
You will need Python 3 installed on your Raspberry Pi in order to run the necessary scripts for your security camera. Python 3 is the programming language used to develop the Raspberry Pi software. You can check if Python 3 is already installed by opening a terminal and running the command python3 --version. If it is not installed, you can install it by running the command sudo apt install python3.
OpenCV
OpenCV is an open-source computer vision library that is used for image and video processing. You will need to install OpenCV in order to capture and process the video feed from your camera. You can install OpenCV by running the command sudo apt install libopencv-dev python3-opencv.
RPi.GPIO
RPi.GPIO is a Python library that allows you to control the GPIO pins on your Raspberry Pi. You will need to install RPi.GPIO in order to control any additional components that you may want to add to your security camera, such as LED lights or a motion sensor. You can install RPi.GPIO by running the command pip3 install RPi.GPIO.

Once you have installed all the necessary software, your Raspberry Pi is ready to be set up as a 4k security camera. In the next section, we will discuss the hardware requirements for this project.
Hardware Requirements
Before setting up your 4k Raspberry Pi security camera, you will need to gather the necessary hardware. Here are the key components you will need:
Raspberry Pi
The core of your security camera setup will be a Raspberry Pi single-board computer. Make sure to choose a model that is capable of handling 4k video processing.
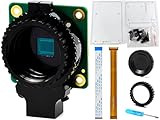
Camera Module
You will also need a compatible camera module. It is recommended to use the Raspberry Pi High-Quality Camera, as it offers excellent image quality and supports interchangeable lenses.
Additionally, you may need the following hardware:
Power Supply
Make sure to get a reliable power supply that can provide enough power for both the Raspberry Pi and the camera module.
MicroSD Card
A high-quality microSD card is necessary to store the operating system and video footage. Choose a card with sufficient capacity and fast read/write speeds.
Enclosure
To protect your Raspberry Pi and camera module from dust and potential damage, consider using an enclosure. There are various options available, including cases specifically designed for Raspberry Pi.
Network Connection
If you plan to access your camera remotely, make sure you have a reliable network connection. You can use either Wi-Fi or Ethernet, depending on your setup and preferences.
By gathering these hardware components, you will have everything you need to start building your 4k Raspberry Pi security camera.

Installation
Before installing your 4k Raspberry Pi security camera, there are a few steps you need to follow:
- First, make sure you have all the necessary equipment. This includes a Raspberry Pi device, a 4k camera module, an SD card, and a power supply.
- Next, download the latest version of the Raspberry Pi operating system (Raspbian) and install it onto the SD card. You can find instructions on how to do this on the Raspberry Pi website.
- After the installation is complete, insert the SD card into the Raspberry Pi device and connect it to the 4k camera module.
- Connect the power supply to the Raspberry Pi device and turn it on.
- Once the device has powered up, you will need to configure the camera settings. Open the terminal and enter the following command:
sudo raspi-config. - In the configuration menu, navigate to “Interfacing Options” and enable the camera interface.
- Save the changes and exit the configuration menu.
- Now you can start using your 4k Raspberry Pi security camera. You can access the camera stream by typing the Raspberry Pi’s IP address into a web browser on a device connected to the same network.
Make sure to secure your camera by setting a strong password for remote access and keeping your Raspberry Pi’s operating system up to date with the latest security patches.
Installing the Raspberry Pi OS
Before setting up your Raspberry Pi as a security camera, you need to install the Raspberry Pi OS. Follow the steps below:
Step 1: Download the Raspberry Pi OS
- Go to the official Raspberry Pi website at https://www.raspberrypi.org/downloads/.
- Choose the Raspberry Pi OS image for your Raspberry Pi model. There are different versions available, such as Raspberry Pi OS Lite (command line only) or Raspberry Pi OS with desktop.
- Click on the download link to save the OS image file to your computer.
Step 2: Flash the OS Image to an SD Card
- Get an SD card with at least 8GB of storage capacity.
- Insert the SD card into your computer using an SD card reader.
- Download and install a disk imaging tool like Etcher (https://www.balena.io/etcher/).
- Open Etcher and select the Raspberry Pi OS image file you downloaded.
- Select the SD card as the target drive.
- Click on the “Flash!” button to start the process of flashing the OS image to the SD card.
- Wait for the process to complete.
Step 3: Configure the Raspberry Pi
- Remove the SD card from your computer and insert it into the Raspberry Pi.
- Connect the Raspberry Pi to a monitor or TV using an HDMI cable.
- Connect a USB keyboard and mouse to the Raspberry Pi.
- Connect the power supply to turn on the Raspberry Pi.
- Follow the on-screen instructions to configure the Raspberry Pi settings, such as language, keyboard layout, and Wi-Fi network.
- Make sure to set a secure password for the default user account.
- Once the initial setup is complete, you will see the Raspberry Pi desktop.
Now that you have installed and configured the Raspberry Pi OS, you can proceed to set up the security camera software and start using your Raspberry Pi as a 4k security camera.
Setting up the camera module
The first step to creating a 4k security camera with Raspberry Pi is to set up the camera module. Follow these instructions to get started:

- Connect the camera module to the Raspberry Pi’s camera slot. Ensure that the connection is secure.
- Boot up the Raspberry Pi and open the terminal.
- Type
sudo raspi-configand press Enter to open the Raspberry Pi configuration menu. - In the menu, navigate to “Interfacing Options” and press Enter.
- Select “Camera” and press Enter.
- Choose “Yes” to enable the camera interface.
- Save the changes and exit the configuration menu.
- Restart the Raspberry Pi to apply the changes.
Once the Raspberry Pi has rebooted, the camera module should be ready for use. You can now proceed to configuring the camera software and settings to capture 4k video and enhance your security system.
FAQ,
What is a Raspberry Pi security camera?
A Raspberry Pi security camera is a surveillance system that uses a Raspberry Pi computer to capture and record video footage. It is a cost-effective and customizable solution for home or small business security.
Why would I want to make a 4K Raspberry Pi security camera?
Creating a 4K Raspberry Pi security camera allows you to capture higher-resolution video footage with more detail. This can be useful for situations where you need to identify individuals or objects with greater clarity. It also provides a better viewing experience when reviewing the footage.
What equipment do I need to make a 4K Raspberry Pi security camera?
To make a 4K Raspberry Pi security camera, you will need a Raspberry Pi 4 model B or higher, a compatible camera module that supports 4K resolution, a power supply for the Raspberry Pi, a microSD card to install the operating system, and a case or enclosure to protect the components.


