
Are you tired of holding your iPhone while taking photos or videos? Do you struggle to keep your phone steady and get the perfect shot? If so, you’re in luck! In this article, we will show you how to make a camera stand for your iPhone using materials you may already have at home.
Step 1: Gather Your Materials
Before we get started, make sure you have the following materials on hand:
- An empty plastic bottle
- A pair of scissors
- A marker or pen
- A ruler
- A hot glue gun (optional)
Step 2: Measure and Mark
Using your ruler, measure and mark the desired height of your camera stand on the plastic bottle. Make sure to leave enough space at the top for your iPhone to fit securely.

Step 3: Cut and Trim
Using the scissors, carefully cut along the marked line to create the base of your camera stand. Then, trim any rough edges to ensure a smooth surface.
Step 4: Create a Phone Holder
To create a secure holder for your iPhone, cut a small vertical slit near the top of the plastic bottle. This will allow you to slide your phone into place and hold it upright during use.
Step 5: Optional Finishing Touches
If desired, you can use a hot glue gun to secure the edges of the plastic bottle and add extra stability to your camera stand.
Note: This DIY camera stand is a budget-friendly solution for capturing steady photos and videos with your iPhone. It’s perfect for vlogging, live streaming, or simply getting that Instagram-worthy shot. Give it a try and take your mobile photography to the next level!
Materials needed for camera stand
The following materials are needed to make a camera stand for your iPhone:
- Aluminum sheet
- Camera mount adapter for iPhone
- Drill
- Screws
- Bolt with a matching nut
- Hacksaw
- File
- Ruler or measuring tape
- Marker
These materials will help you create a sturdy camera stand that will securely hold your iPhone while you capture high-quality photos and videos.
Step-by-step guide for making the stand
Creating a camera stand for your iPhone doesn’t have to be complicated or expensive. With a few basic materials and some simple steps, you can easily make your own stand to help stabilize your phone while taking photos or recording videos. Here’s a step-by-step guide to help you get started:

Step 1: Gather all the materials you will need. You will need a sturdy base, such as a small wooden block or an empty spool, a metal hose clamp, an adjustable ball mount, and some adhesive putty or strong glue.
Step 2: Attach the hose clamp to the base. Place the hose clamp on the surface of the base and use a screwdriver to secure it in place. Make sure it is tight enough to hold the weight of your iPhone.
Step 3: Attach the adjustable ball mount to the hose clamp. Insert the ball mount into the open end of the hose clamp and tighten it securely. This is the part that will hold your iPhone in place.
Step 4: Apply adhesive putty or strong glue to the ball mount. This will help ensure that your iPhone remains stable while mounted on the stand. Make sure to apply enough adhesive to securely hold your iPhone without damaging it.
Step 5: Let the adhesive dry. Depending on the type of adhesive you use, this may take a few hours or overnight. Follow the instructions on the adhesive packaging for the best results.
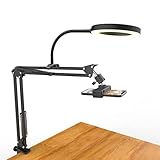
![Overhead Phone Mount,Overhead Camera Mount Tripod Stand[Anti-Shaking] with 10.5" Ring Light,Desk Tripod for iPhone with Ring Light for Video Recording,Zoom Meeting,YouTube,TikTok](https://m.media-amazon.com/images/I/41uC3EVEcZL._SL160_.jpg)
Step 6: Test your stand. Place your iPhone onto the ball mount and adjust the angle as needed. Make sure it is secure and stable before using it for extended periods or in risky situations.
Step 7: Enjoy using your new camera stand! You now have a stable and adjustable stand for your iPhone that will make it easier to take photos or record videos without worrying about shaky footage.
Remember to always handle your iPhone with care and use the stand responsibly. Happy shooting!
Tips for a stable and durable camera stand
When it comes to capturing high-quality photos and videos with your iPhone, having a stable and durable camera stand is essential. Not only does it provide you with steady shots, but it also ensures the safety of your device. Here are some useful tips to help you choose and maintain a camera stand for your iPhone:
|
1. Consider the weight and size: Before purchasing a camera stand, make sure it can support the weight and size of your iPhone. Some stands have weight restrictions, so it’s important to check the specifications before making a decision. Additionally, consider the size of the stand. You want one that can securely hold your device without any wobbling or instability. |
|
2. Look for adjustable features: An adjustable camera stand allows you to easily change the height and angle of your iPhone, giving you more flexibility in capturing different shots. Look for stands with adjustable legs, necks, and tripod heads to adapt to various shooting situations. |
|
3. Opt for durable materials: Investing in a camera stand made from durable materials, such as aluminum or carbon fiber, ensures its longevity and stability. These materials are lightweight yet strong, providing a reliable support system for your iPhone. |
|
4. Check for stability features: Stability is crucial for capturing clear and blur-free shots. Look for camera stands with features like rubberized feet or grips to prevent slipping or sliding on smooth surfaces. Additionally, stands with a weight hook or center column hook can add extra stability, especially in windy conditions. |
|
5. Consider portability: If you plan on taking your camera stand with you on the go, consider its portability. Look for stands that offer compact and lightweight designs, easy folding mechanisms, or even come with a carrying case. This way, you can conveniently take your camera stand wherever you need to capture stunning shots with your iPhone. |
|
6. Regularly maintain your camera stand: To ensure your camera stand remains stable and durable, it’s important to regularly check and maintain it. Clean any dirt or debris that may accumulate over time, tighten any loose screws or knobs, and store it in a safe and dry place when not in use. This will prolong the lifespan of your camera stand and help you achieve consistent results with your iPhone photography. |


By following these tips, you can select a stable and durable camera stand for your iPhone that will enhance your photography experience and help you capture incredible moments with ease.
Comparison of different DIY camera stand designs
When it comes to creating a camera stand for an iPhone, there are various DIY designs that you can consider. Each design has its own unique features and advantages, so it’s important to understand what each design offers before deciding which one is right for you. Here is a comparison of different DIY camera stand designs:
-
Simple Tripod Stand: This design is the most basic and easy to create. It involves using everyday materials such as cardboard, popsicle sticks, or wooden dowels to create a stable tripod stand for your iPhone. While this design may lack some of the advanced features of other designs, it is highly customizable and can be made quickly and inexpensively.
-
Adjustable Arm Stand: This design incorporates an adjustable arm that allows you to position your iPhone at various angles and heights. It usually involves using flexible materials like PVC pipes or bendable metal rods. With this design, you have more flexibility in capturing different shots and can easily adjust the height and angle to suit your needs.
-
Phone Clamp Stand: This design utilizes a phone clamp that securely holds your iPhone in place. It often involves using a combination of materials such as a metal clamp, a telescopic rod, and a stable base. With this design, your iPhone is securely fastened, providing stability and peace of mind while taking photos or videos.
-
Balancing Counterweight Stand: This design involves using a counterweight system to balance your iPhone. It typically consists of a long vertical rod with a counterweight attached at one end and a phone holder at the other end. By adjusting the position of the counterweight, you can achieve a stable and balanced camera stand, making it ideal for capturing steady shots.
These are just a few examples of DIY camera stand designs for iPhones. Depending on your needs and preferences, you can choose the design that suits you best. Remember to consider factors such as stability, adjustability, and ease of use when selecting the right camera stand for your iPhone.
Overview of professional camera stands
When it comes to capturing the perfect shot, having a sturdy and reliable camera stand is essential. Professional photographers and videographers often rely on high-quality camera stands to ensure stability and precision in their work. In this overview, we will explore some of the key features and considerations when choosing a professional camera stand.

One important feature to look for in a professional camera stand is stability. A stand with a solid and sturdy construction can prevent any unwanted camera shaking or movement, which can result in blurry images or videos. High-quality materials such as aluminum or carbon fiber are often used in professional camera stands to provide stability without adding unnecessary weight.
Another important consideration is the adjustability of the camera stand. Professional photographers and videographers often need to position their cameras at different angles and heights to capture the best shot. Look for a camera stand that offers a wide range of adjustability options, including height adjustment, tilt angles, and rotation capabilities.
Durability is also a key factor to consider. Professional camera stands should be able to withstand frequent use and outdoor conditions. Look for stands that are built to last, with features such as weather resistance and sturdy locking mechanisms.
Ease of use and portability are additional features that can make a professional camera stand even more convenient. Look for stands that are easy to set up and adjust, with intuitive controls and quick-release mechanisms. Portability is also important for photographers and videographers who often need to transport their equipment. Look for lightweight and compact camera stands that can be easily folded and carried in a bag or backpack.
Finally, consider the weight capacity of the camera stand. Professional cameras and lenses can be heavy, so it’s important to choose a stand that can safely support the weight of your equipment. Look for stands with a high weight capacity and a stable base.
In conclusion, a professional camera stand is an essential tool for photographers and videographers who want to achieve stability and precision in their work. When choosing a camera stand, consider factors such as stability, adjustability, durability, ease of use, portability, and weight capacity. By investing in a high-quality camera stand, you can enhance your photography and videography capabilities and capture the perfect shot every time.
Cost savings with a DIY camera stand:
If you’re a photography enthusiast or a content creator who frequently uses their iPhone as a camera, investing in a camera stand is a must. However, buying a professional camera stand can be quite expensive. Fortunately, you can save some money by making your own DIY camera stand using simple household items.
A DIY camera stand can be made using a combination of items such as a tripod, a smartphone mount, and even a basic desk lamp or a bookshelf bracket. These items can be easily found at home or purchased at a much lower cost compared to a professional camera stand.
One way to create a DIY camera stand is by using a tripod. Tripods are often used to stabilize cameras and smartphones, and they are available in different sizes and styles. To create a DIY camera stand using a tripod, you can simply attach a smartphone mount to the top of the tripod using a universal adapter. This will provide a stable platform for your iPhone and allow you to capture high-quality photos and videos without any shakes or blurriness.
If you don’t have a tripod at home, you can also repurpose a basic desk lamp or a bookshelf bracket to create a DIY camera stand. Simply attach the smartphone mount to the arm or the brackets of the desk lamp or bookshelf bracket and position it in a way that allows your iPhone to be stable and secure. This makeshift camera stand may not have the same level of stability as a tripod, but it can still provide a cost-effective solution for capturing steady shots.
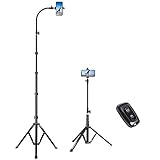
![NEXBOOM iPhone Tripod Stand- 67" [360° Rotation Mount & Heavy Duty] Cell Phone Tripod Stand with Remote, iPhone Tripod Compatible with iPhone 15 14 13 12 Pro Max XS Plus,Samsung S22 /Camera/GoPro](https://m.media-amazon.com/images/I/41vomxKtGSL._SL160_.jpg)
By opting for a DIY camera stand, you can save a significant amount of money while still achieving stable and professional-quality shots with your iPhone. Additionally, creating your own camera stand allows for more flexibility and customization, as you can adjust the height, angle, and position of your iPhone according to your needs and preferences.
Remember, when creating a DIY camera stand, it’s important to ensure that your iPhone is securely attached and the stand provides enough stability to prevent any accidents or damage to your device. Always monitor the position of your iPhone and adjust the stand accordingly to avoid any mishaps.
In conclusion, making a DIY camera stand can be a cost-effective alternative to buying a professional one. By using items readily available at home or purchasing affordable materials, you can create a stable and secure camera stand that allows you to capture high-quality photos and videos with your iPhone. So why spend more money when you can save and be creative at the same time?
Useful accessories for a DIY camera stand
When creating a DIY camera stand for your iPhone, there are several accessories that can greatly enhance the stability and functionality of your setup. These accessories can be easily found and are relatively affordable, making them a great addition to your camera stand project. Here are a few options to consider:
1. Tripod mount adapter
A tripod mount adapter is an essential accessory for any camera stand. It allows you to securely attach your iPhone to the stand, ensuring that it stays in place while you capture photos or videos. Tripod mount adapters are typically made of durable materials and have adjustable features, making them compatible with a wide range of camera stands.
2. Remote shutter
A remote shutter is a handy accessory that allows you to trigger the camera of your iPhone without touching the device itself. This is especially useful when you need to take photos or videos from a distance, or when you want to avoid any accidental camera shake. Remote shutters are typically wireless and can be connected to your iPhone via Bluetooth.
3. Phone holder
A phone holder is another accessory that can greatly improve the stability of your camera stand. It provides a secure grip on your iPhone, preventing it from slipping or moving during use. Phone holders are typically adjustable, allowing you to position your iPhone at the perfect angle for capturing your shots.
4. Lens kit
If you’re looking to take your iPhone photography to the next level, a lens kit is worth considering. These kits include different lenses that can be attached to your iPhone’s camera, allowing you to experiment with different types of photography, such as macro, wide-angle, or telephoto shots. Lens kits are typically compact and easy to use, making them a versatile addition to your camera stand.
By incorporating these useful accessories into your DIY camera stand, you can greatly improve the stability and functionality of your setup. Whether you’re a casual photographer or a serious enthusiast, these accessories will enhance your iPhone photography experience and allow you to capture stunning images and videos.
FAQ
What materials do I need to make a camera stand for iPhone?
To make a camera stand for iPhone, you will need a few materials such as a sturdy base (like a tripod or a stand), an iPhone holder or clamp, and some additional tools like screws or adhesive to secure the holder to the base.
Can I make a camera stand for iPhone without a tripod or stand?
Yes, it is possible to make a camera stand for iPhone without a tripod or stand. One alternative is to use a DIY stand made from materials like cardboard or wood. Another option is to repurpose household items like a mug or a stack of books to create a makeshift stand.
Is it necessary to buy a specific iPhone holder or clamp?
No, it is not necessary to buy a specific iPhone holder or clamp. There are many options available in the market, but you can also make your own holder using DIY techniques like using adhesive, creating a custom holder with foam or fabric, or repurposing existing mobile phone accessories like car mounts or selfie sticks.
What features should I consider when choosing a tripod or stand for my iPhone?
When choosing a tripod or stand for your iPhone, there are a few features you should consider. Firstly, make sure the stand is sturdy and stable enough to hold your phone securely. Secondly, check if it offers adjustable height and angle options to capture different perspectives. Lastly, consider the portability and ease of use, making sure it is compatible with your iPhone model.


