
If you’re looking for a cost-effective and customizable solution to monitor your home or office, then making a security camera with Raspberry Pi Zero is the way to go. Raspberry Pi Zero is a low-cost, credit-card sized computer that you can use to create a variety of projects, including a DIY security camera.
Raspberry Pi Zero provides a compact and affordable alternative to traditional security cameras. With its small size and low power consumption, it can be easily hidden or mounted in inconspicuous locations to capture footage without drawing attention.
Creating a security camera with Raspberry Pi Zero doesn’t require advanced technical skills or expensive equipment. All you need is a Raspberry Pi Zero, a camera module, and a few other components that you can easily find online or at your local electronics store. Additionally, you will need basic knowledge of Raspberry Pi and some coding skills.
In this tutorial, we will guide you through the process of setting up a security camera using Raspberry Pi Zero. We will cover everything from assembling the hardware components to configuring the software and accessing the live camera feed. By the end of this tutorial, you will have a fully functional security camera that you can control and monitor remotely.
Building a security camera
Building a security camera using a Raspberry Pi Zero is a cost-effective and customizable way to monitor your surroundings. In this guide, we will walk through the steps to set up the hardware and configure the software for your security camera.
Materials:
| Raspberry Pi Zero |
| Raspberry Pi Camera Module |
| MicroSD card |
| USB power supply |
| USB cable |
Step 1: Install Raspbian OS
Start by downloading the latest version of Raspbian Lite from the official Raspberry Pi website. Use a tool like Etcher to flash the Raspbian image onto the MicroSD card.
Step 2: Connect the Raspberry Pi Zero
Insert the MicroSD card into the Raspberry Pi Zero’s MicroSD slot. Connect the Raspberry Pi Camera Module to the camera connector on the Raspberry Pi Zero.
Step 3: Power up the Raspberry Pi Zero
Connect the USB power supply to the micro USB port on the Raspberry Pi Zero. Wait for the Raspberry Pi to boot up.
Step 4: Enable the camera module
Launch the Raspberry Pi configuration tool by typing sudo raspi-config in the terminal. Navigate to the “Interface Options” menu and enable the camera module.
Step 5: Install and configure motion detection software

Install the motion detection software by running the following command in the terminal:
sudo apt-get install motionOnce installed, configure the motion detection software by editing the motion configuration file:
sudo nano /etc/motion/motion.confModify the configuration to your liking, adjusting settings such as detection sensitivity, image output, and motion detection areas.
Save the changes and exit the editor. Restart the motion detection software by running the following command:
sudo service motion restartStep 6: Access the security camera feed

To access the security camera feed, open a web browser on any device connected to the same network as the Raspberry Pi Zero. Enter the Pi’s IP address followed by the port number specified in the motion configuration file.
Voila! You now have a functional security camera using Raspberry Pi Zero. Feel free to explore additional features and enhancements to further customize your security setup.
Setting up Raspberry Pi Zero
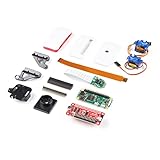
Before you start setting up a security camera with Raspberry Pi Zero, you need to ensure that you have all the necessary components:
| Raspberry Pi Zero | A microSD card with Raspbian installed | A power supply (micro USB) | A USB webcam or a Raspberry Pi camera module | An internet connection (Ethernet or Wi-Fi) | A compatible case (optional) |
Once you have all the components, follow these steps to set up your Raspberry Pi Zero:
- Insert the microSD card with Raspbian installed into the microSD card slot on the Raspberry Pi Zero.
- Connect the USB webcam or Raspberry Pi camera module to one of the USB ports on the Raspberry Pi Zero.
- Connect the power supply to the micro USB port on the Raspberry Pi Zero.
- If you are using an Ethernet connection, connect the Ethernet cable to the Ethernet port on the Raspberry Pi Zero. Otherwise, set up the Wi-Fi connection by following the instructions in the official Raspberry Pi documentation.
- Wait for the Raspberry Pi Zero to boot up. You will see the Raspbian desktop environment.
- Configure the Raspberry Pi Zero by following the on-screen instructions. Make sure to set a secure password for the default user ‘pi’ and optionally change the hostname.
- Update the software packages on the Raspberry Pi Zero by opening the Terminal and running the following commands:
sudo apt-get update
sudo apt-get upgrade - Install the necessary software packages for the security camera by running the following command in the Terminal:
sudo apt-get install motion - Configure the motion software by editing the configuration file:
sudo nano /etc/motion/motion.conf
Adjust the settings according to your requirements, such as frame rate, resolution, and file output. - Save the configuration file and exit the text editor by pressing Ctrl+X, then Y, and finally Enter.
- Start the motion software by running the following command in the Terminal:
sudo service motion start - Access the motion software’s web interface by opening a web browser on another device and navigating to the following URL:
http://:8081
Replace ‘‘ with the IP address assigned to your Raspberry Pi Zero. - You should now see the live video feed from your USB webcam or Raspberry Pi camera module. You can further customize the motion software settings through the web interface to suit your needs.
With your Raspberry Pi Zero set up, you now have a functional security camera that can be accessed remotely over the internet. You can monitor the live video feed, configure motion detection, and even set up alerts to be notified of any suspicious activities.

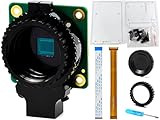
Choosing a camera module
When it comes to setting up a security camera with a Raspberry Pi Zero, one of the most important decisions you’ll need to make is which camera module to use.
Raspberry Pi offers a variety of camera modules, each with its own specifications and features. Some of the options available include the Raspberry Pi High-Quality Camera, the Raspberry Pi Camera Module V2, and various third-party camera modules.
When choosing a camera module, there are several factors to consider:
Resolution:
The resolution of the camera module determines the level of detail in the images or video it captures. Higher resolution modules can capture more detailed footage, but they may also require more processing power and storage space.
Field of view:
The field of view refers to the area that the camera can capture. A wider field of view is beneficial for monitoring larger areas, while a narrower field of view can provide more detail for specific areas.

Low-light performance:
If you plan to use the security camera in low-light conditions, it’s important to choose a camera module with good low-light performance. Look for modules with features like infrared illumination or a low-light sensor.
Connectivity:
Consider how you plan to connect the camera module to your Raspberry Pi Zero. Some camera modules connect directly to the Raspberry Pi’s CSI (Camera Serial Interface) port, while others require additional adapters or cables.
By considering these factors and doing some research on the available camera modules, you can choose the one that best suits your needs for your Raspberry Pi Zero security camera project.
Installing the camera module
To create a security camera with Raspberry Pi Zero, you will need to first install the camera module. Follow the steps below to install the camera module successfully:
- Step 1: Shut down the Raspberry Pi Zero and disconnect it from the power source.
- Step 2: Locate the camera connector on the Raspberry Pi Zero board. It is a smaller, flat ribbon cable connector near the microSD card slot.
- Step 3: Carefully peel back the plastic tab on the camera connector to reveal the metal contacts.
- Step 4: Take the flat ribbon cable of the camera module and insert it into the camera connector. The contacts on the cable should face away from the Ethernet port.
- Step 5: Gently push the ribbon cable into the connector until it is securely seated. Be cautious not to force it or bend the cable.
- Step 6: After inserting the ribbon cable, push the plastic tab back into place to lock the cable in position.
- Step 7: Once the camera module is installed, reconnect the power source to the Raspberry Pi Zero.
Once you have successfully installed the camera module, you can proceed with configuring the software and setting up the security camera functionality on your Raspberry Pi Zero.

Configuring the camera
Before you start using the Raspberry Pi Zero as a security camera, you need to configure the camera module and set up the necessary software.
Enabling the camera module
The first step is to enable the camera module on your Raspberry Pi Zero. To do this, follow these steps:
- Connect your Raspberry Pi Zero to a power source and turn it on.
- Open the terminal on your Raspberry Pi Zero.
- Run the command
sudo raspi-configand press Enter. - Navigate to Interfacing Options and press Enter.
- Select Camera and press Enter.
- Select Enable and press Enter.
- Exit the configuration tool and reboot your Raspberry Pi Zero.
Installing the necessary software
Once the camera module is enabled, you need to install the necessary software to use it as a security camera. Follow these steps:
- Open the terminal on your Raspberry Pi Zero.
- Run the command
sudo apt-get updateto update the package lists. - Run the command
sudo apt-get upgradeto upgrade the installed packages. - Run the command
sudo apt-get install motionto install the Motion software.
With the camera module enabled and the software installed, you are now ready to start using the Raspberry Pi Zero as a security camera.
Setting up motion detection
To set up motion detection on your Raspberry Pi Zero security camera, you will need to install and configure the Motion software. Motion is an open-source program that can capture images or videos using the camera module and detect any motion within its view.
To install Motion, open a terminal window and type the following command:
sudo apt-get install motion |
Once the installation is complete, you will need to configure Motion by editing the configuration file. To do this, open the configuration file using the nano text editor by typing the following command in the terminal:
sudo nano /etc/motion/motion.conf |
Within the configuration file, you will find numerous options that can be adjusted. For motion detection, there are a few key settings that you may want to modify:
| width | Set the width of the captured images or videos in pixels. |
| height | Set the height of the captured images or videos in pixels. |
| framerate | Set the number of frames per second to capture. |
| threshold | Set the sensitivity threshold for motion detection (lower values are more sensitive). |
Once you have made the desired changes, save the configuration file and exit the nano text editor. To start Motion, use the following command in the terminal:
sudo service motion start |
After Motion has started, it will capture images or videos whenever it detects motion within the camera’s view. The captured files can be accessed in the default save directory, which is /var/lib/motion/. You can also configure Motion to save the captured files to a different directory if desired.
By setting up motion detection on your Raspberry Pi Zero security camera, you can have a reliable surveillance system that will capture any movement within its range.
Securing the camera feed
One of the most important aspects of creating a security camera with a Raspberry Pi Zero is ensuring that the camera feed is secure and protected from unauthorized access. Here are some steps you can take to secure your camera feed:
- Change default login credentials: When setting up your Raspberry Pi Zero, it is important to change the default login credentials to prevent anyone from accessing your camera feed. This includes changing the default username and password for both the operating system and any software you are using to stream the camera feed.
- Enable secure connection: Use a secure connection protocol such as HTTPS or SSL/TLS to encrypt the camera feed data. This will ensure that the data transmitted between your camera and the viewing device is secure and cannot be easily intercepted by hackers.
- Set up user authentication: Implement user authentication on the viewing device to restrict access to the camera feed. This can be done by requiring a username and password to access the camera feed, or by implementing more advanced authentication methods such as two-factor authentication.
- Use firewall and network security: Configure your network router to block any incoming connections that are not necessary for accessing the camera feed. This can be done by setting up a firewall or using network security tools to monitor and restrict access to the camera feed.
- Regularly update software: Keep your Raspberry Pi Zero and any software you are using to stream the camera feed up to date. This will ensure that you have the latest security patches and bug fixes, reducing the risk of vulnerabilities that could be exploited by hackers.
By following these steps, you can help secure your camera feed and protect it from unauthorized access.
Viewing the camera feed remotely
Once you have set up your Raspberry Pi Zero security camera, it’s time to access the camera feed remotely. This will allow you to monitor your camera from anywhere using a device with an internet connection.
1. Port Forwarding
In order to view the camera feed remotely, you will need to set up port forwarding on your router. This process will vary depending on your router model, so it’s best to consult your router’s manual or do an internet search for specific instructions.
2. Dynamic DNS
Most residential internet connections have dynamic IP addresses, which means they can change over time. To ensure you can always access your camera feed, you can set up a dynamic DNS service, which will assign a domain name to your IP address. This way, you can access your camera using a domain name instead of an IP address.
3. Uploading the camera feed
Next, you will need to upload the camera feed to a remote server or hosting service. This can be done using FTP or a file transfer protocol of your choice. Make sure to secure the remote server with strong passwords and consider using encryption for the transmitted data.
4. Accessing the camera feed
Once the camera feed is uploaded, you can access it by entering the domain name or IP address of your router in a web browser. This will take you to the login page of your camera feed, where you can enter your credentials to view the live feed.
It’s worth mentioning that viewing the camera feed remotely may involve security risks, so it’s important to take appropriate measures to protect your network and camera feed from unauthorized access.
Final thoughts
In this tutorial, we have learned how to create a security camera using a Raspberry Pi Zero. By following the steps outlined in this guide, you can set up a cost-effective surveillance system with minimal effort.
One of the advantages of using a Raspberry Pi for this project is the ability to customize the camera software and settings. With the help of the Raspberry Pi camera module and the open-source software, you can adjust the resolution, frame rate, and other parameters according to your needs.
Additionally, the small size and low power consumption of the Raspberry Pi Zero make it an ideal choice for a security camera that can be discreetly placed in any location. Whether you want to monitor your home, office, or any other space, the Raspberry Pi Zero offers a flexible and affordable solution.
Remember to consider the legal implications of using a surveillance system in your specific jurisdiction. It is important to comply with any privacy laws and obtain consent when necessary.
Overall, building a security camera with a Raspberry Pi Zero can be a fun and rewarding project. Not only will you have a practical surveillance system, but you can also learn valuable skills in electronics, programming, and network configuration.
Further exploration
- Experiment with different camera modules and accessories to enhance the functionality of your security camera.
- Explore the use of motion detection algorithms to trigger recordings only when there is activity in the camera’s field of view.
- Consider integrating your security camera system with other IoT devices or home automation systems for increased convenience and functionality.
References
- Raspberry Pi website – https://www.raspberrypi.org/
- Raspberry Pi Camera Module – https://www.raspberrypi.org/products/camera-module-v2/
- Raspberry Pi forums – https://www.raspberrypi.org/forums/
FAQ,
What is a raspberry pi zero?
Raspberry Pi Zero is a small and affordable single-board computer that can be used for various projects, including building a security camera.
What are the benefits of using a raspberry pi zero for a security camera?
There are several benefits of using a Raspberry Pi Zero for a security camera. Firstly, it is small and compact, making it easy to hide or mount discreetly. Secondly, it is affordable, which makes it a cost-effective option for DIY projects. Additionally, it is highly customizable and can be programmed to suit your specific needs.
What materials do I need to make a security camera with raspberry pi zero?
To make a security camera with Raspberry Pi Zero, you will need the following materials: a Raspberry Pi Zero board, a camera module, an SD card, a power supply, a case or enclosure, and optional accessories such as a USB Wi-Fi adapter or a motion sensor.


