If you have a wired security camera installed in your home or office and want to make it wireless, you’re in luck. With the advancements in technology, you can now easily convert your old wired camera into a wireless one, allowing you to monitor your surroundings without the hassle of cables.
By going wireless, you can enjoy the freedom of placing your camera wherever you want, without the restrictions of cables. Whether you want to monitor your front porch, backyard, or office, converting your wired security camera into a wireless one can give you the flexibility you need.
So, how do you make a wired security camera wireless? The process is simpler than you might think. With a few essential tools and some basic knowledge, you can transform your existing wired security camera into a wireless system in no time.
In this article, we will guide you through the step-by-step process of converting your wired security camera into a wireless one. We will cover everything, from choosing the right wireless transmitter and receiver to connecting them and setting up your wireless connection. So, let’s get started and make your surveillance system wire-free!
What is a wired security camera
A wired security camera, also known as a wired CCTV camera, is a surveillance camera system that requires a physical connection to transmit video signals. It usually consists of a camera unit that captures the video footage, and a cable that carries the video signal from the camera to a recording or monitoring device.

Wired security cameras are commonly used for both residential and commercial purposes. They provide a reliable and secure method of monitoring properties and deterring potential intruders or criminals.
Components of a wired security camera system
| Camera unit | The camera unit is the main component of a wired security camera system. It is responsible for capturing the video footage and transmitting it through the cable. |
| Cable | The cable is used to connect the camera unit to the recording or monitoring device. It carries the video signal and ensures a stable and secure transmission. |
| Recording or monitoring device | The recording or monitoring device is where the video footage from the camera unit is stored or viewed. It can be a DVR (Digital Video Recorder), NVR (Network Video Recorder), or a computer with appropriate software. |
| Power supply | A wired security camera system typically requires a power supply to operate the camera unit and other components. This can be a direct connection to a power outlet or a separate power source. |
Overall, wired security cameras offer a reliable and effective solution for video surveillance. They provide high-quality video footage and are less susceptible to interference compared to wireless security cameras. However, the installation process for wired cameras can be more complex and may require professional assistance.
Step 1: Assess your current setup
Before you begin making your wired security camera wireless, it is important to assess your current setup to determine the best approach for making the conversion. Take the following steps:
1. Identify your wired security camera
Locate the wired security camera that you want to make wireless. Take note of its model and specifications, as this information will be helpful later in the process.
2. Check for available ports
Inspect the area where your wired security camera is currently connected. Look for any available ports or connections that can be used to convert the camera to a wireless system.

3. Consider the camera’s power source
Determine how your wired security camera is currently powered. Check if it is connected directly to a power outlet or if it uses PoE (Power over Ethernet) technology. Knowing the power source will help you choose the appropriate wireless adapter or converter.
4. Assess your network infrastructure
Evaluate your existing network infrastructure to ensure it can support wireless cameras. Consider factors such as your router’s capabilities, Wi-Fi signal strength, and potential interference sources that may affect the camera’s wireless performance.
By thoroughly assessing your current setup, you will be better equipped to choose the right equipment and approach for making your wired security camera wireless.
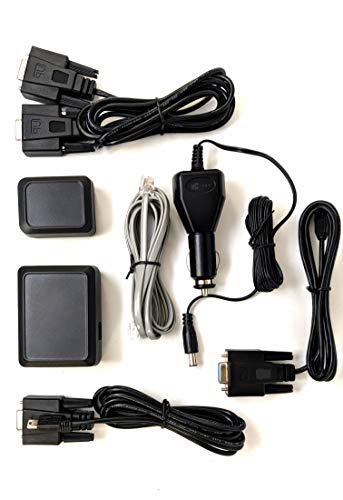
Step 2: Choose a wireless camera conversion kit
Once you have determined that your wired security camera can be converted into a wireless system, the next step is to choose the right wireless camera conversion kit. This kit will enable you to transmit video and audio signals wirelessly, eliminating the need for cumbersome wires.
When selecting a wireless camera conversion kit, there are a few factors to consider:
- Compatibility: Ensure that the kit you choose is compatible with your specific camera model. Different cameras may require different conversion kits, so it’s essential to find one that matches your camera’s specifications.
- Transmission range: Determine the range over which you need to transmit the camera’s signal. Consider factors such as the distance between the camera and the monitoring device, as well as any potential obstacles that may affect signal strength.
- Signal quality: Look for a conversion kit that provides high-quality video and audio transmission. You want to ensure that the converted wireless signal is clear and reliable for effective surveillance.
- Installation: Consider how easy it is to install the wireless camera conversion kit. Some kits may require professional installation, while others can be set up easily by following the provided instructions.
- Price: Set a budget for your wireless conversion project and find a kit that fits within it. Keep in mind that higher-priced kits may offer advanced features and better performance.
By carefully considering these factors, you can select the right wireless camera conversion kit that meets your specific needs and allows you to transform your wired security camera into a wireless system.
Step 3: Install the wireless transmitter and receiver
Once you have gathered all the necessary equipment and completed the previous steps, you are ready to install the wireless transmitter and receiver for your wired security camera. Here’s how:
1. Choose the right wireless transmitter and receiver
There are various wireless transmitter and receiver kits available on the market. Make sure to choose one that is compatible with your wired security camera and meets your specific needs, such as transmission range, signal stability, and video quality.
2. Connect the wireless transmitter to the camera
Locate the video output port on your wired security camera. Plug one end of the video cable into this port, and connect the other end to the video input port on the wireless transmitter. Ensure a secure connection by tightening the connectors.
3. Connect the wireless receiver to the monitor
Connect one end of the video cable to the video output port on the wireless receiver, and plug the other end into the video input port on your monitor or recording device. Tighten the connectors to ensure a stable connection.

4. Power up the equipment
Connect the power adapter of the wireless transmitter and receiver to an electrical outlet. Ensure that the devices have power and are properly switched on. Check the indicator lights to confirm they are functioning.
5. Adjust the settings
Depending on the specific wireless transmitter and receiver you are using, you may need to adjust some settings. Follow the manufacturer’s instructions to set up the wireless connection and configure any necessary settings for optimal performance.
6. Test the wireless connection
Turn on your monitor or recording device and check if the video feed from the wired security camera is being displayed. Walk around the area to test the wireless connection and ensure that the signal remains stable throughout the intended coverage area.
Note: It’s recommended to consult the user manual of your specific wireless transmitter and receiver kit for detailed installation instructions and troubleshooting tips.
| Pros | Cons |
|---|---|
| Eliminates the need for extensive wiring | May experience interference from other devices |
| Allows for flexible camera placement | Signal strength may vary depending on distance and obstacles |
| Easier to install and set up | May require additional equipment or accessories |
| Can be used with multiple cameras | Higher risk of signal interception or hacking |
Step 4: Adjust the camera settings
Once you have successfully connected your wired security camera to the wireless transmitter, it is important to adjust the camera settings to ensure optimal performance.

1. Access the camera’s settings menu by logging into the camera’s web interface. You can usually do this by entering the camera’s IP address into a web browser.
2. Configure the Wi-Fi settings
Within the settings menu, navigate to the Wi-Fi or Network section to configure the camera’s wireless settings. Here, you can select your wireless network and enter the correct network password. Make sure to save the changes.
3. Adjust the image quality and resolution
Next, navigate to the image settings section on the camera’s web interface. Depending on the camera model, you may have options to adjust the image quality, resolution, brightness, contrast, and other image parameters. Experiment with these settings to achieve the desired image quality.
4. Enable motion detection (optional)
If your camera supports motion detection, it is recommended to enable this feature. Motion detection will trigger the camera to start recording or sending notifications when motion is detected within its field of view. This can help you stay alert and also save storage space on your recording device.

5. Test and optimize
After making any changes to the camera settings, it is crucial to test them to ensure everything is working as expected. Monitor the camera’s connection and image quality in real-time to identify any potential issues. Adjust the settings if necessary to achieve the best results.
By adjusting the camera settings, you can customize the wireless security camera to meet your specific requirements and maximize its performance in your desired surveillance area.
Step 5: Test the wireless setup
Once you have completed all the previous steps and have successfully connected your wired security camera to a wireless transmitter, it’s time to test the setup to ensure everything is working properly.
1. Power on the camera and receiver
Make sure both the camera and the wireless receiver are powered on and receiving power. Double-check that all the necessary cables are securely connected.

2. Verify the wireless signal
Check the wireless signal strength on the receiver to ensure it is strong enough for a reliable connection. This can usually be done by checking the signal bars on the receiver’s display or using any available signal strength indicator.
3. Monitor the camera feed
Use a compatible monitor or display device to view the camera feed wirelessly. Depending on the receiver, this may be a built-in monitor or a separate device connected to the receiver. Make sure the video feed is clear and without any significant lag or interference.
4. Test the camera’s range
Walk around the area where the camera is installed while monitoring the live feed. Make sure the camera’s wireless signal reaches all the desired areas without any major signal loss or disruptions. If there are any dead zones or areas with weak signals, consider repositioning or adding additional wireless repeaters to improve signal coverage.
5. Check the recording functionality
If your wired security camera supports recording, test the recording functionality to ensure it works seamlessly with the wireless setup. Verify that the camera is properly saving recorded videos or images to the desired storage device, such as an SD card or a network attached storage (NAS) device.
By following these steps and testing your wireless setup thoroughly, you can ensure that your wired security camera has successfully transitioned into a wireless solution, providing you with easy accessibility and flexibility in monitoring your property or premises.
FAQ,
Can I make my wired security camera wireless?
Yes, you can make your wired security camera wireless by using a wireless video transmitter and receiver kit. This kit will allow you to transmit the video signal wirelessly from the camera to your recording device or monitor.
What is a wireless video transmitter and receiver kit?
A wireless video transmitter and receiver kit is a device that allows you to transmit the video signal from a wired security camera wirelessly to a recording device or monitor. The transmitter is connected to the camera, and the receiver is connected to the recording device or monitor. The kit typically includes all the necessary cables and adapters for installation.
Does making a wired security camera wireless affect its video quality?
Generally, making a wired security camera wireless can affect its video quality to some extent. The video signal may experience some loss or interference during wireless transmission, which can result in a slight decrease in video quality. However, the impact on video quality is usually minimal, and the difference may not be noticeable in most cases.
Do I need any technical skills to make a wired security camera wireless?
While some technical skills may be helpful, you do not necessarily need them to make a wired security camera wireless. Most wireless video transmitter and receiver kits come with easy-to-follow installation instructions, and you can find online tutorials and guides that can walk you through the process step by step. However, if you are not comfortable with DIY installations, it is recommended to seek professional help.
Are there any limitations to making a wired security camera wireless?
Yes, there can be some limitations to making a wired security camera wireless. The range of wireless transmission may vary depending on the specific kit you use. Additionally, obstacles such as walls and other electronic devices can affect the signal strength and quality. It is important to consider these limitations and choose a wireless video transmitter and receiver kit that suits your specific needs and environment.