In today’s digital age, home security has become a top concern for many homeowners. One effective way to ensure the safety of your property is by installing a wireless security camera system. This advanced technology provides you with the ability to monitor your home remotely and receive real-time updates on any suspicious activity.
Setting up a wireless security camera system may seem like a daunting task, but it is actually quite straightforward. By following a few simple steps, you can have your system up and running in no time. Whether you are a tech-savvy individual or a complete beginner, this guide will walk you through the process, making it easy for you to take control of your home’s security.
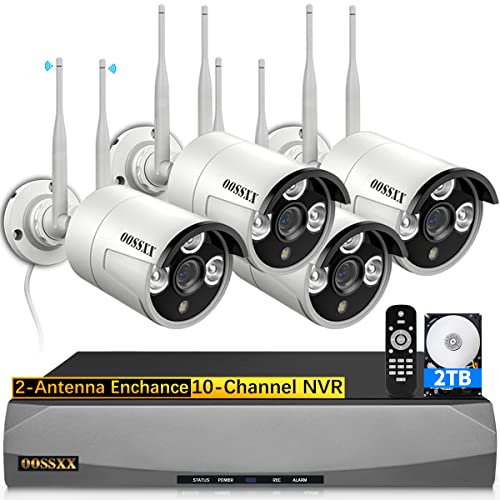
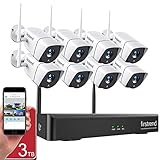
First and foremost, you will need to gather all the necessary equipment. This includes wireless cameras, a central hub, and a monitoring device such as a smartphone or tablet. It is important to choose high-quality cameras that are weatherproof and have a wide viewing angle to ensure maximum coverage. Additionally, look for a central hub that is compatible with your chosen cameras and offers easy connectivity.
Understanding the Importance of Wireless Security Camera Systems
Wireless security camera systems play a crucial role in maintaining the security and safety of homes, businesses, and public spaces. These advanced technological devices provide round-the-clock surveillance and monitoring, deterring criminal activities while offering peace of mind to users.
Here are some key reasons why wireless security camera systems are essential:
- Deterrence: The mere presence of wireless security cameras acts as a deterrent to potential criminals. Knowing that their actions might be caught on camera reduces the risk of theft, vandalism, or other criminal activities.
- Remote Access: Wireless security camera systems allow users to access live feed and recordings from anywhere, using smartphones, tablets, or computers. This feature enables homeowners and business owners to keep an eye on their properties in real-time, even when they are away.
- Crime Prevention: Wi-Fi security cameras play a significant role in preventing crimes. The ability to identify and capture criminals on camera provides valuable evidence that can be used by law enforcement agencies to solve crimes and bring offenders to justice.
- Documentation: Wireless security camera systems offer documentation of events and activities. This documentation is useful for various purposes, such as insurance claims, employee behavior monitoring, or resolving disputes.
- Flexibility: Unlike wired systems, wireless security cameras provide flexibility in terms of installation. They can be easily mounted in any location without the need for complicated wiring, making them ideal for both indoor and outdoor use.
- Cost-Effectiveness: Wireless security camera systems are cost-effective in the long run. While the initial investment may be higher compared to traditional systems, wireless cameras eliminate the need for expensive wiring and allow users to easily expand their surveillance network as needed.
Overall, wireless security camera systems offer convenience, flexibility, and peace of mind to users. With the advanced features they provide, these systems are becoming increasingly popular as a vital component of modern security systems.
Choosing the Right Camera and Equipment
When it comes to creating a wireless security camera system, selecting the right camera and equipment is crucial. There are several factors to consider to ensure you choose the most suitable options for your specific needs.
Camera Type
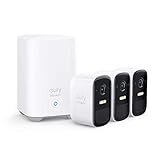
The first decision to make is the type of camera you want to use. There are various options available, including dome cameras, bullet cameras, and PTZ cameras. Dome cameras provide a discreet and tamper-resistant design, bullet cameras are more noticeable and often deter potential intruders, while PTZ cameras offer the ability to pan, tilt, and zoom, providing greater flexibility in monitoring large areas.
Resolution
The camera’s resolution determines the quality of the video and images it captures. Higher resolutions, such as 1080p or 4K, offer clearer and more detailed footage. Consider the area you want to monitor and how important image quality is for your requirements.
Wireless Connectivity
Ensure the camera and equipment you choose support wireless connectivity. Look for cameras that use Wi-Fi or other wireless technologies, which eliminate the need for complicated wiring and make installation easier. Make sure the cameras are compatible with your existing wireless network or choose ones that come with their own dedicated wireless system.
![Wireless Security Camera System Outdoor: [Dual Lens 4K & 10X Hybrid Zoom] Auto Tracking 4PCS PTZ Camera for Home Security WiFi6 10CH Expandable NVR CCTV Security Camera System with 1TB HDD](https://m.media-amazon.com/images/I/41-BArJWMWL._SL160_.jpg)
Power Source
Decide whether you want battery-powered cameras or ones that require a power source. Battery-powered cameras offer more flexibility in terms of placement but require regular battery changes. Cameras that need a power source can be more reliable but require wiring for power supply.
Storage and Cloud Support
Consider how you want to store and access the recorded footage. Some cameras offer local storage options, such as SD cards, while others provide cloud-based storage. Cloud storage allows you to access the recordings remotely and provides an additional backup in case the camera or storage device is damaged or stolen.
By considering these factors and thoroughly researching the available options, you can choose the right camera and equipment for your wireless security camera system. This will ensure optimal performance and meet your specific surveillance requirements.
Installing the Cameras
Once you have decided on the locations for your wireless security cameras, it’s time to start with the installation process. Follow these steps to properly install your cameras:
- Begin by carefully unpacking the camera and its accessories.
- Choose the desired mounting location for each camera. Keep in mind that the area should have a clear line of sight and provide optimal coverage.
- Use the provided brackets and screws to securely attach each camera to the chosen mounting location.
- Ensure that the cameras are pointing in the desired direction and angle. Adjust the camera position if needed.
- If your camera requires an external power source, connect it to a power outlet using the provided power adapter or cables.
- If your camera is a battery-powered model, make sure to insert the batteries following the manufacturer’s instructions.
- Some cameras may require you to connect them to your existing network. Follow the camera’s manual to establish a wireless connection.
- If you are using a central hub or a network video recorder (NVR), connect the cameras to the hub using the provided cables.
- Activate each camera by turning it on or following the specific setup instructions.
- Test the cameras to ensure they are functioning properly and are capturing the desired footage.
Remember to consult the camera’s manual for specific installation instructions, as different models may have slight variations in the installation process.

Once all the cameras are installed and functioning correctly, you can proceed to set up the monitoring system to view the camera feeds and record the footage.
Setting Up the Wireless Connection
Once you have all the necessary components for your wireless security camera system, it’s time to set up the wireless connection. Follow these steps to ensure a smooth and secure wireless connection:
1. Connect the Camera to Power
Before starting the wireless setup, make sure to connect your security camera system to a power source. This will ensure that the cameras have continuous power supply.
2. Accessing the Camera’s Interface
Most wireless security cameras come with a built-in web interface that allows you to access the camera’s settings and configure the wireless connection. To access this interface, you need to connect the camera directly to your computer using an ethernet cable.
Note: If your camera doesn’t have a built-in web interface, refer to the camera’s user manual for specific instructions on how to set up the wireless connection.

3. Configuring the Wireless Settings
Once you have accessed the camera’s interface, navigate to the wireless settings section. Here, you will find options to scan for available Wi-Fi networks or manually enter the network name (SSID) and password.
Note: It’s recommended to use a strong and unique password for your wireless network to ensure maximum security.
4. Connecting to Your Wi-Fi Network
After entering the network details, click on the “Connect” or “Apply” button to establish a wireless connection between the camera and your Wi-Fi network. The camera will then attempt to connect to the network using the provided credentials.
Make sure to keep the camera and the Wi-Fi router in close proximity during the setup process to ensure a strong wireless signal.
5. Testing the Wireless Connection
Once the camera has successfully connected to the Wi-Fi network, disconnect the ethernet cable and place the camera in its desired location. Ensure that the camera is receiving a strong wireless signal by checking the signal strength indicator on the camera’s interface.
Note: If the signal strength is weak, consider moving the Wi-Fi router closer to the camera or using a Wi-Fi range extender to improve the signal coverage.
By following these steps, you will be able to set up a secure and reliable wireless connection for your security camera system. After establishing the wireless connection, you can proceed with configuring other settings such as motion detection and remote access to enhance the functionality of your wireless security camera system.
Configuring and Managing the Camera System
Once you have installed your wireless security camera system, it is essential to properly configure and manage it to ensure optimal performance and security. This section will guide you through the necessary steps.
1. Connect to the camera system’s network: To access the camera system, you need to connect your computer or mobile device to its network. Look for the Wi-Fi network name (SSID) provided with the system and connect to it using the provided password.
2. Access the camera system’s management interface: Open a web browser and enter the IP address of the camera system to access its management interface. Login using the default username and password, which can usually be found in the system’s documentation.

3. Set up wireless settings: In the management interface, navigate to the wireless settings section and configure the necessary parameters. This includes selecting the appropriate Wi-Fi network for the cameras to connect to and entering the network password.
4. Configure camera settings: Each camera in the system will have its own configuration options. This may include adjusting image quality, motion detection sensitivity, and recording settings. Take the time to customize these settings according to your preferences and needs.
5. Set up remote access: To monitor your camera system from outside your local network, you need to set up remote access. This typically involves configuring port forwarding on your router and using a dynamic DNS service. Consult your camera system’s documentation for specific instructions.
6. Enable security features: It is important to enable security features provided by your camera system, such as encryption and authentication. This helps protect your system from unauthorized access and ensures the privacy of your footage.
7. Regularly update firmware: Camera manufacturers often release firmware updates to fix bugs and enhance security. Check for firmware updates regularly and apply them to keep your camera system up-to-date and secure.

| Tip: | Keep a record of your camera system’s settings, including IP addresses, usernames, and passwords, in a secure location. This will help you quickly troubleshoot any issues or set up a new system in the future. |
|---|
Securing the System from Hacking
When it comes to setting up a wireless security camera system, it is essential to take steps to protect it from hacking attempts. Here are some measures you can implement to secure your system:
1. Change the default username and password: The first line of defense against hackers is to change the default login credentials for your camera system. Default usernames and passwords are commonly known and can easily be exploited by experienced hackers.
2. Use strong and unique passwords: Create strong, complex passwords that include a combination of letters, numbers, and special characters. Avoid using easily guessable information such as your name, birthdate, or address. Additionally, ensure that you use different passwords for each camera and device in your system.
3. Keep the firmware up to date: Manufacturers often release firmware updates to address security vulnerabilities. Regularly check for updates and install them promptly to ensure that your camera system is protected against the latest threats.
4. Enable encryption: Ensure that your camera system uses encryption to protect the communication between the cameras and the monitoring device. Look for systems that offer secure protocols such as WPA2 or AES encryption.
5. Set up a secure Wi-Fi network: Use a strong Wi-Fi network password and enable network encryption, such as WPA2. Restrict access to your network by only allowing authorized devices to connect and regularly monitor the connected devices list.
6. Disable remote access: If you do not require remote access to your camera system, consider disabling this feature. Remote access can increase the vulnerability of your system to hacking attempts.
7. Install a firewall: A firewall acts as a barrier between your camera system and the internet, monitoring and blocking unauthorized network traffic. Ensure that your system has a firewall installed and properly configured.
8. Regularly monitor and log activity: Keep track of the activity on your camera system by monitoring and logging events. This can help you identify any suspicious activity or unauthorized access attempts.
9. Be cautious of physical security: Ensure that your camera system is installed in a secure location to prevent unauthorized physical access. Consider using tamper-resistant screws or enclosures to further protect your cameras.
By implementing these security measures, you can significantly reduce the risk of your wireless security camera system being hacked. Regularly review and update your security practices to stay ahead of potential threats.
Monitoring and Reviewing Camera Footage
Once your wireless security camera system is set up and running, it’s important to regularly monitor and review the footage to ensure the safety and security of your property. Here are some key steps to consider:
1. Schedule Regular Checkups
Set a schedule to check the camera footage regularly. This could be daily, weekly, or any other frequency that suits your needs. Regularly reviewing the footage will help you identify any suspicious activities or incidents that might have occurred.
2. Use Motion Detection Alerts
Configure your wireless security cameras to send you motion detection alerts. You can set up these alerts on your camera’s mobile app or software. This way, whenever the camera detects any movement in its field of view, you’ll be notified immediately. This feature can save you time, especially if you don’t have the capacity to actively monitor the footage continuously.
3. Analyze and Share Footage
When reviewing the camera footage, pay close attention to any unusual activities or behaviors. If you notice any potential threats or security breaches, make sure to capture and save the relevant video clips. Additionally, you can share the footage with law enforcement or other relevant authorities if needed, to assist in any investigations.
4. Regularly Maintain and Upgrade
Keep your wireless security camera system up to date with the latest firmware and software updates. Regular maintenance and upgrades will ensure that your cameras are functioning optimally and have the latest security features. This will help enhance the overall efficiency and effectiveness of your surveillance system.
By consistently monitoring and reviewing your camera footage, you can proactively address and prevent any security risks or incidents. Regular checks and maintenance will help you maintain a safe and secure environment for your property.
Troubleshooting Common Issues
Setting up a wireless security camera system can have its challenges. Here are some common issues that you might encounter and their possible solutions:
No Power
If your camera is not powering on, first check if it is properly plugged into a power source. Ensure that the power outlet is functioning by plugging in another device. If the outlet is working fine, try using a different power adapter or cable to see if the issue lies there. If none of these solutions work, it might be a problem with the camera itself and you may need to contact the manufacturer for support.
Poor Signal Strength
If you’re experiencing a weak signal or frequent disconnections, the problem may lie with the distance between the camera and the wireless router. Try moving the camera closer to the router to improve signal strength. Additionally, check for any objects or walls that could be obstructing the signal. If the issue persists, consider adding a wireless range extender or positioning the router in a more central location.
Interference
Interference from other devices, such as microwave ovens or cordless phones, can affect the performance of your wireless camera system. To mitigate this, try relocating the camera or router away from these devices. You can also change the wireless channel on your router to minimize interference from neighboring networks. Updating the firmware on your camera and router may also help resolve compatibility issues.
Loss of Video Feed
If you’re experiencing a loss of video feed, first check if the camera is still connected to the network. Ensure that the camera’s Wi-Fi settings are correctly configured and that it has a stable connection to the wireless router. If the camera is connected but there’s still no video feed, try restarting both the camera and the router. If the issue persists, consider resetting the camera to its factory settings and setting it up again from scratch.
Poor Image Quality
If the video feed from your camera appears blurry or distorted, check the camera lens for any dirt or smudges. Clean the lens gently with a soft cloth or lens cleaner. Adjust the camera’s focus if it has a manual focus option. Additionally, check the camera’s video settings to ensure that they are optimized for image quality. If the problem persists, it could be a hardware issue with the camera and you may need to contact technical support for further assistance.
| Issue | Possible Solution |
|---|---|
| No Power | Check power source, adapter, and cable |
| Poor Signal Strength | Move camera closer to router, remove obstructions |
| Interference | Relocate camera or router, change wireless channel |
| Loss of Video Feed | Check network connection, restart camera and router |
| Poor Image Quality | Clean lens, adjust focus, optimize video settings |
FAQ,
What equipment do I need to make a wireless security camera system?
To make a wireless security camera system, you will need several pieces of equipment, including wireless security cameras, a wireless receiver, a power source for the cameras, and a monitor or recording device to view and store the footage.
How do I set up a wireless security camera system?
To set up a wireless security camera system, you will need to install the cameras at strategic locations around your property, connect them to a power source, and then pair them with the wireless receiver. The receiver can be connected to a monitor or recording device for viewing the footage. You may also need to configure the cameras and receiver using their respective settings and controls.


