Facebook Live has become a popular way for individuals and businesses to connect with their audience in real time. While you can easily go live using your smartphone, using a DSLR camera can take your live stream to the next level in terms of video and audio quality.
Streaming with a DSLR camera may seem complicated, but with the right equipment and a few simple steps, you can start broadcasting high-quality live videos on Facebook. In this article, we will guide you through the process of setting up your DSLR camera for Facebook Live.
Step 1: Check Camera Compatibility
Before you get started, make sure your DSLR camera is compatible with live streaming. Check the manufacturer’s website or user manual to see if it supports live video output via HDMI or USB. Some popular DSLR cameras known for their live streaming capabilities include Canon EOS, Nikon D, and Sony Alpha series.
Step 2: Set Up Camera
Mount your DSLR camera on a tripod to ensure stability during the live stream. Connect your camera to a power source using an AC adapter to avoid any battery-related interruptions. Adjust the camera settings for optimal video quality, such as aperture, ISO, white balance, and focus.
Step 3: Connect Camera to Computer
To stream your DSLR camera’s video to Facebook Live, you need to connect it to your computer. Use an HDMI cable or USB capture device to connect the camera to your computer’s video input. Install any necessary drivers or software provided by the camera manufacturer to enable live video streaming.
Step 4: Choose Streaming Software
There are several streaming software options available, such as OBS Studio, Streamlabs OBS, and XSplit. Choose the one that best suits your needs and install it on your computer. These software programs allow you to customize your stream with overlays, transitions, and other effects.

Step 5: Set Up Streaming Software
Open the streaming software and configure the settings to connect to Facebook Live. Enter your Facebook credentials and select the page or profile you want to stream to. Adjust the video and audio settings, such as resolution, frame rate, and microphone input.
Step 6: Start Streaming on Facebook Live
Once everything is set up, you are ready to go live on Facebook! Click the “Start Streaming” button in the streaming software, and Facebook will detect the incoming video feed from your DSLR camera. Add a catchy description and choose your audience settings before clicking the “Go Live” button.
Streaming on Facebook Live with a DSLR camera can enhance the quality and professionalism of your live videos. Follow these steps, and you’ll be able to create engaging and visually appealing content for your followers.

Remember to test your equipment and internet connection before going live to ensure a smooth and uninterrupted stream.
Choosing the Right DSLR Camera for Facebook Live
When it comes to streaming on Facebook Live using a DSLR camera, choosing the right camera is essential. Here are some factors to consider when making your decision:
- Camera Resolution: Look for a DSLR camera with high resolution. Higher resolution means better image quality, which is important for a professional-looking live stream.
- Low-Light Performance: Facebook Live broadcasts can occur in different lighting conditions, so it’s important to choose a camera that performs well in low-light situations. Look for a camera with a high ISO range and good low-light capabilities.
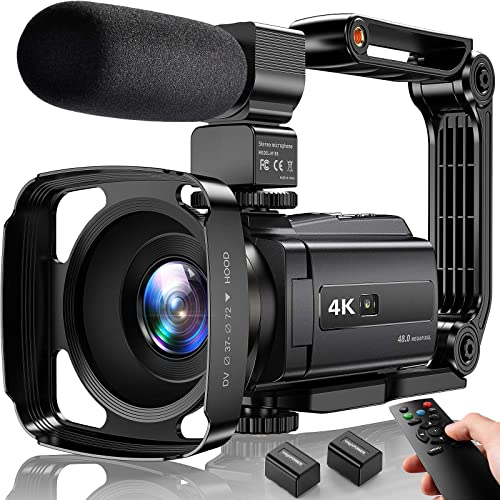
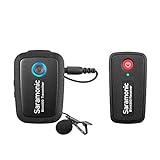
- Audio Quality: While the focus is often on video quality, don’t overlook the importance of good audio. Look for a DSLR camera that has a built-in microphone or the ability to connect an external microphone for better sound quality.
- Autofocus: A camera with reliable autofocus is crucial for capturing clear and sharp images during your Facebook Live broadcasts. Look for a camera that offers fast and accurate autofocus capabilities.
- Connectivity: Check if the camera has the necessary connectivity options to stream directly to Facebook Live. Look for cameras that offer Wi-Fi or built-in streaming capabilities for easy and seamless broadcasting.
Before making your final decision, it’s a good idea to read reviews and compare different models of DSLR cameras. Consider your budget and the specific requirements of your live streaming setup. With the right DSLR camera, you’ll be able to create high-quality Facebook Live streams that engage and captivate your audience.
Essential Accessories for DSLR Live Streaming on Facebook
When it comes to live streaming on Facebook with a DSLR camera, there are a few essential accessories that can enhance your streaming experience and help you produce professional-looking videos. Here are some must-have accessories to consider:
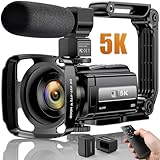
1. Tripod or Gimbal Stabilizer
A sturdy tripod or gimbal stabilizer is crucial for DSLR live streaming on Facebook. It helps eliminate shaky footage and keeps your camera steady during the entire stream. Whether you’re streaming an event, tutorial, or vlogging, a tripod or gimbal stabilizer will greatly improve the overall quality of your video.

2. External Microphone
To ensure clear and high-quality audio, investing in an external microphone is highly recommended. Built-in DSLR microphones can pick up unwanted noise, such as wind or background chatter. An external microphone helps capture crisp audio and provides a more professional sound for your live stream.
3. Power Adapter or Extra Batteries
Live streaming can drain your camera’s battery quickly, especially if you’re streaming for an extended period. To avoid running out of power during your live stream, consider using a power adapter or having extra camera batteries on hand. This will ensure that you can stream uninterrupted without worrying about your camera dying.
It’s worth noting that some DSLRs may have limitations on how long they can continuously record, so having additional power options is essential.
4. High-Quality Lens
The lens you use can make a significant difference in the quality of your DSLR live stream. Consider investing in a high-quality lens that suits your streaming needs. A good lens can help you achieve sharper images, better focus, and even low-light performance, resulting in a more visually appealing live stream.
Research different lens options and consult with professionals to find the best lens for your specific streaming requirements.
In conclusion, these essential accessories can greatly enhance your DSLR live streaming experience on Facebook. A tripod or gimbal stabilizer will keep your camera steady, an external microphone ensures high-quality audio, and having a power adapter or extra batteries avoids any interruptions due to low battery. Lastly, investing in a high-quality lens will significantly improve the overall visual appeal of your live stream.
Remember to test and familiarize yourself with these accessories before going live to ensure optimal performance and a seamless streaming experience.
Setting up your DSLR Camera for Facebook Live
Want to take your Facebook Live streaming to the next level? Using a DSLR camera can provide you with higher quality video and a more professional feel. Follow these steps to set up your DSLR camera for Facebook Live:
1. Check compatibility:
Before getting started, make sure your DSLR camera is compatible with live streaming. Some cameras may require additional accessories or software to connect to your computer or phone for streaming.

2. Connect your camera to your computer:
Use the appropriate USB cable to connect your DSLR camera to your computer. Ensure that your camera is set to “Live View” mode and turn on the “USB Tethering” option if available.
3. Set up your streaming software:
Download and install a streaming software such as OBS (Open Broadcaster Software) or vMix. These programs allow you to capture and broadcast the live video feed from your camera. Configure the software to recognize your DSLR camera as the video source.
4. Adjust camera settings:

Access your camera’s settings and make adjustments for optimal video quality. Set the video resolution and frame rate to the desired settings for your stream. Consider using a tripod or stabilizer for steady shots.
5. Set up your streaming platform:
Create a Facebook Live event or go live directly from your profile page. Connect your streaming software to Facebook Live by copying the stream key provided by Facebook into your streaming software.
6. Test and go live:
Before going live, test your setup to ensure everything is working properly. Check the video and audio quality, framing, and any overlays or graphics you plan to use. Once you’re ready, start your Facebook Live stream and engage with your audience!
With these steps, you can set up your DSLR camera for Facebook Live and elevate your streaming game. Enjoy higher quality video and impress your viewers with a more professional look!
Configuring Audio for Facebook Live Broadcasting with a DSLR Camera
When it comes to broadcasting a Facebook Live video with a DSLR camera, one important aspect that you need to consider is the audio quality. While DSLR cameras are known for their excellent video quality, their built-in microphones are often not sufficient for professional live streaming.
To configure the audio for Facebook Live broadcasting with a DSLR camera, you will need to have an external microphone and connect it to your camera. There are different types of microphones that you can use, such as shotgun microphones or lavalier microphones, depending on your needs and preferences.
Once you have selected the microphone, you will need to connect it to your DSLR camera. Most DSLR cameras have a dedicated microphone input port, usually located on the side of the camera body. You will need to plug the microphone into this port using the appropriate cable.
After connecting the microphone, you will need to adjust the audio settings on your DSLR camera. Access the camera’s menu and look for the audio settings options. Here, you can adjust the microphone input level to ensure optimal audio quality. It’s important to perform some tests and adjust the levels accordingly to avoid any distortion or noise.
Additionally, it is recommended to monitor the audio while broadcasting live. You can connect a pair of headphones to your camera or use an external audio monitor to ensure that the audio levels are coming through clearly. This way, you can make any necessary adjustments on the spot to improve the audio quality.
Before you start broadcasting on Facebook Live, it’s crucial to do some test runs with the camera and microphone setup. Check the audio levels, listen for any interference or unwanted noise, and make any necessary adjustments to ensure a smooth and professional live stream.
Remember, the audio quality plays a crucial role in the overall viewer experience, so investing in a good external microphone and properly configuring the audio settings is essential for successful Facebook Live broadcasting with a DSLR camera.
By following these steps and paying attention to the audio setup, you can ensure that your Facebook Live videos sound as good as they look, providing an immersive and enjoyable experience for your viewers.
Optimizing Lighting for Professional Facebook Live Streams
Facebook Live has become a popular platform for individuals and businesses to showcase their content in a live format. To ensure that your Facebook Live streams look professional and visually appealing, optimizing the lighting is crucial.
1. Natural Light is Key
Utilizing natural light can significantly enhance the quality of your Facebook Live streams. Position yourself or your subject near a window or in a well-lit area. Natural light provides a softer and more flattering illumination, creating a more professional and pleasing look.
2. Invest in Professional Lighting Equipment
While natural light is ideal, it may not always be available or sufficient. Investing in professional lighting equipment can give you more control over the lighting conditions. Consider using softbox lights or LED panels to create a well-balanced and even light source. Experiment with different lighting setups to find the most flattering and appropriate look for your content.
Additionally, always keep in mind the color temperature of your lighting equipment. Aim for a neutral white balance to avoid any unnatural or washed-out appearances.
3. Avoid Harsh Shadows
Harsh shadows can be distracting and unflattering in a Facebook Live stream. To minimize shadows, use a combination of key light (the main source of illumination), fill light (to diffuse shadows), and backlight (to separate the subject from the background). Balanced lighting helps create a more professional and polished appearance.
Consider using reflectors or diffusers to further control the lighting and soften any harsh shadows that may appear.
Remember: Consistency is key. Ensure that your lighting setup remains consistent throughout your Facebook Live stream, whether it’s a single-session or a series of broadcasts. This consistency will create a professional and cohesive visual experience for your audience.
Optimizing the lighting for your Facebook Live streams can greatly enhance the quality of your content and help you make a lasting impression on your viewers. Experiment with different lighting techniques, and don’t be afraid to seek feedback from your audience to further improve your streaming setup.
Learning the Technical Requirements for Facebook Live Streaming with a DSLR Camera
Facebook Live is a popular feature that allows users to stream live video content directly on their Facebook pages. While using a smartphone or webcam is a common way to go live, streaming with a DSLR camera can offer higher quality and more professional-looking results. However, it is important to understand the technical requirements to ensure a smooth streaming experience.
The first step is to verify that your DSLR camera is capable of live streaming. While most newer models support this feature, some older models may not have built-in support. In such cases, you may need to use an external device, such as a capture card, to connect your camera to your computer or smartphone for streaming.
Once your camera is ready, you will need to ensure a stable internet connection. Facebook recommends a minimum upload speed of 4 Mbps for standard video quality and 8 Mbps for high-definition video quality. A wired connection is typically more reliable than a Wi-Fi connection, so consider connecting your device directly to your router if possible.
On the software side, you will need encoding software to convert the video output from your DSLR camera into a format suitable for live streaming. There are many options available, both free and paid, such as OBS Studio, Wirecast, or XSplit. These software solutions allow you to adjust settings like resolution, frame rate, and bit rate according to your requirements and internet connection speed.
Before going live, it is important to test your setup to ensure everything is working correctly. Set up a private or closed Facebook Live session and stream for a few minutes to check the video and audio quality. This allows you to make any necessary adjustments before broadcasting to a wider audience.
Lastly, make sure you have the necessary accessories to support your DSLR camera during live streaming. A tripod or stabilization device can help prevent shaky footage, and an external microphone can improve audio quality. Additionally, keep spare batteries and memory cards on hand to avoid any interruptions during your live stream.
By understanding and meeting the technical requirements for Facebook Live streaming with a DSLR camera, you can ensure a professional and high-quality streaming experience for your audience.
Preparing a Script or Outline for your Facebook Live Broadcast
When it comes to hosting a successful Facebook Live broadcast with a DSLR camera, one of the key steps in the preparation process is creating a script or outline for your broadcast. This will help you stay organized, ensure that you cover all the necessary points, and deliver a professional and engaging live stream.
1. Define the Purpose and Goals of your Broadcast
Before you start writing your script or outline, it is important to clearly define the purpose and goals of your Facebook Live broadcast. Are you aiming to educate your audience, promote a product or service, or simply entertain? Understanding your objectives will help you structure your content and ensure that you stay focused throughout the broadcast.
2. Plan the Flow of your Broadcast
Next, think about how you want your broadcast to unfold. Consider the sequence of topics or segments you want to cover, and plan the transitions between them. This will help you create a logical and cohesive flow for your viewers to follow. You can also think about incorporating visual elements, such as slides or graphics, to enhance your presentation.
For example, if you’re hosting a tutorial on a specific photography technique, you might want to start with an introduction, then move onto explaining the steps involved, provide examples, and end with a Q&A session or call to action.
3. Write a Script or Outline
Once you have a clear purpose and flow in mind, it’s time to start writing your script or outline. Depending on your style and comfort level, you can choose to write a full script or a more loose outline with key points. Whichever approach you take, make sure to include all the important information, such as key talking points, relevant statistics or data, and any additional resources or links you want to share.
Remember to keep your script or outline concise and engaging. Use clear and conversational language, and consider incorporating storytelling or personal anecdotes to captivate your audience. Also, break your content into smaller sections or bullet points to make it easier to follow during the live stream.
4. Rehearse and Refine
Finally, it’s crucial to rehearse your script or outline before going live. Practice delivering your content and pay attention to your timing, pace, and tone of voice. This will help you identify any areas that need improvement and make adjustments accordingly. You can also gather feedback from a trusted friend or colleague to further refine your script or outline.
By preparing a script or outline for your Facebook Live broadcast, you can ensure that you deliver a well-structured and engaging live stream. With practice and refinement, you’ll become more confident and comfortable in front of the camera, keeping your audience captivated and coming back for more.
Promoting your Facebook Live Stream and Engaging Viewers
Once you have set up your Facebook Live stream with your DSLR camera, it is important to promote it and engage with your viewers to make the most out of your live stream. Here are some tips on promoting your live stream and engaging viewers:
| Create a compelling title: | Choose a catchy and descriptive title for your live stream that will attract viewers. Make sure it clearly conveys what the live stream is about and why it would be valuable for viewers to tune in. |
| Share the live stream announcement: | Before you go live, share an announcement post on your Facebook page and other social media platforms to let your audience know about the upcoming live stream. Include the date, time, and a brief description of what you will be covering in the live stream. |
| Engage with your audience: | During the live stream, actively engage with your viewers by responding to their comments and questions. Encourage them to ask questions and participate in the discussion. This will make the live stream interactive and keep your viewers engaged. |
| Invite friends to watch: | Invite your Facebook friends to watch the live stream by sharing it on your personal profile. This can help increase the viewership and reach of your live stream. |
| Promote the replay: | After the live stream ends, promote the replay of the live stream by sharing it on your Facebook page and other social media platforms. This allows people who missed the live stream to watch it later and helps increase the overall viewership. |
| Collaborate with others: | Consider collaborating with other influencers or experts in your niche for your live stream. This can help attract a larger audience and provide valuable insights to your viewers. |
| Run ads: | If you want to further boost the visibility of your live stream, consider running Facebook ads to promote it. This can help reach a wider audience and increase the chances of getting more viewers. |
| Follow up after the live stream: | After the live stream, follow up with your viewers by thanking them for tuning in and addressing any additional questions or feedback. This shows that you value their participation and can help build a stronger connection with your audience. |
By promoting your Facebook Live stream and engaging with your viewers, you can maximize the reach and impact of your live stream, turning it into a valuable tool for connecting with your audience.
Analyzing and Improving your Facebook Live Streams with a DSLR Camera
Streaming live videos on Facebook has become a popular way for individuals and businesses to engage with their audiences in real-time. While smartphones can capture decent quality videos, using a DSLR camera can significantly enhance the production value of your Facebook Live streams. In this article, we will discuss how you can analyze and improve your Facebook Live streams using a DSLR camera.
1. Assessing your equipment
Before streaming on Facebook Live with a DSLR camera, it’s essential to evaluate your equipment. Ensure that you have a compatible DSLR camera, a stable tripod, and any necessary adaptors or cables to connect your camera to your computer or smartphone for streaming purposes.
2. Optimizing camera settings
To improve the quality of your Facebook Live streams, take the time to optimize your DSLR camera settings. Adjust your aperture, shutter speed, ISO, and white balance to achieve the best image quality. Experiment with different settings to find what works best for your specific environment and lighting conditions.
3. Testing your internet connection
A strong and stable internet connection is crucial for a smooth streaming experience. Prior to going live on Facebook, test your internet speed using online tools. Ensure that you have a reliable internet service provider and consider connecting your computer or smartphone directly to your router via an Ethernet cable for a more stable connection.
4. Setting up your streaming software
Choose a reliable streaming software that supports Facebook Live and can work with your DSLR camera. Some popular options include OBS Studio, Xsplit, and Wirecast. Configure the software and connect your DSLR camera as the video source. Ensure that you have the necessary audio inputs and outputs configured.
5. Optimizing lighting and audio
Lighting and audio quality play a significant role in the overall viewer experience. Use proper lighting techniques, such as three-point lighting, to eliminate shadows and create a professional-looking video. Invest in a dedicated microphone or use an external audio source to capture clear and high-quality sound.
6. Engaging with your audience
During your Facebook Live stream, engage with your audience by responding to comments and questions in real-time. Encourage viewers to interact and create a sense of community. Maintain a conversational and friendly tone to make your streams more enjoyable and interactive.
By analyzing and improving your Facebook Live streams with a DSLR camera, you can enhance the overall quality and engagement of your content. Remember to continually assess and adjust your equipment, camera settings, internet connection, streaming software, lighting, audio, and audience engagement techniques to deliver the best possible viewing experience.
Question-answer:
What is Facebook Live?
Facebook Live is a feature on Facebook that allows users to livestream video content in real-time. It allows users to connect with their friends, followers, or audience in a more interactive way.
Can I use a DSLR camera for Facebook Live?
Yes, you can use a DSLR camera for Facebook Live. However, you will need additional equipment such as a capture card or an HDMI converter to connect the camera to your computer or mobile device.


