
Do you want to upgrade your video conferencing experience? Are you tired of the low-quality webcam on your computer? Look no further, because we have a solution for you! In this article, we will guide you through the process of turning your iPhone camera into a high-quality webcam. Say goodbye to grainy and pixelated video, and say hello to crystal clear image quality!
Why use your iPhone as a webcam?
There are several advantages to using your iPhone camera as a webcam. First and foremost, iPhone cameras are known for their exceptional image quality. The latest iPhone models boast impressive camera specs, including high-resolution sensors and advanced image processing technology. By using your iPhone as a webcam, you can leverage these features to ensure that you look your best during video calls and conferences.
Moreover, the versatility of the iPhone camera cannot be overstated. With built-in stabilization, autofocus, and face tracking, your iPhone camera can follow your movements and keep you in focus at all times. This is particularly useful if you like to move around during video calls or if you need to present something to your audience. The wide-angle lens and portrait mode also add a professional touch to your video, making you stand out from the crowd.
In the following sections, we will walk you through the steps to set up your iPhone camera as a webcam. You don’t need any additional hardware or complicated software – just your iPhone, a USB cable, and a compatible app. Get ready to elevate your video conferencing game!

Easy Steps to Use iPhone Camera as Webcam
If you want to use your iPhone camera as a webcam for your computer, you’re in luck! With the help of some third-party apps and software, you can easily transform your iPhone into a high-quality webcam in just a few simple steps. Follow the instructions below to get started:
Step 1: Download a Webcam App
The first step is to download a webcam app on your iPhone. There are several apps available on the App Store, such as EpocCam, iVCam, and Reincubate Camo. These apps allow you to use your iPhone camera as a webcam using either a wired or wireless connection.
Step 2: Install the Companion Software on Your Computer
After downloading the app on your iPhone, you’ll need to install the companion software on your computer. Visit the app developer’s website and download the required software for your operating system. Follow the on-screen instructions to complete the installation process.
Step 3: Connect Your iPhone to Your Computer
Once you have the app installed on your iPhone and the companion software installed on your computer, connect your iPhone to your computer using a USB cable or through Wi-Fi, depending on the app you’re using. Make sure both devices are on the same network.
Step 4: Launch the Webcam App
Open the webcam app on your iPhone and the companion software on your computer. The app should automatically detect your iPhone as a webcam. If not, follow the in-app instructions to establish the connection between your iPhone and computer.
Step 5: Adjust Camera Settings and Start Using Your iPhone as a Webcam
Before you start using your iPhone as a webcam, you may want to adjust some camera settings. Most webcam apps allow you to control video quality, resolution, focus, and other settings. Once you’re satisfied with the settings, you can start using your iPhone camera as a webcam in applications like Zoom, Microsoft Teams, or OBS Studio.
Using your iPhone camera as a webcam is a great way to enhance your video calls and online meetings. It allows you to take advantage of your iPhone’s excellent camera quality and provides a more professional look for your video conferences. Enjoy the seamless experience of using your iPhone camera as a webcam!
Necessary Apps and Tools
Before you turn your iPhone camera into a webcam, you will need to download some apps and tools. Here are the essential ones:
1. Camera app: Make sure you have the latest version of the camera app installed on your iPhone. This will ensure that you have access to all the features needed for the webcam functionality.
2. Webcam software: To use your iPhone camera as a webcam on your computer, you will need to download a webcam software. There are several options available, such as EpocCam, iVCam, and DroidCam. These apps will allow you to connect your iPhone to your computer and use it as a webcam.

3. Wi-Fi connection: Since the iPhone and the computer need to communicate with each other, make sure you have a stable Wi-Fi connection. This will ensure a smooth and uninterrupted webcam experience.
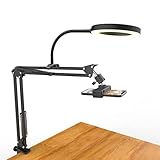
4. Mount or stand: To position your iPhone correctly, you will need a mount or stand. This will hold the phone in place and allow you to adjust its angle and height as needed. There are various options available, including tripod mounts and desk stands.
5. Lighting: Good lighting is crucial for video calls and conferences. Make sure you have adequate lighting in your room to ensure that you are well lit and clearly visible on camera. Consider using a ring light or a desk lamp to enhance your visibility.
Connecting Your iPhone to Your Computer
To use your iPhone as a webcam for your computer, you will need to connect it to your computer using a USB cable. Here are the steps to follow:
1. Make sure you have the latest version of iTunes installed on your computer. You can download it from the Apple website if you don’t already have it.

2. Connect one end of the USB cable to your iPhone and the other end to an available USB port on your computer.
3. On your iPhone, you will see a prompt asking if you trust this computer. Tap “Trust” to continue.
4. On your computer, open the iTunes application. If it doesn’t open automatically, you can open it manually.
5. In iTunes, click on the iPhone icon located at the top left corner of the window.
6. Go to the “Summary” tab and scroll down to the “Options” section.

7. Check the box next to “Sync with this iPhone over Wi-Fi” if it’s not already checked. This will allow your iPhone to stay connected to your computer even when not connected via USB.
8. Now, on your computer, you can use your iPhone as a webcam for video conferencing or other purposes. You may need to download additional software or apps depending on the application you want to use your iPhone camera with, so make sure to check the requirements of the specific software or app.
By following these steps, you can easily connect your iPhone to your computer and use its camera as a webcam.
Configuring Camera Settings
Before using your iPhone camera as a webcam, it’s important to configure the camera settings for optimal performance. The following steps will guide you through the process:
Step 1: Install a Camera App
To start, you’ll need to install a camera app on your iPhone that allows you to use it as a webcam. There are several options available on the App Store, such as EpocCam, iVCam, and DroidCam. Choose one that suits your needs and download it to your iPhone.

Step 2: Connect Your iPhone to Your Computer
Next, connect your iPhone to your computer using a Lightning cable. Make sure the cable is securely plugged into both your iPhone and your computer’s USB port.
Step 3: Launch the Camera App
Open the camera app that you installed on your iPhone. You may need to grant the app permission to access your iPhone’s camera and microphone.
Step 4: Adjust Camera Settings
Once the camera app is open, navigate to the settings or preferences section. Here, you can adjust various camera settings to ensure the best image and video quality. Some common settings include resolution, frame rate, exposure, and focus.
| Setting | Description |
|---|---|
| Resolution | Choose the desired resolution for your webcam feed. Higher resolutions will result in better image quality but may require more bandwidth. |
| Frame Rate | Select the frame rate at which your webcam will capture video. Higher frame rates result in smoother video playback. |
| Exposure | Adjust the exposure settings to ensure that your video is not too bright or too dark. Most camera apps offer automatic or manual exposure options. |
| Focus | Set the focus mode of your camera app. You can choose between automatic or manual focus, depending on your needs. |
Step 5: Test Your Webcam
Once you have configured the camera settings to your liking, it’s time to test your iPhone webcam. Open a video conferencing or streaming app on your computer and select your iPhone camera as the video input device. Make sure the video feed is working properly and adjust the settings if necessary.
By following these steps, you can successfully configure your iPhone camera as a webcam and enjoy high-quality video during your virtual meetings and live streams.

Testing the Camera Connection
Once you have successfully connected your iPhone camera to your computer as a webcam, it is important to test the connection to ensure that everything is working properly.
To test the camera connection, follow these steps:
- Launch a video conferencing application: Open the video conferencing application of your choice on your computer, such as Zoom or Skype.
- Check the camera settings: Within the video conferencing application, navigate to the settings or preferences section and ensure that the connected iPhone camera is selected as the video input device.
- Start the video call: Initiate a video call or join a meeting to test the camera connection.
- Verify camera feed: Once the video call has started, check the video feed to confirm that the iPhone camera is functioning as expected. Ensure that the image is clear and that there are no issues with resolution or frame rate.
- Test audio: In addition to testing the camera, verify that the audio input is also working correctly. Speak into the microphone of your iPhone and ensure that your voice is being captured and transmitted clearly.
If you encounter any issues during this testing process, double-check the camera connection and settings, and ensure that the necessary drivers or software are installed on your computer.
Note: Some video conferencing applications may require additional configuration or setup to use the iPhone camera as a webcam. Refer to the application’s documentation or support resources for more information.
Mounting Your iPhone for Optimal Use
When using your iPhone as a webcam, it is important to have it properly mounted to ensure the best experience. Here are some tips to help you mount your iPhone for optimal use:
1. Choose the right mounting option: There are various mounting options available, including tripod mounts, clamp mounts, and magnetic mounts. Consider your specific needs and preferences to choose the best option for you.
2. Position the camera at eye level: To create a more natural video chatting experience, position your iPhone camera at eye level. This will help prevent awkward camera angles and ensure that you and the person you are talking to are looking directly at each other.
3. Use a stable mount: Stability is crucial when using your iPhone as a webcam. Make sure the mount you choose is sturdy and secure to prevent any unwanted movements or shaking during your video calls.
4. Consider the lighting: Good lighting is essential for clear and high-quality video. Pay attention to the lighting conditions in your workspace and position yourself in a well-lit area. You can also use external lighting options, such as ring lights, to enhance the visibility and clarity of your video.
5. Optimize the camera settings: Before using your iPhone as a webcam, make sure to adjust the camera settings to optimize the video quality. You can do this by going to the Settings app, selecting Camera, and adjusting options such as resolution, frame rate, and exposure.
6. Test the setup: Once you have mounted your iPhone, take some time to test the setup before using it for official video calls or streaming. Check the video quality, audio clarity, and stability of the mount to ensure everything is working properly.
By following these tips, you can ensure that your iPhone camera is mounted correctly for optimal use as a webcam. This will result in better video quality, improved stability, and an overall enhanced video chatting experience.
Adjusting Focus and Exposure
When using your iPhone camera as a webcam, it’s important to ensure that your focus and exposure settings are optimized for the best image quality. Here are a few tips to help you adjust these settings:
1. Manually Adjust Focus
If you find that your webcam image is blurry, you can manually adjust the focus on your iPhone camera. To do this, tap on the area of the screen where you want to focus and hold until the yellow square appears. This indicates that the focus is locked. You can also use the manual focus slider that appears above the yellow square to fine-tune the focus level.
2. Control Exposure
Proper exposure is crucial for a clear and balanced image. To adjust exposure settings on your iPhone camera, tap on the screen and hold until the yellow square appears. Once the focus is locked, a small sun icon will appear next to the square. You can then swipe up or down to increase or decrease the exposure level. Swipe up to make the image brighter or swipe down to darken it.

It’s important to note that adjusting focus and exposure manually might require some trial and error depending on the lighting conditions and your personal preferences. Experimenting with different settings will help you find the ideal balance for your webcam image.
Troubleshooting Common Issues
If you are experiencing any issues while trying to use your iPhone camera as a webcam, here are some common problems and their potential solutions:
1. Connection Issues:
Make sure that your iPhone is connected to the same Wi-Fi network as your computer. Check your network settings and ensure that both devices are connected properly. If the issue persists, try restarting both devices and reconnecting them.
2. App Compatibility:
Ensure that you have installed a compatible app on both your iPhone and computer. There are several apps available that enable you to use your iPhone camera as a webcam. Check the app’s requirements and compatibility with your devices.
3. Camera Permissions:
Check if the app you are using has access to your iPhone camera. Go to your iPhone settings, find the app in the list, and make sure that camera access is enabled for the app. If not, grant the necessary permissions.
4. Software Updates:
Make sure that both your iPhone and computer are running the latest software updates. Outdated software can cause compatibility issues and impact the functionality of the app you are using.
5. Device Restart:
If you have tried the above steps and the issue persists, try restarting your iPhone and computer. Restarting can help resolve any temporary glitches or conflicts that may be affecting the camera functionality.
6. Hardware Issues:
In rare cases, there might be a hardware issue with either your iPhone or computer. If nothing seems to work, try connecting your iPhone to a different computer or using a different iPhone camera app to see if the problem persists. Consider contacting technical support for further assistance.
By following these troubleshooting steps, you should be able to resolve most common issues and successfully use your iPhone camera as a webcam.
FAQ
What is the process of making an iPhone camera as a webcam?
The process of making an iPhone camera as a webcam involves downloading a third-party app on your iPhone and a desktop app on your computer. These apps allow you to connect your iPhone to your computer using a USB cable or wirelessly, and use your iPhone camera as a webcam during video calls or online meetings.
Are there any specific apps that I can use to make my iPhone camera as a webcam?
Yes, there are several apps available on the App Store that can turn your iPhone camera into a webcam. Some popular options include EpocCam, iCam, and iVCam. These apps usually have a desktop component as well, which you will need to install on your computer for the camera to work.
Can I use my iPhone camera as a webcam without any additional apps or software?
No, you cannot use your iPhone camera as a webcam without additional apps or software. The default camera app on the iPhone does not have the capability to function as a webcam. You will need to download a third-party app from the App Store and install the corresponding desktop app on your computer.
What are the advantages of using an iPhone camera as a webcam?
Using an iPhone camera as a webcam can provide several advantages. Firstly, iPhone cameras are generally of higher quality compared to most built-in webcams on computers. This means that you can expect better video quality during your video calls or online meetings. Additionally, using your iPhone camera allows you to have more flexibility in terms of camera angles and placement, as you can position your iPhone wherever you prefer.
Can I use my iPhone camera as a webcam on different video conferencing platforms?
Yes, most third-party apps that allow you to use your iPhone camera as a webcam are compatible with various video conferencing platforms such as Zoom, Microsoft Teams, and Google Meet. These apps act as virtual cameras, which means they can be selected as the video input source within the settings of the video conferencing platform you are using.


