Ever struggled to capture clear and well-lit photos on your iPhone in low-light conditions? The iPhone camera is known for its impressive capabilities, but sometimes it needs an extra boost to produce stunning results in challenging lighting situations. That’s where the flash comes in.
The flash on your iPhone can greatly improve the quality of your photos by providing additional light when needed. Whether you’re taking pictures at a dimly lit restaurant or capturing memories in a dark room, enabling the flash can make a significant difference in the outcome of your photos.
In this article, we will guide you through the simple steps to make the iPhone camera use the flash. By following these steps, you’ll be able to enhance your photography skills and capture vibrant and well-exposed images even in low-light environments.
Understanding the iPhone Camera Flash
The iPhone camera flash is an essential feature that allows you to capture well-lit photos even in low-light conditions. In this section, we will explore how the iPhone camera flash works and how you can make the most out of it.
How Does the iPhone Camera Flash Work?
The iPhone camera flash utilizes the built-in LED flash located on the back of the device. When you activate the flash, the LED emits a burst of bright light to illuminate the scene you are capturing, helping to ensure that your subject is properly exposed.

It’s important to note that the iPhone camera flash is not always necessary or ideal. In some situations, such as when you are capturing photos in well-lit environments, using the flash can result in overexposure or unnatural lighting. The iPhone’s camera software is designed to automatically adjust the flash based on the lighting conditions, but it’s still important to consider whether using the flash is appropriate for the specific photo you are taking.
How to Activate the iPhone Camera Flash
Activating the iPhone camera flash is a simple process. When you open the Camera app, you will find the flash icon located in the top left corner of the screen. Tapping on the flash icon will present you with several options:
- Auto: This is the default flash setting. The iPhone camera software will automatically determine whether to use the flash or not based on the lighting conditions.
- On: This option forces the camera flash to always fire, regardless of the lighting conditions. It’s best to use this setting in low-light environments.
- Off: This option disables the flash completely. Use this setting when capturing photos in well-lit environments or when you want to achieve a more natural lighting effect.
By understanding how the iPhone camera flash works and knowing how to activate it, you can take full advantage of this feature to ensure well-lit and high-quality photos. Experiment with different flash settings in various lighting conditions to achieve the desired effect in your photographs.
Step 1: Accessing the Camera Settings
To make the iPhone camera use flash, you will need to access the camera settings. Follow the steps outlined below to do this:
1. Open the Settings app
Tap on the “Settings” app icon on your iPhone’s home screen to open the Settings app.

2. Scroll down and tap on “Camera”
Scroll down the list of options in the Settings app until you find the “Camera” option. Tap on it to access the camera settings.
3. Enable the flash
In the camera settings, you will find an option called “Flash”. Tap on it to access the flash settings.
Note: You may need to scroll down to find the “Flash” option depending on your iPhone model and iOS version.
4. Choose a flash setting
There are three flash settings available: “Auto”, “On”, and “Off”. If you want the camera to use flash in all situations, select “On”. If you want the camera to automatically determine when to use flash, select “Auto”. If you prefer not to use flash, select “Off”.
Tip: Keep in mind that using flash can affect the overall quality and appearance of your photos, especially in low-light conditions. Experiment with different flash settings to find the one that works best for your needs.
Once you have selected the desired flash setting, close the Settings app. You can now use the iPhone camera with the flash in the chosen mode.
Step 2: Enabling Flash for the Camera
To enable the flash for the camera on your iPhone, follow these steps:
| Step | Instructions |
|---|---|
| 1 | Unlock your iPhone by entering your passcode or using Touch ID. |
| 2 | Open the “Camera” app from your home screen. The icon looks like a camera lens. |
| 3 | Tap on the flash icon located in the top-left corner of the screen. It looks like a lightning bolt. |
| 4 | A menu will appear with different flash options. Select the desired option: |
| – “Auto” to allow the camera to automatically determine when to use the flash. | |
| – “On” to always use the flash when taking photos or videos. | |
| – “Off” to disable the flash. | |
| 5 | Once you have selected the desired flash option, exit the camera app by pressing the home button or swiping up from the bottom of the screen. |
By following these steps, you can easily enable the flash for the camera on your iPhone and start taking well-lit photos and videos.
Step 3: Adjusting Flash Settings
Once you have opened the camera app on your iPhone, you can adjust the flash settings to ensure that it is used when taking photos in low light conditions. Here’s how to do it:
- Tap on the lightning bolt icon located at the top left corner of the camera screen. This will open the flash settings.
- In the flash settings, you will see three options: Auto, On, and Off.
- The “Auto” option is the default setting, which allows the camera to determine when to use the flash based on the lighting conditions.
- If you want to manually control the flash, you can select the “On” option. This will force the flash to be used for every photo you take.
- If you prefer not to use the flash at all, you can select the “Off” option. This will disable the flash completely.
It is recommended to keep the flash setting on “Auto” for most situations, as this allows the camera to automatically adjust the flash based on the lighting conditions. However, there may be times when you want to manually control the flash to achieve a specific effect or to capture better quality photos in certain scenarios.
Once you have adjusted the flash settings, you can start taking photos with the flash enabled or disabled depending on your preference and the lighting conditions.
Keep in mind that using the flash excessively or inappropriately may result in overexposed or harshly lit photos. It is always a good idea to experiment with different flash settings and lighting conditions to achieve the desired results.
Recommended Articles
If you want to learn more about using the camera on your iPhone, check out these articles:
- How to take photos and videos on your iPhone
- How to use the camera on your iPhone, iPad, or iPod touch
Troubleshooting
If you are experiencing any issues with the flash on your iPhone camera, you can try the following troubleshooting steps:
| Problem | Solution |
| The flash is not working | Ensure that the flash is enabled in the camera settings. If it is already enabled, try restarting your iPhone and then check if the flash is working. |
| The flash is too bright or too dim | Adjust the flash settings to “Auto” and experiment with different lighting conditions to see if that improves the flash output. You can also try using a third-party camera app that offers more advanced flash settings. |
| Flash is not synchronized with the camera | Try resetting the camera settings by going to Settings > General > Reset > Reset All Settings. This will restore the default camera settings, including the flash synchronization. |
If the above troubleshooting steps do not resolve the issue, you may need to contact Apple support for further assistance.
Step 4: Troubleshooting Flash Issues
If you are experiencing issues with the flash on your iPhone’s camera, here are some troubleshooting steps you can try:
| Issue | Possible Solution |
| No Flash Option | Make sure your iPhone is running on the latest version of iOS. Sometimes, older versions may not have the flash option. |
| Flash Not Working | Check if the flash is turned on in the Camera app by tapping on the lightning bolt icon and selecting “On”. If it’s already on, try turning it off and on again. |
| Weak Flash | Ensure that there are no obstructions or fingerprints on the flash lens. Clean it gently with a soft cloth if needed. |
| Flash Issues in Low Light | In low light situations, the flash may not be as effective. Try using other sources of light or consider using an external flash attachment. |
| Camera App Freezing | If the camera app freezes when using the flash, try force-quitting the app and reopening it. You can do this by double-pressing the Home button and swiping up on the camera app preview. |
| Contact Apple Support | If none of the above solutions work, it’s recommended to contact Apple Support for further assistance. They may be able to provide more specific troubleshooting steps or determine if there is a hardware issue with your device. |
By following these troubleshooting steps, you should be able to resolve any flash issues you are experiencing with your iPhone’s camera.
Step 5: Using External Flash Accessories
If the built-in flash on your iPhone doesn’t provide enough light for your photography needs, you can enhance it by using external flash accessories. These accessories come in various forms and offer different levels of lighting control and versatility.
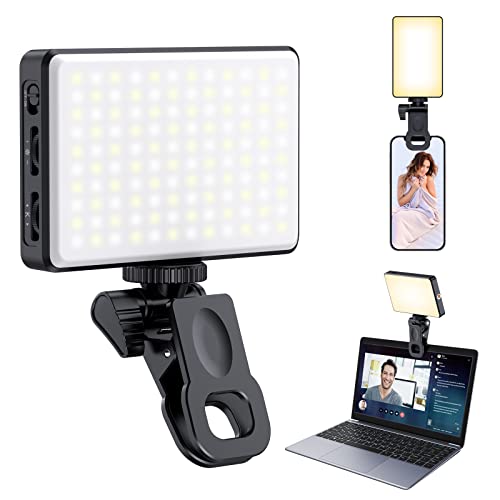
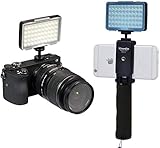
1. LED Light Panels
An LED light panel is a popular choice for iPhone photographers looking to add more light to their images. These panels come in different sizes and feature multiple LED bulbs that provide a continuous light source. They are usually lightweight and portable, making them an excellent option for on-the-go photography.
To use an LED light panel with your iPhone camera, you’ll need an attachment, such as a bracket or a mount, that securely holds the panel in place. Once attached, you can adjust the intensity and direction of the light and experiment with different angles to achieve the desired lighting effect.
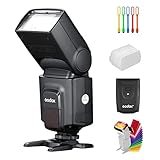
2. External Flash Units
If you prefer a more powerful and versatile option, you can consider using an external flash unit. These units provide a burst of intense light and often come with adjustable settings for controlling the flash output, such as brightness and color temperature.
To connect an external flash unit to your iPhone, you’ll need a compatible flash trigger or adapter. This device allows you to wirelessly trigger the flash and adjust its settings directly from your iPhone. Once connected, you can experiment with different flash angles and modifiers to create stunning lighting effects.
It’s important to note that when using external flash accessories, you may need to adjust the camera settings on your iPhone to achieve optimal results. For example, you may need to manually adjust the exposure or white balance to compensate for the added light.
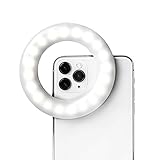
3. Light Diffusers
A light diffuser is another handy accessory that can help soften and spread the light from your iPhone’s flash. It acts as a barrier between the flash and the subject, diffusing the light to reduce harsh shadows and create a more natural-looking illumination.
To use a light diffuser, simply attach it to your iPhone’s flash or the external flash unit if you’re using one. Make sure it covers the entire flash area to ensure maximum diffusion. This accessory is particularly useful for portrait photography or when taking close-up shots of objects.

| Pros | Cons |
|---|---|
| Provides additional lighting for low-light situations | May require additional cost |
| Offers more control and versatility | May add bulk to your setup |
| Allows for creative lighting effects | May need some experimentation to find the optimal settings |
FAQ
Can I use flash on my iPhone camera?
Yes, you can use the flash on your iPhone camera to take better photos in low light conditions. This feature is available on the iPhone 5 and later models.
How do I activate the flash on my iPhone camera?
To activate the flash on your iPhone camera, open the camera app and tap on the flash icon in the top left corner of the screen. You can choose from three different flash options: Auto, On, or Off. Select the option that suits your needs.


