
When it comes to protecting your valuable camera equipment, a security cable can be an essential tool. This cable provides an additional layer of security, helping to prevent theft and unauthorized access to your cameras. With a few simple steps, you can create your own security cable, providing peace of mind and added protection for your valuable gear.
To make a security cable, you will need a few basic materials. First, you will need a strong, durable cable that is resistant to cutting and tampering. A steel cable or a braided steel wire is often the best choice for this purpose. You will also need a pair of cable crimps or ferrules to secure the ends of the cable, and a sturdy lock to secure the cable to a fixed object.
Start by measuring the desired length of your security cable. You will want the cable to be long enough to comfortably reach from your camera equipment to a fixed object, such as a post or railing. Add a few extra inches to your measurements to allow for any slack or flexibility needed in positioning your cameras.
Once you have determined the length, cut the cable to size using a wire cutter or a similar tool. It’s important to ensure a clean cut to achieve maximum security. After cutting the cable, insert one end into a cable crimp or ferrule, and use a crimping tool to secure it in place. Repeat this process at the other end of the cable, ensuring a secure connection.
How to Make a Secure Camera Cable
When it comes to the security of your cameras, a secure camera cable is essential. By using a secure camera cable, you can ensure that your cameras are well-protected and can’t be easily tampered with or stolen. In this article, we will walk you through the steps of making a secure camera cable.

What You Will Need
Before you get started, gather the following materials:
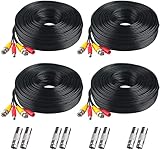
- A high-quality coaxial cable of the desired length
- BNC connectors (male and female)
- Heat shrink tubing
- A coaxial cable stripper
- A cable crimping tool
- A heat gun or torch
Step-by-Step Instructions
Follow these step-by-step instructions to make a secure camera cable:
- Begin by stripping the outer jacket of the coaxial cable using the coaxial cable stripper. Be careful not to damage the inner conductor.
- Expose the inner conductor and the shielding by carefully removing the insulating material.
- Attach the BNC connector to the exposed inner conductor. Make sure it is securely connected.
- Slide the heat shrink tubing over the connector and use a heat gun or torch to shrink it. This will provide additional protection and strain relief.
- Repeat the previous steps for the other end of the cable, but this time attach the female BNC connector.
- Once both ends are secured with connectors and heat shrink tubing, test the cable by connecting it to your camera system. Ensure that you have a stable connection and that the image quality is not compromised.
- If the cable passes the test, you can now install it by routing it through walls or ceilings and connecting it to your cameras.
Benefits of a Secure Camera Cable
Using a secure camera cable has several benefits:
| 1. Theft Deterrence | A secure camera cable makes it difficult for potential thieves to steal or tamper with your cameras. |
| 2. Data Protection | A secure camera cable helps to protect the data transmitted between your cameras and recording system, ensuring the integrity and privacy of your footage. |
| 3. Longevity | A well-made and secure camera cable can withstand environmental factors such as weather and physical stress, increasing its lifespan. |
In conclusion, by following these steps and using a secure camera cable, you can enhance the security and reliability of your camera system. Invest the time and effort into creating a secure camera cable, and you will have peace of mind knowing that your cameras are well-protected.
Importance of Security for Cameras
Securing your cameras is of utmost importance to ensure the safety and protection of your property, loved ones, and valuable assets. With the increasing number of security breaches and invasion of privacy, it is crucial to take necessary measures to safeguard your surveillance equipment.

Here are a few reasons why security for cameras is essential:
Prevent Theft and Vandalism
By installing security cables for your cameras, you can prevent potential theft and vandalism. These cables provide an added layer of protection, making it difficult for criminals to tamper with or steal your cameras. With a secure attachment, you can have peace of mind knowing that your surveillance equipment is safe and secure.
Deter Criminal Activity
The mere presence of security cables can act as a deterrent for criminals. They serve as a visible indication that your cameras are properly protected and monitored. Criminals are less likely to target properties with well-secured surveillance equipment, as they know the risk of being caught on camera increases.
| Benefits | Advantages |
|---|---|
| 1. Prevention of theft and vandalism | 1. Increased peace of mind |
| 2. Deterrence of criminal activity | 2. Enhanced safety and protection |
| 3. Protection of valuable assets | 3. Reduced risk of privacy invasion |
| 4. Effective surveillance | 4. Increased chances of identifying perpetrators |
Protection of valuable assets
In addition to preventing theft and vandalism, security cables also help protect your valuable assets. Cameras can capture evidence of any suspicious activity, allowing you to take appropriate action and potentially recover stolen property. By investing in a secure camera system, you can significantly reduce the risk of losing your assets.

Ensure your peace of mind by implementing security cables for your cameras. By doing so, you enhance the safety and protection of your property, deter criminal activity, and increase your chances of identifying any perpetrators. Don’t compromise on security when it comes to safeguarding your loved ones and valuable belongings.
Gather the Required Materials
Before you can start making a security cable for your cameras, you will need to gather the following materials:
- Steel cable or wire: This will be the main component of your security cable. Make sure it is strong and durable enough to withstand the weight of your cameras.
- Wire cutters: These will be used to cut the steel cable to the desired length.
- Cable crimps: These small metal pieces will be used to secure the ends of the steel cable together.
- Security camera mounting brackets: These brackets will be used to attach the cameras to the steel cable.
- Screws or bolts: You will need these to secure the mounting brackets to the cameras and the steel cable.
- Drill or screwdriver: This will be used to drill holes or insert screws into the mounting brackets and cameras.
- Measuring tape: This will help you take accurate measurements for cutting the steel cable and positioning the cameras.
- Optional: Cable sleeves or covers: These can be used to protect the steel cable from weather elements or to make it less visible.
Once you have gathered all of these materials, you will be ready to start making your security cable for cameras.
Prepare the Cable
Before you start making a security cable for your cameras, you need to gather all the necessary materials and prepare the cable. Here are the steps to follow:
- Gather the materials: You will need a strong and sturdy cable, such as steel or braided wire, a cable cutter, cable crimps, and a screwdriver.
- Measure the cable: Determine the length of cable you will need for your security setup. Make sure to account for any obstacles or corners where the cable might need to bend.
- Cut the cable: Use the cable cutter to cut the cable to your desired length. Make sure to cut it cleanly and at a right angle.
- Strip the ends: Use a wire stripper or a sharp knife to remove the outer insulation from the ends of the cable. Be careful not to cut into the inner wires.
- Insert the cables: If your security cameras require power, insert a power cable into the corresponding hole on the connector. Insert the video cable into the other hole.
- Crimp the connectors: Place the cable crimps over the stripped ends of the cable and connectors. Use a screwdriver to tighten the crimps and secure the connections.
- Test the cable: Once you have finished crimping the connectors, test the cable by connecting it to your security system and checking if the cameras receive power and transmit video properly.
By following these steps, you will have successfully prepared the cable for your security cameras.

Attach the Connectors
Once you have measured and cut the security cable for your cameras, it’s time to attach the connectors. The connectors will allow you to easily connect the cable to your cameras and other security devices.
First, take one end of the security cable and strip off about half an inch of the outer insulation using wire strippers. Be careful not to cut through any of the inner wires while stripping the insulation.
Next, you will see several smaller wires inside the cable. These wires are usually color-coded. Take note of the colors and their corresponding labels, as this will help you with the connector installation.
Installing the BNC Connector
If you are using a BNC connector, you will see a center pin and a metal barrel. Start by sliding the metal barrel onto the stripped end of the security cable.
Take the colored wires and arrange them according to the color code of your connector. Usually, it will be white, black, red, and yellow. Insert each wire into its corresponding port on the BNC connector. Make sure that each wire is securely inserted and making good contact with the metal barrel.
Once all the wires are inserted, carefully slide the metal barrel up and over the wires. The barrel should fit snugly over the connector, holding the wires in place and providing a secure connection.
Installing the Power Connector
If you are using a power connector, start by removing the outer insulation of the security cable, just like you did with the BNC connector.
Inside the cable, you will find two wires – usually a red wire and a black wire. These are the power wires. Strip off a small section of insulation from each wire, exposing the bare copper.
Take the red wire and insert it into the positive port of the power connector. Similarly, insert the black wire into the negative port. Make sure that the wires are securely inserted and making good contact with the connector.
Once the wires are inserted, tighten the screws on the power connector to secure the wires in place. Ensure that the screws are tight enough to prevent the wires from coming loose.

Repeat the steps for attaching connectors to the other end of the security cable, if necessary.
After attaching the connectors, double-check all the connections to ensure they are secure. The connectors should fit snugly and make good contact with the cable wires.
Now you are ready to connect your security cable to your cameras and other security devices. Make sure to follow the manufacturer’s instructions for proper installation and mounting of your cameras.
Test the Security Cable
After constructing the security cable for your cameras, it is crucial to test its functionality to ensure its effectiveness. Follow these steps to properly test the security cable:
Step 1: Attach the Cable
First, attach the security cable to your camera securely. Make sure it is properly connected to the camera and cannot be easily detached.

Step 2: Apply Force
Apply a reasonable amount of force to the security cable to simulate an attempted theft or tampering. This can be done by pulling on the cable or attempting to detach it forcefully.
Note: It is essential to use appropriate force without causing any damage to the camera or its components.
Step 3: Check the Security
Inspect the cable and camera after applying force. Verify if the security cable has adequately protected the camera from being detached or stolen. Ensure that both the camera and cable remain securely fastened.
Additionally, check for any visible signs of damage to the cable or camera. If any issues are detected, reevaluate the design and construction of the security cable and make necessary adjustments.
By properly testing the security cable, you can identify any potential weaknesses or flaws and address them before relying on it to protect your cameras. Regular testing is recommended to ensure ongoing security and prevent any unexpected incidents.
Additional Tips and Considerations
When creating a security cable for cameras, there are a few additional tips and considerations to keep in mind:
1. Choose high-quality materials
It is important to use high-quality materials when making a security cable for cameras. Opt for strong and durable cables that can withstand tension and pulling. Additionally, use sturdy connectors and locks that cannot be easily tampered with or broken.
2. Consider the length of the cable
Before creating a security cable, carefully measure the distance between the camera and the mounting location. Make sure the cable is long enough to allow for proper positioning without being too loose or too tight. Consider the potential obstacles and plan for any necessary adjustments in the cable length.
3. Take weather conditions into account
If you plan to use the security cable outdoors, make sure to choose materials that are weather-resistant and can withstand extreme temperatures, moisture, and UV exposure. This will ensure that your cameras remain secure and functional even in challenging weather conditions.
4. Conceal the cable
To enhance the security of your camera system, consider hiding the security cable from plain view. This can be done by running the cable along the wall, through conduits, or by using cable management solutions. Concealing the cable can help prevent potential intruders from identifying and tampering with it.
By considering these additional tips and factors, you can create a secure and reliable security cable for your cameras. Remember to follow best practices and standards to ensure optimal protection of your camera system.
FAQ,
What is a security cable for cameras?
A security cable for cameras is a device used to secure cameras and prevent them from being stolen or tampered with.
How does a security cable work?
A security cable typically consists of a strong metal cable with a loop at one end and a lock at the other end. The loop is attached to the camera or a mounting bracket, and the cable is then looped around a secure object such as a pole or railing. The lock is then used to secure the cable, preventing any unauthorized removal of the camera.
What tools and materials do I need to make a security cable for cameras?
To make a security cable for cameras, you will need a metal cable, a locking mechanism such as a padlock, a loop or bracket for attaching the cable to the camera, and any necessary mounting hardware. You may also need tools such as pliers and wire cutters to adjust and secure the cable.
Are there any specific considerations when making a security cable for outdoor cameras?
When making a security cable for outdoor cameras, it is important to use materials that are weatherproof and resistant to rust, such as stainless steel or vinyl-coated cables. You should also consider the length of the cable to ensure it can be securely attached to a fixed object, and take into account any additional security measures that may be needed for outdoor settings, such as tamper-proof mounting brackets.
Can a security cable for cameras be used with any type of camera?
A security cable for cameras can generally be used with any type of camera that has a suitable mounting bracket or attachment point. However, you should ensure that the cable and locking mechanism are strong enough to deter theft or tampering, especially for more expensive or high-risk cameras.


