
In today’s digital world, our smartphones have become incredibly versatile tools that can be used for a wide range of purposes. One such use is turning your iPhone into a document camera, allowing you to easily capture and share documents and other printed materials. Whether you’re a student looking for an easy way to share your notes or a professional needing to present documents during a meeting, this guide will show you how to transform your iPhone into a powerful document camera.
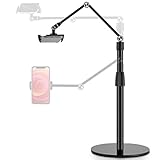
The first step in turning your iPhone into a document camera is to find a suitable stand or mount to hold your phone in place. There are many options available on the market, ranging from simple stands to more advanced mounts with adjustable angles. Make sure to choose one that is compatible with your iPhone model and offers stability to prevent any unwanted movements during use.
Once you have your stand or mount, the next step is to position your iPhone so that it is directly above the document or material you want to capture. This will ensure that your phone’s camera is focused and able to capture clear images. Use the adjustable features of your stand or mount to achieve the desired angle and height.
With your iPhone securely positioned, it’s time to open the camera app and adjust the settings to optimize your document capture. Experiment with different settings such as exposure, focus, and resolution to find the best combination for your specific needs. Consider using the “grid” feature to help align your documents and make sure they are captured straight.
Once everything is set up, you can start capturing your documents by simply pressing the shutter button on your screen or using the volume buttons on the side of your iPhone. Take multiple shots to ensure you have captured the desired content, and use the preview feature to review the quality of your images before proceeding.

After capturing your documents, you can easily share them by email, messaging apps, or cloud storage platforms. This allows you to quickly and efficiently distribute important information to colleagues, classmates, or clients. Remember to review your images before sharing to ensure they are clear, legible, and well-aligned.
By following these steps, you can easily transform your iPhone into a document camera and take advantage of its powerful camera capabilities. Whether you’re a student, professional, or simply someone who wants to digitize their printed materials, using your iPhone as a document camera is a convenient and efficient solution.
Transform your iPhone into a Document Camera: Easy and Effective Methods
If you’re a teacher, presenter, or anyone who frequently needs to share documents or images with an audience, having a document camera can be incredibly useful. However, you don’t necessarily need to invest in an expensive document camera when you can easily transform your iPhone into one. In this article, we’ll explore some easy and effective methods to turn your iPhone into a document camera.
Method 1: Using a Document Camera Stand
One of the simplest ways to transform your iPhone into a document camera is to use a document camera stand. These stands often come with adjustable arms and clamps to securely hold your iPhone in place, allowing it to act as a document camera.
To use this method, you’ll need to place your iPhone in the stand and adjust the arms and clamps to ensure it’s positioned correctly. Once your iPhone is secure, you can use various document camera apps available on the App Store to capture images or videos of your documents.

This method is perfect for teachers or presenters who frequently need to demonstrate or explain documents to an audience.
Method 2: Using an Overhead Rig
If you’re looking for a more budget-friendly option, you can easily create an overhead rig using simple household items. All you need is a sturdy container, such as a shoebox, and a few office supplies like binder clips and tape.
Start by cutting a hole in the bottom of the container, large enough for your iPhone to fit through. Attach binder clips to the sides of the container to secure your iPhone in place. Finally, use tape or any other means to attach the container to a stable surface, such as a desk or whiteboard.
Now, you can position your iPhone, with the camera facing downwards, and capture images or videos of your documents. This method is especially useful for individuals who don’t have a dedicated document camera stand.
Tip: Remember to use a white background or a blank piece of paper under your documents to enhance visibility and readability.

Using your iPhone as a document camera opens up a whole new world of opportunities for sharing information and engaging with your audience. Whether you opt for a document camera stand or create your own overhead rig, these methods are easy, effective, and budget-friendly solutions to transform your iPhone into a versatile document camera.
So, next time you need to share a document or image, simply grab your iPhone and let it do the work!
Convert your iPhone into a Document Camera using Apps
Gone are the days when you needed to invest in expensive document cameras or scanners to project documents or images during presentations or online classes. With the right apps, you can easily convert your iPhone into a document camera, allowing you to present, share, or record documents or objects in real-time.
1. CamScanner
CamScanner is a popular app that allows you to scan documents using your iPhone camera. It automatically detects the edges of the document, adjusts the lighting and perspective, and enhances the image quality. You can then save the scanned document as a PDF or image and share it directly from the app.
2. Office Lens
Office Lens, a product from Microsoft, is another great app for turning your iPhone into a document camera. It has features similar to CamScanner, such as automatic cropping and image enhancement. Additionally, it integrates seamlessly with other Microsoft Office applications, allowing you to easily save and share scanned documents.

3. Evernote Scannable
Evernote Scannable is a user-friendly app that simplifies the process of scanning documents with your iPhone. It automatically identifies and captures documents or business cards, and performs automatic cropping and image optimization. You can save the scanned documents in various formats, including PDF and JPEG, and quickly share them via email or messaging apps.
These apps offer various features and functionalities for converting your iPhone into a document camera. Whether you need to scan documents for work, school, or personal use, these apps provide a convenient solution right at your fingertips.
By utilizing these apps, you can easily utilize your iPhone’s camera to capture and present documents or images during presentations, online classes, or even for personal use. Best of all, you don’t have to invest in additional equipment, making it a cost-effective solution.
Utilize iPhone Accessories to Enhance Document Camera Performance
If you want to turn your iPhone into a document camera, there are several accessories and gadgets that can help enhance its performance. These accessories can improve the quality of your document captures, stabilize your iPhone during recording, and provide better lighting for optimal visibility.
1. Tripod Mount: A tripod mount allows you to securely attach your iPhone to a tripod, keeping it stable and free from shaking. This is especially useful when using your iPhone as a document camera, as any movement or instability can result in blurry or distorted images.

2. LED Light: Adding an LED light attachment to your iPhone can significantly improve the lighting conditions when using it as a document camera. This accessory provides powerful and consistent lighting, ensuring that your documents are well-lit and easily visible, even in low-light environments.
3. External Microphone: An external microphone can help enhance the audio quality when recording videos or giving presentations using your iPhone as a document camera. This accessory allows you to capture clear and crisp audio, making your presentations more professional and engaging.
4. Lens attachments: There are various lens attachments available that can be used to improve the camera’s focus, zoom capabilities, and image quality. Macro lenses, for example, allow you to capture detailed close-up shots, making it easier to showcase smaller text or diagrams during presentations.
5. Remote Shutter: A remote shutter is a handy accessory that allows you to take photos or start/stop video recordings from a distance, without having to touch your iPhone. This helps eliminate any potential movement or vibrations that could affect the document camera performance.
6. Document Stand: A document stand can be used to hold your documents or books in place, making it easier to position and capture them using your iPhone as a document camera. This accessory helps maintain a consistent angle and eliminates the need for constant adjustments during presentations.
7. Mobile Projector: If you want to display your document camera captures on a larger screen, a mobile projector is a great accessory to have. This allows you to project your images or videos onto a whiteboard or wall, making it easier for everyone in the room to see the details clearly.
Using these iPhone accessories can significantly enhance the performance of your document camera setup, making it more versatile and efficient for various presentation or teaching purposes. With improved stability, lighting, audio quality, and additional features, you can take full advantage of your iPhone’s capabilities as a document camera.
DIY Options: Create a Simple Document Camera Stand for your iPhone
If you’re looking to turn your iPhone into a document camera, you don’t need to spend money on expensive stands or equipment. With a few simple materials and a little creativity, you can create a DIY document camera stand for your iPhone. Here are a few options to get you started:
Option 1: Cardboard Box Stand
One of the easiest and most cost-effective options is to create a stand using a cardboard box. Simply find a box that is the right size to hold your iPhone and cut a small hole in the back for the camera lens. Place your iPhone in the box with the camera lens sticking out of the hole, and you have a makeshift document camera stand.
Option 2: Tripod Stand
If you have a tripod lying around, you can easily turn it into a document camera stand for your iPhone. Attach a phone holder or clamp to the top of the tripod, and then secure your iPhone in the holder. Adjust the height and angle of the tripod to position your iPhone as needed for your documents or materials.

Alternatively, you can use a selfie stick as a makeshift tripod. Extend the selfie stick to your desired height and angle, and then attach your iPhone to the end. This can provide a more flexible and adjustable option for your document camera stand.
Option 3: Binder Clip Stand
If you’re looking for a quick and portable option, a binder clip can serve as a makeshift document camera stand. Simply attach a large binder clip to the edge of a table or surface, and then use the clip to hold your iPhone in place. Adjust the position and angle of the clip to achieve the desired view for your documents.
Remember to try different positions and angles to find the best setup for your document camera stand. Experiment with height, distance, and lighting to ensure clear and legible images of your documents. With a little creativity and resourcefulness, you can transform your iPhone into a functional document camera without breaking the bank.
Adjusting Camera Settings for Optimal Document Scanning
When using your iPhone as a document camera, it’s important to adjust the camera settings to ensure optimal scanning quality. Follow these steps to get the best results:
- Open the Camera app on your iPhone and position it above the document you want to scan.
- Tap on the screen to focus the camera on the document. This will help ensure that the text is sharp and easy to read.
- Adjust the exposure by swiping up or down on the screen. This will ensure that the scanned document is neither too bright nor too dark.
- Enable the grid lines by going to Settings > Camera > Grid. The grid lines can help you align the document perfectly and capture it straight.
- Use the built-in flash if necessary. If you’re scanning in a low-light environment, turning on the flash can improve the overall visibility and legibility of the scanned document.
- Consider using a third-party scanning app. There are many apps available on the App Store that offer additional scanning features, such as automatic edge detection and perspective correction, which can further enhance the quality of scanned documents.
By adjusting the camera settings and following these tips, you’ll be able to turn your iPhone into a highly efficient document scanner. Whether you need to digitize important paperwork or capture notes from a whiteboard, your iPhone can now serve as your portable document camera!
Using Third-Party Apps for Advanced Document Capture and Management
If you want to take your document capture and management capabilities to the next level, there are several third-party apps available for your iPhone that can help you do just that. These apps offer features and functionalities that go beyond the basic camera capabilities of the iPhone, allowing you to effortlessly capture, store, and organize your documents with ease.
One popular app for advanced document capture is Adobe Scan. With Adobe Scan, you can use your iPhone camera to scan documents, receipts, business cards, and more. The app automatically detects the edges of the document and enhances the scan for optimal readability. It also features built-in OCR technology, allowing you to convert scanned documents into searchable and editable PDFs.
Another app worth considering is Scanbot. Similar to Adobe Scan, Scanbot offers advanced scanning features such as automatic edge detection and OCR. In addition, it offers cloud integration with popular services like Dropbox, Google Drive, and OneDrive, making it easy to save and access your scanned documents from anywhere.
If you’re looking for a more robust document management solution, Evernote is a great option. In addition to its scanning capabilities, Evernote allows you to organize and store your scanned documents in digital notebooks. You can also add tags, create reminders, and even search for specific words within your scanned documents. Evernote also offers seamless integration with other apps and platforms, making it a powerful tool for document management.
Finally, if you’re looking for a free and easy-to-use option, Microsoft Office Lens is a great choice. Office Lens is designed specifically for document scanning, and it offers features such as automatic cropping, image enhancement, and OCR. It also integrates seamlessly with other Microsoft Office apps, making it a useful tool for those who already use the Office suite.
By utilizing third-party apps like Adobe Scan, Scanbot, Evernote, or Microsoft Office Lens, you can transform your iPhone into a powerful document camera with advanced capture and management capabilities. Whether you need to scan documents for work, school, or personal use, these apps can help you streamline your workflow and stay organized on the go.
Explore Wireless Document Camera Options for Added Convenience
While using your iPhone as a document camera can be a convenient solution, there are also wireless document camera options available that provide added convenience. These wireless options allow you to use your document camera without the need for cables or direct connection to your iPhone.
Advantages of Wireless Document Cameras
Wireless document cameras offer several advantages over using your iPhone as a document camera. Firstly, they provide greater flexibility and mobility. With a wireless document camera, you can move around the classroom or office space without worrying about cables getting in the way or limiting your range of movement.
Secondly, wireless document cameras often come with additional features that enhance functionality. These features can include built-in microphones for capturing audio, adjustable lighting options for better visibility, and the ability to connect to multiple devices simultaneously. Such features make wireless document cameras a versatile option for various educational and business settings.
Purchasing a Wireless Document Camera
When purchasing a wireless document camera, there are a few factors to consider. Firstly, you should determine your specific requirements and evaluate the features offered by different models. Consider factors such as resolution, zoom capabilities, and connectivity options.
It is also important to consider compatibility with your devices. Check whether the wireless document camera is compatible with iOS devices, as well as other operating systems such as Android and Windows. This will ensure seamless integration with your existing devices.
Additionally, consider the setup and ease of use. Look for a wireless document camera that has a user-friendly interface and intuitive controls. This will make it easier for you to operate the camera and utilize its features effectively.
Lastly, read customer reviews and ratings to get an idea of the performance and reliability of the wireless document camera you are considering. This will help you make an informed decision and ensure that you choose a high-quality product.
By exploring wireless document camera options, you can enhance the convenience and functionality of using a document camera in various settings. Take the time to research and compare different models to find the ideal wireless document camera that meets your needs.
Tips and Tricks for Using your iPhone as a Document Camera in the Classroom
- Use a stable stand or tripod for your iPhone to keep it steady and in position while recording or capturing images.
- Ensure good lighting conditions for clear and legible documents. Avoid shadows and glare by positioning the document away from direct light sources.
- Experiment with different camera angles to find the best view. Adjust the height and angle of the stand or tripod to capture the document from the most suitable perspective.
- Make use of the iPhone’s autofocus feature by tapping and holding on the screen to focus on the document. This will ensure that the text and images appear sharp and clear.
- Enable the grid feature on your iPhone’s camera app to help align the document and keep it straight. This will improve the visibility and readability of the content.
- Take advantage of the iPhone’s zoom capabilities to focus on small details or specific sections of the document. Use pinch gestures to zoom in or out as necessary.
- Use the camera’s flash sparingly, if at all, as it can create harsh lighting and shadows. Instead, rely on natural or additional soft lighting to enhance the document’s visibility.
- Consider using a document scanning app or a whiteboard app with built-in document camera functionality. These apps can provide additional features and tools for capturing, editing, and sharing documents.
- Practice using the iPhone as a document camera before using it in the classroom. Familiarize yourself with the camera app’s features and settings, and test out different techniques to ensure smooth operation during lessons.
- Encourage student engagement and participation by allowing them to take turns using the document camera. This will help foster a collaborative learning environment and empower students to share their work or ideas with the class.
Using your iPhone as a document camera in the classroom can enhance teaching and learning by providing a versatile and portable tool for displaying and sharing educational materials. By following these tips and tricks, you can make the most out of this technology and create engaging and interactive learning experiences for your students.
Affordable Alternatives: Transforming your iPhone into a Document Camera on a Budget
If you’re looking to turn your iPhone into a document camera, but don’t want to spend a fortune, there are some affordable alternatives that can help you achieve your goal. These budget-friendly options make it easy to convert your smartphone into a versatile tool for document scanning, presenting, or remote learning.
One of the most cost-effective ways to transform your iPhone into a document camera is by using a simple stand or tripod. There are various options available on the market, ranging from basic phone holders to flexible tripods that can be adjusted to various angles. These stands can hold your iPhone securely in place and position it at the perfect height and angle for capturing documents or objects.
Another affordable solution is to use a smartphone clip-on lens. These lenses attach to your iPhone’s camera and provide additional magnification and clarity, making it easy to capture detailed images of documents. Some clip-on lenses even come with built-in LED lights, which can provide better lighting for your scans.
If you already have a basic desk lamp, you can also repurpose it as a document camera stand. Simply position your iPhone under the lamp and adjust the angle to illuminate your documents or objects. This solution may not be as flexible as a tripod or stand, but it can be a great option if you’re on a tight budget.
Additionally, there are several smartphone apps available that can enhance your iPhone’s document camera capabilities. These apps offer features like automatic edge detection, image correction, and easy sharing options. Many of these apps are free or affordable, making them a budget-friendly alternative to purchasing dedicated document cameras.
In conclusion, transforming your iPhone into a document camera doesn’t have to break the bank. With affordable alternatives like smartphone stands, clip-on lenses, repurposing a desk lamp, or using document camera apps, you can easily capture high-quality scans and images without spending a fortune. Explore these budget-friendly options and unlock the full potential of your iPhone as a document camera.
Advanced Features: Harnessing the Power of Augmented Reality for Document Scanning
With the advancement of technology, our smartphones are becoming powerful tools that can do much more than just make calls and send texts. One such feature that is revolutionizing document scanning is Augmented Reality (AR).
Augmented Reality makes it possible to overlay virtual content on the real world, enhancing our perception of reality and providing new possibilities for capturing and manipulating images. By harnessing the power of AR, you can transform your iPhone into a highly efficient document camera with advanced scanning capabilities.
One of the key advantages of using AR for document scanning is the ability to automatically detect and crop the document, eliminating the need for manual adjustments. AR-enabled document scanning apps use advanced algorithms to identify the edges of the document and create a perfect scan, saving you time and effort.
Another impressive feature of AR document scanning is the ability to capture documents in 3D. With AR, you can create three-dimensional scans of objects, such as books or handwritten notes, by simply moving your iPhone around them. This allows you to capture every detail and perspective of the document, making it easier to read and analyze.
Furthermore, AR can enhance the quality of scanned documents by optimizing lighting conditions. By analyzing the environment and adjusting the exposure settings, AR-enabled scanning apps can ensure that every scan is clear and legible, even in challenging lighting conditions.
Additionally, AR document scanning apps often offer real-time editing features, allowing you to annotate, highlight, or add comments to your scans directly on your iPhone’s screen. This makes it convenient to collaborate with colleagues or make important notes without the need for additional tools or software.
Overall, by harnessing the power of Augmented Reality, you can unlock advanced features for document scanning on your iPhone. From automatic cropping and 3D scanning to optimized lighting and real-time editing, AR-enabled scanning apps provide an enhanced scanning experience that is both efficient and versatile.
So, if you want to elevate your document scanning capabilities, it’s time to explore the world of Augmented Reality and make the most out of your iPhone as a document camera.
Troubleshooting: Common Issues and Solutions when using your iPhone as a Document Camera
Using your iPhone as a document camera can be a great way to capture images and videos in a classroom or office setting. However, like any other technology, there can be issues that may arise. Here are some common problems you may encounter and their solutions:
1. Connectivity Issues
If you’re having trouble connecting your iPhone to your computer or projector, make sure that both devices are connected to the same Wi-Fi network. Additionally, check that you have the latest version of the document camera app installed on your iPhone.
2. Poor Image Quality
If your document camera is not producing clear images, try cleaning the camera lens with a soft cloth. Additionally, ensure that there is sufficient lighting in the room as poor lighting can result in blurry images. Adjusting the focus on your iPhone camera app may also help improve image quality.
3. Stability Issues
If your iPhone is not stable or keeps moving during use, consider using a smartphone tripod or a stable surface to hold your iPhone. This will help ensure that your document camera remains steady and allows for better focus and image stability.
4. App Crashes
If the document camera app on your iPhone keeps crashing, try force quitting the app and reopening it. If the issue persists, try uninstalling and reinstalling the app. It’s also a good idea to check for any available updates for the app, as developers often release updates to fix bugs and improve stability.
Tip: If you are still experiencing issues, consider reaching out to the app developer’s support team for further assistance or exploring alternative document camera apps that may work better with your iPhone.
By troubleshooting these common issues, you can ensure that your iPhone functions effectively as a document camera, allowing you to capture high-quality images and videos for your presentations or classroom teaching.
FAQ
What is a document camera?
A document camera is a type of camera that is designed to capture images or videos of documents, images, or 3D objects. It can be used in classrooms, offices, or for personal use to display or share documents in real-time.
Can I turn my iPhone into a document camera?
Yes, you can turn your iPhone into a document camera with the help of various apps and accessories. There are apps available in the App Store that can turn your iPhone’s camera into a document camera, and you can also use a stand or holder to position your iPhone properly.
What are the benefits of using an iPhone as a document camera?
Using an iPhone as a document camera has several benefits. Firstly, it is a portable and convenient solution as you already have your iPhone with you. Secondly, it allows you to share and display documents in real-time, making it useful in classrooms and presentations. Lastly, using an iPhone as a document camera can save you money as dedicated document cameras can be expensive.
What are some recommended apps for turning an iPhone into a document camera?
There are several apps available in the App Store that can turn your iPhone into a document camera. Some popular and highly recommended apps include “CamScanner”, “Office Lens”, and “Scanner Pro”. These apps offer features such as image enhancement, document cropping, and easy sharing options.


