
If you are looking to install security cameras in your home or business, one of the most important considerations is the quality and reliability of the camera cable. A strong and durable cable is essential for transmitting the video feed from your camera to the monitor or recording device, ensuring that you have a clear and uninterrupted view of your premises.
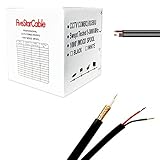
RG6 cable is a high-quality coaxial cable commonly used for residential and commercial applications. It is known for its excellent signal transmission capabilities and durability, making it an ideal choice for security camera installations. While you can easily purchase pre-made cables, making your own RG6 security camera cable can be a cost-effective and rewarding option.
To make your own security camera cable with RG6, you will need a few key tools and materials. Firstly, you will need RG6 cable, which is readily available in hardware stores or online. Additionally, you will need a male BNC connector, a male power connector, a cable stripper, a crimping tool, and a wire cutter. These tools will allow you to cut the cable to the desired length, strip the ends, and attach the connectors securely.
Once you have gathered your materials, you can begin the process of making your own security camera cable. Start by measuring the length of cable needed for your installation, ensuring that you have enough length to reach from your camera to the monitor or recording device. Next, use the wire cutter to cut the cable to the desired length, making sure to cut it cleanly and evenly to prevent signal interference.
Why Choose RG6 Cable for Security Cameras?
When it comes to setting up a security camera system, choosing the right cable is crucial for ensuring high-quality video transmission and reliable performance. One of the most popular choices for security camera cable is RG6 cable.

RG6 cable is a type of coaxial cable that offers several advantages for security camera installations. Here are some reasons why you should choose RG6 cable for your security cameras:
1. High bandwidth: RG6 cable is designed to handle high-frequency signals, making it ideal for transmitting video signals from security cameras. The high bandwidth of RG6 cable ensures that you can get clear and sharp video footage without any loss of quality.
2. Low signal loss: RG6 cable is known for its low signal loss, meaning that it can transmit video signals over long distances without any degradation in quality. This is particularly important for security camera installations, as you may need to run cables for long distances to connect multiple cameras.
3. Easy installation: RG6 cable is easy to install, thanks to its versatility and flexibility. It can be easily routed through walls, ceilings, and conduits, making it ideal for both indoor and outdoor security camera installations. The flexible nature of RG6 cable also makes it easier to handle and terminate.
4. Shielding: RG6 cable is typically equipped with multiple layers of shielding, including a foil shield and a braided shield. This shielding helps to protect the cable from external interference, such as electromagnetic and radio frequency interference, ensuring a clean and stable video signal.

5. Compatibility: RG6 cable is widely used in the security camera industry and is compatible with most security camera systems. Whether you are upgrading an existing system or installing a new one, you can rely on RG6 cable to provide reliable and consistent performance.
In conclusion, choosing the right cable is essential for setting up a reliable and high-quality security camera system. RG6 cable offers several advantages, including high bandwidth, low signal loss, easy installation, shielding, and compatibility. Consider using RG6 cable for your security camera installations to enjoy these benefits and ensure optimal performance.
Benefits of Using RG6 Cable for Security Camera Installation
When it comes to installing security cameras, choosing the right cable is crucial. One popular option that security professionals recommend is RG6 cable. Here are some of the benefits of using RG6 cable for security camera installation:
1. Superior Signal Quality
RG6 cable is designed to provide high-frequency signal transmission, making it ideal for security camera systems. It offers superior signal quality, allowing for clear and sharp video footage. With RG6 cable, you can ensure that the images captured by your security cameras are of the highest quality.
2. Long Transmission Range
Another advantage of RG6 cable is its long transmission range. This means that you can install security cameras at a distance from the central recording device without worrying about signal loss or degradation. RG6 cable can transmit signals over long distances, making it suitable for larger properties or areas.

3. Excellent Shielding
RG6 cable is known for its exceptional shielding capabilities. It features multiple layers of insulation and shielding materials that protect the signal from interference and external factors. This shielding ensures that your security camera system operates smoothly and reliably, without any interruptions or distortions.
4. Easy Installation
Installing RG6 cable for security cameras is relatively straightforward. Its design allows for easy installation, whether you are doing it yourself or hiring a professional. The cable is flexible and can be easily routed through walls, ceilings, and other areas. This flexibility simplifies the installation process and saves both time and effort.
5. Cost-Effective Solution
Compared to other cable options, RG6 cable is a cost-effective solution. It offers high-quality performance at an affordable price, making it an excellent choice for both residential and commercial security camera installations. With RG6 cable, you can achieve reliable signal transmission and clear video footage without breaking the bank.
Overall, using RG6 cable for security camera installation comes with various benefits. Its superior signal quality, long transmission range, excellent shielding, easy installation, and cost-effectiveness make it a popular choice among security professionals.
Understanding the Components of RG6 Cable
The RG6 cable is a type of coaxial cable that is commonly used for security camera installations. It consists of several components that work together to provide a reliable and high-quality video transmission.

1. Center Conductor: At the core of the RG6 cable is the center conductor. It is typically made of solid copper or copper-clad steel and carries the video signal from the camera to the recording or monitoring device.
2. Dielectric: Surrounding the center conductor is the dielectric layer, which is usually made of foam or solid polyethylene. The dielectric helps maintain the cable’s impedance and prevents signal loss by separating the center conductor from the outer conductor.
3. Outer Conductor: The outer conductor, also known as the shield, is a layer of metal foil or braided wire that surrounds the dielectric. It serves to protect the signal from external interference and prevents electromagnetic radiation leakage.
4. Jacket: The outermost layer of the RG6 cable is the jacket, which provides insulation and protects the cable from physical damage, moisture, and UV rays. It is usually made of PVC (polyvinyl chloride) or PE (polyethylene).
5. Connectors: RG6 cables come with connectors at both ends, which allow for easy connection to security cameras and recording devices. The most common connector type used for RG6 cables is the F-type connector, which provides a secure and reliable connection.
Understanding the components of RG6 cable is crucial for anyone looking to make their own security camera cable. By knowing how each component works together, you can ensure a proper installation and reliable video transmission for your security system.
Step-by-Step Guide: Making Your Own RG6 Security Cameras Cable
Are you looking to set up your own security camera system but don’t want to spend a fortune on professional installation? Making your own RG6 security cameras cable can be a cost-effective and rewarding solution. Follow this step-by-step guide to create your own cable and have your security cameras up and running in no time.
What You’ll Need:
- RG6 coaxial cable
- BNC connectors
- Cable stripper
- Cable crimping tool
- Wire cutter
Step 1: Measure and Cut the Cable
Start by measuring the distance between your security camera and the video recorder or monitor. Cut the RG6 coaxial cable to the desired length using a wire cutter. Make sure to account for any corners or obstacles the cable needs to go around.
Step 2: Strip the Cable
Use a cable stripper to remove about 1 inch (2.5 cm) of the outer jacket from each end of the cable. Be careful not to cut into the inner insulation or any of the wires inside. You should now have the inner conductor exposed.
Step 3: Attach BNC Connectors
Take one end of the cable and carefully thread the exposed inner conductor through the center of the BNC connector. Push the connector until it is snugly fitted against the outer jacket of the cable. Use a cable crimping tool to secure the connector in place. Repeat this process for the other end of the cable.

Step 4: Test the Cable
Once both connectors are attached, it’s time to test the cable. Connect one end to your security camera and the other end to the video recorder or monitor. Make sure the connections are secure. Power on the system and check for a clear video signal. If the image is clear and stable, congratulations! You have successfully made your own RG6 security cameras cable.
Making your own RG6 security cameras cable is not only cost-effective but also allows you to customize the length of the cable to your specific needs. Just follow this step-by-step guide, and you’ll have a reliable and secure connection between your security cameras and video recorder or monitor.
Tools and Materials Required for Making RG6 Cable
Making your own security cameras cable with RG6 requires several tools and materials. Before you begin, make sure you have the following items:
Tools:
- Wire stripper
- Coaxial cable stripper
- Compression tool
- Utility knife
- Measuring tape
- Fine point marker
- Needle nose pliers
- Wire cutters
Materials:
- RG6 coaxial cable
- Compression connectors
- Cable clips
- Electrical tape
- Cable tester
- Cable staples or cable ties
It is important to have all the necessary tools and materials before you start making the RG6 cable. This will ensure that you are well-prepared and can complete the project efficiently. Make sure to use high-quality materials to ensure proper signal transmission and longevity of the cable.
Common Mistakes to Avoid When Making RG6 Cable
When making your own RG6 cable for security cameras, it’s important to avoid certain common mistakes to ensure proper functionality and reliability. Here are some key mistakes to be mindful of:
- Incorrect cable stripping: Improperly stripping the RG6 cable can cause signal interference and poor connectivity. It’s crucial to use a proper cable stripper tool and follow the manufacturer’s guidelines for stripping the cable.
- Insufficient cable length: It’s essential to measure the distance between your security cameras and the recording device accurately. Failing to provide sufficient cable length can result in a cable that is too short, leading to installation issues or the need for additional connectors.
- Incorrect cable termination: Incorrectly terminating the RG6 cable can lead to signal loss and weak connections. It’s important to use the appropriate connectors, crimping tools, and follow the proper termination techniques outlined in the manufacturer’s instructions.
- Using low-quality connectors and tools: Using cheap and low-quality connectors or tools can significantly impact the performance and durability of your RG6 cable. Investing in high-quality connectors, crimping tools, and cable strippers will result in a more reliable and efficient connection.
- Untested cable connections: After making your RG6 cable, it’s essential to test the continuity and signal strength of the connections. Neglecting this step can lead to unexpected issues during installation or poor-quality video transmission.
- Improper cable management: Neglecting proper cable management can cause signal interference, cable damage, and hinder future maintenance and troubleshooting. It’s crucial to secure the cable adequately, avoid sharp bends, and use cable management accessories like clips or ties to keep the cable organized.
By avoiding these common mistakes, you can ensure a successful installation and reliable performance for your self-made RG6 security camera cable. Remember to follow the manufacturer’s guidelines, use high-quality components, and test your connections for optimal results.
Testing and Troubleshooting RG6 Cable Connections
Once you have made your own security camera cable with RG6, it is important to test and troubleshoot the connections to ensure they are working properly. This will help you identify and fix any issues that may arise, ensuring that your security system functions effectively.
Here are some steps you can take to test and troubleshoot RG6 cable connections:
| Step | Description |
|---|---|
| 1 | Inspect the connectors |
| 2 | Check for signal loss |
| 3 | Use a cable tester |
| 4 | Measure signal quality |
| 5 | Replace damaged connectors |
First, inspect the connectors on both ends of the RG6 cable. Look for any signs of damage or corrosion, such as bent pins or discolored metal. Clean the connectors if necessary to remove any dirt or debris that could interfere with the signal transmission.
Next, check for signal loss. Connect your security camera to a monitor or recording device and ensure that the video feed is clear and stable. If you notice any distortion or interference, there may be a problem with the cable connection.
Using a cable tester can help you identify any issues with the RG6 cable. This device will check for continuity and measure the signal strength. Follow the manufacturer’s instructions to perform the test and troubleshoot any faults that may be detected.
Additionally, you can measure the signal quality using an oscilloscope or a multimeter. This will provide more detailed information about the integrity of the cable connection and help you pinpoint any specific areas that may require attention.
If you identify any damaged connectors, it is important to replace them promptly. Damaged connectors can cause signal loss or poor signal quality, affecting the overall performance of your security system. Ensure you use high-quality connectors that are compatible with RG6 cable.
By following these steps and regularly testing and troubleshooting your RG6 cable connections, you can ensure that your security system operates optimally and provides reliable surveillance.
Tips for Maintaining your RG6 Security Cameras Cable
Proper maintenance of your RG6 security cameras cable is essential to ensure the smooth functioning and longevity of your surveillance system. Here are a few tips to guide you in maintaining your cable:
1. Regular Inspection: Regularly inspect your RG6 security cameras cable for any signs of wear and tear, such as cuts, fraying, or exposed wires. This will help you identify potential issues early on and take appropriate action to prevent any damage or malfunctions.
2. Keep it Clean: Dust and dirt can accumulate on your cable over time, affecting its performance. Use a soft, lint-free cloth to gently clean the cable and remove any debris. Avoid using harsh or abrasive chemicals that could damage the cable.
3. Protect from Moisture: Moisture can cause corrosion and damage to the cable’s connectors and internal components. Make sure to keep the cable protected from water, humidity, and other sources of moisture. Use weatherproof enclosures or waterproof tape to seal any exposed connections or junctions.
4. Proper Storage: When not in use, store your RG6 security cameras cable in a cool, dry place away from direct sunlight and extreme temperatures. Avoid coiling or bending the cable tightly, as this can cause stress on the wires and lead to breakage or signal degradation.
5. Avoid Overstretching: When installing or adjusting your security cameras, be careful not to overstretch or strain the RG6 cable. Excessive tension or pulling can damage the connectors or weaken the cable’s internal structure. Use proper cable management techniques to avoid any unnecessary stress on the cable.
6. Regular Testing: Periodically test your RG6 security cameras cable to ensure that it is transmitting the video feed and power signals correctly. Use a cable tester or multimeter to check for continuity and proper signal strength. This will help you identify any potential issues before they cause major disruptions in your surveillance system.
7. Professional Assistance: If you encounter any complex issues or are unsure about how to properly maintain your RG6 security cameras cable, it is always best to seek professional assistance. They can provide expert guidance and help resolve any problems effectively.
By following these tips, you can ensure the reliable performance and durability of your RG6 security cameras cable, allowing you to maintain effective surveillance and peace of mind.
FAQ,
What is rg6 cable used for?
Rg6 cable is mainly used for transmitting audio and video signals, making it ideal for applications such as cable TV, satellite TV, and security cameras.
Why should I make my own security camera cable?
Making your own security camera cable allows you to customize the length of the cable to fit your specific needs. It can also be a cost-effective solution compared to buying pre-made cables.


