
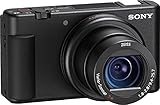
When it comes to ensuring the safety and security of your home or business, having a reliable security system is crucial. One such system is the Sony Super X Wave Security Camera, which offers advanced features and cutting-edge technology to keep you protected.
Operating the Sony Super X Wave Security Camera may seem overwhelming at first, but with a few simple steps, you can easily master its functions and take full advantage of its capabilities.
Step 1: Mounting the Camera
Before you begin operating the camera, it is important to properly mount it in the desired location. Choose an area that provides a clear view of the space you want to monitor and ensure that the camera is securely attached.
Step 2: Powering On the Camera

Once the camera is securely mounted, it’s time to power it on. Connect the camera to a power source using the provided power cable and plug it in. Wait for the camera to initialize, which may take a few seconds.
Step 3: Adjusting Camera Settings
After the camera has powered on, you can start adjusting its settings. Use the provided remote control or access the camera’s settings menu to customize options such as resolution, recording mode, motion detection, and more. Make sure to save your changes before proceeding.
Step 4: Monitoring and Recording
With the camera properly set up and configured, you can now monitor and record video footage. Use the remote control or the camera’s control panel to switch between live view and playback mode. You can also adjust the camera’s pan, tilt, and zoom functions to get a better view of specific areas.

Step 5: Reviewing and Managing Footage
To review and manage the recorded footage, you will need to connect the camera to a computer or a dedicated recording device. Follow the manufacturer’s instructions to access and download the footage for further analysis or storage.
By following these simple steps, you can confidently operate your Sony Super X Wave Security Camera and ensure the safety and security of your property. Remember to regularly check the camera’s performance and maintain it in good condition for optimal results.
Getting started with your Sony Super X Wave camera
Welcome to the world of Sony Super X Wave security cameras! With their advanced features and cutting-edge technology, these cameras are designed to provide you with reliable and high-quality surveillance. In this guide, you’ll learn how to set up and operate your Sony Super X Wave camera, so let’s get started!
1. Unboxing and physical setup
When you unbox your Sony Super X Wave camera, you’ll find the camera itself, a mounting bracket, screws, and a power adapter. Begin by choosing a suitable location for your camera, ensuring it has a clear view of the area you want to monitor. Use the mounting bracket and screws to securely attach the camera to a wall or ceiling.

2. Connecting to power
Once the physical setup is complete, connect the power adapter to the camera and plug it into a power outlet. Ensure that the power source is stable and reliable to avoid any interruptions in camera operation.
3. Connecting to the network
Your Sony Super X Wave camera is capable of connecting to your local network for remote access and control. To do this, use an Ethernet cable to connect the camera to your router. Make sure the router is powered on and connected to the internet.
Note: If you prefer a wireless connection, refer to the camera’s user manual for instructions on connecting it to your Wi-Fi network.
4. Camera configuration
Once your camera is connected to the network, you can access its configuration settings via a web browser or a dedicated software provided by Sony. Enter the camera’s IP address in the browser’s address bar to access the camera’s interface.
From the configuration interface, you can adjust various settings such as resolution, frame rate, motion detection sensitivity, and storage options. Take some time to explore the different options and customize the camera’s settings according to your specific needs.
Tip: It’s recommended to set a strong password for your camera’s login to ensure maximum security.
5. Remote access and viewing
Once your camera is configured, you can access it remotely from any device connected to the internet. Use the camera’s IP address or a dedicated software provided by Sony to access the live feed and recorded footage from your camera.
With your Sony Super X Wave camera, you can now monitor your property, keep an eye on your loved ones, or enhance the security of your business with ease and confidence.
We hope this guide helps you get started with your Sony Super X Wave camera. For more detailed instructions and troubleshooting, refer to the camera’s user manual or visit Sony’s official website for support.
Connecting your Sony Super X Wave camera to a network
Setting up your Sony Super X Wave camera to connect to a network is a simple process that allows you to access and manage your camera remotely. By connecting the camera to a network, you can view live footage, record videos, and adjust settings from your smartphone, tablet, or computer.

Before you begin, make sure you have the following:
- A working and stable internet connection.
- The Sony Super X Wave camera.
- A network router or access point.
- An Ethernet cable (usually included with the camera).
- Your camera’s power adapter.
Follow these steps to connect your Sony Super X Wave camera to a network:
- Place the camera: Find a suitable location to mount your camera. Ensure it has a clear view of the area you want to monitor.
- Power on the camera: Connect the camera to a power outlet using the provided power adapter. Wait for the camera to power on and initialize.
- Connect the camera to the network: Attach one end of the Ethernet cable to the camera’s Ethernet port, and connect the other end to an available Ethernet port on your router or access point. The camera will automatically detect the network connection.
- Configure camera settings: Use the Sony Super X Wave software or app on your smartphone, tablet, or computer to configure the camera settings. This usually involves providing the camera with your network’s SSID (name) and password, as well as setting up any desired features such as motion detection or recording schedules.
- Monitor the camera: Once the camera is connected and configured, you can access the camera’s live stream through the software or app on your device. Make sure you have a stable internet connection to receive the video feed.
With your Sony Super X Wave camera connected to the network, you can now enjoy the peace of mind and convenience of remote surveillance. Remember to periodically check if the camera is functioning properly and update its firmware when new versions are available to ensure optimal performance and security.
Understanding the features of Sony Super X Wave security camera
The Sony Super X Wave security camera is a powerful device that offers a range of features to help you monitor and secure your premises. Understanding these features can help you make the most out of your camera and ensure the safety of your property.
High resolution image capture
One of the standout features of the Sony Super X Wave security camera is its ability to capture high-resolution images. With its advanced image sensor and lens technology, this camera can capture detailed images, even in low light conditions. This ensures that you have a clear and accurate view of your surroundings.

Wide field of view
The camera comes with a wide-angle lens that provides a broad field of view. This allows you to monitor a larger area with just one camera, reducing the number of cameras you need to install. The camera’s pan and tilt capabilities also enable you to adjust the field of view remotely, providing you with more flexibility in monitoring specific areas.
Intelligent motion detection
The Sony Super X Wave security camera is equipped with intelligent motion detection technology. This feature can help you identify and track any movement within the camera’s field of view, ensuring that you are alerted to any potential security breaches. The camera can be set to send notifications to your smartphone or email when motion is detected, allowing you to take immediate action.
Night vision capabilities
With its infrared LEDs, the Sony Super X Wave security camera offers excellent night vision capabilities. This allows the camera to capture clear footage even in complete darkness. Whether it’s monitoring your property at night or in poorly lit areas, you can rely on the camera to provide you with reliable surveillance.
Remote access and control
The camera comes with a companion app that allows you to access and control the camera remotely. With this app, you can view live footage, adjust camera settings, and review recorded footage from anywhere using your smartphone or tablet. This feature gives you peace of mind knowing that you can monitor your property in real-time, even when you are away.
Understanding the features of the Sony Super X Wave security camera can help you optimize its performance and enhance your security measures. Whether you need a surveillance solution for your home or business, this camera provides the advanced features and functionality to meet your needs.

Adjusting settings on your Sony Super X Wave camera
Operating a Sony Super X Wave security camera involves not only capturing high-quality footage but also adjusting the settings to optimize its functionality. By making proper adjustments, you can tailor the camera to meet your specific surveillance needs.
Here are the steps to adjust settings on your Sony Super X Wave camera:
- Accessing the camera menu: Start by connecting to your camera’s interface. Open a web browser and enter the camera’s IP address. Once connected, you will see the camera’s homepage.
- Logging in: To access the camera’s settings, log in using your admin credentials. If you haven’t changed them, the default username is usually “admin” and the default password is “password”.
- Navigating to the settings: Once logged in, navigate to the settings menu. Look for the “Settings” or “Configuration” tab.
- Adjusting image settings: Within the settings menu, locate the image settings options. Here, you can adjust parameters such as brightness, contrast, saturation, and sharpness. Experiment with different values to find the optimal image quality for your surveillance needs.
- Configuring motion detection: If you want your camera to detect motion and trigger alerts, find the motion detection settings. Enable motion detection and adjust the sensitivity level based on your preferences.
- Setting up recording: Configure the recording settings to specify how and when you want the camera to record. You can choose continuous recording or set up a schedule for recording based on specific days and times.
- Configuring network settings: In the network settings section, you can set up the camera to connect to your Wi-Fi network, assign an IP address, and enable remote access.
- Adjusting privacy settings: If there are areas you want to exclude from the camera’s field of view for privacy reasons, locate the privacy settings. Draw privacy masks over the desired areas to ensure they are not recorded or monitored.
- Save your settings: After making all the necessary adjustments, remember to save your settings to apply the changes to the camera.
By following these steps, you can easily adjust the settings on your Sony Super X Wave security camera. This will help you enhance the camera’s performance and ensure that it meets your surveillance requirements effectively.
Managing recorded footage on your Sony Super X Wave camera
Once you have set up your Sony Super X Wave security camera and started recording, it is important to know how to effectively manage and access the recorded footage. Here are some steps to help you navigate the process:
1. Accessing the camera’s storage: To manage recorded footage, you first need to access the camera’s storage. Connect your camera to a computer or use the camera’s built-in interface to access the recorded files.
2. Organizing the footage: Create a logical folder structure to organize your recorded footage. This can be based on dates, locations, or any other categorization that makes sense for your needs. By organizing the footage, you can easily find specific recordings when needed.
3. Viewing the footage: Use a compatible video player or the camera’s provided software to view the recorded footage. This will allow you to review the footage and identify any events or incidents that were captured.
4. Managing footage retention: Determine how long you want to retain the recorded footage. This will depend on your needs and local regulations. Regularly delete older footage to free up storage space and ensure you have enough capacity for new recordings.
5. Backing up the footage: It is important to have backups of your recorded footage. Consider using external hard drives, cloud storage, or other backup solutions to ensure the footage is protected in case of camera malfunction or other unforeseen events.
6. Protecting the footage: Take steps to secure the recorded footage to prevent unauthorized access. Use strong passwords for accessing the camera’s storage, encrypt the footage if possible, and restrict access to the footage to authorized personnel only.
By following these steps, you can effectively manage and access the recorded footage on your Sony Super X Wave security camera, ensuring that you have the necessary evidence or documentation when needed.
Troubleshooting common issues with Sony Super X Wave camera
If you are experiencing issues with your Sony Super X Wave security camera, this guide will help you troubleshoot the most common problems. Follow the steps below to resolve the issue:
1. No power or camera is not working
If your camera is not turning on or is not functioning properly, check the following:
| Possible Cause | Possible Solution |
| The power adapter is not plugged in | Make sure the power adapter is securely connected to a working power outlet. |
| The power supply is faulty | Try using a different power supply to test if the issue is with the power adapter. |
| The camera is not receiving power | Check the power cable and make sure it is properly connected to the camera. |
| The camera is damaged | Contact Sony support for further assistance. |
2. Poor image quality or video playback issues
If you are experiencing poor image quality or issues with video playback, try the following troubleshooting steps:
- Check if the camera lens is dirty or obstructed.
- Adjust the camera settings, such as brightness and contrast, to improve image quality.
- Make sure you have a stable internet connection for smooth video playback.
- Update the camera firmware to the latest version to fix any software bugs that may be causing the issue.
- If the issue persists, contact Sony support for further assistance.
3. Connectivity issues
If you are experiencing connectivity issues with your Sony Super X Wave camera, follow these troubleshooting steps:
- Make sure the camera is properly connected to the Wi-Fi network and that you have entered the correct network credentials.
- Check if the Wi-Fi signal is strong enough for the camera to connect to. You may need to move the camera closer to the router or use a Wi-Fi extender.
- Restart your router and camera to refresh the network connection.
- Update the camera firmware to the latest version to fix any connectivity issues.
- If the issue persists, contact Sony support for further assistance.
If none of the above solutions resolve your issue, it is recommended to contact Sony support for professional assistance. They will be able to provide you with tailored troubleshooting steps based on your specific problem.
FAQ,
What is a Sony Super X Wave security camera?
A Sony Super X Wave security camera is a high-quality surveillance camera manufactured by Sony. It is designed to provide high-resolution video footage and advanced security features.
How do I install a Sony Super X Wave security camera?
Installing a Sony Super X Wave security camera is relatively simple. First, find a suitable location for the camera, preferably near a power source and within the wireless range. Then, mount the camera on a sturdy surface using the provided brackets and screws. Finally, connect the camera to the power source and set up the wireless connection according to the manufacturer’s instructions.
What are the key features of a Sony Super X Wave security camera?
A Sony Super X Wave security camera offers a range of advanced features. Some key features include high-resolution video recording, motion detection, night vision, two-way audio, remote access via a smartphone app, and compatibility with other smart home devices. Additionally, it may have advanced tracking capabilities and the ability to send alerts in case of suspicious activity.
How can I access the footage recorded by a Sony Super X Wave security camera?
To access the footage recorded by a Sony Super X Wave security camera, you can use the manufacturer’s dedicated smartphone app or software. Simply download the app or software, log in using the provided credentials, and you will be able to view, playback, and manage the recorded footage. Some cameras may also have cloud storage options for convenient access to the recordings from anywhere.


