
एक DSLR कैमरा उच्च श्रेणी के फोटोग्राफी उपकरण का एक महत्वपूर्ण हिस्सा है। इसका उपयोग करके आप बेहतर गुणवत्ता वाली फ़ोटो खींच सकते हैं और अद्यतित और निर्माणशील माध्यम की बजाय निर्लेखनीय तस्वीरों को प्राप्त कर सकते हैं। यदि आपके पास एक DSLR कैमरा है और आप इसे सही ढंग से चलाना चाहते हैं, तो आपको कुछ महत्वपूर्ण बातें जाननी चाहिए।
पहले, आपको अपने DSLR कैमरे की बेसिक सेटिंग्स को समझना होगा। आपको अपने कैमरे के सामान्य सेटिंग्स जैसे कि लेंस फ़ोकस, शक्ति, आईसो संख्या, व्हाइट बैलेंस, और शटर स्पीड को समझना होगा। इन सेटिंग्स को प्रयोग करके आप अपने फ़ोटोग्राफी को बेहतर बना सकते हैं और विभिन्न स्थितियों में आदर्श तस्वीरें कैप्चर कर सकते हैं।
दूसरे, आपको अपने DSLR कैमरे के मेनु ऑप्शन्स को समझने की आवश्यकता होगी। आपको बटन्स, डायल्स और निर्जल स्क्रीन के माध्यम से आपके कैमरे के विभिन्न मेनु आइटम्स को नेविगेट करके उन्हें सेट कर सकना चाहिए। इसके अलावा, आपको अपने कैमरे के विभिन्न मोड्स और फ़िल्टर्स को भी समझना चाहिए जो आपको विभिन्न फ़ोटोग्राफी उद्देश्यों के लिए उपयोगी हो सकते हैं।
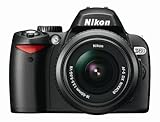
Understanding DSLR Camera
A DSLR camera, or a digital single-lens reflex camera, is a popular choice for professional photographers and enthusiasts alike. Understanding the basics of how a DSLR camera works will enable you to make the most out of its features and take stunning photographs.
1. Camera Body
The camera body is the main component of a DSLR camera. It houses the image sensor, which captures the light and converts it into a digital signal. The camera body also holds the lens, controls, buttons, and displays necessary for operating the camera.

2. Lens
The lens is an essential part of the DSLR camera. It allows light to enter the camera and focuses it onto the image sensor. Different types of lenses are available for various photography needs, such as wide-angle lenses for landscapes or telephoto lenses for capturing distant subjects.
3. Image Sensor
The image sensor is a critical component that converts light into electrical signals. DSLR cameras usually have large image sensors, which result in higher image quality and better performance in low light conditions. The two common types of image sensors found in DSLR cameras are CMOS and CCD sensors.
4. Shutter
The shutter controls the amount of time the image sensor is exposed to light. It opens and closes to capture the desired amount of light, allowing you to control the exposure of your photos. Understanding shutter speed is crucial for capturing motion and getting the right amount of light in your images.
5. Controls and Modes
DSLR cameras offer various controls and shooting modes to cater to different photography needs. Modes like manual, aperture priority, and shutter priority provide flexibility and control over your images. Understanding and exploring these controls will enable you to experiment and achieve your desired results.
6. Viewfinder and LCD Display
The viewfinder allows you to frame your shot by looking through the camera. It provides an optical view of the scene and helps you compose your images effectively. The LCD display on the camera body shows the preview of your images, access to settings, and playback options.

By understanding the key components of a DSLR camera and mastering its controls, you can unlock its full potential and capture stunning photographs. Practice and experiment with different settings and techniques to refine your skills as a photographer.
Basics of DSLR Camera Operation
A DSLR (Digital Single-Lens Reflex) camera is a powerful tool that allows you to capture high-quality photographs and videos. Understanding the basics of operating a DSLR camera is important to make the most out of its features and achieve the desired results.
1. Understanding Camera Body
The camera body houses various controls and features that are crucial for capturing images. Familiarize yourself with the different buttons, dials, and ports on your camera. These include the shutter button, mode dial, power switch, memory card slot, and USB port.
2. Mounting and Changing Lenses
DSLR cameras allow you to interchange lenses based on your photography needs. To mount a lens, align the white lens mounting index on the camera body with the lens’ red/green dot and twist it clockwise until it locks. To remove a lens, press the lens release button and rotate it counterclockwise.
3. Adjusting Camera Settings
DSLR cameras offer various settings to control the exposure, focus, and other aspects of your photographs. The settings are usually accessed through the menu button and navigated using the control buttons or the touchscreen (if available). Experiment with different settings such as aperture, shutter speed, ISO, and white balance to achieve the desired look.

4. Understanding Shooting Modes
A DSLR camera offers different shooting modes to meet different photography requirements:
| Mode | Description |
|---|---|
| Auto | The camera automatically handles all settings. |
| Program | The camera sets the aperture and shutter speed, but you can adjust other settings. |
| Aperture Priority | You set the aperture, and the camera adjusts the shutter speed. |
| Shutter Priority | You set the shutter speed, and the camera adjusts the aperture. |
| Manual | You have full control over all camera settings. |
Understanding the different shooting modes will give you more control over your photographs.
5. Focus and Composition
Achieving proper focus and composing your shots well are essential for creating visually appealing images. Use the focus points in the viewfinder or on the LCD screen to ensure accurate focus. Consider the rule of thirds, leading lines, and other composition techniques to create a balanced and engaging composition.
By mastering the basics of DSLR camera operation, you can unlock its full potential and capture stunning images. Practice regularly and experiment with different settings to enhance your photography skills.
Choosing the Right Lens for DSLR Camera
When it comes to operating a DSLR camera, choosing the right lens is crucial for capturing the best possible images. There are several factors to consider when selecting a lens that will suit your photography needs.

The first consideration is the focal length of the lens. Focal length determines the field of view and magnification of the image. A shorter focal length (e.g., 18-55mm) is ideal for wide-angle shots and landscape photography. On the other hand, a longer focal length (e.g., 70-200mm) is suitable for telephoto shots and close-ups of distant objects.
Another important aspect to consider is the aperture range of the lens. The aperture determines the amount of light entering the camera, which affects the exposure and depth of field. For low-light situations or creative depth of field effects, a lens with a wider aperture (e.g., f/1.8) is recommended. However, lenses with wider apertures tend to be more expensive.
Image stabilization is another feature to look for in a lens. This technology helps reduce blurriness caused by shaky hands or movement. It is particularly useful for handheld photography in low-light conditions or when using longer focal lengths. Some lenses have built-in image stabilization, while others rely on image stabilization in the camera body.
The compatibility of the lens with your DSLR camera is also crucial. Different camera brands have their own lens mounts, so ensure that the lens you choose is compatible with your camera model. Additionally, consider the build quality, size, and weight of the lens, as these factors can affect your overall shooting experience.
Lastly, consider your specific photography needs and budget. There is a wide range of lenses available, each with its own strengths and weaknesses. Research different lenses and read reviews to get an understanding of their performance and suitability for your photography style.

In conclusion, choosing the right lens for your DSLR camera is a critical part of operating the camera effectively. Consider factors such as focal length, aperture range, image stabilization, compatibility, and budget to make an informed decision that will enhance your photography skills and produce high-quality images.
Exposure Settings on DSLR Camera
Exposure settings are an essential part of operating a DSLR camera and can greatly impact the outcome of your photographs. Understanding how to adjust the exposure settings can help you take better and more professional-looking photos.
There are three main exposure settings to consider: aperture, shutter speed, and ISO.
| Exposure Setting | Description |
|---|---|
| Aperture | The aperture determines how much light enters the camera through the lens. It is represented by f-numbers, such as f/2.8 or f/16. A wider aperture (lower f-number) allows more light in, resulting in a shallower depth of field. A narrower aperture (higher f-number) allows less light in, resulting in a larger depth of field. Adjusting the aperture can help control the amount of background blur and sharpness in your photos. |
| Shutter Speed | The shutter speed determines how long the camera’s shutter remains open. It is usually measured in fractions of a second, such as 1/200 or 1/1000. A faster shutter speed allows less light in but freezes motion, while a slower shutter speed allows more light in but can result in motion blur. Adjusting the shutter speed can help capture moving subjects or create long exposure effects. |
| ISO | The ISO setting determines the camera’s sensitivity to light. A lower ISO (such as ISO 100) is less sensitive to light and ideal for well-lit environments, while a higher ISO (such as ISO 1600) is more sensitive to light and suitable for low-light conditions. However, higher ISO settings can introduce noise or graininess in the images. Adjusting the ISO can help achieve the desired exposure in different lighting situations. |
By understanding and experimenting with these exposure settings, you can have more control over the lighting and overall look of your photographs. It is recommended to practice and explore different settings to find out what works best for your specific shooting conditions and artistic preferences.
Focus Techniques for DSLR Camera
One of the key features of a DSLR camera is its ability to capture sharp and focused images. To make the most out of your DSLR camera, it is important to understand and utilize various focus techniques. This article will discuss some of the common focus techniques that can help you improve the clarity and sharpness of your images.

1. Autofocus
Most DSLR cameras come with autofocus capabilities, which can greatly simplify the process of getting sharp images. Autofocus uses sensors within the camera to automatically adjust the focus based on the subject’s distance and movement. It is recommended to use autofocus when shooting fast-moving subjects or when you need to quickly capture a moment.
2. Manual Focus
While autofocus is convenient, there may be situations where manual focus proves to be more effective. Manual focus allows you to have complete control over where you want to focus, which can be particularly useful when shooting landscapes, portraits, or still-life photography. Use the focus ring on your lens to manually adjust the focus until your subject appears sharp and clear in the viewfinder or on the camera’s LCD screen.
3. Focus Points
DSLR cameras typically have multiple focus points that you can choose from. These focus points represent specific areas within the frame where the camera will focus. By default, the camera will select the focus point automatically, but you can manually select a focus point to ensure accurate focusing on your desired subject. Experiment with different focus points to find the one that best suits your composition.
4. Depth of Field
The depth of field refers to the area in front and behind the subject that appears sharp in the image. By adjusting the aperture, you can control the depth of field. A shallow depth of field, created by using a wide aperture (small f-number), will result in a blurred background, making the subject stand out. On the other hand, a narrow aperture (large f-number) will increase the depth of field, resulting in more of the image being in focus.
5. Back Button Focus
Back button focus is a technique where you separate the focusing and shutter release functions by assigning autofocus to a button on the back of the camera, instead of half-pressing the shutter button. This allows you to focus on your subject and recompose the frame without the camera refocusing. It can be particularly useful for subjects that are moving or in situations where you need continuous autofocus.
Final Thoughts
Mastering focus techniques is crucial for capturing sharp and well-focused images with your DSLR camera. Experiment with different techniques and settings to find the ones that work best for your specific shooting scenarios. Remember, practice makes perfect, so keep shooting and refining your skills to elevate your photography game.
Shooting Modes on DSLR Camera
DSL
Tips for Better Composition with DSLR Camera
Composition is crucial in photography, as it can greatly impact the overall quality and impact of your images. Here are some tips for better composition with your DSLR camera:
| 1. Rule of thirds | One of the most basic and effective composition techniques is the rule of thirds. Imagine dividing your frame into three equal horizontal and vertical sections. Place your subject at the intersection points or along the lines to create a more balanced and visually appealing composition. |
| 2. Leading lines | Utilize natural or man-made leading lines to draw attention to your subject. These lines can be roads, fences, or any other elements that guide the viewer’s eyes towards the main point of interest in your photo. |
| 3. Framing | Use the surroundings to frame your subject and create a sense of depth in your composition. This can be achieved by incorporating elements like trees, windows, or archways that act as a frame within the frame. |
| 4. Symmetry and patterns | Symmetry and patterns can create visually striking images. Look for symmetrical scenes or repeating patterns to add a sense of balance and harmony to your composition. |
| 5. Depth of field | Experiment with different depth of field settings to create a sense of depth in your photos. Use a wide aperture (small f-number) to blur the background and make your subject stand out, or use a small aperture (large f-number) to keep everything in focus. |
| 6. Rule of odds | The rule of odds states that images with an odd number of subjects tend to be more visually appealing than those with an even number. Try to include an odd number of subjects in your composition to create a more balanced and interesting image. |
| 7. Fill the frame | Avoid unnecessary distractions in your composition by filling the frame with your subject. This helps to emphasize the main point of interest and create a more powerful visual impact. |
Remember, these are just guidelines, and breaking them can sometimes lead to more interesting and creative compositions. Experiment and find your own style, but always keep in mind that a well-composed photograph is essential for creating a visually captivating image.
Editing and Post-Processing DSLR Camera Photos
Once you have taken photos with your DSLR camera, the next step is to edit and post-process these images to enhance their quality and make them more visually appealing. Here are some tips on how to edit and post-process DSLR camera photos:
1. Transfer the Photos:
Connect your DSLR camera to your computer using a USB cable or remove the memory card and insert it into a card reader. Transfer the photos to your computer so that you can start the editing process.
2. Choose the Right Software:
There are several software options available for editing and post-processing DSLR camera photos, such as Adobe Photoshop, Lightroom, and GIMP. Choose the software that meets your needs and budget.
3. Import the Photos:
Once you have chosen the software, import the photos into the editing software. This will allow you to organize the photos and easily access them for editing.
4. Crop and Straighten:
One of the first steps in editing is to crop and straighten the photos. Use the crop tool to remove any unwanted elements or to change the composition. Use the straighten tool to correct any tilted horizons.
5. Adjust Exposure and White Balance:
Next, adjust the exposure and white balance of the photo. Use the exposure slider to brighten or darken the image as needed. Use the white balance tool to correct any color casts and ensure accurate colors.
6. Enhance Colors and Contrast:
To make the photo more vibrant, enhance the colors and contrast. Use the saturation and vibrance sliders to boost colors. Adjust the contrast to add depth and make the photo more visually appealing.
7. Sharpen and Reduce Noise:
To improve the sharpness of the image, use the sharpening tool. Be careful not to overdo it, as it can create a harsh effect. Reduce noise using the noise reduction tool, especially if you were shooting in low light conditions.
8. Apply Filters and Effects:
If desired, apply filters and effects to give the photo a unique look. Experiment with different filters, such as black and white, vintage, or HDR, to achieve the desired effect.
9. Save and Export:
Once you are satisfied with the editing, save your edited photo in a high-quality format, such as JPEG or TIFF. If you plan on sharing the photo online, resize it and export it in a web-friendly format, such as JPEG or PNG.
10. Backup Your Photos:
Lastly, make sure to backup your edited photos to avoid any loss of data. Store them on an external hard drive, cloud storage, or a reliable backup service.
Editing and post-processing DSLR camera photos can greatly enhance their quality and visual appeal. With the right software and techniques, you can transform your photos into stunning works of art.
Question-answer:
डीएसएलआर कैमरा की वीडियो कैसे रिकॉर्ड करें?
डीएसएलआर कैमरा की वीडियो रिकॉर्ड करने के लिए, पहले अपने कैमरा को चालू करें। फिर स्विच को वीडियो मोड में बदलें। यह करने के बाद, एक ठीक एसडी कार्ड का उपयोग करके अपनी वीडियो रिकॉर्ड करें। आप चाहें तो मैनुअल या आपातकालीन रूप से अपने कैमरे के नियंत्रणों को निर्धारित कर सकते हैं। वीडियो रिकॉर्ड करने के बाद, आप इसे अपने कंप्यूटर या अन्य डिवाइस पर संकलित कर सकते हैं।
डीएसएलआर कैमरा में फोटो कैसे क्लिक करें?
डीएसएलआर कैमरा में फोटो क्लिक करने के लिए, सबसे पहले अपने कैमरा को चालू करें। फिर स्टिल फोटो मोड में स्विच करने के लिए स्विच का उपयोग करें। यह करने के बाद, एक ठीक सीडी कार्ड का उपयोग करके अपनी तस्वीर क्लिक करें। आप मैनुअल नियंत्रणों का भी उपयोग कर सकते हैं, जैसे कि शटर स्पीड और एपर्चर दर्ज करना। तस्वीर क्लिक करने के बाद, आप उसे अपने कंप्यूटर या अन्य उपकरण पर संकलित कर सकते हैं।
एक DSLR कैमरे को हिंदी में कैसे ऑपरेट करें?
एक DSLR कैमरा ऑपरेट करना शुरू करने के लिए, सबसे पहले आपको कैमरे की पावर ऑन करनी होगी। इसके बाद, आप अपने कैमरे की भाषा को हिंदी में सेट कर सकते हैं। इसके बाद, आप उपयोगकर्ता मैनुअल पढ़ सकते हैं या फिर YouTube वीडियो के माध्यम से कैमरा के बेसिक ऑपरेशन का पता लगा सकते हैं। इसके अलावा, आप अपने कैमरे के अलग-अलग मोड्स और सेटिंग्स को अध्ययन कर सकते हैं।
कैसे एक DSLR कैमरे को हिंदी में चलाएं?
एक DSLR कैमरे को हिंदी में चलाने के लिए, आपको सबसे पहले कैमरे की भाषा सेट करनी होगी। ध्यान दें कि बहुत सारे कैमरों में भाषा सेटिंग होती है जिससे आप अपनी पसंदीदा भाषा का चयन कर सकते हैं। इसके बाद, आप अपने कैमरे को ऑन करें और अपनी आवश्यकताओं के अनुसार मोड चुनें। आप अपने कैमरे के ऑपरेशन को सीखने के लिए उपयोगकर्ता मैनुअल या ऑनलाइन वीडियो का उपयोग कर सकते हैं।


