If you are considering installing a security camera outside your home, you may be wondering how to power it without the need for additional wiring or batteries. One clever solution is to use your porch light as a source of power.
By harnessing the existing electrical setup of your porch light, you can easily connect your security camera to this power source, eliminating the hassle of installing new wiring or constantly replacing batteries. This method not only provides a convenient and cost-effective solution, but it also ensures that your security camera remains powered on at all times.
Before proceeding with this method, it is important to ensure that your porch light is compatible with powering a security camera. Ideally, your porch light should have an electrical junction box where you can connect the camera. Additionally, consider the power requirements of your security camera to ensure that the porch light can provide sufficient power.
Once you have confirmed compatibility, the process of powering your security camera from your porch light is relatively straightforward. You will need to run a power cable from the electrical junction box of the porch light to your security camera. This can be done by either extending the existing cable or using a separate cable that is suitable for outdoor use.
Informative Guide on Powering a Security Camera Using a Porch Light
Adding a security camera to your porch can help increase the safety and security of your home. One common question people have is how to power the camera. One option is to utilize the power source from an existing porch light. In this guide, we will provide step-by-step instructions on how to power a security camera using a porch light.

Step 1: Choose a Suitable Security Camera
Before proceeding, it is important to select a security camera that is compatible with a porch light power source. Look for cameras that support low voltage power input, typically ranging from 6 to 12 volts. This will ensure a seamless integration with the existing porch light wiring.
Step 2: Turn Off the Power
Prior to any electrical work, always turn off the power to the porch light at the circuit breaker. This will prevent any accidents or electrical shocks during the installation process.
Step 3: Remove the Porch Light

Using a screwdriver, carefully remove the porch light fixture from the electrical box. Make sure to keep track of any screws or wires that are removed.
Step 4: Identify the Power Source Wires
Locate the two wires that are supplying power to the porch light. Typically, these wires are black (hot) and white (neutral). The hot wire carries the electrical current, while the white wire acts as the return path for the current.
Step 5: Connect the Security Camera
Take the power adapter that came with the security camera and connect the black wire to the hot wire from the porch light, and the white wire to the neutral wire. Use wire connectors to securely join the wires together. Make sure the connections are tight and properly insulated to prevent any electrical issues.

Step 6: Mount the Security Camera
Once the power is connected, mount the security camera in the desired location using the appropriate mounting brackets and screws. Ensure that the camera is pointed in the direction you want to monitor.
Step 7: Test the Setup
Once the camera is securely mounted, restore power to the porch light at the circuit breaker. The security camera should now receive power from the porch light source. Check to see if the camera is functioning properly by accessing the camera’s live feed through the designated app or software.
Note: It is essential to check the camera’s power requirements and consult a professional if you are unsure about any electrical work.

By following these steps, you can successfully power a security camera using a porch light. This method not only saves you from complicated wiring processes but also provides a discreet power source for your camera.
Assessing Your Porch Light’s Power Capability
Before attempting to power a security camera from your porch light, you need to assess the power capability of your current porch light fixture. This will help you determine whether it can provide enough power to support the additional load of a security camera. Here are some steps to assess your porch light’s power capability:
- Ensure the porch light is turned off before proceeding with any assessments.
- Carefully remove the porch light fixture cover using a screwdriver or any other suitable tool.
- Take a close look at the wiring connections inside the fixture. You should see a black (hot) wire, a white (neutral) wire, and a green or bare (ground) wire.
- Check the voltage rating of the porch light fixture. This information should be printed on the inside of the fixture cover or on a label attached to the fixture.
- Calculate the power capability of your porch light fixture by multiplying the voltage rating by the maximum current rating. The maximum current rating is typically mentioned on the fixture or its user manual.
- Compare the calculated power capability with the power requirements of the security camera you intend to install. Ensure that the porch light’s power capability is sufficient to support the additional load.
If the porch light’s power capability is not sufficient, you may need to consider alternative power sources or consult a professional electrician to upgrade the wiring in your porch light fixture. It is important to ensure that the power supply is adequate to avoid any electrical hazards or damage to the security camera or porch light.
Understanding the Power Output of your Porch Light
Your porch light can be a valuable source of power for your security camera, but before you proceed with connecting them, it’s important to understand the power output of your porch light. The power output refers to the amount of electrical energy that the porch light can supply. This knowledge is crucial in order to ensure that your camera can be powered effectively.
Voltage: The voltage of your porch light determines the electrical potential difference between two points, which is essential for the proper functioning of your security camera. Most porch lights operate at a standard voltage of 120 volts. However, it’s always recommended to double-check the voltage of your specific porch light to avoid any electrical mishaps.

Current: Current is the flow of electrical charge, measured in amperes (A). It’s important to understand the current rating of your porch light to ensure that it can supply enough current to power your security camera. The current rating is typically listed on the bulb or inside the fixture. Make sure that the current provided by your porch light matches the requirements of your camera.
Wattage: Wattage is a measure of the total power consumed by an electrical device, calculated by multiplying the voltage and current. In the context of your porch light, the wattage indicates the total amount of power that can be drawn from it. Make sure that the total wattage drawn by your camera, along with any additional devices connected, does not exceed the wattage rating of your porch light to avoid overloading it.
Compatible Power Requirements: It’s important to ensure that the power requirements of your security camera match the power output of your porch light. Check the specifications of both the camera and the porch light to determine if they are compatible. This includes voltage, current, and wattage requirements.
Consult a Professional: If you are unsure about the power output of your porch light or how to connect it to your security camera, it’s always a good idea to consult a professional electrician. They can help you understand the electrical components involved and ensure that the connection is safe and secure.
By understanding the power output of your porch light and ensuring compatibility with your security camera, you can effectively power your camera and enhance the security of your home.

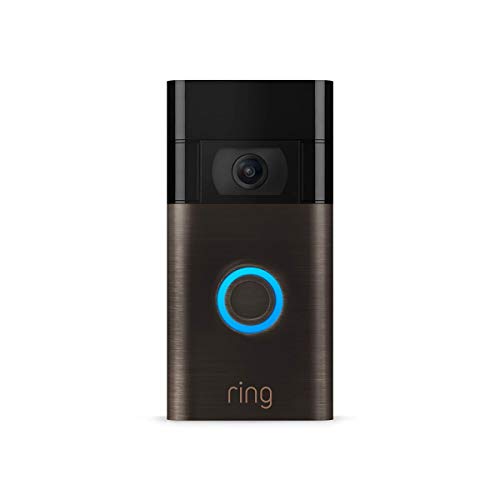
Selecting the Right Security Camera
When it comes to selecting a security camera for your porch light, there are a few important factors you should consider. Choosing the right camera will ensure that you have the best possible surveillance and monitoring capabilities for your home.
1. Resolution and Video Quality
The resolution and video quality of a security camera play a crucial role in capturing clear and detailed footage. Look for cameras that offer high-definition (HD) or ultra-high-definition (UHD) resolution to ensure that you can easily identify faces and objects in the recorded video.
2. Field of View
The field of view (FOV) of a camera determines how much area it can cover. Consider the size of your porch and the area you want to monitor, and choose a camera with a wide enough FOV to capture the desired area. Cameras with adjustable angles or pan-tilt-zoom (PTZ) capabilities can be a great option to cover larger areas.
Note: Keep in mind that a wider FOV may result in a decrease in image resolution.
3. Night Vision
Since porch light cameras are often used for monitoring during nighttime, it is essential to choose a camera with good night vision capabilities. Look for cameras with infrared (IR) LEDs that provide clear visibility in low-light conditions.

4. Power Options
Consider the power options available for the camera. While some security cameras can be powered directly from porch lights, others require separate power sources like batteries or power adapters. Choose a camera that best fits your power supply and installation requirements.
5. Connectivity and Storage
Check the connectivity options available for the camera. Wi-Fi-enabled cameras allow for easy installation and remote access to live feeds and recorded footage. Also, consider the storage options for the recorded videos, such as local storage on a memory card or cloud storage services.
6. Smart Features and Integration
Modern security cameras often come with smart features like motion detection, two-way audio, and smartphone integration. These features can enhance the security capabilities and convenience of your camera system. Look for cameras that offer the features that are important to you and integrate with your existing smart home devices if needed.
By considering these factors, you can select a security camera that meets your specific requirements and provides reliable surveillance for your home.
Choosing a Suitable Camera for Porch Light Power Supply
Selecting the right security camera for powering it from a porch light requires consideration of various factors. Here are a few important aspects to keep in mind when choosing a suitable camera for porch light power supply:
1. Power Requirements
Before purchasing a security camera, it is crucial to review its power requirements. Some cameras are designed to work with low-voltage power sources, while others may require a specific voltage range. Ensure that the camera you choose is compatible with the power output of your porch light.
2. Connectivity Options
Another important factor to consider is the connectivity options provided by the camera. Determine whether the camera supports Wi-Fi, wired connections, or both. This will help you decide whether it can be easily integrated with your porch light’s power supply.
3. Outdoor Capabilities
Since the camera will be installed on your porch, it is essential to select one that is suitable for outdoor use. Look for features such as weather resistance, durability, and an appropriate Ingress Protection (IP) rating to ensure the camera can withstand various weather conditions.
4. Mounting Options
Consider the mounting options available for the camera. Ensure that it can be securely attached to your porch light or any other desired location. Some cameras come with adjustable brackets or mounting kits that make installation easier.
5. Image Quality
Image quality is a critical factor when it comes to security cameras. Look for cameras with high-resolution capabilities and features like night vision. This will ensure that you are able to capture clear images, even in low-light conditions.
6. Additional Features
Lastly, consider any additional features that may be important to you. Some cameras offer advanced functions such as motion detection, two-way audio, and remote access via a smartphone app. Think about your specific requirements and choose a camera that meets them.
By considering these factors, you can choose a suitable security camera that can be powered from your porch light, providing you with the desired surveillance capabilities for your porch.
Gathering the Required Tools and Materials
Before you start powering your security camera from your porch light, you will need to gather the necessary tools and materials. This will ensure that you have everything you need for a successful installation. Here is a list of items you will need:
Tools:
- Drill
- Screwdriver
- Wire stripper
- Wire cutter
- Pliers
- Electrical tape
- Socket wrench
- Multimeter
Materials:
| Item | Description |
|---|---|
| Security camera | A suitable outdoor security camera with power option |
| Porch light | An existing porch light fixture with power source |
| Power adapter | If the camera requires an external power source |
| Cables | Camera cables for video and power transmission |
| Connectors | Proper connectors for connecting cables |
| Mounting hardware | Screws and anchors for securing the camera |
Make sure you have all the necessary tools and materials ready before you proceed to the installation. This will save you time and make the process smoother.
Preparing for the Installation Process
Before you begin installing your security camera powered by the porch light, it’s important to properly prepare for the process. This will ensure a smooth installation and optimal functioning of your camera. Follow these steps to get started:
1. Gather the necessary tools and equipment
Make sure you have all the required tools and equipment for the installation process. This may include a ladder, screwdriver, drill, mounting brackets, screws, and cables. Refer to the instruction manual provided with your security camera for a complete list of required tools.
2. Identify the optimal camera placement
Decide where you want to install your security camera. Consider factors such as the field of view, range, and areas you want to monitor. A good location is usually near the porch light, as it provides an ideal vantage point and access to power. Take into account any potential obstructions or blind spots that may affect the camera’s effectiveness.
You may need to adjust the camera angle and test different positions before finding the best placement. It’s advisable to check for legal restrictions or privacy concerns regarding surveillance camera placement in your area.
3. Check the porch light power source
Inspect the porch light power source to ensure it’s suitable for running the security camera. Make sure the porch light is functioning properly and provides a steady power supply. If the porch light is connected to a switch inside the house, ensure that the switch remains turned on for the camera to receive power continuously.
If the porch light doesn’t provide a constant power supply, you may need to take additional steps such as installing a separate power outlet or using a battery-powered camera with solar panel charging capabilities.
4. Plan the cable routing
Determine how you will route the camera’s power and data cables from the porch light to your desired location. Measure the distance and consider the most discreet and secure pathway for the cables. This may involve drilling holes, using cable protectors, or concealing the cables behind walls or trim.
| TIP: | Consider using conduit or waterproof connectors to protect the cables from outdoor elements and potential damage. |
|---|
By adequately preparing for the installation process, you can ensure a successful setup and operation of your security camera powered by the porch light.
Understanding Power Over Ethernet (PoE)
Power over Ethernet (PoE) is a technology that allows both data and power to be transmitted over a single Ethernet cable. It eliminates the need for a separate power supply, making it an ideal solution for powering security cameras.
With PoE, power is sent alongside the data signals through the Ethernet cable, providing a convenient and efficient way to power devices. This means that you can connect your security camera to your porch light’s Ethernet port and have it powered directly from the light’s electrical supply.
PoE operates using two main components: the Power Sourcing Equipment (PSE) and the Powered Device (PD). The PSE, which can be a PoE switch or injector, supplies power over the Ethernet cable. The PD, in this case, the security camera, receives power and data through the same cable.
There are two main types of PoE: PoE and PoE+. PoE devices can deliver up to 15.4 watts of power, while PoE+ devices can provide up to 30 watts. Make sure to check the power requirements of your security camera to ensure compatibility with the PoE standard.
Benefits of Power Over Ethernet:
- Simplicity: PoE eliminates the need for separate power cables, simplifying installation and reducing clutter.
- Flexibility: With PoE, devices can be installed in locations where AC power outlets may not be available.
- Cost savings: By using existing Ethernet infrastructure for power, you can save on wiring and electrical installation costs.
- Reliability: PoE provides a consistent power supply, ensuring continuous operation even during power outages.
- Scalability: PoE allows for easy expansion and addition of devices without the need for additional electrical infrastructure.
Requirements for Using PoE:
To utilize PoE, you will need the following:
- A PoE-enabled porch light or PoE injector
- A security camera that supports PoE
- An Ethernet cable
It is important to ensure that your porch light or injector supports the PoE standard and that your security camera is compatible with PoE. Additionally, you’ll need to make sure your Ethernet cable is capable of carrying both data and power.
Overall, Power over Ethernet provides a convenient and efficient way to power security cameras from porch lights. It offers simplicity, flexibility, cost savings, reliability, and scalability, making it an attractive option for home and business security systems.
Exploring the Benefits of PoE for Security Cameras
Power over Ethernet (PoE) technology offers numerous benefits for security camera systems. PoE allows both power and data to be transmitted over a single Ethernet cable, simplifying the installation and reducing the need for additional power sources.
One of the key advantages of PoE for security cameras is its enhanced flexibility. With PoE, cameras can be installed in locations where power outlets may not be readily available, such as on walls, ceilings, or in remote areas. This eliminates the need for complex wiring and helps to achieve a clean and professional installation.
PoE also provides centralized power management for security camera systems. A PoE switch or injector can power multiple cameras, allowing for easier control and monitoring of the entire network. This centralized power distribution simplifies system management, reduces maintenance costs, and ensures uninterrupted operation.
Efficiency and reliability are other significant benefits of PoE for security cameras.
By using PoE, power is delivered directly to the camera through the Ethernet cable, eliminating the need for separate power cables and adapters. This reduces the potential points of failure, minimizing downtime and increasing overall system reliability.
PoE also offers energy-saving features, such as the ability to control and monitor power usage. Power can be scheduled to turn on or off based on specific times or events, allowing for optimized energy management. This not only reduces operational costs but also helps to achieve a more sustainable and eco-friendly security camera system.
Furthermore, PoE technology simplifies system scalability. Additional cameras can be easily added to the network without the need for dedicated power sources. This flexibility allows for seamless expansion as security needs grow, without costly and time-consuming rewiring efforts.
In conclusion, PoE technology offers numerous benefits for security camera systems. Its flexibility, centralized power management, efficiency, reliability, and scalability make it an ideal solution for both residential and commercial applications. With PoE, powering security cameras becomes hassle-free, providing peace of mind and optimal performance.
Installing PoE Adapters and Connectors
If you want to power your security camera from a porch light, you will need to use PoE adapters and connectors. PoE stands for Power over Ethernet, which allows the power and data to be transmitted through a single Ethernet cable.
Here are the steps to install PoE adapters and connectors:
- Choose the right PoE adapter: Make sure to select a PoE adapter that is compatible with your porch light and security camera. It should have the necessary power output to support both devices.
- Turn off the power: Before you begin the installation process, switch off the power to the porch light. This will ensure your safety during the installation.
- Mount the PoE adapter: Find a suitable location near the porch light to mount the PoE adapter. You can use screws or adhesive to attach it securely.
- Connect the Ethernet cable: Take the Ethernet cable and connect one end to the PoE adapter. Make sure the connection is tight and secure.
- Connect the power cable: Connect the power cable from the porch light to the input on the PoE adapter. This will provide the necessary power to the adapter.
- Connect the camera: Take the other end of the Ethernet cable and connect it to the security camera. Again, ensure that the connection is secure.
- Test the setup: Once all the connections are in place, turn on the power to the porch light and check if the security camera is receiving power and functioning properly.
Remember to follow the manufacturer’s instructions and guidelines while installing the PoE adapters and connectors. If you are unsure about any step, it is recommended to seek professional help to ensure a safe and reliable installation.
By using PoE adapters and connectors, you can easily power your security camera from a porch light without the need for additional wiring or power sources. This convenient solution allows you to enhance the security of your property with minimal effort and cost.
Connecting your Security Camera to the Porch Light
Installing a security camera on your porch can provide an added layer of safety and peace of mind for your home. One convenient way to power your security camera is by connecting it to your porch light. This not only eliminates the need for separate power sources but also ensures that your camera is always operational, as porch lights are typically connected to a reliable power supply.
To connect your security camera to the porch light, you will need a few tools and materials:
- A security camera with built-in power-over-ethernet (PoE) capability
- An outdoor-rated ethernet cable
- A power injector
- A drill and drill bits
- Screws
Here’s a step-by-step guide on how to connect your security camera to the porch light:
- Choose a suitable location for your security camera, ensuring that it has a clear view of the area you want to monitor.
- Using a drill and drill bits, create a hole for the ethernet cable to pass through from the location of your camera to the porch light.
- Securely attach the camera to the desired location using screws.
- Connect one end of the outdoor-rated ethernet cable to the camera’s PoE port and the other end to the power injector.
- Using another ethernet cable, connect one end to the LAN port of the power injector and the other end to your porch light’s network switch or router.
- Plug the power injector into an electrical outlet to provide power to your camera.
Once connected, your security camera should start receiving power from the porch light, allowing it to function without the need for additional power sources. Make sure to check the manufacturer’s instructions for any additional settings or configurations required for your specific camera model.
Note: It’s important to ensure that your porch light is compatible with power-over-ethernet (PoE). If your porch light doesn’t support PoE, you may need to use an alternative power source or consider installing a separate power supply for your camera.
By connecting your security camera to the porch light, you can effectively combine both lighting and surveillance features, enhancing the security of your porch area. Remember to regularly check and maintain your camera system to ensure its optimal performance.
Securing the Power Connection
To ensure a stable and secure power connection for your security camera, it is important to follow these steps:
1. Turn off the power
Before attempting any work on the electrical connections, make sure to turn off the power to the porch light. This will prevent any potential electrical shocks or hazards while working.
2. Check the wiring
Inspect the wiring that is currently connected to the porch light. Look for any loose or damaged wires that may need to be repaired or replaced.
3. Identify the power source
Locate the power source that is currently providing electricity to the porch light. This is most likely a nearby electrical outlet or circuit breaker. Make sure the power source has enough capacity to support the additional power required by the security camera.
4. Choose the right power adapter
Select a power adapter that is compatible with both the security camera and the power source. Ensure that the adapter can handle the voltage and current requirements of the camera.
5. Connect the power adapter
Connect the power adapter to the power source and the security camera. Follow the manufacturer’s instructions for connecting the wires and make sure to properly secure the connections to prevent any accidental disconnections.
6. Test the power connection
Once the power adapter is properly connected, turn on the power to the porch light and test the power connection for the security camera. Make sure the camera is receiving a stable power supply and that it is functioning correctly.
7. Secure the wiring
After confirming that the power connection is working properly, secure the wiring to prevent any potential damage or accidents. Use cable ties or conduit to properly fasten and protect the wires.
8. Regularly check and maintain the power connection
Periodically inspect the power connection for any signs of damage or loose connections. Make sure to tighten any loose wires and replace any damaged components as needed. This will ensure a reliable and secure power supply for your security camera.
FAQ,
Can I power a security camera using my porch light?
Yes, it is possible to power a security camera using your porch light. You will need to make sure that your porch light has a power outlet or a USB port. If it does, you can connect your security camera to it using the appropriate cables and adapters.
What are the advantages of powering a security camera from a porch light?
Powering a security camera from a porch light can have several advantages. Firstly, it eliminates the need for separate power cables and outlets, making the installation process much simpler. Additionally, using an existing power source like a porch light can save you money on electricity bills since the camera will only be powered when the light is turned on. Lastly, it can provide a more discreet setup as the camera will blend in with the existing porch light.
What do I need to power a security camera from my porch light?
To power a security camera from your porch light, you will need a few things. First, you will need to check if your porch light has a power outlet or a USB port. If it doesn’t, you may need to install a porch light with these features. Once you have a power source, you will need to connect your security camera to it using the appropriate cables and adapters. Make sure to follow the manufacturer’s instructions and guidelines to ensure a proper and safe installation.