
If you’re a photography enthusiast, you know how important it is to keep your DSLR camera lens in pristine condition. However, accidents happen, and sometimes scratches can appear on the lens. While scratches can be frustrating, they don’t necessarily mean the end of your lens. With a few simple steps, you can remove minor scratches and restore your lens to its original clarity.
Step 1: Assess the Damage
Before attempting to remove scratches from your DSLR camera lens, it’s important to assess the extent of the damage. Minor scratches that do not affect the optical performance of your lens can often be safely removed. However, deep scratches or scratches that affect the lens coating may require professional repair or lens replacement.
Step 2: Gather the Necessary Materials
To remove scratches from your DSLR camera lens, you’ll need a few basic materials. These include a lens cleaning solution or isopropyl alcohol, a microfiber cloth, a lens pen or soft brush, and a lens polishing solution or toothpaste. It’s important to use products specifically designed for camera lenses to ensure they won’t damage the lens further.

Step 3: Clean the Lens
Start by cleaning the lens with a lens cleaning solution or isopropyl alcohol to remove any dirt or oils. Apply a small amount of the cleaning solution to a microfiber cloth and gently wipe the lens in a circular motion. Be careful not to press too hard, as this could cause further damage.
Step 4: Remove Minor Scratches
For minor scratches, you can try using a lens pen or soft brush to gently buff the surface of the lens. Move the pen or brush in small circular motions, applying gentle pressure. This may help to minimize the appearance of the scratches.
Step 5: Polish the Lens

If the scratches are still visible, you can try using a lens polishing solution or toothpaste. Apply a small amount of the solution or toothpaste to a soft, cotton cloth and gently rub it onto the scratched area in a circular motion. Rinse the lens with clean water and use a microfiber cloth to dry it.
Note: It’s important to be cautious when using toothpaste, as some formulations may be too abrasive and can damage the lens further. Always test a small, inconspicuous area before applying the toothpaste to the entire lens.
Step 6: Protect the Lens
After removing the scratches, it’s important to protect your DSLR camera lens from future damage. Always use lens caps or hoods when not in use to minimize the risk of scratches. Additionally, avoid touching the lens surface with your fingers, and use a lens cleaning solution and microfiber cloth for regular cleaning.
By following these simple steps, you can remove minor scratches from your DSLR camera lens and ensure optimal optical performance. Remember, if the scratches are deep or affect the lens coating, it may be best to seek professional repair or replacement.

Understanding Lens Scratches
Scratches on a DSLR camera lens can be a frustrating issue for photographers, as they can affect image quality and overall performance. To effectively address this problem, it is important to have a good understanding of lens scratches and their impact.
What Causes Lens Scratches?
Lens scratches can be caused by various factors, including mishandling of the camera, improper cleaning techniques, and exposure to sharp objects. Even a small scratch can have a noticeable effect on image quality, especially when shooting in bright light or using a narrow aperture.
Effects of Lens Scratches
When light passes through a scratched lens, it can scatter or be deflected, leading to reduced contrast, clarity, and sharpness in the resulting images. Scratches may also cause unwanted lens flares or ghosting, which can impact the overall aesthetics of the photographs.

Assessing Lens Scratches
Before attempting any repair methods, it is important to assess the severity of the lens scratches. Minor scratches that do not affect image quality significantly may not require immediate attention. However, deep or numerous scratches may necessitate professional repair or, in some cases, lens replacement.
Preventing Lens Scratches
Prevention is key to avoiding lens scratches. Always handle your camera and lenses with care, using lens caps and protective filters when not in use. Avoid touching the lens directly and only use appropriate cleaning techniques and tools recommended by the lens manufacturer.
Repairing Lens Scratches
While it is not always possible to completely remove lens scratches, there are some methods that can minimize their appearance. These include using lens polishing compounds, specialized coatings, or even toothpaste. However, caution should be exercised as aggressive polishing methods may damage the lens further.
In conclusion, lens scratches are a common issue faced by DSLR camera users, but with proper understanding and preventive measures, their impact can be minimized. It is always recommended to consult professional repair services if the scratches are severe or affecting image quality significantly.
Assessing the Damage
Before attempting to remove scratches from your DSLR camera lens, it is important to assess the level of damage. Depending on the severity of the scratches, you may need to consider whether professional repair or replacement is necessary.
Start by examining the lens under a good light source. Look closely for any visible scratches or marks on the lens surface. If the scratches are superficial and do not affect the image quality, you may be able to try some DIY methods to minimize their appearance.
If the scratches appear deep or numerous, it may be best to consult a professional camera repair service. They will have the expertise and equipment needed to determine the extent of the damage and recommend the most appropriate solution.
Minor Scratches
If the scratches are minor and do not visibly affect your images, you can try some simple methods to reduce their visibility. One option is to use a microfiber cloth to gently buff the lens surface in a circular motion. This might help to smooth out the scratches and minimize their appearance.
Another method is to apply a thin layer of petroleum jelly or toothpaste to the scratched area. Gently rub in a circular motion with a soft cloth, then wipe off with a clean cloth. This technique can sometimes fill in the scratches temporarily, making them less noticeable.
Severe Scratches
If the scratches are deep or numerous, it is unlikely that you will be able to remove them completely on your own. In such cases, it is best to avoid attempting DIY repairs, as you may accidentally cause further damage.
Instead, contact a professional camera repair service to assess the lens and provide expert advice. They may recommend lens replacement or other appropriate solutions depending on the extent of the damage.
Remember, prevention is always better than cure. To avoid scratches on your DSLR camera lens in the future, handle it with care, use lens caps or filters for protection, and avoid placing the lens face down on rough surfaces.

Preparation
Before attempting to remove scratches from your DSLR camera lens, it’s important to take the following steps to ensure the best results:
1. Clean the lens: Start by cleaning the lens thoroughly using a soft, lint-free cloth or cleaning solution specifically designed for camera lenses. This will help remove any dirt or debris that may be present on the lens surface.
2. Assess the damage: Carefully examine the lens for any scratches. Take note of their size, depth, and location on the lens.
3. Gather the necessary tools: Collect the tools and materials you’ll need for the scratch removal process. This may include a microfiber cloth, lens cleaning solution, a lens pen, and a lens repair kit.
4. Find a clean and well-lit workspace: Choose a clean and well-lit area to work on your camera lens. Avoid areas with excessive dust or debris that could potentially worsen the scratches or cause further damage to the lens.

5. Remove the lens: If possible, remove the lens from your camera body before attempting any repairs. This will provide better access to the lens and reduce the risk of accidentally damaging other camera components.
6. Take precautionary measures: Consider wearing gloves during the scratch removal process to prevent oils from your hands transferring onto the lens. Additionally, be gentle and cautious throughout the entire process to avoid causing any additional damage.
By properly preparing for the scratch removal process, you’ll increase your chances of successfully removing scratches from your DSLR camera lens without causing further damage.
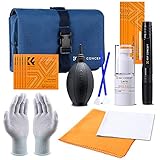
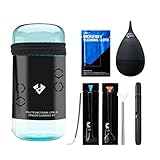
Gathering the Necessary Tools
Before you start the process of removing scratches from your DSLR camera lens, it’s important to gather all the necessary tools. Here is a list of items you will need:
- Microfiber cloth or lens cleaning paper
- Lens cleaning solution or isopropyl alcohol
- Cotton swabs or lens cleaning brush
- Lens blower or compressed air
- UV filter (optional)
A microfiber cloth or lens cleaning paper is essential for gently wiping the lens and removing any dust or debris. Lens cleaning solution or isopropyl alcohol can be used to clean stubborn smudges or fingerprints on the lens. Cotton swabs or a lens cleaning brush can help reach smaller areas or remove dirt from crevices. A lens blower or compressed air is useful for removing loose particles without touching the lens directly. Finally, a UV filter is optional but can be used as an extra layer of protection for the lens.
Cleaning the Lens Surface
When it comes to removing scratches from your DSLR camera lens, the first step is to clean the lens surface properly. This will ensure that any dust or debris doesn’t further damage the lens or affect the quality of your photographs.
Materials you will need:
1. Lens cleaning solution or optical lens cleaner
2. Microfiber cloth or lens cleaning tissue
Step-by-step instructions:
1. Start by removing any visible dust or debris from the lens surface. You can gently blow on it or use a air blower brush to remove loose particles.
2. Apply a small amount of lens cleaning solution or optical lens cleaner to a microfiber cloth or lens cleaning tissue. Avoid using excessive amounts of liquid as it may seep into the lens and cause damage.

3. Gently wipe the lens surface in a circular motion, starting from the center and moving towards the edges. Be careful not to apply too much pressure as it may scratch the lens further. Repeat this process several times, if necessary, to ensure a thorough cleaning.
4. If there are stubborn smudges or fingerprints on the lens, use a lens cleaning pen or a lens cleaning solution specifically designed for removing smudges. Follow the manufacturer’s instructions for best results.
5. Once you have cleaned the lens surface, use a dry microfiber cloth or lens cleaning tissue to gently remove any remaining moisture or residue. Again, use a circular motion for this step.
6. Finally, inspect the lens surface under proper lighting to ensure it is clean and free of any scratches or damage. If you still notice scratches, you may need to seek professional help or consider replacing the lens.
Remember to clean your DSLR camera lens regularly to prevent dust, debris, and scratches from affecting your photographs. It is also recommended to keep a lens cap on when the camera is not in use to protect the lens from accidental damage.
Scratch Removal Techniques
If you have noticed scratches on your DSLR camera lens, don’t worry, there are a few techniques you can try to remove them. While some scratches may be too deep or severe to be completely removed, these methods can help improve the clarity of your lens and reduce the visibility of minor scratches.
1. Lens Cleaning Solution
Using a lens cleaning solution specifically designed for camera lenses can help remove surface scratches. Start by applying a few drops of the solution to a microfiber cloth or lens cleaning tissue. Gently rub the cloth in a circular motion over the scratched area. Be careful not to apply excessive pressure, as this can damage the lens further.
Note: Avoid using harsh chemicals or abrasive materials, as they can cause more damage to the lens.
2. Toothpaste Method
This technique is suitable for removing small scratches. Apply a small amount of toothpaste (non-gel formula) to the scratched area. Using a clean, soft cloth, rub the toothpaste in a circular motion for a few minutes. Rinse the lens with water and then dry it with a lint-free cloth. Check if the scratch has improved, and repeat the process if necessary.
Note: Always use a soft cloth or lens cleaning tissue to avoid scratching the lens further.
If these techniques do not yield satisfactory results, or if the scratches are too deep, it is recommended to consult a professional camera repair service. They may be able to offer more advanced solutions, such as lens replacement or specialized scratch removal treatments.
Remember to be gentle and cautious when attempting to remove scratches from your DSLR camera lens. Taking preventive measures, such as using lens caps and filters, can help protect your lens from scratches in the future.
Using Toothpaste
Toothpaste can be a surprisingly effective solution for removing minor scratches from your DSLR camera lens. Here’s how you can use toothpaste to restore your lens to its former glory:
Step 1: Choose the right toothpaste
Not all toothpaste will work for this method. Look for a non-gel toothpaste that contains baking soda. The baking soda will act as an abrasive that helps to buff out the scratches.
Step 2: Clean the lens
Before applying toothpaste, make sure to clean the lens surface with a microfiber cloth to remove any dirt or debris. This will prevent any particles from scratching the lens further during the polishing process.
Step 3: Apply the toothpaste
Take a small amount of toothpaste and apply it to a microfiber cloth or a cotton swab. Gently rub the toothpaste onto the scratched area in a circular motion. Be careful not to apply too much pressure, as this could cause further damage.
Step 4: Rinse and clean
Once you have finished rubbing the toothpaste onto the scratches, rinse the lens with lukewarm water to remove any residue. Dry the lens with a clean microfiber cloth.
Step 5: Inspect the lens
After cleaning and drying the lens, examine it under a bright light to see if the scratches have been minimized or removed. If the scratches are still visible, you may need to repeat the process or consider seeking professional help.
Note: This method is suitable for minor scratches only. If your lens has deep scratches or cracks, it is recommended to have it repaired professionally or consider replacing it.
By using toothpaste, you can potentially save money and extend the lifespan of your DSLR camera lens by removing minor scratches. However, always use caution when trying DIY methods and stop if you notice any further damage occurring during the process.
Applying a Lens Repair Kit
If you have moderate to deep scratches on your DSLR camera lens, you may consider using a lens repair kit to fix the damage. These kits typically come with specialized tools and materials designed to remove scratches and restore the lens’s clarity. Here are some steps to follow when applying a lens repair kit:
- Start by cleaning the lens surface with a microfiber cloth to remove any dirt or debris. This will help ensure that the repair materials adhere properly.
- Next, assess the severity of the scratches. Some kits may come with different solutions or compounds depending on the depth of the scratches.
- Apply the designated repair compound to the scratched area. Use a cotton swab or a soft cloth to apply the compound in a gentle circular motion. Be sure to follow the instructions provided with the kit, as different compounds may have different application methods.
- Allow the compound to dry completely. This may take a few minutes or longer depending on the specific product you are using.
- Once the compound is dry, use a clean microfiber cloth to buff the lens surface. Apply gentle pressure and continue buffing until the scratches begin to fade or disappear.
- Repeat the process if necessary. In some cases, deep scratches may require multiple applications of the repair compound to achieve satisfactory results.
- After completing the repair, clean the lens again with a microfiber cloth to remove any residue or excess compound.
It’s important to note that while lens repair kits can be effective in removing minor to moderate scratches, they may not be able to completely repair deep or extensive damage. In such cases, it may be necessary to seek professional repair services or consider replacing the lens altogether.
By following these steps and using a lens repair kit correctly, you can potentially restore your DSLR camera lens to its original clarity and minimize the appearance of scratches.
Question-answer:
Is it possible to remove scratches from a dslr camera lens?
Yes, it is possible to remove scratches from a dslr camera lens with the right tools and techniques.
What are some recommended tools for removing scratches from a dslr camera lens?
Some recommended tools for removing scratches from a dslr camera lens include microfiber cloth, lens cleaning solution, lens cleaning pen, and lens polish.
Can I use toothpaste to remove scratches from a dslr camera lens?
Using toothpaste to remove scratches from a dslr camera lens is not recommended. Toothpaste may contain abrasive particles that can further damage the lens.
Can I prevent scratches on my dslr camera lens?
Yes, you can prevent scratches on your dslr camera lens by using a lens cap when the camera is not in use, avoiding touching the lens with your fingers, and storing the camera and lens in a protective case when not in use.


