If you have a security camera system, you may come across a situation where you need to replace the BNC connector on the camera cable. Whether it’s due to wear and tear or a faulty connection, it’s important to know how to properly replace the BNC connector to ensure uninterrupted surveillance.
Before you begin the process, make sure you have the necessary tools and materials on hand. You will need a new BNC connector, a coaxial cable cutter, a coaxial cable stripper, and a BNC crimping tool. It’s also a good idea to have a utility knife and some electrical tape handy.
The first step is to disconnect the camera from the power source to avoid any potential electrical shocks. Once that is done, gently remove the old BNC connector from the cable by unscrewing it counterclockwise. If the connector is damaged or too tight to unscrew, you may need to use a pair of pliers for extra leverage.
Next, use your coaxial cable cutter to trim the end of the cable. Ensure that the cut is clean and straight to achieve a good connection. Then, firmly hold the coaxial cable stripper over the trimmed end of the cable and rotate it in a circular motion. This will remove the outer insulation and expose the inner core and shielding.
With the inner core and shielding exposed, carefully separate the shielding from the core using your fingers. Do not use a knife or any sharp object to avoid damaging the cable. Once the shielding is separated from the core, trim any excess shielding using your coaxial cable cutter.

Now, slide the BNC connector onto the cable, making sure that the core goes into the pinhole inside the connector. The shielding should fit snugly around the outside of the connector. Then, use a BNC crimping tool to secure the connector in place. Apply even pressure on the crimping tool to ensure a tight and secure connection.
Finally, use your utility knife to cut a small strip of electrical tape and wrap it around the base of the connector. This will provide extra protection and prevent any moisture from entering the connection. Your newly replaced BNC connector is now ready for use.
In conclusion, replacing a BNC connector on a security camera cable is a relatively simple process that can be done with the right tools and a little patience. By following these steps, you can ensure a reliable and secure connection, allowing your security camera system to operate effectively.
Overview of BNC Connectors
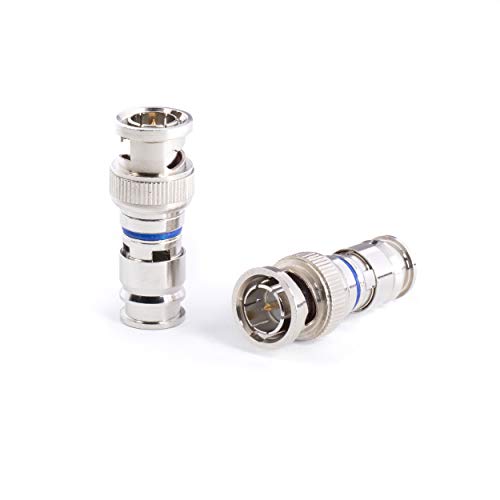
BNC connectors, also known as Bayonet Neill-Concelman connectors, are a type of coaxial cable connector commonly used in video surveillance systems and other applications that require a high-quality connection. They are designed to provide a secure and reliable connection while allowing for easy installation and removal.
BNC connectors feature a bayonet-style locking mechanism that ensures a tight and secure connection. The connector has a male and female end, with the male end having a pin and the female end having a socket. When the connectors are mated, the pin on the male connector slides into the socket on the female connector, creating a secure electrical connection.

One of the key advantages of BNC connectors is their versatility. They can be used with various types of coaxial cables, including RG-59 and RG-6, which are commonly used in security camera installations. The connectors are also available in different variants, such as straight and right-angle, to accommodate different installation requirements.
Features of BNC Connectors:
- Easy installation: BNC connectors are designed for quick and straightforward installation. They often feature a twist-on design, allowing users to simply twist the connector onto the cable without the need for special tools or soldering.
- Secure connection: The bayonet-style locking mechanism provides a secure and reliable connection that won’t come loose easily, ensuring a stable video signal transmission.
- High-frequency capabilities: BNC connectors are known for their excellent performance at high frequencies, making them suitable for applications that require reliable video signal transmission.
- Commonly used in video surveillance: BNC connectors are widely used in the security industry, particularly in CCTV systems, due to their ability to maintain a high-quality video signal over long cable runs.
In conclusion, BNC connectors are a popular choice for security camera installations and other applications that require a reliable and secure video signal connection. They offer easy installation, a stable connection, and excellent performance at high frequencies, making them a suitable choice for various video surveillance systems.
Tools and Materials Needed
Before replacing a BNC connector on a security camera cable, you will need the following tools and materials:
- BNC connector (male or female, depending on the cable)
- Coaxial cable stripper
- Wire cutters
- Screwdriver (flat-head or Phillips-head, depending on the connector)
- Heat shrink tubing
- Heat gun or lighter
- Electrical tape
- Small knife or razor blade
- Lint-free cloth or alcohol wipes
- Optional: soldering iron and solder (if soldering is required)
Step-by-Step Guide to Replacing a BNC Connector
If you are experiencing issues with your security camera cable, such as poor picture quality or intermittent video feed, it may be time to replace the BNC connector. A BNC connector is a common type of connector used in video surveillance systems to connect the camera to the coaxial cable. Here is a step-by-step guide on how to replace a BNC connector on a security camera cable.
Step 1: Gather the necessary tools and materials
Before you begin, make sure you have the following tools and materials:

- Coaxial cable stripper
- BNC connector
- BNC crimping tool
- Wire cutters
- Electrical tape
Step 2: Prepare the cable
Start by using the coaxial cable stripper to carefully remove about 1 inch of the outer protective layer of the cable, exposing the inner conductor and the shielding. Be careful not to damage the inner wires during this process.
Step 3: Strip the inner wires
Next, strip off about 1/4 inch of the outer insulation from the inner conductor using the wire cutters. This will expose the copper wire underneath.
Step 4: Attach the BNC connector
Take the BNC connector and slide it over the exposed inner conductor. Make sure the connector is properly aligned with the wire.
Using the BNC crimping tool, crimp the connector onto the wire. Apply enough pressure to ensure a secure connection, but be careful not to damage the wire.
Step 5: Test the connection
After attaching the BNC connector, it’s important to test the connection before finalizing the installation. Connect the cable to the security camera and the DVR or monitor. Check for a stable video feed and make sure there are no issues with the picture quality.
Step 6: Secure the connection
If the connection is working properly, secure it by wrapping electrical tape around the connector and the cable. This will provide additional protection and prevent any accidental disconnections.
By following these steps, you can easily replace a BNC connector on a security camera cable. Remember to always exercise caution when working with electrical equipment and ensure the power is turned off before making any connections or adjustments.
Troubleshooting
When attempting to replace a BNC connector on a security camera cable, there may be a few common issues that can arise. By troubleshooting these issues, you can ensure a successful replacement.
Issue 1: Poor Video Quality
If you notice poor video quality after replacing the BNC connector, there may be an issue with the cable connection. Make sure that the connector is securely attached to the cable and that there are no loose connections. Additionally, check the condition of the cable itself to ensure that it is not damaged or frayed.
Issue 2: No Video Signal
If you are not receiving any video signal after replacing the BNC connector, there may be a problem with the power supply or the camera itself. Check that the camera is receiving power and that all connections are secure. If the issue persists, it may be necessary to troubleshoot or replace the camera unit.

Note: It is important to handle the camera and cable with care during the troubleshooting process to prevent further damage. Be gentle when disconnecting and reconnecting cables, and avoid bending or twisting the wires excessively.
If you continue to experience issues after troubleshooting, it may be beneficial to consult a professional or contact the manufacturer for further assistance. They can provide additional guidance and support to ensure that the BNC connector replacement is successful and that the security camera system is functioning properly.
FAQ,
How do I replace a BNC connector on my security camera cable?
To replace a BNC connector on your security camera cable, you will need a few tools such as a coaxial cable stripper, a BNC connector, a soldering iron, and solder. First, use the coaxial cable stripper to strip off a small section of the cable’s outer insulation. Then, carefully strip off the inner insulation without damaging the inner copper conductor. Next, slide the BNC connector onto the cable, making sure the copper conductor is fully inserted into the connector. Use a soldering iron to solder the copper conductor to the connector’s inner pin. Finally, slide the connector’s outer shell over the cable and screw it on securely.
What tools do I need to replace a BNC connector on a security camera cable?
To replace a BNC connector on a security camera cable, you will need a coaxial cable stripper, a BNC connector, a soldering iron, solder, and a screwdriver. The coaxial cable stripper is used to remove the outer insulation, while the soldering iron and solder are used to connect the inner copper conductor to the BNC connector. The screwdriver is needed to secure the connector’s outer shell. Make sure to have these tools ready before starting the replacement process.

Can I replace a BNC connector on a security camera cable myself?
Yes, you can replace a BNC connector on a security camera cable yourself. It requires a few tools such as a coaxial cable stripper, a BNC connector, a soldering iron, solder, and a screwdriver. By following the proper steps and using the right tools, you can remove the old BNC connector and install a new one. If you are comfortable with basic electrical work, you should be able to replace the BNC connector without any issues. However, if you are unsure or uncomfortable with this task, it is always recommended to seek professional help.
Are there any specific precautions I should take when replacing a BNC connector on a security camera cable?
When replacing a BNC connector on a security camera cable, there are a few precautions you should take. First, ensure that the power is turned off to the security camera to avoid any electrical accidents. Also, make sure to use a coaxial cable stripper and a soldering iron with caution, as these tools can cause injury if mishandled. Additionally, double-check that the copper conductor is fully inserted into the connector before soldering to avoid any connectivity issues. Lastly, always use the appropriate size and type of BNC connector for your security camera cable to ensure compatibility.


