
Installing security cameras in your home is an important step towards ensuring the safety and security of your loved ones and your property. However, one of the challenges that homeowners face when setting up security cameras is how to run the cables in an existing house without causing damage or running into obstacles.
Running security camera cables in an existing house requires careful planning and strategizing to ensure a seamless installation. Here are some steps to follow:
1. Assess your home’s layout: Start by understanding the layout of your house and determining the areas where you want to install the security cameras. Take note of potential obstacles such as walls, ceilings, and floors that you’ll need to navigate.
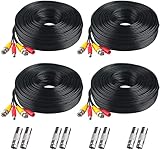
2. Choose the right cables: Consider the distance between the security camera and the DVR or NVR, as this will determine the type and length of cables you’ll need. Opt for high-quality cables that are durable and can withstand outdoor conditions if you’re installing cameras outside.
3. Plan the cable routes: Sketch out a plan of where you want to run the cables, taking into account the shortest and least obstructed paths. Look for existing conduits, such as electrical or telephone wiring, that you can utilize to conceal the security camera cables.

4. Use cable clips and cable channels: Secure the cables along the planned route using cable clips or cable channels. This will help keep the cables organized and prevent them from hanging loose or getting tangled.
5. Avoid damaging walls: If you need to run cables through walls, consider using existing openings such as electrical outlets or air vents. Alternatively, you can use fish tapes or fish rods to guide the cables through walls, without the need for extensive drilling or cutting.
By following these steps and taking the necessary precautions, you can successfully run security camera cables in your existing house without causing damage or hindering the functionality of your security system.
Planning for camera installation
Before you begin installing security camera cables in your existing house, it is important to plan out the installation process. By taking the time to carefully plan, you can ensure that the cameras are positioned effectively and that the cables are properly concealed.
Here are some steps to consider when planning for camera installation:

- Identify the areas that require surveillance: Walk around your property and identify the areas that you want to monitor with security cameras. This could include the entrances, backyard, garage, or any other vulnerable areas.
- Determine the number of cameras needed: Based on the areas you identified, determine the number of cameras you will need. This will help you determine how many cables you will need to run.
- Select the type of cameras: Choose the type of cameras that best suit your needs. Consider factors such as resolution, night vision capabilities, and whether you want wired or wireless cameras.
- Sketch out a camera placement plan: Once you have identified the areas and determined the number of cameras, sketch out a placement plan. This will help you visualize where each camera will be positioned and how the cables will need to be run.
- Plan cable routes: Determine the best routes for running the cables from each camera to the location where they will be connected to a recording device or power source. Consider factors such as convenience, aesthetics, and potential obstacles.
- Consider cable concealment options: Think about how you will conceal the cables to ensure a clean and professional installation. This could involve hiding the cables behind walls, running them through conduits, or using cable covers.
- Ensure sufficient power supply: Make sure you have access to a power source for each camera. If you are using wired cameras, plan for how the power cables will be run.
By carefully planning for camera installation, you can ensure a smooth and effective installation process. Take the time to consider all the factors mentioned above to achieve the best possible results.
Identify optimal camera locations
When it comes to running security camera cables in an existing house, one of the first steps is to identify the optimal locations for installing the cameras. This will ensure that you capture the best angles and have maximum coverage of your property. Here are some tips to help you determine the best camera locations:
1. Analyze your property
Take a walk around your property and carefully analyze the areas that you want to monitor. Look for vulnerable entry points such as doors, windows, and garage doors. Identify areas where valuable assets are stored, like a pool, jewelry, or expensive equipment. Think about blind spots and areas that are prone to criminal activity.
2. Consider camera capabilities
Once you have identified the areas of interest, consider the capabilities of your security cameras. Factors such as camera resolution, field of view, and night vision should be taken into consideration. For example, if you want to monitor a large outdoor area, you may need a camera with a wide field of view and excellent night vision capabilities.
3. Determine camera placement
Based on your analysis and camera capabilities, decide on the placement of your cameras. Consider the height, angle, and direction in which the camera should be installed to capture the required footage effectively. Keep in mind that mounting the camera at a higher vantage point can help improve the overall coverage.

You can install cameras at various points around your property, such as the front door, back door, garage, driveway, and backyard. It is recommended to install cameras near entry points and areas where valuable assets are stored. You can also consider placing cameras in common areas such as hallways or living rooms.
Remember to consult the manufacturer’s guidelines for installation and camera placement. They may provide specific recommendations based on the model and features of your security cameras.
By identifying the optimal camera locations, you can ensure that your security system effectively monitors and protects your property, giving you peace of mind.
Determine cable requirements
Before running security camera cables in an existing house, it is important to determine the cable requirements to ensure a successful installation.
Here are some factors to consider:
-
Camera locations
Determine where you want to install your security cameras. Consider the areas you want to monitor and the best vantage points. This will help you determine the number of cables you will need and their lengths.
-
Cable type
Choose the appropriate cable type based on the distance between your security cameras and the recording device. There are various options available, including coaxial cables, Ethernet cables, and wireless options. Coaxial cables are commonly used for analog cameras, while Ethernet cables are suitable for IP cameras.
-
Cable length
Measure the distance between your security cameras and the recording device to determine the cable length needed. It is recommended to add some extra length to account for any unexpected obstacles or changes in installation plans.
-
Cable specifications
Consider the specifications of the cable needed, such as its thickness, shielding, and durability. Thicker cables with proper shielding can help prevent signal loss and interference, ensuring reliable video transmission.
-
Power requirements
Take into account the power requirements for your security cameras. Some cameras may require separate power cables, while others can be powered through the same cable used for video transmission.
-
Number of channels
Determine the number of channels available on your recording device to ensure compatibility with the number of cameras you plan to install. This will help you determine whether you need multiple cables or can use a single cable with multiple connectors.
By considering these factors, you can determine the cable requirements for running security camera cables in an existing house and ensure a successful installation.
Choose appropriate cables and connectors
When it comes to running security camera cables in an existing house, it is important to choose the appropriate cables and connectors to ensure a reliable and secure connection. Here are some factors to consider:
Type of cable: There are different types of cables available for security camera installations, including coaxial cables, Ethernet cables, and power cables. The type of cable you choose will depend on the specific requirements of your security system.
Length of cable: Measure the distance between your security cameras and the central recording unit to determine the length of cable you will need. It is important to choose cables that are long enough to reach your cameras without creating unnecessary slack, as excess cable can be unsightly and potentially hazardous.
Quality of cable: Invest in high-quality cables that are designed specifically for video surveillance applications. Look for cables that are durable, weatherproof, and capable of transmitting video and power signals without interference.

Connectors: Choose connectors that are compatible with your chosen cable types. Common connector types for security camera installations include BNC connectors for coaxial cables, RJ45 connectors for Ethernet cables, and power connectors for power cables. Make sure to use connectors that are properly matched to your cables to ensure a secure and reliable connection.
Installation method: Consider the installation method you plan to use and choose cables and connectors that align with that method. For example, if you are planning to run cables through walls or conduits, you may need connectors that can be easily threaded through tight spaces.
By carefully selecting the appropriate cables and connectors for your security camera installation, you can ensure a seamless and efficient setup that meets your specific needs.
Prepare necessary tools
Before running security camera cables in an existing house, you will need to gather the necessary tools to complete the job efficiently and effectively. Having the right tools on hand will make the process smoother and minimize any potential damage to your home.
Here are some essential tools you will need:
- Tape measure: Use a tape measure to accurately measure the length of the cables needed for each camera.
- Fish tape: This flexible wire tool is used to guide and pull the cables through walls, ceilings, or conduits.
- Cable connectors: These connectors are used to join the cables together and create a secure and reliable connection.
- Power drill: A power drill will be useful for creating holes in walls, floors, or ceilings to route the cables.
- Screwdriver: You may need a screwdriver to remove any existing screws or plates that are obstructing cable routes.
- Stud finder: Use a stud finder to locate wall studs, which can serve as a guide when running cables.
- Level: A level will help ensure that your camera mounts and cables are straight and properly aligned.
- Ladder: Depending on the height of your ceilings or walls, a ladder may be needed to reach camera mounting locations.
- Cable clips: These small clips can help secure the cables along walls or ceilings, keeping them neat and organized.
- Cable tester: A cable tester is essential for checking the integrity and functionality of your security camera cables.
By having these tools ready and easily accessible during the installation process, you can save time and ensure a successful installation of your security camera system.

Running the cables
Running security camera cables in an existing house may seem like a daunting task, but with careful planning and the right tools, it can be done effectively and efficiently. Here are some steps to help you run the cables:
|
1. Plan the route: Start by determining the best path for the cables. Consider the location of the cameras, the availability of power sources, and any obstacles that may interfere with the cable installation. It is important to choose a route that minimizes cable visibility and potential damage. |
2. Gather the necessary tools: Before starting the installation, make sure you have all the tools you need. This may include a stud finder, fish tape, drill, screwdriver, cable clips, and a cable management system. |
|
3. Prepare the walls: If necessary, you may need to cut holes in the walls to run the cables. Use a stud finder to locate any studs or electrical wires that may be hidden behind the walls. |
4. Run the cables: Start by attaching the cables to the camera. Use cable clips or a cable management system to secure the cables along the planned route. If there are obstacles, such as doors or windows, you may need to use a fish tape or a drill to create holes for the cables to pass through. |
|
5. Connect the cables: Once the cables are in place, you will need to connect them to the cameras and the recording system. Follow the manufacturer’s instructions for the specific camera and recording system you are using. |
6. Test the cameras: After connecting the cables, test the cameras to ensure they are functioning properly. Adjust the camera angles if necessary. |

Running security camera cables in an existing house requires careful consideration and planning, but with the right tools and knowledge, you can successfully install your cameras and ensure the security of your home.
Locate access points
When running security camera cables in an existing house, it’s essential to locate suitable access points.
Access points are places in your home where you can easily connect the security camera cables to your desired areas. These access points could include areas such as attics, crawl spaces, or unfinished basements.
You may need to do some exploring to locate the best access points. Start by examining the layout of your house and identifying areas near your desired camera locations that have a clear path to the main monitoring system or DVR. Avoid areas with excessive obstructions or difficult access.
Once you have identified potential access points, check for existing conduits or cable runs that could potentially be used. If there are none, you may need to create access points by drilling holes through walls, ceilings, or floors. It’s essential to plan and measure carefully, ensuring that you avoid any critical structures or utilities during this process.
Remember to consider factors such as the length of the cable runs and the type of cables you will be using. For longer cable runs, you may need to use signal boosters or install additional power sources near the access points.
By locating suitable access points, you can efficiently run security camera cables in your existing house, ensuring optimal coverage and functionality of your surveillance system.
Route cables through walls and ceilings
Running security camera cables through walls and ceilings can be a bit challenging, but with the right tools and techniques, it can be done effectively. Here are some steps to help you route cables through walls and ceilings:
- Plan your cable routes: Before starting the installation process, carefully plan where you want to place your security cameras and determine the best route for your cables. Consider avoiding areas with electrical wiring or pipes.
- Prepare the necessary tools: Gather the tools you will need, including a fish tape or wire snake, a drill with different drill bits, a keyhole saw, wire strippers, and cable clips.
- Identify access points: Locate the access points in your walls or ceilings where you can easily access the areas where you want to run your cables. This can be electrical outlets, attic spaces, or unfinished basement areas.
- Drill holes: Use a drill with an appropriate drill bit to create holes in the walls or ceilings where you want to route your cables. Ensure that the holes are large enough to accommodate the cables.
- Feed cables through: Attach the cables to a fish tape or wire snake and carefully feed them through the drilled holes. Use a twisting motion to help guide the cables through the wall or ceiling cavities.
- Secure cables: Once the cables have been routed, use cable clips to secure them to the walls or ceilings. This will help prevent them from hanging or getting damaged.
- Test the connections: After routing the cables, test the connections to ensure that everything is working properly. Connect the cameras to their respective power sources and check for a video feed.
- Cover the access points: Once everything is tested and working, cover the access points in the walls or ceilings with wall plates, access panels, or other suitable covers.
By following these steps, you can successfully route security camera cables through walls and ceilings in your existing house. Keep in mind that if you are not comfortable with this process, it is always best to consult a professional for assistance.
Secure cables and make necessary connections
Once you have run the security camera cables through your existing house, it is important to properly secure them and make the necessary connections. This will ensure that your cameras are functioning correctly and transmitting a clear video feed.
1. Cable management
Start by organizing the cables and ensuring they are neatly arranged. Use zip ties or cable clips to secure the cables along the desired path, making sure they are not hanging loosely or obstructing any areas.
You can attach the cables to the wall, ceiling, or floor using adhesive clips or cable management channels. Keep the cables away from any potential hazards like sharp objects or heat sources to prevent damage.
2. Connectors and junction boxes
Next, you will need to make the necessary connections between the cables, cameras, and the security system. This may involve using connectors, junction boxes, or terminal blocks, depending on the type of cables and camera system you have.
Refer to the manufacturer’s instructions for specific guidelines on connecting your security camera cables. This will usually involve stripping the cable ends, matching the correct wires, and securely fastening them together using the appropriate connectors.
Ensure that all connections are tight and properly insulated to avoid any loose or exposed wires. This will prevent any potential malfunctions or electrical hazards.
Note: It is recommended to consult with a professional or an electrician if you are unsure about making the connections or if you have complex security camera system setup.
Finally, test your camera system to ensure that everything is working properly. Check the video feed, adjust the camera angles if necessary, and make any final adjustments to the cable management to achieve a clean and professional installation.
By securely installing and connecting your security camera cables, you can have peace of mind knowing that your system is reliable and functioning optimally to protect your home.
FAQ,
What is the best way to run security camera cables in an existing house?
The best way to run security camera cables in an existing house is to use existing conduits or cable runs. If there are no existing conduits, you can use fish tape or a wire pulling lubricant to thread the cables through walls, ceilings, or crawlspaces. It is important to plan the cable route beforehand to avoid damaging walls or other structures.
Can I run security camera cables along the baseboard of my walls?
Yes, you can run security camera cables along the baseboard of your walls. This is a common and convenient method, as it allows for easy access to power outlets and the ability to hide the cables with cable covers or adhesive tape. However, it is important to secure the cables properly and avoid placing them in high-traffic areas where they may get damaged or tripped over.
Is it possible to run security camera cables through the attic?
Yes, it is possible to run security camera cables through the attic. Running cables through the attic is often a good option because it is a relatively open and accessible space. You can use cable staples or clips to secure the cables along the attic beams and avoid any sharp objects that may damage the cables. Additionally, it is important to consider temperature fluctuations in the attic and choose cables that can withstand such conditions.


