
Scanning a book with a digital camera can be a great alternative to using a traditional scanner. It can save you both time and money while still producing high-quality scanned images. Plus, with the right techniques and tools, you can easily turn your digital camera into a portable scanner that you can take with you anywhere.
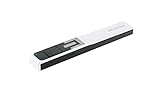
Before you begin, make sure you have the right equipment. You’ll need a digital camera with a high resolution and a lens with a focal length suitable for scanning text. It’s important to choose a camera that can capture images without distortion or blurring, as this will affect the readability of the scanned text. Additionally, you’ll need a tripod or another stable surface to keep the camera steady during the scanning process.
Next, prepare the book for scanning. Ensure that the book is clean and free of any dust or debris that could impact the image quality. If the book is bound tightly, gently open it to the page you want to scan, taking care not to damage the spine. If necessary, use weights or clips to hold the pages flat and prevent them from turning during the scanning process. This will help ensure that the scanned images are clear and legible.
Now it’s time to start scanning! Position the camera directly above the page you want to scan, making sure it is parallel to the surface of the book. Adjust the camera settings to ensure proper exposure and focus. To capture the full page, take multiple photos of different sections and later combine them using image editing software. Remember to leave some overlap between each shot for easier alignment.
After you have captured all the necessary images, transfer them to your computer and use image editing software to crop, rotate, and adjust the scanned pages as needed. You can also enhance the image quality by adjusting the brightness, contrast, and sharpness. Save the scanned pages as PDF or image files for easy access and sharing.

Scanning a book with a digital camera offers flexibility and convenience compared to using a traditional scanner. By following these steps and utilizing the right equipment, you can easily digitize your books and access them digitally anytime, anywhere.
Scanning a Book with a Digital Camera: A Step-by-Step Guide
Scanning a book with a digital camera can be a convenient and cost-effective way to create digital copies of your favorite reading materials. Whether you want to preserve an old book or share a page with others, this guide will walk you through the process step by step.
Step 1: Set up your workspace
Find a well-lit area where you can lay the book flat. Ideally, use a tripod or some other stabilizing equipment to keep your camera steady. This will help you capture clear and sharp images.
Step 2: Adjust camera settings
Make sure your camera is set to its highest resolution and use autofocus to ensure crisp images. You may also want to disable any flash or use a diffuser to prevent glare and shadows.
Step 3: Position the book
Carefully place the book on the surface and arrange the pages so that they are flat and visible to the camera. If the book is thick, you may need to weigh down the pages to keep them flat.
Step 4: Capture the images
Start capturing the images of each page, making sure to focus on the text and avoid capturing your own shadow or reflection. Take your time to ensure each page is captured clearly before moving on to the next one.

Step 5: Review and adjust
After capturing all the images, review them on your camera’s screen to make sure they are clear and readable. If necessary, retake any blurry or poorly framed images.
Step 6: Transfer and organize
Transfer the images from your camera to your computer using a USB cable or memory card reader. Create a folder for your scanned book and organize the images in a logical order, such as page numbers or chapters.
Step 7: Edit and enhance

If desired, use photo editing software to enhance the scanned images. Adjust the brightness, contrast, or color to improve readability and overall quality.
Step 8: Convert to PDF
Once you are satisfied with the scanned images, convert them to a PDF file using software such as Adobe Acrobat or online converters. This will make it easier to read and share your digital book.
Step 9: Backup and store
Make sure to create backups of your scanned book and store them in multiple locations, such as external hard drives, cloud storage, or DVDs. This will ensure the preservation of your digital copy for future use.

Remember to respect copyright laws and only scan books that you have the legal right to copy.
By following these steps, you can effectively scan a book with a digital camera and create your own digital library. Enjoy the convenience of having your favorite books at your fingertips, wherever you go!
Choosing the Right Camera and Lens
When it comes to scanning a book with a digital camera, selecting the right camera and lens is crucial for obtaining high-quality and accurate results. Here are some important factors to consider:
Camera Sensor: Look for a camera with a high-resolution sensor to capture fine details and minimize noise.
Resolution: Aim for a camera with a resolution of at least 12 megapixels or higher, as this will provide sharp and clear images.
Auto-Focus: A camera with a reliable auto-focus system will ensure that your images are in focus and sharp.
Lens Quality: Invest in a good quality lens that offers sharpness, minimal distortion, and low chromatic aberration.
Zoom Range: Consider a camera with a lens that offers a versatile zoom range to capture different sizes of books without sacrificing image quality.
Macro Capability: Look for a camera with macro capability, as this will allow you to capture close-up shots of small text and details.
Image Stabilization: Optical or sensor-based image stabilization can help reduce blur caused by hand movement when capturing the book pages.

Manual Controls: Having manual controls such as aperture and shutter speed will give you more control over the image quality and exposure.
By considering these factors and choosing the right camera and lens combination, you can ensure that your book scanning process is efficient and produces high-quality digital copies.
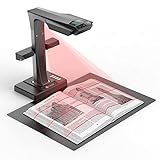
Setting Up Your Scanning Area
Before you start scanning your book with a digital camera, it is important to properly set up your scanning area. Follow these steps to ensure the best results:
1. Find a well-lit space
Look for a room or area with plenty of natural light, as this will provide the best lighting conditions for scanning. Avoid using flash or artificial lighting, as it can create glare or reflections on the pages.
2. Clean your workspace
Clear any clutter from your workspace to create a clean and tidy environment for scanning. Remove any objects that might obstruct your camera’s view or cast shadows onto the book pages.
3. Position your camera
Place your camera on a stable surface, like a tripod or a stack of books, ensuring it is level and secure. This will prevent blurry images and allow for consistent scanning. Adjust the camera’s height so that it aligns with the book pages.
4. Align the book
Position the book carefully on the scanning area, making sure it is centered and aligned with the camera. Use book weights or clips to hold the pages flat and prevent them from moving during the scanning process.
5. Test the camera settings
Before you start scanning, test the camera settings to ensure they are optimal for capturing clear images. Adjust the aperture, ISO, and shutter speed based on the lighting conditions and the desired image quality.
6. Take test shots
Take a few test shots of a sample page to check the focus, exposure, and overall image quality. Adjust the camera settings if necessary until you achieve the desired results.
By setting up your scanning area properly, you can ensure that your digital camera captures high-quality images of the book pages, making the scanning process more efficient and effective.
Positioning the Book
Before you start scanning, it’s essential to properly position the book for optimal results.
Here are some tips to help you position the book effectively:
- Choose a flat surface: Select a stable, flat surface to place the book on. A table or a desk works well for this purpose. This will ensure that the book remains steady throughout the scanning process.
- Secure the book: Use bookends or other objects to keep the book steady and prevent it from closing while scanning. This will help maintain consistent image quality.
- Open the book carefully: Gently open the book to the desired page you want to scan. Avoid applying excessive force that could damage the book’s binding.
- Flatten the pages: Smooth out any creases or wrinkles on the pages using your hands or a flat object like a ruler. By flattening the pages, you’ll minimize distortions and create clearer scans.
- Adjust the lighting: Make sure you have adequate lighting conditions. Avoid shadows or reflections, as they can interfere with the scanning process and affect the image quality.
- Find the right angle: Position yourself and the camera at an angle that allows you to capture the entire page without distorting the text or images. Experiment with different angles until you find the most suitable one.
Following these positioning tips will help you achieve high-quality scans and ensure that the book remains undamaged throughout the process.
Adjusting Camera Settings
Before you start scanning a book with your digital camera, it is important to adjust the camera settings to ensure the best possible image quality. Here are some settings you should consider:
-
Resolution:
Set the camera to the highest resolution available. This will result in sharper and more detailed images of the book pages.
-
ISO:
Choose a low ISO setting to minimize image noise. A lower ISO setting will produce cleaner and smoother images.
-
White Balance:
Select the appropriate white balance setting based on the lighting conditions. This will ensure accurate color representation in the scanned images.
-
Focusing:
Use the manual focus mode to adjust the focus specifically for the book pages. This will help capture clear and sharp text and images.
-
File Format:
Choose a file format that preserves the highest image quality, such as RAW or TIFF. These formats offer more flexibility for editing and processing the scanned images later.
-
Exposure:
Check the exposure settings to ensure proper brightness and contrast. Experiment with different exposure settings to find the optimal balance for your specific lighting conditions.
By adjusting these camera settings, you can capture high-quality images of the book pages and enhance the scanning process.
Using a Tripod
A tripod is a valuable tool when scanning a book with a digital camera. It provides stability and ensures that your photos come out clear and focused. Here are a few tips for using a tripod effectively:
1. Set up the tripod
Choose a stable surface to place your tripod on, such as a table or desk. Make sure the tripod is fully extended and all the legs are securely locked in place. Adjust the height of the tripod so that the camera is positioned at the correct level for scanning the book.
2. Attach the camera
Most tripods come with a mounting plate or screw that can be attached to the bottom of your camera. Make sure the camera is securely fastened to the tripod before starting the scanning process. This will prevent any accidental movement or shaking that could result in blurry photos.
Tip: Use a remote shutter release or the camera’s self-timer function to eliminate any camera shake caused by pressing the shutter button.
3. Position the book
Place the book on a flat surface, making sure it is fully open and the pages are flat. It may be helpful to use a book weight or clamp to keep the pages from moving while you scan. Position the book so that it is centered in the camera’s frame and adjust the tripod as needed.
Important: Be mindful of the lighting conditions in the room. Try to avoid direct sunlight or harsh artificial lighting, as this can cause glare and reflections on the pages of the book.
Using a tripod will make the process of scanning a book with a digital camera much easier and produce higher quality results. It allows you to capture sharp, focused images without the risk of camera shake. If you don’t already have a tripod, consider investing in one to improve your digital scanning workflow.
Ensuring Proper Lighting
In order to get clear and legible scans, proper lighting is crucial. Here are some tips to ensure you have the right lighting setup:
1. Natural light: Whenever possible, try to scan your book in a well-lit area with plenty of natural light. Natural light provides the most accurate color representation and reduces the chances of glare or reflections.
2. Avoid harsh lighting: Harsh lighting can create shadows and uneven lighting on the pages. It is best to avoid direct, overhead lighting or bright artificial lights. Instead, opt for a diffused light source that provides even illumination.
3. Use a lightbox: If natural light is not available or if you need to scan in a controlled environment, consider using a lightbox. A lightbox is a device that provides diffused and evenly distributed light, ensuring optimal lighting for your scans.
4. Position the lights properly: When using artificial lighting, position the lights at an angle to minimize shadows and glare. Experiment with the placement of the lights to find the best position that provides even lighting across the pages.
5. Adjust the white balance: Depending on the lighting conditions, you may need to adjust the white balance on your camera to ensure accurate color reproduction. Most digital cameras have a white balance setting that can be adjusted to match the light source.
6. Test and adjust: Before scanning the entire book, take test shots and review the results on your camera’s screen or computer. Make necessary adjustments to the lighting setup until you achieve optimal results.
Remember, good lighting is the key to obtaining high-quality scans. By following these tips, you can ensure that your scans are clear, legible, and free from unwanted shadows or reflections.
Focusing the Camera
One of the most important steps in scanning a book with a digital camera is properly focusing the camera. Without proper focus, the text in the images may appear blurry or unclear.
Here are some tips to help you focus your camera effectively:
1. Choose the appropriate focus mode
Most digital cameras offer different focus modes, such as automatic focus (AF) or manual focus (MF). For scanning books, it is recommended to use manual focus to have full control over the focus point.
2. Use a tripod or stable surface
To ensure sharp focus, it is important to minimize camera shake. Using a tripod or placing your camera on a stable surface can help eliminate any unintentional movement and improve the focus of your images.
3. Use the camera’s focus assist feature
Many digital cameras have a focus assist feature that helps you achieve better focus in low light conditions or on subjects with low contrast. This feature can be useful when scanning books with dim lighting or pages that lack contrast.
4. Adjust the focus manually
If you are using manual focus mode, adjust the focus by rotating the focus ring on the lens until the text in the viewfinder or LCD screen appears clear and sharp. Take test shots and review them to ensure the focus is accurate.
| Tip: | Enable the camera’s zoom function to magnify the text on the LCD screen, making it easier to spot any focus issues. |
By following these tips, you can ensure that your camera is properly focused when scanning a book, resulting in clear and legible images.
Capturing the Pages
When scanning a book with a digital camera, it is important to capture the pages clearly and accurately. Follow these steps to ensure a successful scan:
1. Prepare the book and camera
Place the book on a flat surface and make sure it is open to the desired page. Ensure that there is enough lighting in the room to avoid shadows or glare on the pages. Position the camera overhead, making sure it is stable and aligned with the page.
2. Adjust the settings
Before capturing the pages, adjust the camera settings to optimize the image quality. Set the resolution to the highest option available for clearer and more detailed scans. Additionally, adjust the exposure and white balance settings to ensure accurate colors and contrast.
3. Take multiple shots
To capture the entire page, take multiple shots by moving the camera slightly from top to bottom or left to right. Make sure to overlap each shot slightly to ensure that no part of the page is missed. Take your time and focus on capturing each page clearly and accurately.
4. Review and retake if necessary
After capturing the pages, review the images on the camera’s display. Check for any blurriness, distortion, or other issues that may affect the readability of the text. If necessary, retake the shots until you are satisfied with the quality of the scans.
5. Transfer and organize the images
Transfer the captured images to your computer using a USB cable or memory card reader. Organize the images into separate folders for each book or chapter to make them easier to locate in the future. Consider renaming the image files to reflect their respective page numbers for easy reference.
By following these steps, you can ensure that your digital scans of books are clear, accurate, and of high quality.
Organizing and Naming the Scanned Images
Once you have scanned the book pages with your digital camera, it is important to organize and name the scanned images properly. This will make it easier for you to locate specific pages and maintain a systematic arrangement of your scanned book.
To organize the scanned images, create a folder on your computer specifically dedicated to storing these images. You can name the folder based on the book title or any other relevant identifier.
Next, create subfolders within the main folder to sort the scanned images by chapters or sections. This will help you quickly navigate through different sections of the book in the future.
When naming the scanned images, it is crucial to use a consistent and descriptive approach. Start by including the page number as a prefix to the file name, followed by a brief description of the content on that page. For example, if you are scanning page 10 that contains a diagram of a cell, you can name the image “10_cell_diagram.jpg”.
Additionally, if you want to include more specific information in the image name, you can also add the chapter or section number. For instance, the file name for page 10 in chapter 4 can be “10_chapter4_cell_diagram.jpg”. This will further enhance the organization and accessibility of your scanned images.
Remember to save the scanned images in a widely compatible file format such as JPEG or PNG, which can be easily viewed and shared. Avoid using complex file formats that might require special software to open.
By implementing a structured approach to organizing and naming the scanned images, you will be able to efficiently navigate through your digital book collection and easily locate specific pages whenever needed.
Post-Processing and Saving
After you have captured the images of the book pages, it is important to post-process them and save them in a suitable format for easy access and readability. Here are some steps to follow:
1. Organize and Rename Files
First, organize the captured images into a separate folder on your computer for easy access. It is recommended to rename the files using a logical numbering system or descriptive names that correspond to the page numbers or content.
2. Adjust Image Settings
Use image editing software such as Adobe Photoshop or GIMP to adjust the brightness, contrast, and color balance of the scanned images. This step can greatly enhance the legibility and overall quality of the final digital book.
Tip: Pay attention to any image distortion or skewing caused by the camera angle or lens, and use the appropriate tools in the software to correct these issues.
3. Crop and Straighten
Crop the images to remove any unwanted areas or borders that may have appeared during the scanning process. You can also use the straighten tool to align the text and ensure that it appears straight and evenly aligned on the digital page.
Tip: It is a good practice to maintain a consistent margin across all pages to create a professional look and improve readability.
4. Save in PDF Format
Once you are satisfied with the adjustments and edits, save the images in a PDF format. PDF is a commonly used format for digital books as it preserves the formatting and allows for easy navigation between pages.
Tip: To optimize the file size, consider reducing the image resolution while maintaining an acceptable level of clarity.
By following these post-processing steps and saving the scanned book pages in an appropriate format, you will create a digital version that is easily accessible and visually pleasing.
Question-answer:
What equipment do I need to scan a book with a digital camera?
To scan a book with a digital camera, you will need a digital camera, a tripod or stable surface to place the camera on, good lighting, and a computer with image editing software.
What is the best camera setting for scanning a book?
The best camera setting for scanning a book is to use manual mode, set a low ISO to minimize noise, choose a high aperture to ensure a large depth of field, and select a suitable shutter speed to avoid blurriness. Experimentation may be needed to find the perfect settings for your specific camera and lighting conditions.
What is the recommended lighting setup for scanning a book?
The recommended lighting setup for scanning a book is to use natural light if possible, as it provides the most accurate colors. If natural light is not available, you can use diffused artificial light sources to minimize reflections and shadows. It’s important to position the lighting sources at an angle to the book to avoid direct glare.
How can I ensure the pages of the book lay flat when scanning?
To ensure the pages of the book lay flat when scanning, you can use a book cradle or specially designed scanning stand to hold the book open at a 90-degree angle. Another option is to gently weight down the pages with weights or your hands while taking the photographs.
What is the best image editing software to use for scanning a book?
There are various image editing software options available for scanning a book, such as Adobe Photoshop, Lightroom, or GIMP. These programs offer features for adjusting brightness, contrast, cropping, and correcting any imperfections or distortions in the scanned images. Choose the software that you are comfortable with and that best suits your needs.


