
Getting the right white balance is crucial for capturing accurate colors in your DSLR camera photos. While automatic white balance works well in many situations, there are times when it may not give you the desired results. That’s when setting a custom white balance comes in handy.
A DSLR camera allows you to manually adjust the white balance settings to match the lighting conditions of your environment. By doing so, you ensure that the colors captured by your camera are true to life. Whether you are shooting indoors with artificial lighting or outdoors with mixed lighting sources, setting a custom white balance can significantly improve the quality of your photographs.
To set a custom white balance, start by locating the white balance settings in your camera’s menu. Depending on the model, it may be labeled as “WB” or “White Balance.” Once you’ve found the settings, select “Custom” or “Preset” to access the custom white balance options.
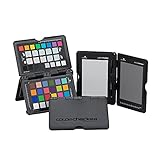
Next, you need a white reference object to calibrate the white balance. Ideally, use a neutral gray or white surface as a reference. It could be a white piece of paper, a gray card, or a specifically designed white balance card. Place the reference object in the same lighting conditions as your subject and adjust the camera settings to focus on the reference object, filling the frame.
Once the reference object is in place, press the shutter button halfway to activate the camera’s metering system. The camera will analyze the lighting and generate a custom white balance setting based on the reference object. You may need to press a button or select a specific option to set the custom white balance.

After setting the custom white balance, make sure to check the results by taking a test photo. Examine the image on your camera’s LCD screen or upload it to a computer for a better view. If the colors appear accurate and balanced, you have successfully set the custom white balance. If not, repeat the process using a different reference object or adjust the camera settings.
Setting a custom white balance might seem challenging at first, but with practice, it becomes an efficient technique for achieving natural-looking colors in your DSLR camera photos. Experiment with different lighting conditions and reference objects to master the art of custom white balance and take your photography skills to the next level.
Why White Balance is Important in Photography
White balance is a fundamental aspect of photography that plays a crucial role in capturing accurate and pleasing colors in your images. It refers to the adjustment of colors in a photo to ensure that white objects appear truly white, regardless of the lighting conditions.
Lighting conditions can vary greatly, from the bright sunlight to indoor artificial lighting, and each type of light has its own color temperature. Our eyes automatically adjust to these differences, but cameras need some assistance to reproduce accurate colors.
When the white balance is incorrect, your photos can turn out with a color cast, making them look too warm, cool, yellow, or blue. This can significantly affect the overall mood and feel of your images and can even make them look unnatural.
By setting a custom white balance in your DSLR camera, you can ensure that the colors in your photos are as accurate as possible. This involves taking a reference photo of a white or neutral colored object under the same lighting conditions as your intended subjects.
Once you have your reference photo, you can use it to create a custom white balance setting in your camera. This setting will then be applied to all the subsequent photos you take in the same lighting conditions, resulting in more accurate and pleasing colors.
Benefits of Setting Custom White Balance:
1. Accurate Colors: Custom white balance ensures that the colors in your photos are true to life, making your images look more natural and vibrant.
2. Consistency: By using the same white balance setting for a series of photos taken under the same lighting conditions, you can maintain a consistent look throughout your images.
3. Saves Time in Post-processing: When you get the white balance right in-camera, you spend less time correcting the colors during post-processing. This allows you to spend more time on other aspects of editing.

In conclusion, understanding and adjusting the white balance in your DSLR camera is an essential skill for any photographer. It allows you to capture accurate and pleasing colors, enhancing the overall quality of your photos. So, take the time to learn and utilize the custom white balance feature on your camera to elevate your photography to the next level.
Understanding White Balance Settings in DSLR Camera
White balance is a crucial aspect of photography that determines the overall color temperature of your images. It ensures that the colors in your photos appear accurate and natural. In a DSLR camera, you can adjust the white balance to match the lighting conditions of your shooting environment.
Why is white balance important?
Every light source emits a different color temperature. For instance, sunlight has a warm tone, while fluorescent lights have a cooler tone. If your camera’s white balance setting doesn’t match the actual lighting conditions, your photos may look too warm or too cool.
Correcting the white balance helps in eliminating unwanted color casts from your photos, making them appear more true-to-life. Whether you shoot in automatic white balance mode or adjust it manually, understanding the various white balance settings available on your DSLR camera can significantly improve the quality of your photographs.
The most common white balance presets in DSLR cameras are:
- Auto: The camera automatically analyzes the lighting conditions and adjusts the white balance accordingly. It is suitable for most shooting situations, especially when lighting conditions change frequently.
- Daylight: This setting captures the natural colors of outdoor scenes under sunlight. It adds warmth to images taken in shady areas or during golden hour.
- Cloudy: The cloudy setting compensates for the cool, blue tones that occur on cloudy days, resulting in warmer and more vibrant images.
- Shade: This setting is useful when shooting in shaded areas as it reduces the bluish tint that can occur under these lighting conditions.
- Tungsten: Select this setting for indoor shooting under tungsten or incandescent lighting. It counteracts the warm, orange tones produced by these lights.
It’s worth noting that DSLR cameras also offer manual white balance settings, which allow you to set the white balance based on a reference point in your scene. This can be a gray card, white object, or anything with a neutral color that should appear white in your photo. By manually setting the white balance, you have more control over the color temperature of your images.

Experimenting with different white balance settings and understanding how they affect the colors in your photos is key to achieving the desired results. Whether you’re shooting landscapes, portraits, or other types of photography, having a good grasp of white balance will greatly enhance your ability to capture true-to-life colors and create visually stunning images.
Step-by-Step Guide to Setting Custom White Balance
Setting the correct white balance in your DSLR camera is essential for achieving accurate colors and avoiding unwanted color casts in your photographs. While automatic white balance can be sufficient in many situations, there are times when using a custom white balance setting is necessary to get the perfect color accuracy. Here is a step-by-step guide on how to set a custom white balance in your DSLR camera:
Step 1: Find a Neutral Grey Subject
Look for a subject that is neutral grey or white, such as a grey card or a white piece of paper. This will help you calibrate your camera to the correct white balance.
Step 2: Set Your Camera to Manual Mode
Switch your DSLR camera to manual mode to have full control over the settings, including white balance.
Step 3: Access the Custom White Balance Setting
Navigate through your camera’s menu and find the custom white balance setting. This may vary depending on the camera brand and model.

Step 4: Select “Custom White Balance”
Select the “Custom White Balance” option to activate the custom white balance feature.
Step 5: Frame the Grey Subject
Frame the neutral grey subject in the center of the viewfinder or LCD screen.
Step 6: Zoom In and Fill the Frame
Zoom in on the grey subject and fill the frame as much as possible to ensure accurate calibration.
Step 7: Set the White Balance
Press the shutter button halfway to set the white balance based on the grey subject you framed. Some cameras may require you to press a dedicated button or menu option to complete this step.
Step 8: Confirm the White Balance Setting
Check the LCD screen or viewfinder to see if the custom white balance has been successfully set. If it looks correct, you can proceed to use the custom white balance setting for your photographs.

Using a custom white balance setting can significantly improve the color accuracy in your images. Practice setting custom white balance in various lighting conditions to familiarize yourself with the process and capture stunning photographs with accurate colors every time.
Using a Gray Card for Accurate White Balance
One effective method for setting a custom white balance on a DSLR camera is by using a gray card. A gray card is a simple tool that helps to ensure accurate color balance in your photographs.
To use a gray card, follow these steps:
- Set Up Your Scene: Set up your scene as you normally would, making sure to include the gray card in the frame.
- Adjust Camera Settings: Set your camera to manual mode and adjust the ISO, aperture, and shutter speed according to your desired settings.
- Capture an Image: Take a photo with the gray card filling the frame.
- Import the Image: Transfer the image to your computer or view it on your camera’s display.
- Access White Balance Settings: Navigate to the white balance settings in your camera’s menu or editing software.
- Select the Gray Card: Use the dropper tool or similar feature to select the gray card in the image. This tells the camera what the true neutral gray should look like.
- Apply the White Balance: Apply the selected white balance setting to all the photos taken under the same lighting conditions.
By using a gray card, you can ensure that your camera accurately corrects the colors in your photos based on the actual lighting conditions. This technique is particularly useful when shooting in mixed lighting or challenging lighting situations, as it allows you to maintain accurate color representation.
Remember to always refer to your camera’s manual for specific instructions on adjusting white balance settings and utilizing the gray card feature.

Manual White Balance Adjustment for Challenging Lighting Conditions
Setting the white balance correctly is crucial for achieving accurate and pleasing colors in your photographs. While many DSLR cameras offer automatic white balance modes, they may struggle to accurately capture colors in challenging lighting conditions. In such situations, manually adjusting the white balance can help you achieve the desired results.
Here are the steps to manually adjust the white balance on your DSLR camera:
- Set your camera to the manual white balance mode. This mode is usually represented by a WB icon, which you can find in the camera’s shooting menu.
- Locate a neutral-colored object in the scene. Ideally, this object should be white or gray, as it will serve as a reference point for setting the color temperature.
- Fill the frame with the neutral-colored object. Make sure the object is evenly illuminated by the same lighting conditions that you want to correct.
- Take a test shot of the neutral-colored object.
- Access the camera’s white balance settings. This can usually be done by pressing the dedicated WB button on your camera or going into the shooting menu.
- Select the “Custom” or “Preset” white balance option. This allows you to manually set the white balance based on the test shot you took.
- Import the test shot into the camera’s white balance settings. This can be done by following the camera’s on-screen instructions or navigating to the image and selecting it as the reference for the white balance adjustment.
- Review the preview of the adjusted white balance on your camera’s LCD screen. Make fine adjustments if necessary.
- Once you are satisfied with the preview, save the custom white balance setting.
By manually adjusting the white balance in challenging lighting conditions, you can ensure that the colors in your photographs appear natural and accurate. Experiment with different white balance settings to find the most suitable one for each lighting situation you encounter.
White Balance Presets for Common Lighting Situations
Setting the right white balance is crucial for capturing accurate colors in your photographs. Different lighting situations can have a major impact on the overall color balance of your images. Thankfully, most DSLR cameras offer preset white balance options to help you achieve accurate color reproduction in various lighting conditions. Here are some common lighting situations and the corresponding white balance presets that can be used to optimize the colors in your photos.
Daylight
When shooting outdoors during daylight hours, the Daylight white balance preset is typically the most suitable option. This preset is designed to provide a neutral color balance when shooting under sunlight.
Cloudy
On overcast or cloudy days, the Cloudy white balance preset can help warm up your images by adding warmth and richness to the colors. This preset compensates for the bluish cast that can be present in images taken under cloudy conditions.
| Lighting Situation | Recommended White Balance Preset |
|---|---|
| Indoor Lighting (Incandescent) | Tungsten |
| Fluorescent Lighting | Fluorescent |
| Sunset or Sunrise | Daylight or Shade |
| Flash | Flash |
| Shade | Shade |
It’s important to note that these white balance presets are simply suggestions and may not always provide the perfect color balance in every situation. It’s always a good idea to experiment with different white balance presets and make manual adjustments as needed to ensure accurate color reproduction in your images.
Remember, setting a custom white balance using a gray card or a neutral color reference can be another option to achieve precise color accuracy in challenging lighting conditions.
Using Editing Software to Fine-Tune White Balance
While setting a custom white balance directly on your DSLR camera can produce accurate colors, there may be times when you want to further adjust the white balance during post-processing. By using editing software, such as Adobe Photoshop or Lightroom, you can make subtle changes to the white balance to achieve the desired effect.
Here are steps to fine-tune white balance using editing software:
- Open the image: Launch your preferred editing software and open the image you want to adjust.
- Access the white balance settings: Look for the white balance adjustment settings, usually located under the “Color” or “Temperature” section in the software’s toolbar or menu.
- Experiment with different settings: Use the sliders or numerical inputs provided to adjust the white balance. Move the sliders for temperature and tint to warm up or cool down the image, or to correct any unwanted color casts.
- Compare before and after: Make sure to view the image before and after making adjustments. This will allow you to see the subtle changes and determine if it has improved the overall appearance.
- Save the edited image: Once you are satisfied with the white balance adjustment, save the edited image to your desired file format (JPEG, TIFF, etc.) and location on your computer.
Remember, it’s important to use editing software that supports white balance adjustments to effectively fine-tune the colors in your images. By following these steps, you can have more control over the white balance in your photos and achieve the desired aesthetic.
Disclaimer: The process may slightly vary depending on the editing software you use. Please refer to the software’s documentation for specific instructions.
Benefits of Setting Custom White Balance in DSLR Camera
When it comes to photography, getting the colors just right is essential. One way to achieve accurate color representation is by setting a custom white balance in your DSLR camera. While many cameras offer automatic white balance settings, taking the time to set a custom white balance can greatly improve the quality of your photos.
Produces Accurate Color Representation
Setting a custom white balance allows you to accurately capture colors as they appear in real life. By calibrating your camera to the specific lighting conditions, you can ensure that white objects appear truly white in your photographs. This is particularly important when shooting in mixed lighting environments, as different light sources can cast different color temperatures.
Without a custom white balance, your camera may struggle to accurately interpret the colors, resulting in a shift towards warmer or cooler tones. This can lead to inaccurate color representation and make your photos look unnatural. By setting a custom white balance, you can ensure that the colors in your photos are faithful to the original scene.
Reduces the Need for Post-Processing
Another benefit of setting a custom white balance is that it reduces the need for extensive post-processing. When the white balance is set correctly, there is less need to make significant adjustments to the colors during editing. This saves time and allows you to maintain the authenticity of your photos.
Post-processing can also introduce noise and artifacts into your images, especially when making drastic color corrections. By setting a custom white balance, you can minimize the amount of post-processing needed, resulting in cleaner and more natural-looking photos.
Conclusion
In conclusion, setting a custom white balance in your DSLR camera offers several benefits. It allows you to accurately represent colors, resulting in more realistic and pleasing photographs. It also reduces the need for extensive post-processing, saving you time and maintaining the integrity of your images. So, take advantage of your camera’s custom white balance feature and elevate the quality of your photography.
Question-answer:
What is white balance in a DSLR camera?
White balance in a DSLR camera refers to the process of adjusting the colors in an image to make them appear neutral and natural. It is important to set the correct white balance in order to accurately reproduce the colors of a scene.
Can I set custom white balance in my DSLR camera?
Yes, most DSLR cameras allow you to set a custom white balance. This is useful when shooting in challenging lighting conditions or when you want to achieve a specific look in your photos.
How do I set a custom white balance in my DSLR camera?
The process of setting a custom white balance varies depending on the camera model, but generally involves taking a photo of a white or neutral gray reference card under the same lighting conditions as your subject. You then select this photo as the custom white balance reference in your camera’s settings.


