If you are looking to enhance the security of your property, investing in a Samsung security camera system can be a great option. These systems offer high-quality video surveillance, allowing you to monitor your property at all times. However, setting up the cameras and configuring them can sometimes be a bit overwhelming, especially if you are new to security camera systems.
In this article, we will guide you through the process of setting up a Samsung security camera system to 8 channels, ensuring that you can effectively monitor multiple areas of your property. Whether you are setting up the cameras for your home or a business location, these steps will help you get started with ease.
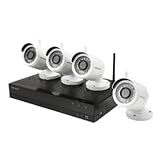
Before you begin, make sure you have all the necessary equipment. You will need a Samsung security camera system with an 8-channel DVR (Digital Video Recorder), multiple cameras, and all the cables and accessories that come with the system. Check the packaging to ensure that you have everything you need before proceeding.
Once you have all the necessary equipment, follow these steps to set up your Samsung security camera system to 8 channels:
Samsung Security Camera Features
Samsung security cameras offer a range of features that ensure high-quality video surveillance for your home or business. Here are some key features you can expect from Samsung security cameras:
- High Resolution: Samsung cameras capture footage in high resolution, allowing you to see clear and detailed images.
- Night Vision: Many Samsung cameras are equipped with infrared LEDs, enabling them to capture clear footage even in low light or total darkness.
- Wide Angle Lens: Samsung cameras come with a wide-angle lens, providing a broader field of view and allowing you to monitor larger areas with fewer cameras.
- Motion Detection: Samsung security cameras use advanced motion detection technology, sending you instant alerts whenever motion is detected within the camera’s field of view.
- Remote Viewing: With the Samsung SmartThings app, you can monitor your security cameras remotely from your smartphone or tablet, giving you peace of mind even when you’re away.
- Weather Resistance: Samsung security cameras are built to withstand the elements, making them suitable for both indoor and outdoor use.
- Backup Storage: Many Samsung cameras support motion-triggered recording and allow you to save footage to a local storage device or cloud storage, ensuring you never miss any important events.
- Easy Installation: Samsung security cameras are designed for easy installation, with straightforward setup instructions and user-friendly interfaces.
These are just a few examples of the features you can expect from Samsung security cameras. Whether you’re looking to protect your home or business, Samsung offers a range of surveillance solutions to meet your needs.
Understanding 8 Channel Setups
Setting up a Samsung security camera with an 8 channel configuration can provide comprehensive surveillance coverage for your property. However, it is important to have a clear understanding of how the 8 channel setup works in order to optimize its use.
An 8 channel setup refers to a security camera system that can accommodate up to 8 separate cameras. This configuration allows you to monitor multiple areas simultaneously, providing a higher level of security and surveillance.
When setting up an 8 channel system, it is crucial to strategize the placement of the cameras. Start by identifying the key areas that need surveillance coverage, such as entrances, parking lots, or outdoor spaces. Distribute the cameras evenly to ensure maximum coverage and eliminate blind spots.
Once you have determined the placement of the cameras, you will need to connect them to the central monitoring system. This can be done using cables or wireless connections, depending on the specific camera model. Ensure that each camera is properly connected and that the signal is strong and stable.
After connecting the cameras, you will need to configure the monitoring system software. This involves setting up the desired recording parameters, such as motion detection, scheduling, and video quality. Familiarize yourself with the user manual or online resources provided by Samsung for detailed instructions on how to configure your specific model.
With the 8 channel setup properly configured, you will be able to monitor and record footage from all connected cameras in real-time. The recorded footage can be accessed and reviewed later for any suspicious or significant events.
It is worth noting that an 8 channel setup may require additional equipment, such as a digital video recorder (DVR) or network video recorder (NVR), depending on the model. These devices are used to store and manage the recorded footage from the cameras. Ensure that you have the necessary equipment and sufficient storage capacity to accommodate your surveillance needs.
Regular maintenance and monitoring of the 8 channel setup is essential to ensure its continued functionality. Check the camera connections, system software, and storage capacity on a regular basis to identify and resolve any issues proactively.
In conclusion, understanding how to set up an 8 channel Samsung security camera system is crucial for effective surveillance coverage. Strategize the camera placement, properly connect the cameras, and configure the monitoring system software to maximize its functionality. Regular maintenance and monitoring will help ensure a reliable and secure surveillance system for your property.

Choosing the Right Samsung Security Camera Model
When it comes to setting up a reliable security system, selecting the right camera model is crucial. Samsung offers a range of security camera models with different features and capabilities to suit various needs. In this article, we will guide you through the important factors to consider when choosing a Samsung security camera model.
1. Resolution: One of the key aspects to look for in a security camera is its resolution. Samsung offers security cameras with a range of resolutions, including HD, Full HD, and 4K Ultra HD. Higher resolutions enable you to capture detailed footage, making it easier to identify people and objects.
2. Field of View: The field of view is another crucial factor to consider. Samsung security cameras come with different lens options, providing varying degrees of coverage. Wide-angle lenses offer a broader field of view, while narrower lenses are better suited for focusing on specific areas.
3. Night Vision: If you require surveillance during nighttime, it is essential to choose a Samsung security camera with good night vision capabilities. Look for models equipped with infrared (IR) LEDs, which provide clear and crisp images even in complete darkness.
4. Connectivity: Samsung security cameras support different types of connectivity options. Most models offer both wired and wireless connections, allowing flexible installation and remote monitoring. Consider your specific needs and choose a model accordingly.

5. Weather Resistance: If you plan to mount the security camera outdoors, you should opt for a weather-resistant model. Samsung offers cameras with varying levels of weatherproofing, ensuring their durability and performance in harsh weather conditions.
6. Storage: Storage is another critical aspect to look out for. Samsung security cameras support various storage options, including local storage and cloud storage. Determine your storage requirements and choose a model that offers adequate storage capacity.
7. Additional Features: Lastly, consider any additional features or functionality you may need. Samsung security cameras come with various extras, such as motion detection, two-way audio, and smart integration with other devices. Assess your specific requirements and select a model that caters to your needs.
By considering these factors, you can confidently choose the right Samsung security camera model that meets your expectations and provides reliable surveillance for your property.
Installing the Samsung Security Camera System
Installing a Samsung Security Camera System is a straightforward process that can be completed in a few simple steps. Follow the instructions below to ensure a successful installation:

- Choose the right location: Select the optimal location to mount your security cameras. Consider areas of high traffic, blind spots, and vulnerable entry points.
- Mount the cameras: Use the provided mounting brackets to securely attach the cameras to the wall or ceiling. Ensure that the cameras are positioned at the desired angle for maximum coverage.
- Connect the cables: Connect the video cables from each camera to the corresponding ports on the back of the Samsung Security Camera System. Ensure that the cables are secure and properly connected.
- Power on the system: Connect the power adapter to the Samsung Security Camera System and plug it into a power outlet. Power on the system to activate the cameras.
- Configure the system: Use the included remote control or connect a monitor to the system to access the settings. Follow the on-screen instructions to set up the system, including adjusting the date and time, setting recording schedules, and configuring motion detection settings.
- Test the system: Once the system is set up, test each camera to ensure that it is capturing clear video footage. Adjust the cameras as needed to improve the viewing angle and clarity.
- Monitoring and maintenance: Regularly monitor the system to ensure that it is functioning properly. Clean the cameras and check all connections for any signs of damage or wear.
By following these steps, you can successfully install your Samsung Security Camera System and enjoy peace of mind knowing that your property is protected.
Connecting Cameras to the 8 Channel DVR
To set up your Samsung security camera system with an 8 channel DVR, you’ll need to connect each camera to the DVR using the provided cables. Follow these steps to ensure a proper connection:
Step 1: Position your cameras in the desired locations around your property. Make sure they are within range of the DVR and have a clear view of the areas you want to monitor.
Step 2: Use the provided coaxial cables to connect each camera to one of the video input ports on the back of the DVR. The cables should securely screw into place.
Step 3: Plug the power adapters of each camera into a nearby electrical outlet. Ensure that the power supply is reliable and can handle the power requirements of all connected cameras.

Step 4: Connect the DVR to a display device, such as a TV or monitor, using an HDMI or VGA cable. This will allow you to view the camera footage.
Step 5: Plug in the power adapter of the DVR and turn it on. Wait for it to fully boot up, which may take a few minutes.
Step 6: Use the included remote control or the DVR’s menu buttons to navigate to the camera settings. From there, you can adjust the settings for each camera, such as motion detection sensitivity and recording duration.
Step 7: Once you have finished setting up the cameras, ensure that the DVR is connected to your home network if you wish to access the camera footage remotely. This can usually be done through the DVR’s settings menu.
Step 8: Test the camera feeds on your display device to confirm that the connection is working properly. Adjust the camera angles or settings as needed to achieve your desired monitoring setup.

Following these steps, you should now have your Samsung security cameras connected to your 8 channel DVR, ready to monitor and protect your property.
Setting Up Remote Access for Samsung Security Camera
In order to access your Samsung security camera remotely, you need to set up remote access. By following the steps below, you can easily enable remote access to your Samsung security camera system.
Step 1: Connect your Security Camera
Make sure your Samsung security camera is properly connected to your network using an Ethernet cable. Ensure that the camera is powered on and receiving a stable internet connection.
Step 2: Find the IP Address of your Camera
Locate the IP address of your Samsung security camera by checking the camera’s settings or using a network scanning tool. The IP address usually starts with “192.168.” followed by a number.
Step 3: Access the Web Viewer
Open a web browser on your computer or mobile device and enter the IP address of the camera in the address bar. Press Enter to access the camera’s web viewer.
Step 4: Log in to the Web Viewer
Enter the username and password for your Samsung security camera system when prompted. If you haven’t set up a username and password, use the default credentials provided by the manufacturer or consult the user manual for instructions.
Step 5: Set up Port Forwarding
In order to access your camera remotely, you need to set up port forwarding on your router. Refer to your router’s user manual or contact your internet service provider for specific instructions on how to set up port forwarding.
Step 6: Configure Dynamic DNS
If your internet service provider assigns you a dynamic IP address, you need to configure Dynamic DNS on your router or security camera system. Dynamic DNS allows you to access your camera using a domain name instead of an IP address. Consult your router’s user manual or the camera’s documentation for instructions on how to configure Dynamic DNS.
Step 7: Test Remote Access
Once you have completed the previous steps, test remote access by accessing your Samsung security camera system from a remote location. Open a web browser and enter the external IP address of your network, followed by the port number and web viewer URL specified in the port forwarding settings.
| Protocol | Port Number | Web Viewer URL |
|---|---|---|
| HTTP | 80 | http://[external IP address]:[port number] |
| HTTPS | 443 | https://[external IP address]:[port number] |
Make sure to replace “[external IP address]” with the actual external IP address of your network and “[port number]” with the port number specified in your router’s port forwarding settings.
Congratulations! You have successfully set up remote access for your Samsung security camera system. You can now monitor your cameras and view the live video feed from anywhere using a web browser or a dedicated mobile app.
Configuring Motion Detection on Samsung Security Camera
Setting up motion detection on your Samsung security camera is an important step to enhance the security and surveillance of your property. By configuring motion detection, you can receive alerts and capture footage whenever any movement is detected in the camera’s field of view.
To configure motion detection on your Samsung security camera, follow these steps:
- Access the Camera’s Settings: Connect your camera to a compatible device such as a smartphone, tablet, or computer. Launch the Samsung security camera app or access the camera’s web interface to enter the settings.
- Select Motion Detection: Once you are in the camera’s settings, navigate to the motion detection options. This option is typically located under the “Alarm” or “Event” settings.
- Enable Motion Detection: Toggle the motion detection feature to “On” or “Enabled” to activate it. This allows the camera to start monitoring for any movement within its range.
- Adjust Sensitivity: Depending on your preferences and the camera’s environment, you may need to adjust the sensitivity level of the motion detection. Increasing the sensitivity can make the camera more responsive to slight movements, while decreasing it can minimize false alerts triggered by minor disturbances.
- Set Detection Areas: Some Samsung security cameras allow you to specify certain areas within the camera’s field of view where motion detection should be activated. This is useful if you want to monitor specific zones, such as entryways or high-value areas. Use the camera app or web interface to mark these areas.
- Configure Alert Notifications: To receive alerts whenever motion is detected, you need to configure the notification settings on your camera. This can usually be done through the camera app or web interface. Choose your preferred notification method, such as push notifications, email alerts, or SMS messages.
- Save and Test: After making the necessary configurations, save your settings and test the motion detection feature. Walk within the camera’s range to ensure that it captures motion and triggers the desired notifications.
Following these steps will help you properly configure motion detection on your Samsung security camera, providing you with enhanced surveillance capabilities and peace of mind.
Adjusting Video Settings for Clear Footage
Samsung security cameras are equipped with a variety of video settings that can be adjusted to optimize the clarity and quality of the footage captured. Taking the time to configure these settings properly can greatly enhance your surveillance experience. In this guide, we will walk you through the process of setting up your Samsung security camera to an 8-channel system for crystal-clear video.
Step 1: Logging in to the System
Start by logging in to the Samsung security camera system. Open the web browser on your computer and enter the IP address of the security camera system in the address bar. You will be prompted to enter the username and password provided with your system. Once logged in, you will have access to the settings panel.
Step 2: Accessing the Video Settings
In the settings panel, navigate to the “Video” tab. This tab will allow you to adjust various video settings such as resolution, frame rate, and brightness.
Step 3: Adjusting the Resolution
Set the resolution to the highest available option for optimal clarity. Keep in mind that higher resolution settings will require more storage space, so make sure you have enough storage capacity available.
Step 4: Fine-tuning the Frame Rate
The frame rate determines the number of frames per second captured by the camera. Higher frame rates can provide smoother and more detailed footage. However, higher frame rates also require more bandwidth and storage. Adjust the frame rate according to your specific needs and the available resources.
Step 5: Enhancing Brightness and Contrast
Experiment with the brightness and contrast settings to achieve the best image quality. Increase the brightness if the video appears too dark, and adjust the contrast to enhance the details in the footage.
Step 6: Saving and Applying the Settings
Once you have adjusted the video settings to your preferences, click on the “Save” or “Apply” button to save the changes made. The system may prompt you to restart the cameras for the new settings to take effect. Follow the instructions provided to complete the process.
By following these steps, you can optimize the video settings of your Samsung security camera system to ensure clear and high-quality footage. Enjoy the benefits of enhanced surveillance and peace of mind knowing that your property is well-protected.
| Step | Instructions |
|---|---|
| Step 1 | Log in to the Samsung security camera system using the provided username and password. |
| Step 2 | Navigate to the “Video” tab in the settings panel. |
| Step 3 | Adjust the resolution to the highest available option. |
| Step 4 | Tweak the frame rate according to your needs and available resources. |
| Step 5 | Experiment with the brightness and contrast settings to achieve the best image quality. |
| Step 6 | Save or apply the settings and follow any restart instructions. |
Troubleshooting Samsung Security Camera 8 Channel System
If you are experiencing any issues with your Samsung Security Camera 8 Channel System, there are a few troubleshooting steps you can take to resolve the problem. Following these steps will help ensure that your security camera system is functioning properly and providing the necessary surveillance coverage.
Check Power Connection
First, make sure that all cameras and the main DVR unit are properly connected to a power source. Check the power cables and ensure they are securely plugged in. If there is a power failure or loose connection, it can cause the cameras to stop working or produce a low-quality video feed.
Verify Network Connection
Ensure that your Samsung Security Camera 8 Channel System is properly connected to the network. Check the Ethernet cables and make sure they are securely plugged into the DVR unit and the router or switch. A weak or faulty network connection can affect the remote viewing capability of your security camera system.
Check Camera Placement
Verify that the placement of your cameras is appropriate and does not hinder their functionality. Check for any obstructions, such as branches or objects blocking the camera’s view. Additionally, ensure that the cameras are positioned at the correct angle and focus to capture the desired surveillance area.
Inspect Camera Settings
Double-check the camera settings on the DVR unit. Ensure that each camera is correctly configured, including resolution, frame rate, and recording schedule. Incorrect settings can lead to poor video quality or missed recordings.
Note: If you are unsure about the optimal camera settings for your specific needs, refer to the user manual or contact Samsung support for assistance.
Reboot the System
If you have tried the above steps and are still experiencing issues with your Samsung Security Camera 8 Channel System, try rebooting the system. Power off the DVR unit and unplug it from the power source. Wait for a few moments and then plug it back in, allowing the system to reboot. This can help resolve any temporary glitches or software errors.
By following these troubleshooting steps, you can address common issues with the Samsung Security Camera 8 Channel System and ensure that your surveillance system is functioning optimally. If the problem persists, consider contacting Samsung technical support for further assistance.
FAQ,
What is an 8 channel security camera system?
An 8 channel security camera system is a surveillance system that allows you to connect and control up to 8 security cameras at once.
How do I set up a Samsung security camera to 8 channel?
To set up a Samsung security camera to an 8 channel system, you need to first connect the cameras to the DVR using the provided cables. Then, you can access the DVR’s settings to configure the cameras and adjust the recording and viewing options.
Do I need any additional equipment to set up an 8 channel security camera system?
Yes, in order to set up an 8 channel security camera system, you will need the cameras themselves, a DVR (digital video recorder) to connect the cameras to, and any necessary cables or adapters. Make sure you have all the required equipment before attempting to set up the system.
Can I access and control the Samsung security cameras remotely?
Yes, you can access and control the Samsung security cameras remotely by connecting them to the internet and using a compatible app or software provided by Samsung. This allows you to view the camera feed, adjust the settings, and receive alerts from anywhere using your smartphone, tablet, or computer.
Are Samsung security cameras compatible with other brands?
Samsung security cameras are generally compatible with other brands, as long as they use standard protocols and connections such as IP or analog. However, it’s always recommended to check the compatibility and requirements of the specific camera and DVR models you are using to ensure seamless integration.