Have you ever wished you had a document camera to capture high-quality images of documents, photos or objects during your presentations or online classes? Look no further! With just your iPhone, you can easily turn it into a document camera and take your presentations to the next level. In this article, we will guide you step-by-step on how to set up your iPhone as a document camera.
Using your iPhone as a document camera comes with numerous advantages. It eliminates the need for an additional device and saves you precious time and money. The camera quality on iPhones is exceptional, ensuring clear and sharp images, even when zoomed in. Whether you are presenting to a classroom or conducting virtual meetings, using your iPhone as a document camera provides convenience and flexibility.
Step 1: Positioning your iPhone
The first step to setting up your iPhone as a document camera is to find a stable surface to position it on. You can use a tripod or a phone holder to ensure that your iPhone stays steady while capturing images. Place your iPhone a suitable distance away from the object or document you want to capture. Make sure that the camera lens is aligned with the area you want to focus on.
Step 2: Adjusting camera settings

Open the camera app on your iPhone and tap on the “Settings” icon. Here, you can adjust various settings, such as brightness, focus, and exposure. Experiment with these settings to achieve the best image quality for your specific needs. You can also enable the gridlines feature to help you align your iPhone properly and ensure that your images are well-framed.
Step 3: Using a document camera app
While the default camera app on your iPhone is sufficient for capturing images, you can enhance your document camera experience by using a dedicated document camera app. These apps provide additional features such as real-time annotation, image adjustment, and even live streaming capabilities. Some popular document camera apps include CamScanner, Evernote Scannable, and Microsoft Office Lens. Download and install the app of your choice from the App Store, and you’re ready to go.
By following these simple steps, you can transform your iPhone into a powerful document camera. Capture clear and detailed images of documents, photos, or objects and elevate your presentations or online classes. With the convenience and flexibility offered by your iPhone, you’ll never need to invest in a separate document camera again.
How to Set Up iPhone as Document Camera
If you need to use a document camera and don’t have one readily available, you can turn your iPhone into a makeshift document camera. With the right setup, you’ll be able to use your iPhone to display documents, photos, or even handwritten notes in real-time. Here’s a step-by-step guide on how to set up your iPhone as a document camera:

Step 1: Gather the necessary materials
To set up your iPhone as a document camera, you’ll need the following materials:
- An iPhone or iPad
- A stand or tripod to hold your iPhone
- A document or object you want to display
Step 2: Position your iPhone
Place your iPhone in the stand or attach it securely to a tripod. Make sure that the camera lens is facing the document or object you want to display. Adjust the angle and height of your iPhone to ensure a clear view of the document.
Step 3: Enable Guided Access
Open the Settings app on your iPhone and go to Accessibility. Tap on Guided Access and toggle it on. This feature will prevent accidental taps or gestures from interfering with the document camera setup.
Step 4: Open the Camera app
Launch the Camera app on your iPhone and switch to the rear camera. Make sure that the camera is focused on the document or object you want to display. You can tap and hold on the screen to lock the focus and exposure.
Step 5: Use a video conferencing app or screen sharing
If you need to share the document camera feed with others, you can use a video conferencing app or screen sharing feature. Start a video call or screen sharing session and select your iPhone’s camera as the video source. This way, others will be able to see the document or object you’re displaying in real-time.
By following these simple steps, you can quickly set up your iPhone as a document camera and use it for various purposes, such as teaching, presenting, or collaborating remotely. Make the most out of the technology you have at hand!
Note: Keep in mind that using your iPhone as a document camera may drain the battery quickly. Make sure you have a charger nearby or fully charge your device before using it for an extended period.
Download Camera Document App
If you want to use your iPhone as a document camera, you’ll need to download a camera document app. There are several apps available on the App Store that can turn your iPhone into a document camera with just a few taps.
One popular app is called [App Name]. It has a user-friendly interface and offers a range of features to enhance the document camera experience. With this app, you can easily capture images and videos of your documents, adjust the camera settings, and even annotate your images.
Another great option is [App Name]. This app allows you to connect your iPhone to your computer or projector wirelessly, making it perfect for presentations or video conferences. You can also use it to scan documents and convert them into PDF files.

Once you’ve chosen the app that suits your needs, open the App Store on your iPhone and search for the app by name. Tap the “Get” or “Download” button, and the app will start downloading and installing on your device.
After the app is installed, open it and follow the on-screen instructions to give it access to your iPhone’s camera and other necessary permissions. Once you’ve granted the app the required permissions, you’ll be ready to use your iPhone as a document camera.
Make sure to position your iPhone properly, so that the camera captures the documents clearly. You can adjust the camera settings within the app to achieve the best results.
Using your iPhone as a document camera can be a convenient and cost-effective solution for various situations, such as online teaching, business meetings, or personal use. Just make sure to choose a reliable and feature-rich camera document app to get the most out of your iPhone’s camera capabilities.
Position Your iPhone Properly
Once you have set up your iPhone as a document camera, it is important to position it properly to get the best results. Here are some tips to help you position your iPhone correctly:
1. Place your iPhone at a proper height: Make sure to position your iPhone at a height that allows the document or object you want to capture to be clearly visible. A height of around 12-18 inches above the document is usually ideal.
2. Use a stable surface: It is essential to place your iPhone on a stable surface to prevent any shaking or movement during recording or capturing. Use a tripod or a sturdy stand to keep your iPhone steady and the captured images or videos clear.
3. Adjust the angle: Experiment with different angles to find the best position for capturing your document or object. Tilting the iPhone slightly downwards can help eliminate glare or reflections on the document surface.
4. Ensure proper lighting: Adequate lighting is crucial for clear and legible document capture. Make sure there is sufficient light on the document or object you want to record. Avoid strong backlighting, as it can result in a washed-out image.
5. Use the iPhone’s autofocus: The autofocus feature on the iPhone can help you capture sharp and focused images. Tap on the screen to focus on a specific area or document, and the iPhone will adjust the focus automatically.

6. Lock the autofocus and exposure: If you want to maintain consistent focus and exposure settings, you can lock them by tapping and holding on the screen until the yellow square appears. This can be useful if you are recording multiple pages or objects with varying lighting conditions.
By following these positioning tips, you can ensure that your iPhone functions effectively as a document camera and captures high-quality images and videos.
Adjust Camera Settings
Before using your iPhone as a document camera, it’s important to adjust the camera settings for the best image quality and stability:
1. Open the Camera app on your iPhone.
2. Tap on the “Settings” option located at the top-left corner of the screen.

3. Scroll down and tap on “Resolution & Frame Rate”.
4. Here, you can choose the camera resolution and frame rate that suits your needs. For document camera purposes, it’s recommended to select a higher resolution (e.g., 1080p) for clearer images.
5. Go back to the main Settings menu and tap on “Exposure & Focus”.
6. You can enable or disable the “Auto Exposure” and “Auto Focus” features. In most cases, it’s best to keep these features enabled for optimal image quality.
7. If needed, you can manually adjust the exposure and focus by tapping and holding on the area of the screen you want to focus on.

8. Lastly, make sure to stabilize your iPhone by using a stand or tripod to minimize shaky footage.
Once you’ve adjusted the camera settings, you’re ready to use your iPhone as a document camera for various purposes, such as presentations, tutoring sessions, or even live streaming.
Prepare the Document
Before you can start using your iPhone as a document camera, you need to prepare the document you want to capture. Here are some steps to follow:
| 1. | Place the document on a flat surface. |
| 2. | Ensure that there is enough lighting in the area to capture clear images. |
| 3. | Remove any unwanted objects or clutter from the document. |
| 4. | Ensure that the document is properly aligned and positioned within the camera’s view. |
| 5. | If necessary, use paperweights or clips to secure the document in place. |
By properly preparing the document, you can ensure that you capture high-quality images and make the most out of your iPhone as a document camera.
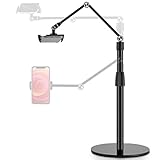
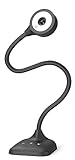
Connect iPhone to a Stand
To set up your iPhone as a document camera, you will need a stand that can hold your iPhone securely in place. There are various stands available on the market, designed specifically for this purpose.
Here are the steps to connect your iPhone to a stand:
|
Step 1: |
Place the stand on a stable surface, such as a table or desk. |
|
Step 2: |
Extend the holder or bracket on the stand to make sure it can accommodate your iPhone. |
|
Step 3: |
Attach your iPhone to the stand by inserting it into the holder or bracket. |
|
Step 4: |
Ensure that your iPhone is securely fastened to the stand to prevent it from falling or slipping. |
|
Step 5: |
Adjust the angle and height of the stand to position your iPhone at the desired distance and angle for document scanning. |

Once your iPhone is securely connected to the stand, it is ready to be used as a document camera. You can now launch a document scanning app on your iPhone and start capturing images or videos of documents or objects that you need to display.
Connect to a Computer or Projector
To set up your iPhone as a document camera, you can also connect it to a computer or projector for a larger display. Here’s how:
- Connect your iPhone to the computer or projector using an appropriate cable, such as a Lightning to USB or HDMI cable.
- On your iPhone, go to the Control Center by swiping down from the top-right corner (iPhone X or newer) or swiping up from the bottom of the screen (iPhone 8 or older).
- Tap on “Screen Mirroring” or “AirPlay” (depending on your iOS version) to see the list of available devices.
- Select your computer or projector from the list to begin mirroring your iPhone’s screen.
Once connected, your iPhone screen will be mirrored on the computer or projected onto the larger display. You can open your preferred document camera app and start using your iPhone as a document camera for presentations or demonstrations.
Use a Whiteboard or Background
When setting up your iPhone as a document camera, it is important to have a clear and uncluttered background. One way to achieve this is by using a whiteboard or a plain background.
A whiteboard provides a blank canvas for you to showcase your documents or objects. It offers a clean and crisp surface that makes it easier for your audience to see the details of what you are presenting. Make sure to write or draw with dark-colored markers to enhance the visibility.
If you don’t have a whiteboard, you can use a plain background instead. Choose a wall or a flat surface that is free from distractions. You can use a solid-colored sheet or even a large piece of paper to create a simple and neutral background.
Remember to position your iPhone at an appropriate distance from the whiteboard or background to capture the entire document or object. You can experiment with different angles and heights to find the best setup for your specific needs.
Using a whiteboard or background not only enhances the visibility of your presentations but also adds a professional touch to your setup. It helps to eliminate any unnecessary distractions and allows your audience to focus solely on the content you are sharing.
Start Using Your iPhone as a Document Camera
Are you looking for an easy and convenient way to turn your iPhone into a document camera? With just a few simple steps, you can transform your iPhone into a powerful tool for presentations, teaching, and more. Read on to learn how to set up your iPhone as a document camera.
Step 1: Gather Your Materials
Before you begin, make sure you have everything you need. You will need:
- Your iPhone
- A stand or tripod to hold your iPhone
- A whiteboard or a flat surface to place your documents
- A lighting source (if necessary)
Step 2: Position Your iPhone
Set up your stand or tripod so that your iPhone is positioned directly above your whiteboard or flat surface. Make sure the camera is facing downward and has a clear view of the documents you want to capture.
Step 3: Adjust the Focus and Exposure
Open the camera app on your iPhone and tap on the screen to focus on the documents. If the lighting conditions are not ideal, you can manually adjust the exposure by swiping up or down on the screen.
Step 4: Use the Camera
Now that your iPhone is set up, you can start using it as a document camera. Place your documents on the whiteboard or flat surface and position them within the view of the camera. Use the camera app to capture images or record videos of the documents.
Additionally, you can use features like zoom, timer, or gridlines in the camera app to enhance your document capturing experience. Take advantage of the built-in editing tools to crop, rotate, or annotate the captured documents.
Step 5: Share and Present
Once you have captured the documents using your iPhone, you can easily share and present them. You can use AirDrop or email to send the documents to others, or use screen mirroring to display the documents on a larger screen for presentations.
Using your iPhone as a document camera is a great way to make your presentations more interactive and engaging. Whether you are a teacher, professional, or student, this setup allows you to easily capture, share, and present documents with just your iPhone. Start using your iPhone as a document camera and take your presentations to the next level!
Troubleshooting Tips
If you are experiencing any difficulties while setting up your iPhone as a document camera, here are a few troubleshooting tips to help you resolve the issues:
Check Device Compatibility
Before proceeding, ensure that your iPhone is compatible with the document camera app you are using. Check the app’s requirements and ensure that your iPhone meets all the necessary specifications.
Restart Your iPhone
Sometimes, simply restarting your iPhone can resolve minor software glitches. Press and hold the power button until you see the power off slider, then drag the slider to turn off the device. Wait for a few seconds, then press and hold the power button again until the Apple logo appears.
Update Your Device and App
Make sure that your iPhone and the document camera app are running the latest software versions. To update your iPhone, go to Settings, then General, and select Software Update. Follow the on-screen instructions to download and install any available updates. Similarly, check the App Store for updates to the document camera app, if available.
Ensure Proper Connection
Check the connection between your iPhone and the device you are using as the document camera. Ensure that the cables are securely plugged in and that any wireless connections are properly set up. If using a wired connection, try using a different cable to rule out any potential cable issues.
Reset App Settings
If the document camera app is not functioning as expected, you can try resetting its settings. Go to Settings, then scroll down to find the document camera app. Tap on it, then select Reset Settings. Keep in mind that this will reset any customized preferences and you may need to set them up again.
Contact App Support
If none of the above troubleshooting tips resolve your issue, consider contacting the app’s support team for further assistance. They may be able to provide specific troubleshooting steps or identify any known issues with the app that could be causing the problem.
By following these troubleshooting tips, you should be able to address most common issues that may arise while setting up your iPhone as a document camera.
FAQ
What is a document camera?
A document camera is a device that captures live images or documents and displays them on a larger screen, such as a computer or a projector. It is commonly used in classrooms or during presentations.
How can I set up my iPhone as a document camera?
To set up your iPhone as a document camera, you will need a stand or a tripod to hold your iPhone in place. You can then use various apps available on the App Store, such as CamScanner or Scanner Pro, to capture and display the live images or documents. Connect your iPhone to a larger screen or projector using an HDMI adapter or wireless screen mirroring to share the images or documents with your audience.