
If you are concerned about the security of your property or simply want to keep an eye on your surroundings, setting up a PoE (Power over Ethernet) security camera system is a smart choice. PoE security camera systems are easy to install and provide a reliable way to monitor your home or business. In this article, we will guide you through the process of setting up a PoE security camera system, from choosing the right equipment to configuring the system.
First, it’s important to understand what PoE is and why it’s beneficial for security camera systems. PoE technology allows both power and data to be transmitted over a single Ethernet cable, eliminating the need for separate power and data cables. This simplifies the installation process and makes it easier to set up multiple cameras in different locations without worrying about power sources. With a PoE security camera system, you can have peace of mind knowing that your cameras will remain powered even during power outages.
When setting up a PoE security camera system, the first step is to choose the right equipment. Start by considering the number of cameras you need and the areas you want to monitor. Look for cameras that are weatherproof and have good night vision capabilities if you plan to use them outdoors. It’s also important to select a network video recorder (NVR) that is compatible with PoE cameras. The NVR will be the central hub of your security camera system and will allow you to view, record, and manage the footage from the cameras.
What is a PoE security camera?
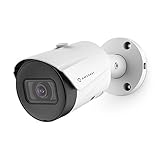
A Power over Ethernet (PoE) security camera is a type of surveillance camera that can be powered and connected to a network using a single Ethernet cable. Unlike traditional security cameras that require separate power cables, PoE cameras receive both power and data through the same Ethernet cable.

With PoE cameras, there is no need for additional power outlets or complicated wiring setups, making installation and setup much easier. This makes them an ideal choice for both indoor and outdoor surveillance applications.
One of the main advantages of PoE security cameras is their flexibility in terms of placement. Since they only require a single Ethernet cable, they can be installed in areas where power outlets may be limited or inaccessible.
Another benefit of PoE cameras is their ability to transmit data and power over longer distances, allowing for greater flexibility in camera placement. This can be especially useful in large or remote areas where running separate power cables may be impractical or costly.
Key features of PoE security cameras:
- Power and data transmission through a single Ethernet cable
- Easy installation and setup
- Flexibility in camera placement
- Ability to transmit data and power over longer distances
- Compatibility with PoE network switches and injectors
In conclusion, PoE security cameras provide a convenient and flexible solution for video surveillance. With their ability to transmit power and data through a single cable, they simplify installation and reduce wiring complexity. Whether for home or business use, PoE cameras offer a reliable and efficient way to monitor and protect your property.
Advantages of using PoE security cameras
Power over Ethernet (PoE) security cameras offer several advantages over traditional security cameras. Here are some key benefits of using PoE cameras:

- Easy installation: PoE cameras are easier to install compared to traditional cameras that require separate power cables. With PoE cameras, you only need to connect a single Ethernet cable for both power and data transmission.
- Cost-effective: Using PoE eliminates the need for additional power cables and outlets, resulting in cost savings on installation and infrastructure. This makes PoE security cameras a more affordable choice in the long run.
- Flexible placement: PoE cameras can be easily installed in locations where power outlets are not readily available. This flexibility allows for more strategic camera placement to maximize surveillance coverage.
- Remote access: PoE cameras can be connected to a network, enabling remote access to live video feeds and camera controls from anywhere with an internet connection. This is especially beneficial for monitoring and managing multiple cameras across different locations.
- Reliable power supply: PoE cameras receive power from a PoE switch or injector, ensuring a stable and reliable power supply. This eliminates the risk of power failures or interruptions that could potentially compromise security.
- Scalability: PoE infrastructure allows for easy scalability, making it simple to add or relocate cameras as needed. This scalability is particularly useful for expanding surveillance systems in larger or growing environments.
Overall, PoE security cameras provide a cost-effective, easy-to-install, and flexible solution for enhancing the security and surveillance capabilities of homes or businesses.
Step-by-step guide to setting up a PoE security camera
Step 1: Choose the right location
Start by determining the best location for your PoE security camera. Look for areas that require surveillance and have a power outlet nearby. Consider factors like visibility, accessibility, and potential obstructions.
Step 2: Install the camera mount
Once you have selected the location, install the camera mount securely using screws. Make sure it is stable and can support the weight of the camera. Adjust the angle of the mount to capture the desired view.

Step 3: Connect the PoE camera
Locate the Ethernet port on the PoE security camera and connect one end of the Ethernet cable to it. The other end should be connected to the PoE network switch or the injector. Ensure a secure connection by verifying the clicks or LED lights on the devices.
Step 4: Configure the camera settings
Access the camera’s web interface by entering its IP address in a web browser. Log in using the default credentials or set up a new username and password. Configure the camera settings such as resolution, motion detection, and alerts according to your preferences.
Step 5: Mount the camera

Attach the PoE security camera to the mount by aligning the slots and sliding it into place. Secure it with screws if needed. Ensure that the camera is tightened and properly positioned to get the desired field of view.
Step 6: Test the camera
After mounting the camera, test it to ensure that it is functioning correctly. Check the live feed, review the recorded footage, and ensure that the motion detection is working. Make any necessary adjustments to the camera settings based on the test results.
Step 7: Monitor and manage
Once the PoE security camera is set up and tested, you can start monitoring and managing it. Access the camera’s web interface or use a dedicated surveillance software to view the live feed, playback footage, and make any further adjustments or configurations.

By following these step-by-step instructions, you can successfully set up a PoE security camera and enhance the security of your premises.
Step 1: Choose the right PoE security camera
Before setting up a PoE (Power over Ethernet) security camera system, it is important to choose the right camera for your needs. There are a few factors to consider when selecting a PoE camera:
- Resolution: The resolution of the camera determines the clarity and level of detail in the video footage. Higher resolution cameras will capture more detail, but they may also require more storage space for recordings.
- Field of view: The field of view refers to the area that the camera can cover. It is important to choose a camera with a field of view that matches the area you want to monitor.
- Night vision: If you need to monitor an area during the night, it is important to choose a camera with infrared LEDs or other night vision capabilities. This will ensure that you can still capture clear video footage in low-light conditions.
- Weather resistance: If you plan to install the camera outdoors, it is crucial to choose a camera that is weather resistant. Look for cameras with an appropriate IP (Ingress Protection) rating that can withstand various weather conditions.
- Mounting options: Consider how you want to mount the camera. Some cameras come with different mounting options, such as wall mounts or ceiling mounts. Choose a camera that can be easily mounted in your desired location.
- Remote accessibility: If you want to access the camera remotely from your smartphone or computer, choose a camera that offers remote accessibility features. This will allow you to view live feeds and playback recordings from anywhere.
By considering these factors and choosing the right PoE security camera, you can ensure that you have the best camera for your specific needs and preferences.
Step 2: Prepare the necessary equipment
Before you can set up your PoE security camera, you will need to gather all the necessary equipment. Here are the items you will need:
- A PoE security camera
- A PoE switch or injector
- Network cables
- A power adapter (if your PoE switch or injector does not provide power)
- A computer or mobile device
- Access to your network router
Make sure you have these items on hand before proceeding with the installation. It is also a good idea to have a screwdriver and any other tools you may need to mount the camera in the chosen location.

Step 3: Install the PoE switch
After setting up your PoE security camera system, the next step is to install the PoE switch. The PoE switch is a device that allows you to connect and power multiple PoE cameras using a single Ethernet cable. Here is how you can install the PoE switch:
1. Choose the right location
Select a suitable location for your PoE switch. It should be near a power outlet and have enough space to accommodate all the cables and connections. Additionally, ensure that the location is well-ventilated to prevent overheating of the switch.
2. Connect the switch to power
Connect one end of the power cord to the PoE switch and the other end to a nearby power outlet. Make sure that the switch is receiving power by checking for any indicator lights or LEDs on the switch that indicate it is turned on.
3. Connect the switch to your network
Use an Ethernet cable to connect one of the LAN ports on the PoE switch to your network router or modem. This will allow the switch to access the internet and connect to your security camera system.
4. Connect the cameras to the switch
Using Ethernet cables, connect each PoE camera to one of the available PoE ports on the switch. Make sure that you securely plug in both ends of the cable to ensure a reliable connection.
5. Test the camera connections
Once all the cameras are connected to the switch, verify that they are receiving power and are properly connected to the network. You can do this by checking the indicator lights on the cameras and accessing the camera feed through your chosen monitoring software or app.
By following these steps, you can easily install the PoE switch for your security camera system and ensure that all the cameras are powered and connected to your network.
Step 4: Connect the PoE security camera to the switch
Once you have installed the PoE switch, it’s time to connect your PoE security cameras to it. Follow these steps to connect the camera:
Step 1: Locate the PoE port on the camera
Look for the Ethernet port on your PoE security camera labeled “PoE” or “LAN/PoE”. This is the port you will use to connect the camera to the PoE switch.
Step 2: Connect the Ethernet cable
Take one end of the Ethernet cable and plug it into the PoE port on the camera. Make sure it is securely connected.

Step 3: Connect the other end of the Ethernet cable to the switch
Take the other end of the Ethernet cable and plug it into any available PoE port on the PoE switch. Again, ensure it is securely connected.
Step 4: Repeat for additional cameras
If you have multiple PoE security cameras, repeat the above steps for each camera. Make sure to connect each camera to a separate PoE port on the switch.
Once you have connected all your cameras to the PoE switch, the cameras will start receiving power and data through the Ethernet cables. This eliminates the need for separate power cables for each camera, simplifying the installation process.
Now that your PoE security cameras are connected to the switch, you can proceed with configuring the cameras and the accompanying surveillance software to start monitoring your property.
| Important Tips: |
|---|
|
Step 5: Configure the camera settings
Once you have successfully connected your PoE security camera to your network, you will need to configure its settings to ensure optimal performance and functionality.
1. Access the camera’s configuration page
To configure your camera, you will need to access its configuration page. Open a web browser on your computer and enter the camera’s IP address. You can find the IP address in the camera’s user manual or by using a network scanning tool.
2. Login to the camera
Once you have accessed the configuration page, you will be prompted to log in. Enter the default username and password, which can also be found in the camera’s user manual. It is recommended to change the default login credentials for security purposes.
3. Adjust the camera settings
Once logged in, you will have access to the camera’s settings. Here are some important settings that you may need to configure:
- Resolution: Set the desired resolution for your camera. Higher resolutions provide better image quality but may require more bandwidth and storage space.
- Frame rate: Adjust the frame rate at which the camera captures video. Higher frame rates result in smoother video but may consume more bandwidth and storage.
- Recording mode: Choose the recording mode that suits your needs. You can select continuous recording, scheduled recording, or motion-based recording.
- Network settings: Configure the network settings of your camera, including the IP address, subnet mask, gateway, and DNS server. Ensure that the camera is connected to the correct network.
- Security settings: Set up password protection, enable encryption, and configure other security features to safeguard your camera against unauthorized access.
4. Save your changes
After configuring the desired settings, make sure to save your changes. Look for a “Save” or “Apply” button on the configuration page and click it to apply the settings to the camera. The camera will then restart with the new settings.
By properly configuring your PoE security camera’s settings, you can ensure that it captures high-quality video, operates efficiently, and meets your specific surveillance requirements.

Step 6: Test the camera and adjust its position
Once you have successfully connected your PoE security camera to the network and configured its settings, it’s time to test the camera and adjust its position for optimal coverage. Follow these steps to ensure that your camera is functioning properly:
- Access the camera’s live view through the associated software or app.
- Verify that you can see a clear and crisp image from the camera.
- Check for any signs of interference or obstructions that might be affecting the camera’s view.
- Move the camera to different positions to test its coverage and ensure that it captures the desired area.
- Adjust the camera’s angle and focus to minimize blind spots and optimize the image quality.
- Test the camera’s features, such as motion detection or night vision, to ensure they are working correctly.
- Monitor the camera for some time to ensure that it is stable and there are no issues with the feed.
| No image or poor image quality | Check the camera’s connections and make sure that they are secure. Adjust the camera’s focus or settings if necessary. |
| Interference or blurry images | Remove any potential sources of interference like nearby objects or lights. Clean the camera lens if it appears dirty or smudged. |
| Camera not capturing desired area | Reposition the camera or consider installing additional cameras to cover the necessary areas. |
| Camera offline or disconnecting frequently | Check the Ethernet cable and PoE switch connections. Restart the camera and ensure that it has a stable network connection. |
By thoroughly testing and adjusting the camera’s position, you can ensure that your PoE security camera system provides optimal surveillance coverage and meets your specific requirements.
FAQ,
What is a PoE security camera?
A PoE security camera is a type of surveillance camera that can be powered and connected to a network using a single Ethernet cable. It eliminates the need for a separate power supply and allows for easy installation and setup.
What are the advantages of using PoE security cameras?
PoE security cameras offer several advantages. They simplify the installation process as only one cable is required for both power and data transmission. They are also more reliable as they have a dedicated power source instead of relying on batteries or external power supplies. Additionally, PoE security cameras can be easily integrated and managed within a network infrastructure.


