
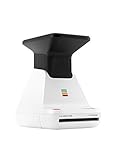
Thinking of getting a Polaroid digital camera? Excited to capture and share instant memories? Setting up your new camera is an essential first step to ensure that you are ready to start shooting in no time.
In this guide, we will walk you through the step-by-step process of setting up your Polaroid digital camera. From charging the battery to formatting the memory card, we will cover all the necessary tasks to get your camera up and running.
Before you begin, make sure you have all the necessary components. Your Polaroid digital camera should come with a battery charger, a USB cable, and a memory card. You will also need a computer or a compatible device to connect your camera to for transferring and viewing photos.
The first step is to charge the battery. Connect the battery charger to a power source, and then attach the other end of the charger to the camera. Allow the battery to charge fully, as indicated by the charging light. Depending on the model, this may take a few hours.
Once the battery is charged, you can insert the memory card into your camera. Locate the memory card slot, usually on the side or bottom of the camera, and gently insert the memory card until it clicks into place. Ensure that the card is facing the correct way, as indicated by the arrows on the card and the camera.
Introductory facts about Polaroid digital cameras
Polaroid digital cameras have become increasingly popular in recent years, offering users the ability to capture and print instant photos. These cameras combine the nostalgic charm of classic Polaroid cameras with the convenience and technology of digital photography.
Instant Printing
One of the primary features of Polaroid digital cameras is their ability to instantly print photos. With traditional digital cameras, users must transfer images to a computer and then print them using a separate printer. With a Polaroid digital camera, however, users can capture a photo and have a print in their hands within seconds. This makes it perfect for capturing and sharing memories on the spot, without the need for additional equipment or waiting times.
Integrated Digital Technology
Unlike classic Polaroid cameras that used film, Polaroid digital cameras utilize modern digital technology. These cameras feature built-in digital sensors, allowing users to preview and review photos on an LCD screen before choosing to print them. This enables users to easily adjust settings, retake photos if necessary, and ensure that they capture the perfect shot.
Additionally, many Polaroid digital cameras offer a range of creative features such as filters, frames, and editing options, allowing users to add unique touches to their photos before printing.
| Advantages | Disadvantages |
|---|---|
|
|
Overall, Polaroid digital cameras offer a unique blend of instant photography and digital technology, making them a popular choice for those seeking a fun and convenient way to capture and share memories.

Unboxing and Initial Set Up
Welcome to the world of instant photography with your new Polaroid digital camera! In this guide, we will walk you through the process of unboxing your camera and setting it up for the first time.
Step 1: Unboxing
Start by carefully opening the box and removing all the contents. Check that you have the following items:
- • Polaroid digital camera
- • USB cable
- • Rechargeable batteries
- • User manual
Inspect the camera for any physical damage or missing accessories. If everything looks good, proceed to the next step.
Step 2: Battery Installation
Take the rechargeable batteries and insert them into the battery compartment on the camera. Make sure to follow the correct polarity indicated inside the compartment.
Note: If your camera uses disposable batteries, skip this step and insert the batteries according to the polarity indicated.

Step 3: Charging the Camera
Connect one end of the USB cable to the camera and the other end to a computer or a USB wall adapter. The camera will start charging automatically. Allow the camera to charge fully before moving on to the next step.
Step 4: Power On and Initial Setup
Once the camera is fully charged, press and hold the power button on the camera to turn it on. Follow the on-screen prompts to select your language, date, and time settings.
Congratulations! You have successfully unboxed and set up your new Polaroid digital camera. Now you are ready to capture and enjoy instant memories!
Installing batteries and memory card
Before you start using your Polaroid digital camera, you need to install the batteries and memory card. Here are the steps to follow:
-
Open the battery compartment located on the bottom of the camera.
-
Insert the batteries into the compartment according to the polarity markings.
-
Close the battery compartment securely.
-
Locate the memory card slot on the side or bottom of the camera.
-
Remove the memory card from its packaging.
-
Insert the memory card into the slot with the label facing the front of the camera.
-
Push the memory card gently until it clicks into place.
Once the batteries and memory card are installed, you are ready to start using your Polaroid digital camera. Make sure to check the camera manual for any additional instructions specific to your model.

Powering on and adjusting settings
Setting up your Polaroid digital camera is a simple process that starts with powering it on and adjusting the settings to suit your preferences and shooting conditions.
Powering on the camera
To turn on your Polaroid digital camera, locate the power button usually located on the top or side of the camera. Press and hold the power button until the camera’s LCD screen illuminates. Once the screen is on, you are ready to start using your camera.
Adjusting camera settings
Before taking photos, it’s important to adjust the camera settings to ensure you capture the best possible images. Most Polaroid digital cameras have a menu button or icon that allows you to access the settings menu.
Press the menu button to access the settings menu. You can navigate through the menu using the arrow keys or the scroll wheel, depending on your camera model. Look for options such as resolution, ISO, white balance, and exposure. Adjust these settings according to your preferences and shooting conditions.
For example, you can set the resolution to a higher value for better image quality, adjust the ISO to control the camera’s sensitivity to light, set the white balance to match the lighting conditions, and adjust the exposure for brighter or darker images.

Once you have made the necessary adjustments, exit the settings menu to return to the camera’s main screen. You are now ready to start capturing photos with your Polaroid digital camera.
Understanding camera modes and shooting options
Before you start using your polaroid digital camera, it’s important to understand the different camera modes and shooting options it offers. By familiarizing yourself with these features, you’ll be able to capture beautiful photos in various settings.
| Camera Mode | Description |
|---|---|
| Auto Mode | This mode automatically adjusts the camera settings for optimal exposure and focus. It’s recommended for beginners or when you want the camera to handle all the technical details. |
| Program Mode | In this mode, you have more control over the camera settings like ISO, shutter speed, and aperture. It allows you to experiment with different combinations to achieve the desired effect. |
| Aperture Priority Mode | This mode allows you to control the camera’s aperture setting while the camera determines the appropriate shutter speed. It’s ideal for controlling depth of field and creating a blurred background. |
| Shutter Priority Mode | In this mode, you can set the desired shutter speed while the camera adjusts the aperture accordingly. It’s useful for freezing action or creating motion blur in your photos. |
| Manual Mode | In manual mode, you have complete control over the camera settings. It requires a good understanding of exposure, as you’ll need to adjust both the shutter speed and aperture manually. |
In addition to the camera modes, your polaroid digital camera may offer various shooting options such as:
- Scene Modes: These are pre-set modes designed for specific shooting scenarios, such as landscape, portrait, night, or sports. They automatically adjust the camera settings to optimize the results.
- White Balance: This setting helps you control the color temperature of your photos. You can choose from options like sunlight, cloudy, fluorescent, or custom to ensure accurate colors in different lighting conditions.
- Exposure Compensation: If you find that your photos are too bright or too dark, you can use exposure compensation to adjust the exposure level. This allows you to override the camera’s automatic exposure settings.
- ISO Sensitivity: ISO determines the camera’s sensitivity to light. Higher ISO values are suitable for low-light conditions, but they may introduce noise or graininess in the photos. Lower ISO values are ideal for well-lit environments.
By exploring and experimenting with different camera modes and shooting options, you’ll be able to enhance your photography skills and capture stunning images with your polaroid digital camera.
Taking your first photo with a Polaroid digital camera
Once you have successfully set up your Polaroid digital camera, it’s time to take your first photo! Here is a step-by-step guide to help you capture your very first digital Polaroid moment.
Step 1: Turn on the camera by pressing the power button. Wait for the camera to power up and make sure it is ready to take photos.
| Step 2: |
|
| Step 3: |
Once the photo is taken, you will see it displayed on the LCD screen or through the viewfinder. Take a moment to review your photo and make sure it captures the moment as you intended. |
| Step 4: |
If you are satisfied with the photo, you can save it by pressing the save button or following the on-screen prompts. If you are not happy with the photo, you can delete it and retake it by following the camera’s menu options. |
Congratulations! You have successfully taken your first photo with your Polaroid digital camera. Now, you can continue capturing more moments and experimenting with different settings to enhance your photography skills.
Reviewing and deleting photos
Once you have taken some photos with your Polaroid digital camera, it’s time to review and delete any unwanted pictures. Follow these steps to easily manage your photo collection:

- Turn on your camera and navigate to the gallery or review mode. This will allow you to see all the photos you have taken.
- Use the arrow buttons or touchscreen (if equipped) to browse through the photos one by one. Take your time to review each picture.
- If you come across a photo that you don’t like or want to delete, select the photo and look for the delete option. It is usually represented by a trash bin icon or a dedicated delete button.
- Confirm the deletion when prompted. Some cameras may ask for a confirmation to ensure that you don’t accidentally delete a photo.
- Repeat steps 2-4 until you have reviewed and deleted all the unwanted photos.
Note: Be careful when deleting photos, as this action is usually irreversible. Make sure you have a backup of important pictures before deleting them.
Deleting unnecessary photos will free up space on your camera’s memory card or internal storage, allowing you to capture more memorable moments without interruption. By regularly reviewing and deleting photos, you can keep your Polaroid digital camera organized and ready for new adventures.
Transferring photos to a computer or mobile device
Once you have captured some amazing moments with your Polaroid digital camera, you may want to transfer them to your computer or mobile device for easy viewing and sharing. Transferring photos is a straightforward process that can be done using a USB cable or by connecting your camera wirelessly.
Using a USB cable
To transfer photos using a USB cable, follow these steps:
- Connect one end of the USB cable to your camera and the other end to a USB port on your computer or laptop.
- Turn on your camera and set it to the “Transfer” or “USB” mode, usually found in the camera settings menu.
- On your computer, a notification may appear indicating that a new device has been connected. If prompted, select the option to open the device or access its files.
- Navigate to the folder on your camera that contains the photos you want to transfer.
- Drag and drop the selected photos onto a folder on your computer to begin the transfer. Alternatively, you can copy and paste the files.
- Once the transfer is complete, safely disconnect your camera from the computer by clicking on the “Eject” or “Safely Remove Hardware” icon in the system tray.
Wireless transfer
If your Polaroid digital camera supports wireless transfer, you can use this method for a more convenient way of transferring photos. Here’s how:
- Make sure both your camera and the device you want to transfer the photos to are connected to the same Wi-Fi network.
- On your camera, navigate to the settings menu and enable the Wi-Fi or wireless transfer function.
- On your computer or mobile device, open a web browser and enter the provided IP address or scan the QR code displayed on your camera’s screen.
- Once connected, you should see a list of available photos on your camera’s memory.
- Select the photos you want to transfer and choose the destination folder on your computer or mobile device.
- Click on the “Transfer” button to start the wireless transfer process.
- Wait for the transfer to complete, and then disconnect your camera from the Wi-Fi network.
By following these steps, you will be able to easily transfer your photos from your Polaroid digital camera to your computer or mobile device. Enjoy sharing your captured memories with friends and family!
Editing and enhancing photos with software or apps
After capturing photos with your Polaroid digital camera, you may want to edit and enhance them using software or apps. This can help you adjust the brightness, contrast, and other settings, as well as add filters and effects to give your photos a unique look.
There are several popular software programs and apps available for editing photos, both free and paid. Some popular options include Adobe Photoshop, Lightroom, and GIMP. These software programs offer a wide range of editing tools and features, allowing you to make precise adjustments to your photos.
If you’re looking for a more user-friendly and beginner-friendly option, there are also many photo editing apps available for smartphones. Some popular apps include Snapseed, VSCO, and Adobe Lightroom Mobile. These apps offer a simplified interface and a variety of filters and effects that you can easily apply to your photos.
When editing your photos, it’s important to remember that less is often more. It can be tempting to go overboard with filters and effects, but sometimes a subtle adjustment is all you need to enhance your photos. Experiment with different editing techniques and settings to find the style that suits your photos best.
Additionally, it’s a good idea to keep the original copies of your photos before making any edits. This way, you can always go back to the original if you’re not satisfied with the edited version. Many software programs and apps offer non-destructive editing features, allowing you to make changes without permanently altering the original photo.
Overall, editing and enhancing your photos can be a fun and creative process. It allows you to bring out the best in your shots and add your own personal touch. Whether you choose professional software or user-friendly apps, there are plenty of options available to help you achieve the desired look for your Polaroid digital camera photos.
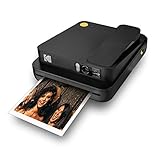
Printing and sharing polaroid digital photos
One of the unique features of a polaroid digital camera is the ability to instantly print your photos. Once you have captured a picture, you can print it directly from the camera without the need for any external devices or connections.
To print a photo, simply navigate to the photo you want to print on the camera’s LCD screen. Once you have selected the desired photo, look for the print icon or option in the camera’s menu. Press the print button, and the camera will start printing the photo onto a polaroid-style instant film.
It’s important to note that polaroid instant film is different from traditional photo printing paper. The film contains all the necessary chemicals to develop the photo, so there is no need for any additional equipment or processing. The photo will gradually appear on the film, and it will be fully developed within a few minutes.
Sharing your photos
In addition to printing your photos, polaroid digital cameras also offer various options for sharing your pictures. One common method is transferring the photos to a computer or smartphone via USB connection or wireless technology.
Once the photos are on your computer or smartphone, you can easily share them through email, social media platforms, or messaging apps. This allows you to instantly send your polaroid digital photos to friends and family or post them on your favorite social media accounts.
Another fun way to share your polaroid digital photos is by creating physical photo albums or scrapbooks. You can print multiple copies of your photos and arrange them in a personalized album or scrapbook to cherish and share with others.
Lastly, some polaroid digital cameras even allow you to share your photos directly from the camera itself. These cameras often have built-in Wi-Fi or Bluetooth capabilities, enabling you to connect to a smartphone or tablet and share your photos instantly.
Overall, the printing and sharing features of polaroid digital cameras add a unique and convenient aspect to capturing and sharing memories. Whether you choose to print your photos right from the camera or share them digitally, you can enjoy the instant gratification of polaroid-style photography in the digital age.
Troubleshooting common issues and tips for maintenance
Even though Polaroid digital cameras are designed to be user-friendly, there can still be some common issues that you may encounter. This section will provide you with troubleshooting tips and maintenance advice to keep your camera in optimal condition.
Camera not turning on
If your Polaroid digital camera is not turning on, there are a few things you can try:
- Check if the battery is fully charged. If not, connect your camera to the charger and wait until it reaches a full charge before trying again.
- Make sure the battery is inserted correctly and the battery compartment is securely closed.
- Try removing and reinserting the memory card.
- If none of the above steps work, consult the user manual or contact Polaroid customer support for further assistance.
Blurry or out-of-focus images
If you are experiencing blurry or out-of-focus images, here are a few things you can do to improve the quality of your photos:
- Make sure the lens is clean. Use a microfiber cloth to gently clean the lens surface.
- Check if the camera settings are appropriate for the shooting conditions. Adjust the focus mode or use the autofocus feature.
- Ensure proper lighting conditions. If the lighting is too dim or uneven, use the camera’s flash or find a well-lit area.
- Keep the camera steady while taking photos. Consider using a tripod or stabilizing the camera against a solid surface.
Regular maintenance can also prolong the lifespan of your Polaroid digital camera. Here are some tips:
| Tips for maintenance |
|---|
| Keep your camera in a protective case when not in use to prevent dust and scratches. |
| Regularly clean the camera body and lens using a soft cloth or brush. |
| Avoid exposing your camera to extreme temperatures or humidity. |
| Store your camera and accessories in a dry and safe place when not in use. |
| Keep the battery contacts clean and free from dust or debris. |
Following these troubleshooting tips and maintenance advice will help you resolve common issues and ensure the longevity of your Polaroid digital camera.
Question-answer:
What is a polaroid digital camera?
A polaroid digital camera is a type of camera that combines the instant printing capabilities of a traditional polaroid camera with the convenience and functionality of a digital camera. It allows you to take photos and instantly print them out without the need for additional equipment.
What type of batteries does a polaroid digital camera use?
A polaroid digital camera usually uses AA batteries. However, the specific battery type may vary depending on the model of the camera. It is always recommended to check the camera’s instruction manual for the correct battery specifications.
Can I print the photos taken with a polaroid digital camera on a printer?
Yes, you can print the photos taken with a polaroid digital camera on a printer. Most polaroid digital cameras have the option to transfer the photos to a computer or a smart device via a USB cable or Bluetooth. Once the photos are on the computer or smart device, you can use a printer to print them just like any other digital photos.
Are polaroid digital cameras suitable for professional photography?
Polaroid digital cameras are more commonly used for casual or instant photography rather than professional photography. While they offer convenience and fun with instant printing, they may not have the advanced features and capabilities required for professional photography, such as interchangeable lenses and manual settings. However, there are some polaroid digital camera models that offer more advanced features and can be used for professional purposes to some extent.


