
In today’s world, security is a top priority for individuals and businesses alike. Whether you want to monitor your home while you’re away or keep an eye on your business premises, setting up a series of security cameras is a smart and effective solution. With the advancement of technology, it has become easier than ever to install, configure, and manage security cameras on your own.
Before you begin the process of setting up your security camera system, it’s crucial to have a well-thought-out plan. Start by assessing the areas you want to cover and identify the specific security needs for each location. Think about factors such as lighting conditions, accessibility, and potential blind spots. This planning stage will help you determine the number and type of cameras you need, as well as their optimal placement.
When it comes to choosing security cameras, there are numerous options available in the market. Factors to consider include image resolution, field of view, night vision capabilities, and connectivity options. It’s also important to choose cameras that are suitable for both indoor and outdoor use, depending on the areas you want to monitor. Additionally, consider whether you need cameras with built-in motion detection or audio capabilities.
Once you have selected your cameras, the next step is to set up the system. This involves mounting the cameras in the desired locations, ensuring they have a clear line of sight and are protected from the weather. Running cables or setting up a wireless configuration is another aspect to consider. Make sure to carefully read the manufacturer’s instructions and follow them step by step, as each camera model may have slightly different setup requirements.
After installing the cameras, you will need to configure them for optimal performance. This includes connecting them to your network, setting up remote access capabilities, and adjusting camera settings such as resolution, motion detection sensitivity, and recording preferences. It’s also advisable to set up a secure password for accessing the camera system to protect your privacy and prevent unauthorized access.

Setting up a series of security cameras may seem like a daunting task at first, but with proper planning and careful execution, it can be a straightforward process. By taking the time to assess your security needs, choosing the right cameras, and following the installation and configuration steps, you can ensure that your property is well-protected and provide yourself with peace of mind.
Understanding the Basics of Security Cameras
Security cameras play a crucial role in maintaining safety and surveillance in various settings. Whether it’s for residential or commercial purposes, understanding the basics of security cameras is essential for effective installation and operation.
Types of Security Cameras
There are different types of security cameras available in the market, each designed for specific use cases:
- Indoor Cameras: These cameras are specifically designed for indoor surveillance and are ideal for monitoring activities inside homes, offices, or retail stores.
- Outdoor Cameras: As the name suggests, outdoor cameras are built to withstand outdoor conditions like rain, snow, and extreme temperatures. They are commonly used for monitoring entrances, parking lots, and other outdoor areas.
- Wireless Cameras: Wireless cameras use Wi-Fi or other wireless technologies to transmit video signals, eliminating the need for messy cables. These cameras offer flexibility in terms of installation locations.
- PTZ Cameras: PTZ (pan-tilt-zoom) cameras can be remotely controlled to pan, tilt, and zoom in on specific areas. These cameras are often used in large surveillance systems where operators need to monitor a wide range of areas.
Key Features and Considerations
When selecting security cameras for your setup, there are a few key features and considerations to keep in mind:
- Resolution: The resolution determines the clarity and level of detail captured by the camera. Higher resolutions, such as 1080p or 4K, provide better image quality.
- Night Vision: Cameras with night vision capabilities use infrared LEDs to capture clear images in low-light or no-light conditions.
- Field of View: The field of view refers to the area that the camera can capture. Cameras with wide-angle lenses offer a larger field of view, allowing for monitoring of larger areas.
- Storage: Consider the storage options for the recorded footage. Some cameras have built-in storage, while others require external storage devices or cloud-based solutions.
- Remote Access: Cameras that offer remote access capabilities allow you to monitor and control the cameras from anywhere using a smartphone or computer.
By understanding the different types of security cameras and considering the key features, you can make an informed decision when setting up your series of security cameras.

Choosing the Right Cameras for Your Needs
When it comes to setting up a series of security cameras, choosing the right cameras for your needs is crucial. There are several factors to consider before making your final decision.
1. Resolution: The resolution of a camera determines the level of detail that the camera can capture. It is important to choose cameras with high resolutions for clearer images and better identification of objects or people.
2. Field of View: The field of view is the area that the camera can capture. Depending on your specific needs, you may require cameras with a wide field of view to cover a larger area or cameras with a narrow field of view for more focused monitoring.
3. Night Vision: If you need surveillance in low-light conditions or during nighttime, selecting cameras with night vision capabilities is essential. These cameras use infrared technology to capture images even in complete darkness.
4. Connectivity: Consider how you want to connect your cameras to your surveillance system. You can choose between wired cameras, which require physical cables for connection, or wireless cameras, which connect through Wi-Fi or other wireless networks.

5. Weather Resistance: If you plan to install cameras outdoors, it is important to choose cameras that are weather resistant. They should be able to withstand harsh weather conditions such as rain, snow, and extreme temperatures.
6. Storage Options: Determine how you want to store the footage captured by your cameras. You can choose cameras with built-in storage, cameras that save footage to a local device, or cameras that upload footage to the cloud for remote access.
7. Budget: Lastly, consider your budget when choosing security cameras. Set a budget and look for cameras that offer the features you need within your price range. Remember that investing in high-quality cameras is important for reliable and effective security surveillance.
By considering these factors and doing thorough research, you can choose the right cameras that meet your specific security needs and provide you with peace of mind.
Setting Up Your Security Camera System
Installing a security camera system can provide you with peace of mind and added protection for your home or business. Follow these steps to set up your security camera system:

- Plan the camera placement: Determine the areas you want to monitor and identify the best positions for your cameras. Consider the field of view, lighting conditions, and potential blind spots.
- Choose the right cameras: Select cameras that meet your specific needs, such as indoor or outdoor use, resolution, and night vision capabilities. Decide between wired or wireless cameras based on your preference and available infrastructure.
- Install the cameras: Mount the cameras securely using the appropriate equipment for the location. Follow the manufacturer’s instructions for each camera model.
- Set up the DVR/NVR: If your security camera system includes a digital video recorder (DVR) or network video recorder (NVR), connect it to your cameras and follow the setup instructions to configure recording settings.
- Connect to power and network: Ensure the cameras have a stable power source and connect them to a network for remote access. Use Ethernet cables or a Wi-Fi connection depending on your camera type.
- Configure camera settings: Access the camera’s settings through a web interface or mobile app and customize preferences such as motion detection, scheduled recording, and alerts.
- Test the system: Verify that all cameras are functioning properly and capturing clear footage. Adjust camera angles and settings as needed.
- Secure your system: Change default passwords, enable encryption, and apply necessary firmware updates to protect your security camera system from unauthorized access.
- Set up remote access: If desired, configure remote access to view your camera feeds from anywhere using a smartphone, tablet, or computer. Follow the manufacturer’s instructions for remote viewing setup.
- Maintain and monitor: Regularly check your cameras, clean lenses, ensure proper storage capacity on your DVR/NVR, and monitor camera feeds for any suspicious activity.
By following these steps, you can successfully set up your security camera system and enhance the safety and security of your property.
Installing Outdoor Security Cameras
When it comes to setting up a series of security cameras to protect your outdoor space, proper installation is crucial. Here are some steps to guide you through the process:
1. Determine the Camera Locations
Start by assessing your property and identifying the areas that require surveillance. Consider entrances, windows, driveways, and other vulnerable spots. Once you have determined the locations, create a plan for camera placement.
2. Choose the Right Cameras
Ensure that the cameras you select are suitable for outdoor use and designed to withstand the elements. Look for features like weatherproofing, infrared night vision, and motion detection capabilities.
3. Mount the Cameras
Install the mounting brackets securely to the chosen locations. Make sure they are level and provide a clear view of the intended area. Use screws or other appropriate hardware to attach the brackets to walls, poles, or other surfaces.
4. Connect the Cameras
Run the necessary cables from each camera to a central location where you plan to house the recording device. Use conduits or cable clips to secure the cables and protect them from the elements.
5. Set Up the Recording Device
Connect the cameras to the recording device or surveillance system. Make sure all cables are properly connected and the system is powered on. Follow the manufacturer’s instructions to set up the necessary settings and configurations.
6. Test the System
After the installation, test each camera to ensure it is capturing the desired area. Check the video feed, adjust the camera angles if necessary, and verify that the recording device is functioning properly.
By following these steps, you can effectively install outdoor security cameras and enhance the security of your property. Remember to regularly maintain and check your cameras to ensure optimal performance.
Positioning Indoor Security Cameras
Setting up indoor security cameras properly can greatly enhance the effectiveness of your home security system. By strategically positioning your cameras, you can maximize their coverage and ensure that all important areas are monitored. Here are some tips on how to position indoor security cameras:

- Identify high-risk areas: Start by identifying the high-risk areas in your home, such as entry points, main hallways, and valuable possessions. These areas should be given priority when positioning your cameras.
- Mount cameras at eye level: Position the cameras at eye level, as this will provide the best angle for capturing faces and important details. Mounting the cameras too high or too low can result in ineffective footage.
- Angle the cameras towards entry points: It is recommended to angle the cameras towards the entry points of your home, such as doors and windows. This will capture any potential intruders as they attempt to enter your property.
- Cover blind spots: Take note of any blind spots in your home where the cameras might not have a clear view. Consider adding additional cameras or adjusting the position of existing ones to eliminate these blind spots.
- Install cameras in common areas: If you have common areas in your home where family members spend a lot of time, such as the living room or kitchen, consider installing cameras in these areas. This will help monitor activities and ensure the safety of your loved ones.
- Secure cameras discreetly: While it is important to position cameras in visible locations to serve as a deterrent, it is also recommended to secure them discreetly. This can be done by hiding the cameras in inconspicuous locations or using cameras with a smaller design.
By following these tips, you can ensure that your indoor security cameras are positioned correctly to provide optimal coverage and enhance the security of your home.
Connecting Your Security Cameras to a Network
Setting up a series of security cameras in your home or office is an important step towards maintaining safety and security. However, in order to effectively monitor and manage these cameras, you need to connect them to a network. This allows you to access and control the cameras remotely from your computer or smartphone.
1. Choose a Network
The first step in connecting your security cameras to a network is to choose the network you want to use. You can connect your cameras to your home or office Wi-Fi network, or you can use a dedicated network specifically for your security system. Using a dedicated network can provide better security and reliability, as it won’t be affected by other devices or network congestion.
2. Connect the Cameras

Once you have chosen a network, you need to physically connect your security cameras to the network. Most modern security cameras have an Ethernet port that allows you to connect them directly to your router or network switch using an Ethernet cable. Simply plug one end of the cable into the camera’s Ethernet port and the other end into an available port on your router or switch.
3. Configure the Cameras
After connecting the cameras to the network, you need to configure them to work with your network. This usually involves accessing the camera’s settings through a web interface or mobile app and entering the network information such as the Wi-Fi network name (SSID) and password. Some cameras also have a built-in IP address that you may need to configure.
4. Test and Monitor
Once the cameras are connected and configured, it’s important to test them to ensure they are functioning properly. You can do this by accessing the camera’s live feed from your computer or smartphone and checking for clear and stable video. Additionally, you should set up monitoring software or apps to receive notifications and alerts in case of any security breaches or suspicious activity.
Conclusion
Connecting your security cameras to a network is essential for effective monitoring and management. By choosing the right network, connecting the cameras correctly, configuring them properly, and regularly testing them, you can ensure that your security system is working efficiently to keep your property safe.
Configuring Security Camera Settings
Configuring the settings of your security cameras is an important step in setting up a reliable surveillance system. These settings allow you to customize the behavior and performance of your cameras to suit your specific needs. Here are some key settings that you should consider:
1. Resolution
The resolution of your security cameras determines the level of detail captured in the video footage. Higher resolutions result in clearer images but require more storage space. You can choose from various resolution options, such as 720p, 1080p, or even higher.
2. Frame Rate
The frame rate refers to the number of frames captured per second by your security cameras. A higher frame rate provides smoother video playback, but it also requires more storage space. Depending on your requirements, you can choose a frame rate ranging from 15 to 30 frames per second.
3. Motion Detection
Enabling motion detection on your security cameras can help conserve storage space by only recording when movement is detected. You can adjust the sensitivity level of the motion detection feature to minimize false alarms and ensure accurate detection.
4. Field of View
The field of view determines how much area your security camera can cover. You can choose between wide-angle lenses for broad coverage or zoom lenses for more focused views. Keep in mind the specific areas you want to monitor and adjust the field of view accordingly.
5. Night Vision
If you need surveillance in low-light or nighttime conditions, make sure your security cameras have infrared (IR) capabilities for night vision. Adjust the sensitivity and range of the night vision feature to ensure optimal visibility in dark environments.
These are just a few of the many settings you can configure on your security cameras. It’s important to read the user manual or consult the manufacturer’s guidelines to fully understand and optimize all available settings for your specific camera model. By configuring these settings effectively, you can enhance the performance and functionality of your security camera system.
Monitoring Your Security Cameras
Once your series of security cameras is set up and properly installed, it is important to establish a monitoring system that allows you to keep an eye on your property at all times. By effectively monitoring your security cameras, you can ensure that you are aware of any potential threats or incidents and take appropriate action if necessary.
1. Remote Access
One of the best ways to monitor your security cameras is through remote access. This means you can access the camera feed from anywhere using a smartphone, tablet, or computer. To set up remote access, you will need to configure the cameras and connect them to a network. Once connected, you can use the camera manufacturer’s app or software to view the camera feed in real-time, playback recorded footage, and adjust camera settings.
2. Video Management Software
Another option for monitoring your security cameras is to use video management software (VMS). VMS allows you to manage and monitor multiple cameras from a central location. With VMS, you can view live camera feeds, review recorded footage, and receive real-time notifications of any suspicious activity. Additionally, some VMS systems offer advanced features like motion detection, facial recognition, and the ability to integrate with other security systems.
When monitoring your security cameras, it is important to establish a schedule or routine to ensure thorough coverage. This includes checking the camera feeds regularly, reviewing any motion-triggered recordings, and addressing any issues or alerts promptly.
Monitoring your security cameras effectively can greatly enhance the security of your property and provide peace of mind. By utilizing remote access or video management software, you can stay connected and informed no matter where you are.
Ensuring the Security of Your Security Camera System
Setting up a series of security cameras in your home or business is an important step towards enhancing safety and surveillance. However, it is equally important to ensure the security of your security camera system itself, to prevent unauthorized access or tampering.
Here are some key measures you can take to secure your security camera system:
1. Strong and Unique Passwords
When setting up your security camera system, the default passwords provided by the manufacturer are often weak and easily guessed. Be sure to change these passwords promptly and choose strong, unique combinations that are difficult to crack. Avoid using common words, personal information, or consecutive numbers.
2. Regularly Update Firmware
Firmware updates are essential to fix vulnerabilities and security issues in your security camera system. Check for updates provided by the manufacturer regularly and make sure to install them promptly to keep your system up-to-date and secure.
3. Secure Network Connection
Ensure that your security camera system is connected to a secure and encrypted network. Use WPA2 encryption and a strong Wi-Fi password to prevent unauthorized access to your system. Avoid using public or unsecured networks for your security cameras.
4. Limit Access to Cameras
Monitor and control access to your security cameras. Restrict access to authorized individuals only. Create unique user accounts with secure passwords for each person who needs access. Avoid sharing passwords or granting unrestricted access to your security camera system.
5. Physical Security
Physically secure your security camera system by placing cameras out of reach or in tamper-resistant housing. Install cameras in areas where they are less likely to be tampered with or disabled. Consider using cameras with built-in alarms or tamper detection features.
6. Regular System Maintenance
Regularly check and maintain your security camera system to ensure optimal functionality and security. Check for signs of tampering, loose connections, or any suspicious activities. Update passwords periodically and review access logs to detect any unauthorized access attempts.
| Best Practices | Description |
|---|---|
| Strong and Unique Passwords | Choose passwords that are strong, unique, and difficult to guess. |
| Regularly Update Firmware | Install firmware updates provided by the manufacturer to fix vulnerabilities. |
| Secure Network Connection | Connect your security camera system to a secure and encrypted network. |
| Limit Access to Cameras | Restrict access to authorized individuals only and avoid sharing passwords. |
| Physical Security | Place cameras out of reach and install them in tamper-resistant housing. |
| Regular System Maintenance | Maintain your system regularly and check for any signs of tampering. |
FAQ,
What are the benefits of setting up a series of security cameras?
Setting up a series of security cameras can provide numerous benefits. Firstly, it helps deter potential criminals as the mere presence of cameras can act as a strong deterrent. Secondly, it allows for constant surveillance and monitoring of your property, ensuring that any unusual or suspicious activity can be detected and addressed promptly. Additionally, security cameras provide valuable evidence in the event of a crime, aiding in the identification and prosecution of perpetrators. Overall, installing a series of security cameras enhances the safety and security of your premises.
What equipment do I need to set up a series of security cameras?
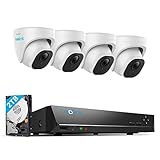
To set up a series of security cameras, you will need several essential pieces of equipment. Firstly, you will need the cameras themselves, which can be either wired or wireless. Secondly, you will need a central recording device, such as a Network Video Recorder (NVR) or a Digital Video Recorder (DVR), to store and manage the footage captured by the cameras. Additionally, you will need power cables or batteries to supply energy to the cameras, and network cables or Wi-Fi connections to connect them to the recording device. It is also recommended to have a monitor or a mobile device where you can view the live or recorded footage.
How many security cameras do I need to install?
The number of security cameras you need to install depends on several factors. Firstly, it depends on the size of the area you want to cover. Larger areas may require more cameras to ensure comprehensive surveillance. Secondly, it depends on the specific vulnerabilities and risks of your property. Areas with high-value assets or high crime rates may require more cameras for enhanced security. Thirdly, it depends on your budget and personal preferences. While a greater number of cameras can provide more comprehensive coverage, it also comes with higher costs. Ultimately, it is recommended to conduct a security assessment of your property and consult with a security professional to determine the optimal number of cameras for your specific needs.
Are wireless security cameras better than wired ones?
Both wireless and wired security cameras have their own advantages and disadvantages. Wireless cameras offer greater flexibility in terms of installation as they do not require extensive wiring and can be easily moved or repositioned. They also provide remote access to live or recorded footage, allowing you to monitor your property from anywhere via mobile devices or computers. On the other hand, wired cameras generally offer more reliable and stable connections, as they are directly connected to the recording device. They also do not rely on Wi-Fi signals, which can be vulnerable to interference. Ultimately, the choice between wireless and wired cameras depends on your specific needs and preferences.
How can I ensure the privacy and security of my security camera system?
To ensure the privacy and security of your security camera system, there are several measures you can take. Firstly, it is important to choose reputable and trusted brands for your cameras and recording devices. This helps minimize the risk of potential vulnerabilities or exploitations. Secondly, it is crucial to set strong and unique passwords for your cameras and recording devices, and regularly update them. This prevents unauthorized access to your system. Additionally, enabling encryption and two-factor authentication, if available, adds an extra layer of security. It is also recommended to regularly update the firmware of your cameras and recording devices to patch any security vulnerabilities. Finally, placing physical barriers or covers, such as placing cameras out of reach or using privacy filters, can help prevent tampering or unauthorized viewing of the footage.


