Raspberry Pi is a credit card-sized computer that can be used for a variety of purposes. One interesting project that you can undertake with your Raspberry Pi is turning it into a security camera using the Raspbian operating system. In this guide, we will walk you through the steps to set up your Raspberry Pi as a security camera using Raspbian.
Raspbian is the recommended operating system for Raspberry Pi. It is based on the popular Debian distribution and comes with a user-friendly interface. With Raspbian, you can easily install and configure the necessary software to turn your Raspberry Pi into a security camera.
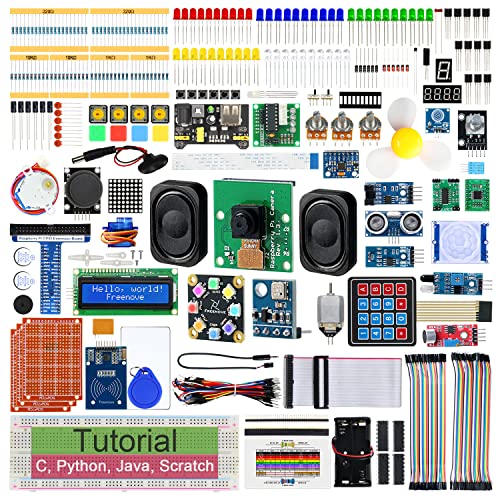
To start, you will need a few things: a Raspberry Pi board, a compatible camera module, an SD card, and a power supply. Once you have gathered all the necessary hardware, you can move on to the software setup.
First, you need to install Raspbian on your Raspberry Pi. You can download the latest version of Raspbian from the official Raspberry Pi website. Once you have downloaded the Raspbian image, you can use Etcher or another software to flash the image onto the SD card. Insert the SD card into your Raspberry Pi and power it on.
What is a Raspberry Pi?
A Raspberry Pi is a credit-card sized computer that was developed in the UK by the Raspberry Pi Foundation. It is a versatile device that can be used for a wide range of projects, including but not limited to being a security camera.
The Raspberry Pi runs on an operating system called Raspbian, which is a version of the Linux operating system specifically designed for the Raspberry Pi. Raspbian provides a user-friendly interface and a host of useful tools and applications.
One of the key features of the Raspberry Pi is its GPIO (General Purpose Input/Output) pins. These pins allow the Raspberry Pi to interact with the outside world, enabling it to control external devices and sensors.
With its small form factor and low power consumption, the Raspberry Pi is an ideal choice for creating a security camera. By connecting a camera module to the Raspberry Pi and using the appropriate software, you can set up a cost-effective and customizable security system.
Whether you are a beginner or an experienced developer, the Raspberry Pi offers endless possibilities for experimentation and learning. From building robots to creating media centers, the Raspberry Pi is a powerful tool that has revolutionized the world of computing.
In conclusion, the Raspberry Pi is a small but mighty computer that can be used for a variety of projects, including setting up a security camera system. Its affordability, versatility, and user-friendly interface make it an excellent choice for both beginners and experienced users alike.

What is Raspbian?
Raspbian is a free operating system based on the Linux kernel specially designed for Raspberry Pi single-board computers. It is the recommended operating system for beginners due to its user-friendly interface and extensive community support. Raspbian provides a desktop environment similar to that of other popular operating systems, making it easy to navigate and use.
One of the main advantages of Raspbian is its compatibility with a wide range of software and applications. Users can easily install and run various programs, including security camera software, on their Raspberry Pi devices. Raspbian also includes pre-installed software such as the Chromium web browser and the LibreOffice office suite, providing additional functionality to users.
Features of Raspbian:
Raspbian offers several features that make it an ideal choice for setting up a security camera using Raspberry Pi:
- Performance: Raspbian is optimized for the Raspberry Pi hardware, ensuring efficient performance even with resource-intensive tasks.
- Security: Raspbian includes security features such as a firewall and automatic system updates to protect against vulnerabilities and keep your system secure.
- Community Support: Raspbian has a large and active community of users and developers who provide support and resources for troubleshooting and expanding the capabilities of your Raspberry Pi.
- Compatibility: Raspbian is compatible with a wide range of hardware and peripherals, making it easy to integrate with your security camera setup.
Overall, Raspbian offers a reliable and user-friendly platform for setting up a security camera system using Raspberry Pi, making it an excellent choice for both beginner and advanced users.
Getting Started
Setting up a Raspberry Pi as a security camera using Raspbian is a straightforward process that requires a few steps. Follow the steps below to get started:

- First, make sure you have a Raspberry Pi and a compatible camera module.
- Download the latest version of Raspbian from the official website and flash it onto an SD card using a tool like Etcher.
- Insert the SD card into your Raspberry Pi and connect it to a power source.
- After booting up, open the Raspberry Pi configuration tool by typing
sudo raspi-configin the terminal. - Expand the file system to utilize the full capacity of your SD card.
- Enable the camera interface by going to “Interfacing Options” and selecting “Camera”.
- Exit the configuration tool and reboot your Raspberry Pi.
- Install the required packages by running the following commands in the terminal:
sudo apt updatesudo apt install python3-picamerasudo apt install motion
- Configure the motion software by editing the
/etc/motion/motion.conffile. Set the appropriate values for resolution, frame rate, and other settings. - Start the motion service by running
sudo service motion startin the terminal. - Access the live stream from your security camera by opening a web browser and entering the IP address of your Raspberry Pi followed by the port number (default is 8081).
Once you have completed these steps, your Raspberry Pi security camera setup should be up and running. You can further customize the setup by exploring the motion software’s documentation and configuring additional features.
Installing Raspbian on Raspberry Pi
To set up your Raspberry Pi as a security camera, you’ll need to install Raspbian, the operating system designed specifically for the Raspberry Pi. Follow the steps below to install Raspbian:
1. Download the latest version of Raspbian from the official Raspberry Pi website: https://www.raspberrypi.org/downloads/raspbian/.
2. Insert a microSD card into your computer. Make sure it has at least 8GB of storage capacity.
3. Use an SD card formatter tool, such as SD Formatter or Etcher, to format the microSD card.
4. Open the Etcher application and select the Raspbian image you downloaded in step 1.
5. Choose the microSD card you inserted in step 2 as the target drive.
6. Click on the “Flash” button to start the flashing process. This may take a few minutes.
7. Once the flashing process is complete, insert the microSD card into your Raspberry Pi.
8. Connect the Raspberry Pi to a power source and wait for it to boot up.

9. Follow the on-screen instructions to set up Raspbian on your Raspberry Pi.
Congratulations! You’ve successfully installed Raspbian on your Raspberry Pi. Now, you’re ready to proceed with setting up your Pi as a security camera.
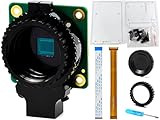
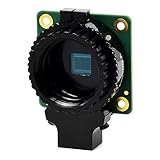
Connecting the Camera Module
The first step in setting up your Raspberry Pi as a security camera is to connect the Camera Module.
To do this, locate the CSI (Camera Serial Interface) port on your Raspberry Pi board. It is a small rectangular connector located near the HDMI port.
Next, carefully insert the ribbon cable of the Camera Module into the CSI port, making sure it is securely connected.

Once the Camera Module is connected, you can begin configuring the software on your Raspberry Pi to use the camera for surveillance purposes.
Configuring Raspbian
To set up your Raspberry Pi as a security camera using Raspbian, you will need to configure various settings. Here is a step-by-step guide on how to do it:
1. Install Raspbian
The first step is to install the Raspbian operating system on your Raspberry Pi. You can download the latest version of Raspbian from the official Raspberry Pi website. Follow the instructions provided to install Raspbian onto an SD card.
2. Login to Raspbian
After installing Raspbian, insert the SD card into your Raspberry Pi and connect it to a monitor, keyboard, and mouse. Power on the Raspberry Pi and log in using the default username and password (pi/raspberry).
3. Update Raspbian
Once logged in, it’s important to update Raspbian to ensure you have the latest packages and security patches. Open a terminal and run the following commands:
sudo apt update
sudo apt upgrade
4. Configure Network Settings
Next, you need to configure the network settings of your Raspberry Pi. This can be done through the graphical interface or by editing the network configuration file. To edit the file, run the following command in the terminal:
sudo nano /etc/network/interfaces
In the file, add the following lines to configure your network:
auto wlan0
iface wlan0 inet static
address [IP address]
netmask [netmask]
gateway [gateway]
dns-nameservers [DNS servers]
Replace [IP address], [netmask], [gateway], and [DNS servers] with your network configuration. Save the file and exit.
5. Install Motion
To turn your Raspberry Pi into a security camera, you will need to install the Motion software. Motion allows you to capture images and videos from a connected camera. Run the following command in the terminal to install Motion:
sudo apt install motion
6. Configure Motion
After installing Motion, you need to configure its settings. Open the configuration file by running the following command:
sudo nano /etc/motion/motion.conf
In the file, you can customize various settings, such as the resolution, frame rate, and output directory. Make the necessary changes and save the file.
Note: Make sure to set the “daemon” option to “on” to allow Motion to run as a background process.
7. Start Motion
Once you have configured Motion, you can start the software by running the following command:
sudo service motion start
Motion will now capture images and videos from the connected camera according to your settings.
By following these steps, you can set up your Raspberry Pi as a security camera using Raspbian. Once configured, you can access the captured images and videos remotely or set up alerts for motion detection.
Setting up the Security Camera
Setting up a Raspberry Pi as a security camera is a great way to monitor your surroundings. In this guide, we will go through the steps required to set up your Raspberry Pi with Raspbian as a security camera.
1. Install Raspbian: Start by downloading the latest version of Raspbian from the official Raspberry Pi website. Once downloaded, flash the Raspbian image to an SD card using a tool like Etcher.
2. Set up the Raspberry Pi: Insert the SD card into your Raspberry Pi and connect it to a monitor, keyboard, and mouse. Boot up the Pi and follow the on-screen instructions to set up Raspbian.
3. Update and upgrade: Open a terminal and run the following commands to update Raspbian and its packages:
sudo apt update |
sudo apt upgrade |
4. Install MotionEyeOS: MotionEyeOS is a web-based interface for controlling and viewing your security camera. Run the following commands in the terminal to install MotionEyeOS:
sudo apt install motion |
sudo systemctl enable motion |
sudo systemctl start motion |
5. Access the MotionEyeOS interface: Open a web browser on your computer and enter the IP address of your Raspberry Pi followed by port 8081 (e.g., http://192.168.1.100:8081). You should see the MotionEyeOS interface, where you can configure and view your security camera.
6. Configure your camera: Click on the “Add Camera” button in the MotionEyeOS interface to configure your camera settings. You can adjust parameters such as resolution, frame rate, and motion detection sensitivity.
7. View your camera feed: Once your camera is configured, you can view the live feed by clicking on the camera’s thumbnail in the MotionEyeOS interface. You can also set up alerts and notifications for motion detection events.
Now you have successfully set up your Raspberry Pi as a security camera using Raspbian and MotionEyeOS. You can mount the Pi with a camera module in a suitable location and monitor your surroundings remotely through the MotionEyeOS interface.
Installing MotionEyeOS
To set up your Raspberry Pi as a security camera, you can use MotionEyeOS, an open-source operating system specifically designed for video surveillance. Here’s how to install MotionEyeOS:
| Step | Description |
|---|---|
| 1 | Download the latest MotionEyeOS image from the official website |
| 2 | Insert an SD card into your computer |
| 3 | Use a tool like Etcher to flash the MotionEyeOS image onto the SD card |
| 4 | Eject the SD card from your computer and insert it into the Raspberry Pi |
| 5 | Connect the Raspberry Pi to a power source and wait for it to boot up |
| 6 | Access the MotionEyeOS interface by entering the IP address of your Raspberry Pi into a web browser |
| 7 | Follow the on-screen instructions to configure MotionEyeOS |
| 8 | Once the configuration is complete, you can start using your Raspberry Pi as a security camera |
With MotionEyeOS installed, you’ll have access to a user-friendly web interface where you can manage your security camera settings, view live video streams, and receive notifications for any detected motion. It’s a great solution for DIY home security.
Configuring MotionEyeOS
Once you have set up your Raspberry Pi with MotionEyeOS, you will need to configure it to function as a security camera. Here are the steps to do so:
Step 1: Access the MotionEyeOS Interface
To configure MotionEyeOS, you will need to access the interface. Open a web browser on a device connected to the same network as your Raspberry Pi and enter the IP address of the Pi followed by the port number 80 (e.g., http://192.168.1.100:80). This will open the MotionEyeOS interface.
Step 2: Configure Camera Settings
Once in the MotionEyeOS interface, click on the “Add Camera” button. Enter a name for your camera and configure the desired settings, such as resolution, frame rate, and motion detection sensitivity. You can also enable audio recording if desired. Click “Apply” to save the changes.
Step 3: Set Up Motion Detection
MotionEyeOS offers advanced motion detection features. To set up motion detection, go to the “Motion Detection” tab in the interface. Enable motion detection by selecting the appropriate checkbox. You can also configure specific areas of the camera’s view to monitor for motion. Adjust the sensitivity and threshold settings based on your preferences. Click “Apply” to save the changes.
Step 4: Configure Notifications (Optional)
MotionEyeOS can send email or push notifications when motion is detected. To set up notifications, go to the “Notifications” tab in the interface. Enter the relevant email or push notification settings, such as SMTP server details or API keys. Click “Apply” to save the changes.
Step 5: Accessing Live Stream and Recorded Footage
You can view the live stream from your MotionEyeOS camera by clicking on the camera’s name in the interface. To access recorded footage, click on the “Movies” tab. MotionEyeOS allows you to download or delete recorded videos.
With these configurations, your Raspberry Pi running MotionEyeOS is now ready to function as a security camera. You can access the live stream, monitor for motion, and receive notifications as desired.
Accessing the Security Camera
Once your Raspberry Pi is set up as a security camera using Raspbian, you can access the live feed and recorded footage through various methods.
1. Local Network:
If your Raspberry Pi and monitoring device (such as a laptop or smartphone) are connected to the same local network, you can access the security camera by entering the Raspberry Pi’s IP address in a web browser. To find the IP address, open the Terminal and enter the command ifconfig. Look for the IP address under the network interface connected to your local network.
For example, if the IP address is 192.168.0.10, you can access the security camera by entering http://192.168.0.10 in a web browser. This will display the live feed or interface for accessing recorded footage.
2. Remote Access:
If you want to access the security camera remotely, you’ll need to set up port forwarding on your router. This involves configuring your router to forward incoming requests on a specific port to the IP address of your Raspberry Pi.
Once port forwarding is set up, you can access the security camera from anywhere by entering your public IP address followed by the forwarded port number in a web browser. For example, if your public IP address is 123.456.78.90 and you set up port forwarding for port 8080, you can access the security camera by entering http://123.456.78.90:8080.
3. Mobile Apps:
There are various mobile apps available that allow you to access your Raspberry Pi security camera remotely. These apps often provide additional features such as motion detection, notifications, and cloud storage for recorded footage. Some popular apps include IP Webcam for Android and iCam for iOS.
Before accessing your security camera remotely, make sure to secure your Pi’s connection with a strong username and password. Additionally, consider enabling encryption and using a VPN for enhanced security.
FAQ,
What is Raspbian?
Raspbian is a free operating system based on Debian Linux and optimized for the Raspberry Pi hardware.
Can I use any model of Raspberry Pi as a security camera?
Yes, you can use any model of Raspberry Pi as a security camera as long as it has a camera module port.
Is it possible to access the camera feed remotely?
Yes, it is possible to access the camera feed remotely by configuring port forwarding on your router and accessing the camera’s IP address and port number from outside your local network.