
Are you tired of scrolling through social media feeds filled with mouthwatering food photos? Do you often find yourself wondering how to capture the perfect shot of your delicious meals? Look no further – we have all the tips and tricks you need to take stunning food photos with a DSLR camera.
Food photography has become increasingly popular in recent years, with more and more people sharing their culinary creations online. Whether you’re a food blogger, a restaurant owner, or simply a food enthusiast, learning how to take captivating photos of food can take your culinary journey to new heights.
Using a DSLR camera for food photography allows you to capture the intricate details and vibrant colors of your dishes. With its manual controls and versatility, a DSLR camera gives you complete creative control over your images. By following a few simple guidelines and applying some creative techniques, you can elevate your food photography skills and capture incredible shots that will leave your audience craving for more.
Choosing the Right DSLR Camera for Food Photography
When it comes to food photography, having the right camera can make all the difference in capturing beautiful and enticing images. A DSLR camera offers a range of features and settings that can enhance your food photography skills. Here are some factors to consider when choosing the right DSLR camera for food photography:
1. Sensor Size
The sensor size of a DSLR camera affects the image quality and low-light performance. A larger sensor size will capture more light, allowing for better image quality and sharpness. Consider cameras with APS-C or full-frame sensors for optimal results in food photography.

2. Megapixels
Megapixels determine the resolution of an image. A higher megapixel count can result in more details and sharper images. While a high megapixel count is not necessary for food photography, it can be beneficial if you plan to print your photos or crop them extensively.
3. Autofocus System
Food photography often involves capturing close-up shots of tiny details. Having a DSLR camera with a fast and accurate autofocus system is crucial in achieving sharp and precise images. Look for cameras with advanced autofocus features, such as multiple focus points and tracking capabilities.
4. ISO Range
In food photography, the lighting conditions can vary, especially when shooting indoors or in low-light settings. A DSLR camera with a wide ISO range will allow you to adjust the sensitivity of the sensor to capture well-exposed images in different lighting conditions without excessive noise.
5. Lens Compatibility
The quality and versatility of the lens will greatly impact the overall image quality. Look for a DSLR camera that is compatible with a wide range of lenses, especially macro lenses that are ideal for capturing close-up shots of food. Consider investing in a high-quality lens to complement your camera choice.
When choosing a DSLR camera for food photography, it’s important to consider your budget, shooting style, and personal preferences. Take the time to research and compare different models, read reviews, and try out various cameras before making a decision. Remember, the best camera for food photography is the one that suits your needs and helps you capture stunning images of delicious dishes.
Understanding the Basics of Food Photography
Capturing mouth-watering photos of food is a skill that can be learned and mastered over time. Whether you are a food blogger, aspiring chef, or just want to improve your food photography skills, understanding the basics is essential.
Lighting
Lighting is one of the most important aspects of food photography. Natural light is often the best choice, especially diffused light that creates soft shadows and highlights the textures and colors of the food. Avoid harsh overhead lighting or direct sunlight that can create unflattering shadows or wash out the details.
Composition
Creating a visually appealing composition is crucial for food photography. Use the rule of thirds to create balance and interest in your photos. Consider the placement of your subject, props, and negative space to guide the viewer’s eye. Experiment with different angles and perspectives to find the most flattering view of the food.
Props and Styling
Choosing appropriate props and styling can make a significant difference in your food photos. Select props that complement the food and add visual interest without overpowering the main subject. Pay attention to the colors, textures, and shapes of the props to create a cohesive and visually pleasing composition.
Focus and Depth of Field
Decide on the focal point of your photo and use a shallow depth of field to create a visually appealing blur in the background. This technique helps draw attention to the main subject and adds depth to the photo. Experiment with different aperture settings to achieve the desired effect.

Post-Processing
Post-processing can enhance your food photos and make them even more enticing. Use photo editing software to adjust the brightness, contrast, saturation, and sharpness of the image. Be careful not to overdo the editing, as it can make the food appear unnatural.
By understanding and applying these basic principles of food photography, you can take your food photos to the next level. Remember to practice, experiment, and have fun capturing the beauty and deliciousness of your culinary creations!
Mastering Lighting Techniques for Food Photography
When it comes to food photography, lighting is one of the most crucial factors to consider. The right lighting can make your dishes look more appetizing and give them a professional touch. Here are some essential lighting techniques to help you master the art of food photography:
1. Natural Lighting
Natural lighting is considered the best option for food photography as it creates a soft, diffused light that enhances the colors and details of the food. The ideal setup is by placing your subject near a large window during daylight hours. Experiment with the position and angle of the food to find the best lighting direction.
2. Diffusers and Reflectors
To control and manipulate natural lighting, you can use diffusers and reflectors. A diffuser softens harsh sunlight, reducing shadows and preventing overexposure. Reflectors, such as white foam boards or reflector discs, bounce light back onto the food, filling in shadows and adding dimension.
3. Artificial Lighting
If natural lighting is not available or not sufficient, you can use artificial lighting. Invest in a good quality continuous LED light or a speedlight flash to create your own controlled light source. These lights provide consistent illumination and allow you to adjust the intensity and angle as needed.
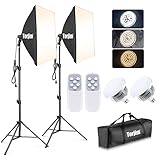
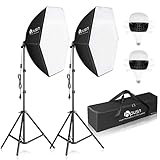
4. Light Modifiers
Light modifiers like softboxes and umbrellas can transform harsh artificial light into a softer, more diffused light. They help create a flattering and elegant look for your food. Experiment with different sizes and shapes of modifiers to achieve the desired effect.
5. Color Temperature
Be mindful of the color temperature of your lighting. Different light sources can have varying color temperatures, ranging from warm to cool tones. Adjust the white balance settings on your camera to ensure the colors of your food are accurately captured.
Remember, practice makes perfect when it comes to mastering lighting techniques for food photography. Experiment with different setups and lighting styles to find your own unique style and create stunning food images that will make mouths water.
Selecting the Right Props and Backgrounds
When taking food photos with a DSLR camera, selecting the right props and backgrounds is crucial in creating visually appealing images. The props and backgrounds you choose play a significant role in enhancing the composition and overall aesthetic of your food photos.

Here are some tips to help you select the perfect props and backgrounds for your food photography:
| 1. Keep it Simple: | Opt for props and backgrounds that do not overpower the main subject – the food. The focus should always remain on the dish you are photographing. Simple, plain backgrounds or neutral-colored surfaces like wood or marble can complement your food without being distracting. |
| 2. Consider the Theme: | Think about the theme or style you want to convey in your food photography. Props and backgrounds should align with the overall mood and concept you are trying to achieve. For example, rustic props and earthy backgrounds can work well for a farm-to-table or country-style theme, while vibrant and colorful props can complement a tropical or festive theme. |
| 3. Vary Textures and Colors: | Experiment with different textures and colors to add visual interest to your photos. Consider using props with contrasting textures or colors that highlight the colors and textures of the food. For example, a rough wooden board can create an interesting contrast with a smooth and creamy dessert. |
| 4. Use Fresh Ingredients as Props: | Using fresh ingredients that are included in the dish as props can add authenticity to your food photos. For example, if you are photographing a salad, include some fresh vegetables or herbs as props to enhance the visual appeal. |
| 5. Add Depth and Dimension: | Consider using props and backgrounds that add depth and dimension to your photos. This can be achieved by using objects of different heights or layering props to create interesting compositions. For example, stacking plates, bowls, or utensils can add depth and make the photo more visually appealing. |
Remember, the props and backgrounds you choose should enhance the overall presentation of the food and contribute to telling a story through your photos. Experiment with different combinations and find what works best for the specific dish you are photographing.
Styling and Plating Food for Beautiful Photos
Capturing stunning food photos requires more than just a good camera. The way you style and plate your food plays a crucial role in creating beautiful and appetizing images. Here are some tips to help you make your food look its best:
1. Choose the Right Props
The props you use in your food photos can help set the mood and tell a story. Select plates, bowls, cutlery, and napkins that complement the colors and textures in your dish. Consider the overall aesthetic you want to achieve and select props accordingly. Wooden boards, rustic linens, or colorful ceramics can add a touch of personality and make your photos more visually interesting.
2. Create Depth and Texture
Creating depth and texture in your food photos can make them more visually appealing. Use ingredients and garnishes that add layers and contrast to your dish. For example, sprinkle fresh herbs or spices on top to add pops of color or drizzle sauces or oils to create a sense of movement. Play with different textures by using crunchy elements, creamy sauces, or crispy crusts. These details will enhance the overall appearance and make your photos more enticing.
Pro tip: Consider using props like a partially peeled citrus zest or a scattering of breadcrumbs to add texture and visual interest to your shot.
3. Pay Attention to Composition
The way you arrange the elements in your frame can greatly impact the composition of your food photo. Apply the rule of thirds by dividing your frame into a grid of nine equal parts and placing key elements along the lines or at their intersections. Use diagonals to create movement and lead the viewer’s eye through the image. Experiment with different angles and perspectives to find the most visually appealing composition for your dish.
4. Use Natural Light
Natural light can make a huge difference in the quality of your food photos. Avoid using artificial lighting, which can cast harsh shadows and distort the colors of your dish. Set up your shoot near a window or outdoors to take advantage of soft, diffused light. If the light is too harsh, you can use a diffuser or white fabric to soften it. Experiment with different lighting conditions to find the most flattering and appealing light for your dish.
Pro tip: Avoid shooting under direct sunlight, as it can create harsh highlights and shadows. Cloudy days or shaded areas can provide more even lighting conditions.
5. Tell a Story
Food photography is not just about showcasing delicious dishes; it’s also about evoking emotions and telling a story. Think about the mood and narrative you want to convey and incorporate elements that add context and interest to your photos. Consider including ingredients, utensils, or ingredients in the background that hint at the preparation process or the origin of the dish. This will help create a narrative and make your photos more engaging and compelling.

Pro tip: Don’t overcrowd your frame with too many props or elements. Keep it simple and let the food take center stage.
By paying attention to styling and plating techniques, you can elevate your food photos from ordinary to extraordinary. Experiment with different props, compositions, lighting, and storytelling elements to create visually stunning and appetizing images that will make your viewers crave the dishes you capture.
Editing and Enhancing Food Photos with Software
Once you have taken your food photos with your DSLR camera, it’s time to enhance and edit them using photo editing software. With the right software, you can make your food photos even more appealing and professional-looking. Here are some tips on how to edit and enhance your food photos:
| Cropping and Composition | Remove any distracting elements from the background by cropping your photo. Experiment with different compositions to find the most visually pleasing arrangement for your food. |
| Lighting and Exposure | Adjust the lighting and exposure to ensure that your food looks well-lit and properly exposed. You can use brightness and contrast adjustments to improve the overall lighting in your photo. |
| Color Correction | Make sure the colors in your food photo are accurate by adjusting the white balance, saturation, and hue. This will help your food look more vibrant and appetizing. |
| Sharpening | Apply sharpening techniques to enhance the details and textures in your food photo. Be careful not to over-sharpen, as it can make the image look unnatural. |
| Removing Imperfections | If there are any minor imperfections in your food, such as a stray crumb or a sauce smudge, you can use the clone stamp or healing brush tool to remove them. Just be mindful not to remove any essential details. |
| Adding Filters and Effects | Experiment with different filters and effects to enhance the mood and style of your food photo. However, use them sparingly to avoid making the photo look overly processed. |
| Resizing and Saving | Before saving your edited photo, resize it to the appropriate dimensions for your intended use, such as social media or a website. Save your photo in a high-quality format, such as JPEG or PNG. |
Remember, the goal of editing and enhancing your food photos is to make them look more appealing and showcase the deliciousness of the food. With practice and the right software, you can take your food photography to the next level.
Question-answer:
What is the best camera setup for food photography?
The best camera setup for food photography typically involves using a DSLR camera with a macro lens. These cameras allow for higher image quality and better control over depth of field, which is important for capturing details in food photos. Additionally, using a tripod and remote shutter release can help reduce camera shake and ensure sharp images.
What lighting is best for food photography?
The best lighting for food photography is typically soft, diffused light. Natural light is often preferred, so shooting near a large window with sheer curtains can create a soft, flattering light that enhances the textures and colors of the food. However, if natural light is not available, using a diffuser on artificial light sources such as studio lights or flashes can help achieve a similar effect.


