Are you captivated by the beauty of the night sky? Do you want to learn how to capture those stunning celestial moments with your DSLR camera? Look no further, as we have the ultimate guide to help you take breathtaking night sky pictures.
Photographing the night sky can be a rewarding and mesmerizing experience. However, it requires a different approach compared to daytime photography. The darkness of the night brings out a whole new world of possibilities, but it also presents unique challenges that need to be overcome.
Fortunately, with the right techniques and equipment, you can unlock the secrets of astrophotography. In this guide, we will walk you through everything you need to know to capture stunning images of the night sky with your DSLR camera. From understanding camera settings to choosing the right location, you’ll be well on your way to becoming a master of capturing the cosmos.
So, grab your DSLR camera, tripod, and a sense of adventure as we embark on this journey to capture the beauty of the night sky. Whether you’re a beginner or an experienced photographer, this guide will provide you with the knowledge and skills to take awe-inspiring pictures of the stars and beyond.
Choosing the Right Equipment for Night Sky Photography
The first step in capturing stunning night sky pictures with your DSLR camera is to ensure you have the right equipment. Here are some key considerations to keep in mind when choosing your gear:

Camera: To capture the night sky in all its glory, you’ll need a DSLR camera that has manual settings. Look for a camera with a wide dynamic range and low noise performance at high ISO settings. Full-frame cameras tend to perform better in low-light situations, but crop-sensor cameras can also produce excellent results with the right lens.
Lens: A fast and wide-angle lens is essential for night sky photography. Look for a lens with a wide maximum aperture (f/2.8 or wider) to allow as much light as possible to reach the camera’s sensor. Lens focal lengths between 14mm and 24mm are ideal for capturing expansive night sky scenes.
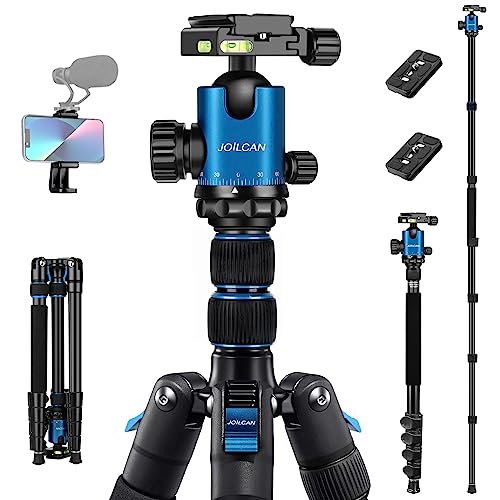
Tripod: Stability is key when taking long exposure shots of the night sky. Invest in a sturdy tripod to keep your camera steady during long exposures. Look for a tripod that is lightweight, yet robust enough to handle your camera and lens setup.
Remote Shutter Release: A remote shutter release or intervalometer is essential for minimizing camera shake during long exposures. This accessory allows you to trigger the camera’s shutter without touching it, preventing any unwanted movement that could blur your photos.
Additional Accessories: Consider investing in a star tracker or equatorial mount, which can help you capture more detailed images of the night sky by compensating for the Earth’s rotation. Graduated neutral density filters can also be useful for balancing the exposure between the sky and foreground during twilight or astrophotography.

By choosing the right equipment for night sky photography, you’ll greatly increase your chances of capturing stunning images of the cosmos. Remember to do your research, try different combinations of gear, and have fun exploring the wonders of the night sky with your DSLR camera!
Finding the Ideal Location for Shooting Night Sky Pictures
When it comes to capturing stunning night sky pictures with your DSLR camera, finding the right location is crucial. Here are a few tips to help you find the ideal spot:
1. Dark Sky Areas
Look for areas that are known for their dark skies, away from light pollution. Light pollution can greatly affect the visibility of stars and other celestial objects. Use online resources or apps to locate dark sky areas near your location. These areas are typically found in remote rural regions and national parks.
2. Clear Visibility
Make sure your chosen location offers a clear view of the night sky without obstruction. Avoid shooting near tall buildings, trees, or mountains that may block your view of the stars. Find a spot that offers a wide-open view of the horizon.
3. Minimal Atmospheric Disturbance
Choose a location where the air is clear and free from any obstructions that may cause atmospheric disturbance. Coastal areas and high altitude locations tend to have clearer skies with less atmospheric interference.
Remember that weather conditions are also important. Check the weather forecast beforehand to ensure clear skies and minimal cloud cover. Additionally, keep in mind the season and the position of the moon, as these factors can affect the visibility of stars and other celestial objects.
Once you’ve found the ideal location, don’t forget to bring the necessary equipment, such as a tripod, remote shutter release, and extra batteries. Happy stargazing and capturing breathtaking night sky pictures!
Understanding the Basics of Camera Settings for Night Sky Photography
When it comes to capturing stunning night sky pictures with a DSLR camera, understanding the basics of camera settings is essential. The right settings can make a significant difference in the quality and clarity of your images. Here are some key settings to consider:
1. Manual Mode: It is recommended to shoot in manual mode to have complete control over your camera settings. This allows you to adjust the exposure, aperture, and shutter speed to capture the perfect shot.
2. ISO: The ISO determines the camera’s sensitivity to light. During night sky photography, you will typically need a higher ISO to capture the faint light. However, keep in mind that higher ISO values can introduce noise in your images. Experiment with different ISO values to find the right balance between capturing enough light and minimizing noise.

3. Aperture: The aperture setting controls the amount of light entering the camera. For night sky photography, using a wide aperture (such as f/2.8 or lower) is ideal to gather as much light as possible. This helps in capturing the faint stars and Milky Way.
4. Shutter Speed: The shutter speed determines the duration of the exposure. When photographing the night sky, longer shutter speeds are often necessary to capture enough light. However, using shutter speeds that are too long can result in star trails. To minimize star trails, you can use the “500 Rule” as a starting point. Divide 500 by the focal length of your lens to determine the maximum shutter speed in seconds without significant star trails.
5. White Balance: Adjusting the white balance allows you to control the color temperature in your images. For night sky photography, using a setting such as “Daylight” or “Custom” can help maintain the natural colors of the stars and sky.
6. Focus: Achieving sharp focus in low-light conditions can be challenging. One technique is to use manual focus and set your lens to infinity (∞) or to a distant object and then fine-tune the focus. Another option is to use the camera’s manual focus assist or Live View to zoom in and manually adjust the focus.
Remember, capturing beautiful night sky pictures with a DSLR camera takes practice and experimentation. Don’t be afraid to try different settings and techniques to achieve the desired results. The more you practice, the better you will become at capturing breathtaking images of the night sky.

Using a Tripod for Stable Night Sky Shots
Capturing beautiful night sky shots with a DSLR camera requires some special equipment and techniques. One essential tool that can greatly enhance the quality of your photos is a tripod.
Why Should You Use a Tripod?
Shooting at night often requires longer exposure times, ranging from a few seconds to several minutes. Holding the camera by hand during these long exposures can result in blurry and shaky images. By using a tripod, you can keep your camera steady and eliminate any unintended camera movements.
Choosing the Right Tripod
When selecting a tripod for night sky photography, there are a few key factors to consider:

Stability:
Choose a tripod that is sturdy and stable enough to hold your camera securely. Look for tripods made of lightweight but durable materials such as carbon fiber or aluminum, which provide both stability and portability.
Height and Weight:
Consider the height and weight of the tripod. Make sure it is tall enough to accommodate your shooting needs and adjust to different angles. Additionally, if you plan on traveling to different locations to capture night sky shots, a lightweight and portable tripod will be more convenient.
Setting Up Your Tripod
Once you have selected the right tripod, follow these steps to set it up correctly:
- Find a flat and stable surface to place your tripod. Avoid setting up on uneven terrain or places where the ground might shake, such as near busy roads.
- Extend the tripod legs to your preferred height, making sure they are firmly locked in place.
- Attach the camera to the tripod using a compatible mounting plate or quick-release system.
- Adjust the tripod head to the desired position and lock it securely.
Using Your Tripod Effectively

While shooting night sky photos with a tripod, keep these tips in mind:
- Use a remote shutter release or the camera’s self-timer function to minimize camera shake caused by pressing the shutter button.
- Avoid touching the camera or tripod during exposures to prevent any unwanted movement.
- Experiment with different compositions and camera settings to capture the beauty of the night sky.
Remember, a tripod is an essential tool for stable night sky shots with a DSLR camera. By investing in a quality tripod and using it correctly, you can achieve sharp and stunning images of the stars and celestial objects.
Capturing Star Trails in Night Sky Photography
When it comes to night sky photography, capturing star trails can result in stunning and mesmerizing images. Star trails are created when stars appear to move across the night sky due to the rotation of the Earth. This effect can be captured using a DSLR camera with long exposure settings. Here are some tips on how to capture star trails in your night sky photography:
1. Find a Dark Sky Location
Choose a location away from city lights and light pollution to get clear and vibrant star trails. Dark sky locations, such as national parks or rural areas, offer the best conditions for capturing the night sky. You can use websites or apps to check the light pollution levels in your area and find the best spot for your night sky photography.
2. Use a Sturdy Tripod
Stability is crucial for capturing sharp star trails. Use a sturdy tripod to keep your camera steady during the long exposure. Make sure the tripod is set up on a stable surface to prevent any movement or vibrations that can blur the star trails.
3. Set Up Your DSLR Camera
Set your camera to manual mode and select a wide-angle lens to capture a larger portion of the night sky. Use a remote shutter release or the camera’s built-in timer to minimize camera shake when pressing the shutter button. Set your ISO to a low value, usually between ISO 100-800, to reduce noise in the final image.
Next, choose a long exposure time. The longer the exposure, the longer the star trails will appear. Start with an exposure time of 30 seconds to 1 minute and adjust as needed. Keep in mind that longer exposures may result in increased noise, so finding the right balance is essential.
4. Frame Your Shot
Before capturing star trails, consider composing your shot with interesting foreground elements. This can add depth and visual interest to your night sky photography. Experiment with different angles and compositions to create a visually stunning image.
Note: Make sure to turn off any image stabilization or vibration reduction features on your lens, as they can cause blurring during long exposures.
5. Start Capturing Star Trails
Once your camera is set up and framed, start capturing star trails by pressing the shutter button. Let your camera keep taking continuous long exposures for an extended period, ideally 30 minutes to several hours. The longer you expose, the more pronounced and longer the star trails will appear in your final image.
Tip: Using a intervalometer or a remote shutter release with a timer can help automate the process of capturing continuous exposures without having to manually press the shutter button for each shot.
Remember, patience is key when capturing star trails. It’s a waiting game, but the results can be truly rewarding. Feel free to experiment with different exposure times and techniques to achieve your desired star trail effect.
With these tips and techniques, you’ll be able to capture stunning star trails in your night sky photography. So, grab your DSLR camera and head out to a dark sky location to witness and capture the beauty of the night sky!
Using the Bulb Mode for Long Exposures in Night Sky Photography
When it comes to capturing stunning images of the night sky with your DSLR camera, using the Bulb mode for long exposures can produce incredible results. Bulb mode allows you to keep the shutter open for an extended period of time, which is essential for capturing the faint details in the night sky such as stars, Milky Way, and even meteors.
What is Bulb mode?
Bulb mode is a feature found on most DSLR cameras that allows the user to manually control the length of the exposure. Unlike the automatic modes, where the camera determines the appropriate exposure settings, Bulb mode hands over the control to the photographer, allowing them to decide how long the shutter should remain open.
How to use Bulb mode for night sky photography?
Here are the steps to use Bulb mode for long exposures in night sky photography:
- Set up your camera on a sturdy tripod to avoid any camera shake.
- Select Manual mode on your camera and set the ISO to a low value, usually around 800 or lower, to minimize noise.
- Choose a wide-angle lens with a low focal length to capture more of the night sky.
- Open the aperture to its widest setting, usually the lowest f-number available, to let in as much light as possible.
- Switch to Bulb mode by selecting it from the shutter speed settings or using a remote shutter release with a Bulb mode option.
- Press and hold the shutter release button to start the exposure.
- Release the shutter release button when you feel that sufficient light has been captured, depending on the desired effect and the brightness of the night sky.
- Review the image and make any necessary adjustments to the exposure settings if needed.
It is important to note that using Bulb mode for long exposures can result in overexposed images if not properly controlled. The duration of the exposure will depend on several factors, including the brightness of the night sky, desired effect, and the amount of light pollution present in the area. Experimentation and practice will help you achieve the desired results.
By using the Bulb mode for long exposures in night sky photography, you can capture the mesmerizing beauty of the stars and create stunning images that truly showcase the wonders of the night sky.
Post-processing Tips for Enhancing Night Sky Pictures
After capturing stunning night sky pictures with your DSLR camera, the next step is to enhance them using post-processing techniques. By making some adjustments to the exposure, color balance, and noise reduction, you can take your night sky photos to the next level. Here are some tips to help you get started:
|
1. Adjust Exposure: Start by adjusting the exposure of your night sky picture to bring out the details in the stars and other celestial objects. Increase the exposure slightly to brighten up the sky, but be careful not to overexpose the image as it can wash out the colors. |
2. Enhance Colors: One of the challenges in night sky photography is capturing the true colors of the stars. Use the color balance adjustment tools in your post-processing software to fine-tune the colors and make them more vibrant. Experiment with different color temperature values until you achieve the desired effect. |
|
3. Reduce Noise: Noise can be a common issue in night sky photos, especially when shooting at high ISO values. To reduce noise, use the noise reduction tools in your post-processing software. Be careful not to overdo it, as excessive noise reduction can result in loss of details. |
4. Adjust Contrast: Increase the contrast of your night sky picture to make the stars and other objects stand out. This can help create a more dramatic and eye-catching image. Use the contrast adjustment tools in your post-processing software to tweak the contrast levels until you achieve the desired effect. |
|
5. Sharpen Details: To enhance the details in your night sky picture, apply some sharpening techniques. Use the sharpening tools in your post-processing software to selectively sharpen the stars and other important elements in the image. Be careful not to oversharpen, as it can introduce artifacts. |
6. Crop and Straighten: Finally, consider cropping and straightening your night sky picture to remove any distractions and improve the composition. Use the crop and straighten tools in your post-processing software to make the necessary adjustments. Experiment with different cropping ratios to find the one that works best for your photo. |
By following these post-processing tips, you can enhance the beauty of your night sky pictures and make them truly captivating. Remember, post-processing is a creative process, so don’t be afraid to experiment and find your own unique style.
Taking Night Sky Pictures with DSLR Camera: Final Thoughts
Taking pictures of the night sky with a DSLR camera can be a rewarding and exciting experience. From capturing stunning star trails to photographing the Milky Way, the possibilities are endless. However, it requires a combination of patience, knowledge, and the right equipment.
First and foremost, it’s important to find a location with minimal light pollution. This will greatly enhance the visibility of stars in your photographs. Apps and websites can help you identify areas with low light pollution.
Next, familiarize yourself with the camera’s settings. Adjusting the shutter speed, aperture, and ISO can make a significant difference in capturing the night sky. Experiment with different settings to achieve the desired effect.
Using a tripod is crucial for night sky photography. It prevents camera shake and allows for longer exposures, resulting in sharper images. Additionally, using a remote trigger or the camera’s timer function can further reduce shake and ensure sharper shots.
Consider using a wide-angle lens to capture a larger portion of the sky. This will allow for more stars to be included in your frame and create a sense of depth in your photographs.
Lastly, be patient and persistent. Night sky photography requires time and practice to perfect. Don’t be discouraged if your first attempts don’t turn out as expected. Learn from each experience and keep trying.
In conclusion, taking night sky pictures with a DSLR camera is a rewarding endeavor. With the right equipment, knowledge, and practice, you can capture stunning images of the celestial wonders above. So grab your camera, find a dark location, and let your creativity soar under the starry skies.
Question-answer:
What equipment do I need to take night sky pictures with a DSLR camera?
To take night sky pictures with a DSLR camera, you will need a camera with manual settings, a wide-angle lens with a low aperture, a sturdy tripod, and a remote or cable release for the camera.
Can I use any DSLR camera to take night sky pictures?
Most DSLR cameras can be used to take night sky pictures as long as they have manual settings. However, cameras with full-frame sensors generally perform better in low-light conditions.
What camera settings should I use for night sky photography?
For night sky photography, it is best to shoot in manual mode. Start with a wide aperture (around f/2.8 to f/4), ISO between 1600 and 3200, and a shutter speed of around 20-30 seconds. Adjust these settings based on the brightness of the sky and the desired effect.
How can I reduce noise in night sky pictures taken with a DSLR camera?
To reduce noise in night sky pictures, you can use a lower ISO setting, adjust the exposure time, or use noise reduction software during post-processing. Additionally, keeping the camera sensor cool can also help reduce noise.