
Are you tired of the continuous struggle to manage storage space on your iPhone 11? Do you often find yourself deleting precious photos and videos from your camera roll just to make room for new ones? Well, worry no more! In this simple guide, we will show you how to transfer your camera roll to a hard drive, ensuring that you never have to sacrifice your cherished memories again.
Step 1: Connect your iPhone 11 to your computer using a lightning cable. Make sure the computer is running the latest version of iTunes, which will facilitate the data transfer. Once connected, unlock your iPhone and tap “Trust” on the pop-up prompt to establish a secure connection between your devices.
Step 2: Open iTunes on your computer and select your iPhone 11 from the device menu. You can find this menu by clicking on the device icon located in the upper-left corner of the iTunes window. This will take you to the Summary tab, where you can configure various settings for your iPhone.
Step 3: Scroll down to the “Options” section and enable the “Manually manage music, videos, and TV shows” option. This will allow you to have full control over the content on your iPhone, including your camera roll. Click “Apply” to save the changes.
Step 4: Next, navigate to the “File Sharing” section, which can be found under the “Settings” tab in iTunes. This feature allows you to transfer files between your iPhone and your computer. Select the app you use to manage your camera roll (e.g., Photos or Camera) from the list of apps shown.

Step 5: After selecting the app, you will see a list of all the files present in your camera roll. Simply choose the photos and videos you want to transfer to your hard drive by selecting them with your mouse or trackpad. Once you have made your selection, click “Save” or “Export” to save the files to a location on your computer’s hard drive.
Step 6: Congratulations! You have successfully transferred your camera roll to your hard drive. Now you can enjoy the freedom of deleting photos and videos from your iPhone without the fear of losing them forever. Remember to periodically back up your hard drive to avoid any potential data loss.
With this handy guide, you can easily transfer your camera roll to a hard drive, freeing up precious space on your iPhone 11. No more sacrificing cherished memories or missing out on capturing new ones. Start managing your storage efficiently today!
Why should you transfer your camera roll to a hard drive on your iPhone 11?
The camera roll on your iPhone 11 is likely filled with precious memories in the form of photos and videos. It’s important to transfer these files to a hard drive for several reasons:
1. Preserve your memories: Your camera roll contains moments that are valuable to you, such as family gatherings, vacations, or special events. By transferring them to a hard drive, you ensure that they are safely stored and can be cherished for years to come.

2. Free up storage space: As you capture more photos and videos on your iPhone 11, your camera roll will continue to grow in size. Transferring these files to a hard drive helps you free up precious storage space on your device, allowing you to download more apps, music, or videos.
3. Protect against data loss: iPhones are not immune to data loss due to various reasons like accidental deletion, hardware failure, or software glitches. By regularly transferring your camera roll to a hard drive, you create a backup of your important files, reducing the risk of losing them permanently.
4. Easy sharing and accessibility: Storing your camera roll on a hard drive makes it easier to share your photos and videos with friends and family. You can simply connect the hard drive to a computer and access the files, without the need for an internet connection or cloud storage service.
5. Peace of mind: Knowing that your precious memories are backed up and stored on a hard drive provides peace of mind. Even if something happens to your iPhone 11, you can rest assured that your photos and videos are safe and can be easily recovered.
Transferring your camera roll to a hard drive is a practical solution to protect and preserve your memories, free up storage space, and ensure easy accessibility. Don’t wait until it’s too late; take action now and secure your valuable files.
Backing up your precious memories
As we all know, our smartphones have become our primary camera for capturing and storing precious memories. However, it is important to ensure that we have a backup of these memories to prevent loss in case of phone damage or theft. In this article, we will discuss how to transfer the camera roll from an iPhone 11 to a hard drive so that you can keep your memories safe.
Step 1: Connect your iPhone 11 to your computer
To transfer your camera roll to a hard drive, you will need to connect your iPhone 11 to your computer using the USB cable that came with your phone. Make sure your computer is turned on and unlocked before connecting the cable.
Step 2: Launch iTunes or Finder
Once your phone is connected to your computer, you will need to launch iTunes (on Windows) or Finder (on macOS). This will allow you to access the files and folders on your iPhone 11.
Step 3: Select your iPhone 11
In iTunes or Finder, you should see your iPhone 11 listed. Click on it to access the device’s settings and files.
Step 4: Transfer the camera roll to your hard drive
Look for the “Photos” or “Camera Roll” folder in your iPhone 11’s file system. Once you find it, you can copy and paste the entire folder or select individual photos to transfer to your hard drive. Simply right-click on the selected folder or photos and choose “Copy” or “Cut”. Then, go to the destination folder on your hard drive and right-click again, selecting “Paste”.

Pro tip: It is a good practice to organize your photos into folders on your hard drive, so you can easily find and access them later.
Step 5: Eject your iPhone 11
After the transfer is complete, you should safely eject your iPhone 11 from your computer. This will ensure that all data has been properly transferred and that it is safe to disconnect your phone.
By following these steps, you can easily transfer your camera roll from your iPhone 11 to a hard drive, keeping your precious memories safe and secure. Remember to regularly back up your photos to avoid losing them in case of any unforeseen events.
Creating space on your iPhone 11
If you’re running out of storage space on your iPhone 11, it’s essential to take action to create more space. By managing your storage efficiently, you can free up space for important files and prevent your device from slowing down. Here are some steps to help you create space on your iPhone 11:
1. Delete unnecessary apps and files
Start by identifying apps that you rarely use and delete them. Tap and hold the app icon until it starts jiggling, then tap the “x” button to delete. Additionally, go through your camera roll and delete any unwanted photos and videos. Remember to empty the “Recently Deleted” album to completely remove them.

2. Offload unused apps
If you don’t want to completely delete apps but still want to free up space, you can offload them. Offloading apps will remove the app but keep its data and documents on your device. To offload an app, go to Settings > General > iPhone Storage and tap on the app you want to offload. Tap “Offload App” to remove it.
3. Optimize your photo storage
Enable the “Optimize iPhone Storage” option under Settings > Photos. This setting will automatically store full-resolution photos and videos in iCloud while keeping smaller versions on your iPhone. By doing so, you can save a significant amount of storage space without losing access to your media.
4. Clear cache and temporary files
Apps often store cache and temporary files on your device, which can take up valuable space over time. To clear cache and temporary files, you can use third-party apps available on the App Store or clear them manually. Clearing cache and temporary files will help create more space on your iPhone 11.
5. Use cloud storage
If you frequently use apps like iCloud, Google Drive, or Dropbox, consider storing your files, photos, and videos in the cloud. This way, you can access them whenever needed without taking up space on your device. Be sure to regularly clean up your cloud storage and only keep essential files to avoid running out of space.
By following these steps, you can effectively create space on your iPhone 11 and ensure smoother device performance. Remember to regularly review your usage and manage your storage to prevent any storage-related issues in the future.

| Benefits of Creating Space |
|---|
| 1. Improved device performance |
| 2. More storage for important files |
| 3. Prevents device from slowing down |
| 4. Avoids storage-related issues |
What are the options to transfer camera roll to a hard drive on your iPhone 11?
If you have an iPhone 11 and want to transfer your camera roll to a hard drive, there are several options available to you. These options can help you free up space on your phone and ensure that your precious memories are safely stored.
1. Using a computer: One of the most common methods to transfer your camera roll to a hard drive is by using a computer. Connect your iPhone 11 to your computer using a USB cable. Open the “Photos” app on your computer and select the photos you want to transfer. Then, simply drag and drop the selected photos onto your hard drive.
2. Using iCloud: If you have iCloud enabled on your iPhone 11, you can also use it to transfer your camera roll to a hard drive. Open the “Settings” app on your iPhone and tap on your name at the top of the screen. Select “iCloud” and then “Photos”. Enable the “iCloud Photos” option and wait for your photos to sync with iCloud. Once they are synced, you can access them on your computer by going to the iCloud website and downloading them to your hard drive.
3. Using third-party apps: There are many third-party apps available on the App Store that can help you transfer your camera roll to a hard drive. These apps often offer additional features such as automatic backup and organization of your photos. Some popular apps include Google Photos, Dropbox, and Microsoft OneDrive. Simply download the app of your choice, follow the instructions to set it up, and then transfer your photos to your hard drive.
Note: It is important to regularly back up your photos to a hard drive to protect them from accidental loss or damage. Consider creating a backup schedule to ensure your memories are always safely stored.

By utilizing these options, you can easily transfer your camera roll to a hard drive on your iPhone 11. Choose the method that works best for you and enjoy the peace of mind knowing that your precious memories are safely backed up.
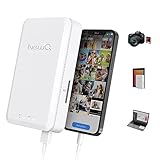
Using a Lightning to USB Adapter
If you want to transfer your camera roll to a hard drive, you can use a Lightning to USB adapter. This adapter allows you to connect your iPhone 11 to an external storage device, such as a hard drive. Here are the steps to transfer your camera roll using a Lightning to USB adapter:
Step 1: Connect the Lightning to USB adapter to your iPhone 11’s Lightning port.
Note: Make sure you have a Lightning to USB adapter that is compatible with your iPhone 11 model.
Step 2: Connect the external storage device, such as a hard drive, to the USB port of the Lightning to USB adapter.
Note: Ensure that your hard drive is formatted to a compatible file system, such as FAT32 or exFAT, to ensure compatibility with your iPhone 11.
Step 3: You may receive a prompt on your iPhone asking for your permission to allow the connected device to access your photos. Tap “Allow” to grant the necessary permissions.
Step 4: Open the “Files” app on your iPhone 11. This is the default file manager app that comes pre-installed with iOS.
Step 5: Navigate to the “On My iPhone” section in the “Browse” tab of the Files app.
Step 6: You should see the external storage device listed under the “Locations” section. Tap on the storage device to access its contents.
Step 7: Find and select the photos or camera roll folder that you want to transfer to the hard drive.
Step 8: Tap on the “Share” button, usually represented by a square with an arrow pointing out of it.
Step 9: Select “Save to Files” from the list of available options.
Step 10: Choose the location on the external storage device where you want to save the files, and then tap “Save” to start the transfer.
Note: The transfer speed may vary depending on the size of the files and the speed of your external storage device.
By following these steps, you can easily transfer your camera roll from your iPhone 11 to a hard drive using a Lightning to USB adapter. This method gives you the flexibility to back up and store your photos on an external storage device, providing you with extra storage space on your iPhone.
Using a wireless hard drive
If you prefer a wireless solution for transferring your camera roll to a hard drive on your iPhone 11, you can consider using a wireless hard drive. This option allows you to wirelessly transfer your photos and videos to the hard drive without the need for cables.
Here are the steps to transfer your camera roll to a wireless hard drive:
| Step 1: | Get a wireless hard drive that is compatible with your iPhone 11. There are many options available in the market, so choose one that suits your needs and preferences. |
| Step 2: | Connect your wireless hard drive to your iPhone 11 by following the manufacturer’s instructions. This usually involves connecting to the wireless network created by the hard drive. |
| Step 3: | Once the connection is established, open the Photos app on your iPhone 11. Select the photos and videos you want to transfer to the hard drive by tapping on them. |
| Step 4: | Tap on the Share button and choose the option to save the selected items to the wireless hard drive. |
| Step 5: | Wait for the transfer to complete. The time taken will depend on the size of the files being transferred and the speed of the wireless connection. |
| Step 6: | Once the transfer is finished, disconnect your iPhone 11 from the wireless hard drive. |
| Step 7: | You can now access your camera roll photos and videos from the wireless hard drive. Simply connect it to your computer or any other device that supports the hard drive’s wireless connection. |
Using a wireless hard drive provides a convenient and cable-free way to transfer your camera roll to a hard drive on your iPhone 11. It allows you to free up storage space on your device and have your photos and videos easily accessible on the hard drive.
How to transfer camera roll to a hard drive on your iPhone 11 using a lightning to USB adapter?
If you are running out of storage on your iPhone 11 and want to transfer your camera roll to a hard drive, you can do so using a lightning to USB adapter. This adapter allows you to connect your iPhone to an external hard drive or USB flash drive, enabling you to transfer your photos and videos easily.
Here’s how you can transfer your camera roll to a hard drive using a lightning to USB adapter:
Step 1: Connect the lightning to USB adapter to your iPhone 11.
Step 2: Plug the USB adapter into the USB port on your external hard drive or USB flash drive.
Step 3: Unlock your iPhone 11 and you may see a prompt asking for your device passcode or to Trust This Computer. Follow the on-screen instructions to proceed.
Step 4: Open the Photos app on your iPhone 11 and select the photos and videos you want to transfer to the hard drive. You can select multiple items by tapping on them.
Step 5: Once you have selected all the files you want to transfer, tap on the Share button, usually located at the bottom left corner of the screen. It looks like a box with an arrow pointing out.
Step 6: In the share options, scroll through the list until you find the “Save to Files” option and tap on it. If you don’t see this option, swipe left on the second row of activities and tap on the “More” button to enable it.
Step 7: In the “Save to Files” menu, navigate to the location where your external hard drive or USB flash drive is listed. You may need to tap on the “On My iPhone” option first, and then select your external storage device.
Step 8: Once you have selected the location, tap on the “Save” button to start transferring your camera roll to the hard drive. The transfer progress will be indicated by a progress bar.
Step 9: Once the transfer is complete, you can disconnect your iPhone 11 from the lightning to USB adapter.
Note: Make sure your external hard drive or USB flash drive is formatted in a compatible format (such as FAT32 or exFAT) to ensure it is readable by both your iPhone and computer.
By following these steps, you can easily transfer your camera roll to a hard drive on your iPhone 11 using a lightning to USB adapter. This will free up valuable storage space on your device and allow you to keep a backup of your precious photos and videos.
Step 1: Connect the lightning to USB adapter to your iPhone 11
To transfer the camera roll from your iPhone 11 to a hard drive, you will need to first connect a lightning to USB adapter to your device. This adapter allows you to connect your iPhone 11 to a hard drive using a USB cable.
Here’s how to do it:
- Start by turning off your iPhone 11 to ensure that no data is being transferred while you connect the adapter.
- Connect the lightning to USB adapter to the charging port on your iPhone 11. Ensure that the adapter is securely plugged in.
- Next, connect one end of the USB cable to the USB port on the lightning to USB adapter.
- Take the other end of the USB cable and connect it to an available USB port on your hard drive.
- Once the connections are made, turn on your iPhone 11.
Now that the lightning to USB adapter is connected to your iPhone 11 and the USB cable is connected to your hard drive, you are ready to proceed with transferring your camera roll to the hard drive. Make sure you have enough storage space on your hard drive to accommodate the files from your camera roll.
FAQ
How can I transfer my camera roll from iPhone 11 to a hard drive?
To transfer your camera roll from iPhone 11 to a hard drive, you can use several methods. One way is to connect your iPhone 11 to your computer using a USB cable, open the Photos on your computer, select the photos you want to transfer, and then drag and drop them into the desired folder on your hard drive. Another method is to use cloud storage services like iCloud or Google Photos to back up your camera roll, and then download the photos from the cloud storage to your hard drive.
Can I transfer my camera roll to a hard drive without using a computer?
Yes, you can transfer your camera roll to a hard drive without using a computer. One way is to use a Lightning to USB adapter to connect your iPhone 11 directly to an external hard drive. Once connected, you can use the Files app on your iPhone 11 to select and transfer your photos to the hard drive. Another option is to use a wireless hard drive that has its own app. With the app installed on your iPhone 11, you can wirelessly transfer your camera roll to the hard drive.
Is it possible to transfer only selected photos from my camera roll to a hard drive?
Yes, it is possible to transfer only selected photos from your camera roll to a hard drive. When connecting your iPhone 11 to a computer, you can open the Photos app and manually select the photos you want to transfer. You can then drag and drop the selected photos into a folder on your hard drive. If using cloud storage services, you can choose to upload only specific photos from your camera roll to the cloud storage, and then download them to your hard drive.
What are some recommended hard drives for transferring camera roll from iPhone 11?
There are several recommended hard drives for transferring camera roll from iPhone 11. Some popular options include the WD My Passport Wireless Pro, Seagate Backup Plus Slim, and SanDisk Extreme Portable SSD. These hard drives offer large storage capacities, fast transfer speeds, and are compatible with both computers and mobile devices like the iPhone 11. It is important to choose a hard drive that suits your storage needs and can connect to your iPhone 11.
Can I transfer my camera roll to multiple hard drives at the same time?
No, you cannot transfer your camera roll to multiple hard drives at the same time using traditional methods. When connecting your iPhone 11 to a computer or using a Lightning to USB adapter, you can only select one destination for transferring your camera roll. However, you can make separate transfers to different hard drives one after another. If using cloud storage services, you can download the photos from the cloud storage to multiple hard drives.


