Have you ever wanted to up your video conferencing game? Using a DSLR camera as your webcam can greatly enhance the quality of your video calls, whether it’s for business meetings or even streaming on platforms like Twitch or YouTube. While most DSLR cameras are primarily designed for photography, they also have the potential to serve as powerful webcams. In this article, we will guide you through the process of turning your DSLR camera into a webcam.
Why would you want to use a DSLR camera as a webcam? The main advantage of using a DSLR camera is the superior image quality it can provide compared to a standard webcam. DSLR cameras generally have larger sensors, which result in better image resolution, improved low-light performance, and more control over depth of field. This can help you look more professional and stand out in your video calls, creating a more engaging and visually appealing experience for your audience.
How can you turn your DSLR camera into a webcam? To turn your DSLR camera into an effective webcam, you will need a few additional tools. First, you will need a USB cable that is compatible with your camera. Make sure to check your camera’s user manual or the manufacturer’s website to find the suitable cable. Additionally, you will need a capture card, which acts as the intermediary between your camera and computer. There are various capture card options available on the market, and it’s essential to choose one that is compatible with your camera model and computer setup.
Why Use a DSLR Camera as a Webcam?
Improved Image Quality: One of the main reasons to use a DSLR camera as a webcam is the superior image quality it provides. DSLR cameras have larger sensors, better lenses, and advanced image processing capabilities, resulting in sharper and more vibrant images compared to traditional webcams.
Professional Look: If you’re using a DSLR camera as a webcam, you’ll instantly bring a professional and polished look to your video conferences, live streaming, or online content creation. DSLR cameras are designed for professional photography and videography, so they offer a more cinematic and high-quality appearance.

Flexibility and Control: DSLR cameras give you more control over various settings, such as aperture, shutter speed, ISO, and white balance. This means you can fine-tune the camera settings to match your specific lighting conditions and desired look. You can also change lenses depending on the shot you want to achieve, providing flexibility and creative control that traditional webcams lack.
Background Blurring: Another advantage of using a DSLR camera as a webcam is the ability to create a shallow depth of field. By using a wide aperture and focusing on the subject, you can achieve a beautifully blurred background, commonly known as the bokeh effect. This helps to isolate the subject and eliminate any distracting elements, resulting in a more professional and aesthetically pleasing video.
Low Light Performance: DSLR cameras generally perform better in low light conditions compared to webcams. With larger sensors and better image processing, they are able to capture more light, resulting in cleaner and less grainy footage in darker environments. This is particularly useful for video conferencing or streaming in dimly lit rooms.
Overall Upgrade: By using a DSLR camera as a webcam, you can significantly upgrade the visual quality of your online presence. Whether you’re a content creator, professional streamer, or business professional, the use of a DSLR camera enhances your credibility and elevates the overall quality of your videos.
Benefits of Using DSLR Cameras for Video Conferencing
Video conferencing has become an essential mode of communication for businesses and individuals alike. With the increasing number of remote work and telecommuting arrangements, the need for high-quality video and audio has also grown. One solution that can greatly enhance the video conferencing experience is using a DSLR camera instead of a traditional webcam.

Superior Image Quality
DSL
What You Need to Turn a DSLR Camera into a Webcam
If you have a DSLR camera and want to use it as a webcam for your online meetings or livestreams, there are a few things you’ll need to get started. Here is a list of the essential items:
1. DSLR Camera
Naturally, you’ll need a DSLR camera to use as your webcam. Make sure it is in good working condition and has a compatible video output. Most modern DSLR cameras have an HDMI output, which is required for connecting it to your computer.
2. HDMI Cable
In order to connect your DSLR camera to your computer, you’ll need an HDMI cable. Make sure the cable is long enough to reach from your camera to your computer setup. Additionally, check that both ends of the cable match the HDMI specifications of your camera and computer.
3. HDMI Capture Card
A HDMI capture card is a device that allows you to convert the HDMI output from your DSLR camera into a USB signal that your computer can recognize as a webcam. This is an essential component for using your DSLR camera as a webcam. Look for a capture card that is compatible with your computer’s operating system.

4. Computer Software
You’ll need computer software to control and configure your DSLR camera as a webcam. Some DSLR manufacturers provide their own software, while others require third-party applications. Do some research to find the appropriate software for your camera model and computer.
With these essential items, you’ll be well on your way to turning your DSLR camera into a high-quality webcam for your online meetings, livestreams, or other video applications.
Step-by-Step Guide: Turning Your DSLR Camera into a Webcam
Using your DSLR camera as a webcam can greatly improve the quality of your video calls and live streams. In this step-by-step guide, we will walk you through the process of setting up your DSLR camera as a webcam.
Step 1: Check Compatibility
The first step is to make sure your DSLR camera is compatible with being used as a webcam. Check the manufacturer’s website or the camera’s user manual to see if it supports webcam functionality. Note that not all DSLR cameras can be used as webcams.
Step 2: Install Necessary Software
Next, you need to install the necessary software on your computer to connect your DSLR camera to the video conferencing or live streaming application you plan to use. Many camera manufacturers provide software specifically designed for this purpose, so check their website for any available downloads.

Step 3: Connect Your DSLR Camera
Once you have the software installed, connect your DSLR camera to your computer using the appropriate cable. Most DSLR cameras use USB or HDMI cables for connection. Make sure to turn off the camera before connecting it.
Step 4: Configure Camera Settings
Open the software you installed in Step 2 and navigate to the camera settings. This will vary depending on the software and camera you are using. In the camera settings, select the option to use your camera as a webcam.
Step 5: Adjust Camera and Lighting
Before you start using your DSLR camera as a webcam, position it properly and adjust the camera settings for the best video quality. Make sure the camera is stable and focused on your face. Also, ensure that the lighting in your room is adequate for clear video.
Step 6: Test Your Setup
After you have configured the camera settings, open your video conferencing or live streaming application and check if your DSLR camera is recognized as a webcam. Start a test call or stream to ensure that everything is working correctly and that the video quality meets your expectations.
By following these step-by-step instructions, you can easily turn your DSLR camera into a high-quality webcam for your video calls and live streams. Enjoy the improved video quality and make a professional impression in your online meetings and content creation!
Camera Settings for Optimal Video Quality
When using a DSLR camera as a webcam, it is important to adjust the camera settings to ensure the highest video quality possible. Here are some recommended camera settings to achieve optimal video quality:
1. Manual Focus
Set your camera to manual focus mode to have complete control over the focus point. This will prevent the camera from constantly refocusing during the video, resulting in a clearer and more consistent image.
2. Shutter Speed
Choose an appropriate shutter speed that matches the frame rate you are using for your video. A general rule of thumb is to set the shutter speed to double the frame rate. For example, if you are recording at 30 frames per second, set the shutter speed to 1/60th of a second.
3. Aperture
Adjust the aperture to control the depth of field. A lower f-stop number (wider aperture) will result in a shallower depth of field, where the subject is in focus but the background is blurred. Consider the look you want to achieve and adjust the aperture accordingly.
4. ISO
The ISO setting determines the camera’s sensitivity to light. For optimal video quality, it is recommended to use the lowest ISO possible to minimize noise in the footage. However, make sure the video is properly exposed by adjusting the shutter speed and aperture accordingly.

5. Picture Style
Depending on your camera model, you may have various picture style options available. Experiment with different picture styles to find the one that suits your video’s mood and look. Keep in mind that you can also adjust the picture style in post-production if shooting in a flat or neutral profile.
By adjusting these camera settings, you can enhance the video quality when using your DSLR camera as a webcam. Remember to check your camera’s user manual for specific instructions on how to change these settings on your particular model.
Tips and Tricks for Using a DSLR Camera as a Webcam
If you’re tired of the low-quality video from your webcam and want to up your game, you can use a DSLR camera as a webcam. Here are some tips and tricks to help you get the best results.
1. Check Compatibility and Install the Required Software
Before getting started, make sure your DSLR camera is compatible with being used as a webcam. Check the manufacturer’s website or user manual for more information. Once you have confirmed compatibility, download and install the required software provided by the camera manufacturer. This software will act as the bridge between your camera and computer.
2. Use the Right Cables and Adapters
In order to connect your DSLR camera to your computer, you will need the right cables and adapters. Depending on your camera model, you may need an HDMI cable, a USB cable, or both. Make sure to use high-quality cables and adapters to ensure a secure and reliable connection.

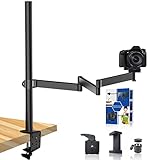
3. Set Up the Camera Properly
Properly positioning and setting up your DSLR camera will greatly impact the quality of your webcam experience. Consider using a tripod or other stabilizing device to ensure a steady shot. Adjust the camera settings to optimize video quality, such as aperture, shutter speed, and ISO. Keep in mind that using a DSLR camera as a webcam may cause it to overheat, so monitor the temperature and take breaks if needed.
4. Lighting and Background
Good lighting and an appropriate background will enhance your video quality and overall presentation. Make sure you are well lit by either natural or artificial light sources, and minimize shadows or glare. Choose a clean and professional-looking background that is not distracting or cluttered.
5. Audio Quality
While DSLR cameras are primarily designed for capturing high-quality images, the built-in microphones may not provide the best audio quality. Consider using an external microphone or a separate audio setup for better sound. Sync the audio and video in the streaming software you are using to avoid any delay.
6. Test and Adjust
Before going live or joining an important video call, make sure to thoroughly test your setup. Check the video and audio quality and make any necessary adjustments in the camera settings or streaming software. This will help you avoid any last-minute surprises and ensure a smooth experience.
| Pros | Cons |
|---|---|
| High video quality | Potential overheating |
| Improved control over camera settings | Requires additional cables and adapters |
| Professional-looking background and lighting | May require extra setup for audio |
By following these tips and tricks, you can transform your DSLR camera into a high-quality webcam and take your video conferencing or streaming to the next level.
Popular Software Solutions for DSLR Webcam Conversion
Using a DSLR camera as a webcam can greatly enhance the image quality and overall experience of video conferencing, streaming, and content creation. While some cameras can be directly connected to a computer via USB, others require additional software to enable webcam functionality. Fortunately, there are several popular software solutions available that allow you to transform your DSLR camera into a high-quality webcam.
1. SparkoCam
SparkoCam is a versatile software that not only enables DSLR camera connectivity but also offers a wide range of features to enhance your webcam experience. It supports a variety of Canon and Nikon cameras and enables live streaming, virtual webcam usage, and green screen functionality. With SparkoCam, you can adjust exposure, focus, and other camera settings directly from your computer.
2. EOS Webcam Utility
Canon users can benefit from the EOS Webcam Utility software, which allows you to use your compatible Canon DSLR as a high-quality webcam. This software makes it incredibly easy to set up and use your camera as a webcam, without the need for additional hardware. Simply connect your camera to your computer using a USB cable and follow the instructions provided by the EOS Webcam Utility.
Note: The EOS Webcam Utility is currently compatible with select Canon cameras and is available for Windows and Mac users.
3. Nikon Webcam Utility
Similar to Canon, Nikon has also released their own Webcam Utility software, enabling Nikon DSLR users to transform their cameras into webcams. With the Nikon Webcam Utility, you can enjoy high-quality video and audio during video conferencing and streaming. The software is compatible with select Nikon models and is available for Windows and Mac operating systems.
Important: Before using the Nikon Webcam Utility, make sure to update your camera’s firmware to the latest version.
By utilizing these popular software solutions, you can easily convert your DSLR camera into a powerful webcam and take advantage of its superior image quality and advanced features for a professional video experience.
Question-answer:
Can I use my DSLR camera as a webcam?
Yes, you can use your DSLR camera as a webcam with the help of certain software and hardware tools.
What do I need to use my DSLR camera as a webcam?
You will need a DSLR camera, a USB cable or capture card, and software like OBS or SparkoCam to use your DSLR as a webcam.
Is it difficult to set up a DSLR camera as a webcam?
Setting up a DSLR camera as a webcam can be a bit technical, but with the right tools and instructions, it is not too difficult.
Are there any limitations to using a DSLR camera as a webcam?
While using a DSLR camera as a webcam can provide high-quality video, there can be limitations such as limited battery life and the need for a larger setup compared to dedicated webcams.