
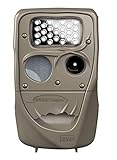
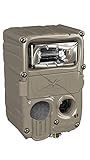
If you’re an avid nature enthusiast or a passionate wildlife photographer, having the right equipment is essential. One of the most popular choices among photographers is the Cuddeback digital camera, known for its high-quality images and reliability in the field. However, if you’re new to this camera or simply need a refresher, it’s important to know how to properly turn it on to ensure you capture every precious moment.
Firstly, locate the power button on your Cuddeback digital camera. Typically, this button is located on the top or side of the camera body, near the shutter button. It is usually labelled with a small power symbol or the word “power”. Once you’ve located the power button, press and hold it for a few seconds to turn on the camera.
After pressing the power button, you’ll notice the camera’s LCD screen turning on. This screen provides important information such as battery life, storage capacity, and shooting settings. It is essential to check these details before you start shooting to ensure you have enough battery and storage space.
At this point, your Cuddeback digital camera is powered on and ready for action. If you’re planning to take still images, you’re all set to start capturing the beauty of nature. However, if you’re interested in recording videos, it’s crucial to switch the camera to video mode. Look for a small switch or button on the camera body labelled “photo” and “video”. Slide or press the button to switch to the video mode, and you’re prepared to record stunning wildlife videos.
Now that you know how to turn on your Cuddeback digital camera, you’re ready to venture into the wild and capture breathtaking moments. Remember to familiarize yourself with other camera settings and features to make the most out of your photography expedition. So strap on your gear, embrace the beauty of nature, and let your Cuddeback camera pave the way for unforgettable memories.
Troubleshooting
If you are experiencing any issues with turning on your Cuddeback digital camera, please refer to the following troubleshooting steps:
1. Check the Batteries
Make sure that the batteries inserted in your camera have enough power. If the batteries are depleted, replace them with new ones and try turning on the camera again.
2. Ensure Proper Installation
Check if the batteries are inserted correctly into the camera. Improper installation may prevent the camera from turning on. Refer to the camera’s user manual for detailed instructions on how to install the batteries correctly.
3. Reset the Camera
If the camera is unresponsive, try resetting it. Look for the reset button or switch on the camera and press it for a few seconds. This may resolve any temporary issues that are preventing the camera from powering on.
4. Verify Memory Card
Ensure that a compatible memory card is inserted into the camera. If no memory card is detected, the camera may not turn on. Try removing and reinserting the memory card to establish a proper connection.

5. Contact Customer Support
If none of the above troubleshooting steps resolve the issue, it is recommended to contact Cuddeback customer support for further assistance. They will be able to provide specific guidance and help you troubleshoot and resolve any technical issues.
Powering on the Camera
To turn on your Cuddeback Digital Camera, follow these simple steps:
- Open the camera’s battery compartment located on the side of the camera.
- Insert the required number of AA batteries into the compartment, ensuring that the positive (+) and negative (-) ends align correctly.
- Close the battery compartment securely.
- Locate the power switch, usually located on the top or side of the camera.
- Move the power switch to the “ON” position.
- Wait for a few seconds for the camera to power up and initialize.
- Once the camera is powered on, check the display screen or LED indicators to ensure that it is functioning properly.
With these simple steps, your Cuddeback Digital Camera will be powered on and ready to capture stunning photos and videos of wildlife and outdoor activities. Enjoy your photography adventures!
Configuring Settings
Once you have successfully turned on your Cuddeback digital camera, you can start configuring the settings to ensure optimal performance. By customizing the settings, you can tailor the camera to your specific needs and preferences. Follow the steps below to configure the settings:
Step 1: Access the Menu
Press the Menu button on the camera to access the settings menu. This will allow you to navigate through the different options and make adjustments as needed.
Step 2: Select Basic Settings
In the settings menu, locate the Basic Settings option and select it. This will bring up a list of fundamental settings that you can modify to suit your requirements.
Step 3: Adjust Image Quality
Within the Basic Settings menu, you will find the Image Quality option. Use the arrow keys to select this option and press the OK button. From here, you can choose the desired image quality for your photos. Higher quality settings will result in larger file sizes, so consider your storage capacity when making adjustments.
Note: It is recommended to select the highest quality setting if you have ample storage space, as this will ensure the best possible image resolution.
Step 4: Set Capture Mode
Another important setting to configure is the Capture Mode. This determines how the camera captures images – whether it is a single photo, a video, or a series of photos. Depending on your intended use, select the appropriate Capture Mode option and make any necessary adjustments.
Step 5: Customize Trigger Options
To further customize your camera’s performance, you can adjust the Trigger Options. This includes settings such as the trigger speed, delay between shots, and the number of photos per trigger. By fine-tuning these options, you can ensure that your camera captures the right moments and conserves battery life efficiently.

Note: Experimenting with different trigger options may be necessary to achieve the desired results for specific wildlife photography scenarios.
Step 6: Save and Exit
Once you have made all the desired changes to the settings, navigate to the Save or Apply option in the menu. Press the OK button to confirm and save the configuration. Finally, exit the settings menu by pressing the Menu button again.
By following these steps, you can easily configure the settings on your Cuddeback digital camera and optimize its performance for capturing stunning wildlife photos.
Mounting the Camera
Before turning on your Cuddeback digital camera, it is essential to properly mount it for optimal performance and capture quality. Follow these steps to mount your camera securely:
- Choose a suitable location: Find a good spot to mount your camera that offers a clear view of the area you want to monitor. Consider factors such as wildlife movement, angle of view, and the distance you want to cover.
- Select a mounting option: There are various mounting options available for Cuddeback cameras, such as tree mounts, strap mounts, or tripod mounts. Select the option that best suits your needs and the location you have chosen.
- Prepare the mounting equipment: Ensure you have all the necessary equipment to mount the camera securely. This may include straps, screws, or mounting brackets provided by Cuddeback.
- Securely attach the camera: Follow the manufacturer’s instructions to attach the camera to the chosen mounting option. Ensure it is tightly secured to prevent any movement or shifting once installed.
- Adjust the camera angle: Once the camera is mounted, adjust its angle to capture the desired field of view. Aim it towards the area you want to monitor and make any necessary adjustments to achieve the best coverage.
By following these steps, you can properly mount your Cuddeback digital camera and ensure it is ready to be turned on and used effectively. Remember to always refer to the manufacturer’s instructions for specific installation guidance.

Testing the Camera
Once you have successfully turned on your Cuddeback digital camera, the next step is to test its functionality to ensure that it is working properly. You can follow the steps below to test your camera:
- Prepare a memory card: Insert a compatible memory card into the camera. Make sure it is correctly placed.
- Configure camera settings: Use the camera’s menu options to adjust settings such as date and time, image resolution, and other preferences according to your needs.
- Check battery level: Ensure that the camera has sufficient battery power to complete the testing process. A low battery may cause issues or prevent the camera from functioning optimally.
- Position the camera: Mount the camera in a suitable location where you want to monitor or capture wildlife activity. Ensure that it is securely fastened and positioned correctly.
- Trigger the camera: Utilize the camera’s testing mode or simulate a wildlife event to trigger the camera. This can be done by walking in front of the camera or using a test trigger device if available.
- Review captured images: After the camera has been triggered, remove the memory card and insert it into a compatible device (such as a computer or card reader) to view the captured images and evaluate their quality.
- Verify functionality: Check for any issues or abnormalities with the captured images, such as blurriness, incorrect exposure, or other technical problems.
- Make necessary adjustments: If any issues are identified, refer to the camera’s user manual or contact customer support for troubleshooting steps or guidance.
- Repeat the testing: If adjustments were made, repeat the testing process to ensure that the camera is now functioning correctly.
By following these steps, you can ensure that your Cuddeback digital camera is working as intended and is ready to capture high-quality wildlife images.
Downloading Images
To download images from your Cuddeback digital camera, follow these steps:
- Connect the camera to your computer using the included USB cable.
- Turn on the camera by pressing the power button.
- On your computer, open the file explorer or a similar program.
- Navigate to the location where you want to save the downloaded images.
- In the file explorer, you should see the camera listed as a removable device. Click on it to open.
- Inside the camera’s folder, you will find the image files. Select the images you want to download by clicking on them.
- Once you have selected the images, right-click and choose the “Copy” option.
- Navigate back to the folder where you want to save the images on your computer.
- Right-click inside the folder and choose the “Paste” option to transfer the images from the camera to your computer.
After following these steps, the selected images will be downloaded and saved to your computer. You can then view, edit, or share them as desired.
Transferring Images to a Computer
To transfer images from your Cuddeback digital camera to a computer, follow the steps below:

Step 1: Connect your camera
Start by connecting your camera to the computer using the USB cable provided with the camera. Plug one end of the USB cable into the camera’s USB port and the other end into an available USB port on your computer.
Step 2: Turn on your camera
Turn on your Cuddeback digital camera by pressing the power button. Make sure the camera is in playback mode and not in capture mode.
Step 3: Access the camera’s memory
Once your camera is turned on, your computer should recognize the device and automatically open the file transfer window. If the window does not open automatically, you can manually access the camera’s memory by going to “My Computer” or “This PC” on your computer and locating your camera under the “Devices and Drives” section.
Step 4: Select and copy the images
Once you have accessed the camera’s memory, you will see a list of image files stored on the camera. You can select individual images or multiple images by holding down the Ctrl key while clicking on each image. Right-click on the selected images and choose “Copy” from the drop-down menu.
Step 5: Paste the images to your computer
Open the folder or location on your computer where you want to save the transferred images. Right-click on the folder and choose “Paste” from the drop-down menu. The images will then be copied from your camera to your computer.

Once the transfer is complete, you can disconnect your camera from the computer by safely removing the USB cable. You can now access and view the transferred images on your computer.
Note: If you encounter any issues during the transfer process, make sure you have the necessary software and drivers installed on your computer. You may need to visit the Cuddeback website to download the latest software and driver updates.
Maintenance and Care
Regular maintenance and care of your Cuddeback digital camera will ensure its optimal performance and prolong its lifespan. Here are some tips to keep in mind:
1. Clean the Camera
Regularly clean your camera to remove any dust, dirt, or debris that may accumulate on the lens or sensors. Use a soft brush or compressed air to gently remove any particles. Avoid using harsh chemicals or abrasive materials, as they can damage the camera.
2. Protect from Extreme Temperatures
Avoid exposing your camera to extreme temperatures, whether hot or cold. Extreme temperatures can affect the battery life and overall performance of the camera. Store the camera in a cool, dry place when not in use.
Please note: Although Cuddeback digital cameras are built to withstand some weather conditions, it is recommended to avoid exposing the camera to prolonged moisture, extreme humidity, or direct sunlight.
With proper maintenance and care, your Cuddeback digital camera will continue to capture high-quality images and provide you with reliable performance for years to come.
Question-answer:
How do I turn on my Cuddeback digital camera?
To turn on your Cuddeback digital camera, make sure you have fresh batteries in it. Then, press and hold the power button until you see the camera’s display screen light up.
What kind of batteries does the Cuddeback digital camera require?
The Cuddeback digital camera requires 8 AA batteries. Make sure to use high-quality batteries for optimal performance.
Can I turn on the Cuddeback digital camera without using the power button?
No, you need to use the power button to turn on the Cuddeback digital camera. It is usually located on the top or side of the camera.
How long does it take for the Cuddeback digital camera to turn on?
Once you press and hold the power button, it should only take a few seconds for the Cuddeback digital camera to turn on and for the display screen to light up.
Why is my Cuddeback digital camera not turning on?
If your Cuddeback digital camera is not turning on, first check if the batteries are inserted correctly and if they have enough charge. If the batteries are fine, try replacing them with fresh ones. If the problem persists, there may be an issue with the camera’s power button or internal circuitry, and it is recommended to contact Cuddeback customer support for further assistance.


