
If you are a photography enthusiast, you probably know the joy of capturing amazing pictures with your camera. However, the process of transferring those pictures from your camera to your iPhone may seem a bit daunting at first. But worry not, it’s actually much easier than you think!
In this article, we will guide you through the step-by-step process of uploading pictures from your camera to your iPhone. Whether you have a DSLR camera or a point-and-shoot, we’ve got you covered with the best methods to transfer your photos effortlessly.
One of the easiest ways to upload pictures from your camera to your iPhone is by using a Lightning to USB Camera Adapter. This handy accessory allows you to connect your camera directly to your iPhone, making the transfer process seamless. Simply connect the Lightning to USB Camera Adapter to your iPhone, plug in your camera’s USB cable, and your iPhone will automatically detect the connected camera. From there, you can choose which photos to import to your iPhone’s camera roll.
If you don’t have a Lightning to USB Camera Adapter, don’t worry! You can also transfer your pictures using a computer. Just connect your camera to your computer using a USB cable, import the pictures onto your computer, and then sync your iPhone with your computer using iTunes. This will transfer the pictures from your computer to your iPhone. It may take a few extra steps, but it’s equally effective.
Overview:
Uploading pictures from a camera to an iPhone can be a simple and seamless process using various methods available. Whether you are using a digital camera or a DSLR, you can transfer your photos to your iPhone in just a few steps.

Method 1: Using a Lightning to SD Card Camera Reader
If your camera has an SD card, you can use a Lightning to SD Card Camera Reader to transfer your photos to your iPhone. Simply connect the reader to your iPhone’s Lightning port and insert the SD card into the reader. Your iPhone will automatically detect the SD card and display the photos available for import. You can select the desired photos and choose to import them to your iPhone’s Photos app.
Method 2: Using a USB Cable
If your camera uses a USB cable for data transfer, you can connect your camera to your iPhone using a Lightning to USB Camera Adapter. This adapter allows you to connect your camera directly to your iPhone’s Lightning port. Once connected, your iPhone will automatically recognize the camera and prompt you to import the photos. You can then choose the photos you want to transfer and import them to your iPhone.
Note: Some cameras may require you to enable “PTP” or “PC Connect” mode in their settings before establishing a connection with your iPhone
Method 3: Using Wi-Fi Transfer
If your camera supports Wi-Fi connectivity, you can transfer photos wirelessly to your iPhone using the camera’s dedicated app or a third-party photo transfer app. Follow the instructions provided with your camera to connect it to your iPhone via Wi-Fi. Once connected, you can select the photos you want to transfer and initiate the transfer process. The photos will be transferred directly to your iPhone without the need for any physical cables.
Note: Make sure both your camera and iPhone are connected to the same Wi-Fi network for successful transfer.
By following these methods, you can easily upload pictures from your camera to your iPhone and have them readily available for viewing and sharing on your device.
Importing Photos from Camera to iPhone: Step-by-Step Guide
Here is a simple guide on how to import photos from your camera to your iPhone:
- Connect your iPhone to your camera using a USB cable.
- Ensure that your camera is turned on and in the appropriate photo transfer mode.
- On your iPhone, open the Photos app.
- Tap on the “Albums” tab at the bottom of the screen.
- Scroll down and tap on the “Import” album.
- You will see the name of your camera under the “Import” album. Tap on it.
- Now, you will see all the photos on your camera. You can tap on individual photos to select them, or tap on “Import All” to import all the photos.
- After selecting the photos you want to import, tap on the “Import” button at the bottom right corner of the screen.
- The photos will now be imported to your iPhone. You can find them in the “Recents” album in the Photos app.
- Once the import is complete, you can disconnect your camera from your iPhone.
Now you know how to easily import photos from your camera to your iPhone. Enjoy capturing memories with your camera and easily accessing them on your iPhone!
Step 1: Connect your camera to your iPhone
To upload pictures from your camera to your iPhone, you will first need to connect the two devices. Depending on the type of camera you have, you may need a specific cable or adapter.
1. Locate the appropriate cable or adapter for your camera. This may include a USB cable or a Lightning to USB adapter.

2. Connect one end of the cable or adapter to the camera, and the other end to the iPhone’s Lightning port.
3. Once the camera and iPhone are connected, your iPhone should recognize the camera and display a prompt asking for your permission to access the photos. Tap “Allow” to continue.
4. If your iPhone does not automatically recognize the camera, open the Photos app and tap on the “Import” tab at the bottom of the screen. Then tap on the “Import” button in the top-right corner and select your camera from the list of available devices.
Now that your camera is connected to your iPhone, you can proceed to the next step to transfer the pictures.
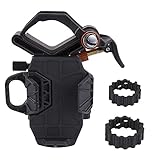
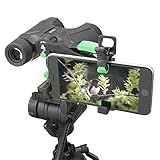
Connect Your Camera to the iPhone Using an Adapter
If you want to upload pictures from your camera to your iPhone, you can use an adapter to connect the two devices. This will allow you to transfer the photos directly from your camera to your iPhone without the need for a computer.

Here are the steps to connect your camera to your iPhone using an adapter:
Step 1: Check Compatibility
Before you purchase an adapter, make sure it is compatible with your specific camera model and iPhone. Different adapters are designed to work with different cameras and iPhone models, so it’s important to check compatibility to ensure a seamless connection.
Step 2: Purchase an Adapter
Once you have determined the compatibility, you can purchase the adapter. Adapters can be found online or at electronics stores. Make sure to choose one that is specifically designed for connecting cameras to iPhones.
Step 3: Connect the Adapter
Plug one end of the adapter into the charging port of your iPhone. The other end of the adapter will have a slot where you can insert the memory card from your camera. Carefully insert the memory card into the slot, making sure it is secure.
Step 4: Access the Photos App
With the adapter connected and the memory card inserted, unlock your iPhone and open the Photos app. If this is your first time connecting a camera, you may need to give the app permission to access the files on the camera’s memory card.

Step 5: Transfer the Photos
Once the Photos app is open, you should see a prompt asking if you want to import the photos from your camera. Tap on the prompt and select the photos you want to transfer. You can choose to import all the photos or select specific ones. Once you have made your selections, tap on the “Import” button to start the transfer.
After the transfer is complete, the imported photos will be saved to your iPhone’s Photos app. You can view, edit, and share them just like any other photos on your device.
Connecting your camera to your iPhone using an adapter is a convenient way to transfer photos without the need for a computer. It allows you to quickly and easily access your camera photos on your iPhone and share them with friends and family.
Step 2: Connect your camera to your iPhone
Once you have the necessary adapter, the next step is to connect your camera to your iPhone. Here’s how:
1. Connect the adapter to your iPhone: Start by plugging one end of the adapter into the charging port of your iPhone. Make sure it fits securely and is properly aligned.

2. Connect your camera to the adapter: Take the USB cable that came with your camera and connect it to the USB port on the adapter. This will allow your camera to communicate with your iPhone.
3. Turn on your camera: Make sure your camera is turned on and set to the appropriate mode for transferring photos. Refer to your camera’s user manual for specific instructions, if needed.
Note: Depending on your camera model, you may need to adjust certain settings or enable a “PC Connection” mode in order for your iPhone to recognize the camera.
4. Unlock your iPhone: If your iPhone is locked, unlock it by entering your passcode or using Touch ID/Face ID.
5. Open the Photos app: Once your iPhone recognizes the camera, it may automatically open the Photos app. If not, open the Photos app manually by tapping on the app icon from your iPhone’s home screen.
Now that your camera is connected to your iPhone, you are ready to transfer your photos and videos. Continue to the next step to learn how to do that.
Open the Photos App on Your iPhone
After connecting your camera to your iPhone using the appropriate adapter, the first step to uploading pictures is to open the Photos app on your iPhone.
To open the Photos app, navigate to your iPhone’s home screen and tap on the Photos icon. The icon is typically a multicolored flower. If you can’t find it, you can use the search function by swiping down on the home screen and typing in “Photos”.
Once you have opened the Photos app, you will see different tabs at the bottom of the screen: Photos, For You, Albums, and Search. The default tab that opens is usually the Photos tab, which displays all the photos and videos on your iPhone.
If you have just connected your camera, you may need to go to the Albums tab instead. To do this, simply tap on the Albums tab at the bottom of the screen.
Within the Albums tab, you will see different folders and albums where your photos are stored. Look for the folder or album that corresponds to your connected camera. It may be named after the camera brand or the date of import.
Once you have located the correct folder or album, tap on it to open it. Inside, you should see the photos that you have imported from your camera. You can swipe up and down to browse through the photos and videos.
In this album view, you can select individual photos to view and edit them. You can also select multiple photos by tapping on the “Select” button in the top right corner. This allows you to perform actions such as sharing, deleting, or editing multiple photos at once.
Now that you have successfully opened the Photos app on your iPhone and located the folder or album containing your imported photos, you can proceed with organizing, editing, or sharing them as desired.
Step 3: Connecting the camera to the iPhone
Now that your camera’s memory card is prepared and your Lightning to SD card adapter is ready, let’s connect the camera to your iPhone:
- Plug one end of the SD card adapter into the Lightning port on your iPhone.
- Insert the SD card from your camera into the SD card slot of the adapter.
- Ensure that the SD card is securely inserted into the adapter and that the adapter is properly connected to your iPhone.
- Once connected, your iPhone should automatically open the Photos app. If it doesn’t, open the Photos app manually.
Your camera will now be detected by your iPhone, and you’ll be able to import and view the photos stored on your camera’s SD card using the Photos app.
Select the “Import” option
Once your camera is connected to your iPhone using the appropriate adapter, the next step is to select the “Import” option to transfer the photos from your camera to your iPhone. Follow the steps below to complete this process:
Step 1: Launch the Photos app
Look for the Photos app on your iPhone’s home screen and tap on it to open it. The app’s icon resembles a multicolored flower.
Step 2: Connect your camera to your iPhone
Use the appropriate camera adapter to connect your camera to your iPhone. The type of adapter you need will depend on the model of your camera and your iPhone. For example, if you have a recent iPhone with a Lightning port, you may need a Lightning to USB adapter.
Step 3: Tap on the “Import” tab
At the bottom of the Photos app, you will see different tabs labeled “Photos,” “For You,” “Albums,” and “Search.” Tap on the “Import” tab, which is represented by a square icon with an arrow pointing upward.
Step 4: Select the photos you want to import
The “Import” tab will display all the photos available on your connected camera. You can browse through the photos or use the search bar to find specific ones. Tap on each photo you want to import to select them. Selected photos will have a blue checkmark on them.
Step 5: Tap on the “Import Selected” button
After selecting the desired photos, tap on the “Import Selected” button located at the bottom right corner of the screen. This will start the importing process and transfer the selected photos from your camera to your iPhone.
Once the import is complete, you can find the imported photos in the “Photos” tab of the Photos app, organized by the date they were imported. From there, you can view, edit, and share the photos as desired.
| Step | Action |
|---|---|
| Step 1 | Launch the Photos app |
| Step 2 | Connect your camera to your iPhone |
| Step 3 | Tap on the “Import” tab |
| Step 4 | Select the photos you want to import |
| Step 5 | Tap on the “Import Selected” button |
FAQ
Can I upload pictures from my camera to my iPhone?
Yes, you can upload pictures from your camera to your iPhone. There are a few different methods you can use to do this.
What cable do I need to connect my camera to my iPhone?
The cable you need to connect your camera to your iPhone will depend on the type of camera you have. Most cameras use a USB cable, so you may need an adapter to connect it to your iPhone’s Lightning port.
Is there a wireless way to transfer photos from my camera to my iPhone?
Yes, there are wireless methods you can use to transfer photos from your camera to your iPhone. One option is to use a Wi-Fi enabled SD card in your camera, which allows you to transfer photos wirelessly to your iPhone using an app.
Can I use a memory card reader to upload pictures from my camera to my iPhone?
Yes, you can use a memory card reader to upload pictures from your camera to your iPhone. You will need a memory card reader that is compatible with your camera’s memory card format, and a Lightning to USB adapter to connect it to your iPhone.
What apps can I use to transfer photos from my camera to my iPhone?
There are several apps you can use to transfer photos from your camera to your iPhone, such as the Camera Connect app for Canon cameras, or the Sony Imaging Edge app for Sony cameras. These apps allow you to wirelessly transfer photos from your camera to your iPhone.


