Are you looking to take your photography or videography skills to the next level? One essential tool to consider is a DSLR camera stabilizer. A DSLR camera stabilizer helps you capture steady, professional-looking shots by reducing any unwanted camera movements such as shaky hands or vibrations. Whether you’re a beginner or a seasoned photographer, using a stabilizer can greatly improve the overall quality of your work.
Using a DSLR camera stabilizer may seem intimidating at first, but with a little practice and knowledge, you’ll soon be capturing smooth and captivating footage. Firstly, it’s important to understand the different types of stabilizers available. There are handheld stabilizers, shoulder rigs, and even motorized gimbals. Each type has its own unique features and advantages, so it’s important to choose the one that best suits your shooting style and needs.
Once you’ve chosen the right stabilizer, it’s time to set it up and start shooting. Begin by attaching your DSLR camera securely to the stabilizer. Most stabilizers come with adjustable mounting plates or quick-release systems that make it easy to attach and detach your camera. Make sure to use a strong and sturdy mounting technique to prevent any accidents or damage to your equipment.
Next, it’s important to properly balance your camera on the stabilizer. This step is crucial in achieving stable footage. Begin by adjusting the height and angle of the camera until it feels well-balanced. You may need to move the camera forward or backward on the mounting plate to find the perfect balance. Once you find the right position, use the provided knobs or screws to lock the camera in place.
Finally, it’s time to start shooting with your DSLR camera stabilizer. Remember to maintain a relaxed and steady grip on the stabilizer, allowing it to absorb any movements or vibrations. Practice walking or panning smoothly to capture dynamic shots. Experiment with different angles and movements to unleash your creativity and capture stunning visuals.
In conclusion, utilizing a DSLR camera stabilizer is a game-changer for any photographer or videographer. With a little practice, you’ll be capturing professional-looking shots and footage that will amaze your audience. So, don’t hesitate to invest in a stabilizer and take your photography and filmmaking skills to new heights!
Benefits of Using a DSLR Camera Stabilizer
A DSLR camera stabilizer is an essential tool for photographers and videographers who want to capture professional-quality images and videos. Here are some of the benefits of using a DSLR camera stabilizer:
1. Improved Image and Video Quality
One of the main advantages of using a DSLR camera stabilizer is that it helps to reduce camera shake and vibration, resulting in sharper and clearer images and videos. Camera shake can be especially problematic when shooting in low light conditions or when using telephoto lenses, as even the slightest movement can lead to blurriness. By using a stabilizer, you can ensure that your shots remain stable and steady, resulting in better overall image and video quality.
2. Increased Versatility
A DSLR camera stabilizer allows you to capture shots from a wide variety of angles and perspectives, giving you more creative control over your photography and videography. Whether you are shooting handheld, walking or running, or even capturing shots from a moving vehicle, a stabilizer can help you achieve smooth and stable footage. This increased versatility opens up new possibilities for your creative vision and allows you to capture shots that would otherwise be difficult or impossible to achieve.
3. Reduced Fatigue
Using a DSLR camera stabilizer can also help to reduce fatigue during long shooting sessions or when carrying heavy camera equipment. Without a stabilizer, photographers and videographers may find themselves straining to keep the camera steady, which can quickly lead to muscle fatigue and shaky footage. By using a stabilizer, the weight of the camera is distributed more evenly, reducing strain on your arms and allowing you to shoot for longer periods without discomfort.
In conclusion, a DSLR camera stabilizer is a valuable tool that can significantly improve the quality of your images and videos. Not only does it help to reduce camera shake and vibration, but it also increases versatility and reduces fatigue, allowing you to capture professional-quality shots with ease. Whether you are a professional photographer or a hobbyist, investing in a DSLR camera stabilizer is a worthwhile decision that will greatly enhance your shooting experience.
Different Types of DSLR Camera Stabilizers
When it comes to capturing stable footage with a DSLR camera, a stabilizer can be a valuable tool. There are various types of stabilizers available on the market, each designed to provide different levels of stability and control.
1. Handheld Stabilizers: Handheld stabilizers are lightweight and portable, making them a popular choice among filmmakers and videographers. They are designed to be held by hand, providing stability and reducing camera shake while allowing for smooth camera movements.
2. Gimbal Stabilizers: Gimbal stabilizers use motors and sensors to counteract movement and provide seamless stabilization. They are particularly effective for shooting dynamic footage, such as tracking shots or action sequences. Gimbal stabilizers can be handheld or used with an attached handle or tripod.
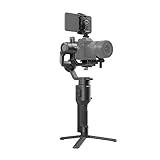
2.1 3-Axis Gimbal Stabilizers
3-axis gimbal stabilizers provide stabilization in three dimensions, namely roll, pitch, and yaw. This means they can compensate for movement in all directions, resulting in extremely smooth footage.
![FeiyuTech SCORP-C [Official] Camera Stabilizer 3-Axis Handheld Gimbal Stabilizer for Mirrorless/DSLR Camera,for Sony a7IV a7s Canon R5 R6 M50 Panasonic Nikon Fujifilm,Max5.5lb,Cable Control Camera](https://m.media-amazon.com/images/I/41xIubw-rZL._SL160_.jpg)
3. Shoulder Mount Stabilizers: Shoulder mount stabilizers are designed to be worn on the shoulder, distributing the weight of the camera and providing stability. They are especially useful for longer shoots and can help reduce fatigue and strain on the arms.
4. Camera Rig Stabilizers: Camera rig stabilizers are more complex and versatile systems that offer a wide range of stabilization options. They consist of various components such as shoulder mounts, handles, and counterweights, allowing for customizable stabilization setups.
4.1 Vest Stabilizers
Vest stabilizers are a type of camera rig stabilizer that includes a vest worn by the operator. The vest transfers the weight of the camera setup to the operator’s body, reducing strain during prolonged shoots and providing increased stability.
When choosing a DSLR camera stabilizer, it’s important to consider your specific needs and shooting style. Factors such as the weight of your camera, the type of shots you want to capture, and how long you’ll be shooting for will all affect the type of stabilizer that will work best for you.
Investing in a high-quality stabilizer can greatly improve the quality of your footage and allow you to capture smooth, professional-looking shots with your DSLR camera.

Choosing the Right DSLR Camera Stabilizer
When it comes to capturing smooth and stable footage with your DSLR camera, using a stabilizer is essential. A DSLR camera stabilizer helps to minimize camera shake and movement, resulting in professional-looking videos.
Here are some factors to consider when choosing the right DSLR camera stabilizer:
1. Type of Stabilizer: There are several types of stabilizers available, including handheld gimbals, shoulder rigs, and tripod-based stabilizers. Each type has its advantages and disadvantages, so you need to choose the one that suits your needs and shooting style.
2. Camera Compatibility: Make sure the stabilizer you choose is compatible with your DSLR camera. Check the maximum weight capacity of the stabilizer and ensure that it can support the weight of your camera and any additional equipment, such as lenses and accessories.
3. Stabilization Mechanism: Different stabilizers use various stabilization mechanisms, such as gimbals, counterweights, or electronic motors. Research and understand how each mechanism works and choose the one that best fits your shooting requirements.

4. Portability: Consider the size and weight of the stabilizer, especially if you plan to travel with it. A lightweight and compact stabilizer will be easier to carry and use in various shooting environments.
5. Ease of Use: Look for a stabilizer that is easy to set up and operate. Some stabilizers require extensive balancing and adjustments, while others are more user-friendly. Consider your experience level with using camera stabilizers when making your decision.
6. Additional Features: Some stabilizers come with additional features, such as built-in focus control or remote control capabilities. These features can enhance your shooting experience and open up new creative possibilities, so consider whether you need them.
By considering these factors, you can choose the right DSLR camera stabilizer that meets your requirements and helps you capture steady and professional-looking footage.
Setting Up a DSLR Camera Stabilizer
Using a DSLR camera stabilizer can greatly improve the quality of your photography or videography by reducing shakiness and creating smoother, more professional-looking shots. Here are a few steps to help you set up your DSLR camera stabilizer for optimal performance:
- Start by attaching the camera plate to the bottom of your camera using the mounting screw. Make sure it is securely fastened.
- Adjust the balance of the stabilizer by sliding the camera forward or backward on the plate. The goal is to find the center of gravity and achieve a stable balance.
- Tighten the plate adjustment knob to lock the camera in place once you have achieved the desired balance.
- Hold the stabilizer with both hands and extend your arms fully. Relax your body and keep your hands steady.
- Position your camera in the desired angle and tighten the adjustment knobs to secure the position.
- Turn on any necessary stabilization features on your camera, such as image stabilization or electronic stabilization.
- Practice walking or moving around with the camera stabilizer to get a feel for its movement and how it affects the stability of your shots.
- Make any necessary adjustments to the stabilizer’s settings or your camera’s settings as you test it out and gain more experience.
Remember, using a DSLR camera stabilizer may take some practice to get the best results. Experiment with different techniques and settings to find what works best for you and your shooting style.
Balancing Your DSLR Camera on the Stabilizer
When using a DSLR camera stabilizer, one of the key steps to ensure smooth and stable footage is to properly balance your camera on the stabilizer. Balancing your camera correctly will not only improve stability, but also prevent unnecessary strain on your arms and wrists during use.
1. Mounting the Camera
Start by mounting your DSLR camera onto the stabilizer plate. Ensure that the plate is securely attached to the stabilizer handle and that the mounting screw is tightened properly. It is important to have a secure connection between the camera and the stabilizer to avoid any accidental drops or slippage.
2. Adjusting the Lateral Balance
Next, adjust the lateral balance of your camera. This involves shifting the camera left or right on the stabilizer plate to find the center of gravity. To do this, loosen the thumbscrew on the plate and slide the camera until it stays level and doesn’t tilt to either side. Tighten the thumbscrew once you have achieved the desired balance.
3. Setting the Fore-Aft Balance
After achieving the lateral balance, you need to set the fore-aft balance. This balance involves adjusting the front-to-back position of the camera on the stabilizer plate. Loosen the sliding plate on the stabilizer and carefully move the camera forward or backward until it stays level and doesn’t tilt forward or backward. Once you have achieved the fore-aft balance, tighten the sliding plate securely.

It is important to note that the exact balance point may vary depending on the lens and other accessories attached to your camera. Experiment with different positions until you find the right balance for your specific setup.
4. Testing and Adjusting
Before shooting, it’s essential to test the balance of your camera on the stabilizer. Hold the stabilizer as you normally would and check if the camera remains level and doesn’t tilt in any direction. If needed, make additional adjustments to the lateral or fore-aft balance to achieve the desired stability.
Continuously monitor the stability as you use the stabilizer, as it may require minor adjustments while you move or change shooting positions. With practice and experience, you will become adept at quickly balancing your camera on the stabilizer and achieving smooth, stable footage.
By following these steps and taking the time to properly balance your DSLR camera on the stabilizer, you can improve the quality of your footage and capture professional-looking videos.
Adjusting the Stabilizer for Smooth Shots
When using a DSLR camera stabilizer, it’s important to properly adjust it in order to achieve smooth and steady shots. Here are some tips on how to do that:
1. Balancing the Camera
Start by ensuring that your camera is properly balanced on the stabilizer. This is crucial for achieving stable footage. Adjust the position of the camera and any counterweights attached to the stabilizer until you find the right balance. You should be able to hold the stabilizer without the camera tilting forward or backward.
2. Adjusting the Handle
The handle on the stabilizer allows you to control the movement and stability of the camera. It’s important to adjust the handle for maximum comfort and control. You can typically adjust the handle’s length, angle, and position. Experiment with different configurations to find the one that works best for you.
Additionally, make sure your grip on the handle is relaxed and steady. This will help to minimize any unintentional movements that could result in shaky footage.
3. Fine-Tuning the Stabilizer
Once you have balanced the camera and adjusted the handle, take the time to fine-tune the stabilizer. This involves making small adjustments to the stabilizer’s settings, such as tension or damping controls. Often, these adjustments will be specific to the model of stabilizer you are using, so refer to the manufacturer’s instructions for guidance.
Remember to take your time with these adjustments and test your stabilizer before shooting. This will help you get familiar with its capabilities and ensure that you achieve the desired smoothness in your shots.
By following these steps and practicing with your DSLR camera stabilizer, you’ll be able to capture professional-looking footage with smooth and steady shots.
Using the DSLR Camera Stabilizer for Action Shots
If you’re looking to capture crisp and smooth action shots with your DSLR camera, using a camera stabilizer can significantly improve the results. A camera stabilizer helps reduce camera shake and provides stability during fast-moving or action-packed moments, allowing you to capture clear and professional-looking photos and videos.
Here are some important tips to keep in mind when using a DSLR camera stabilizer for action shots:
- Choose the right stabilizer: There are various types of camera stabilizers available, including handheld stabilizers, shoulder rigs, and wearable stabilizers. Consider the type of action shots you’ll be capturing and choose a stabilizer that suits your needs.
- Balance the stabilizer: Before you start shooting, make sure to properly balance the stabilizer. Adjust the counterweights or knobs on the stabilizer to ensure that your camera stays steady and level during action sequences.
- Master the grip: When using a handheld stabilizer, practice and perfect your grip. Hold the stabilizer with both hands, keeping your elbows close to your body for added stability. This will help reduce hand and arm fatigue during extended shooting sessions.
- Use smooth movements: When shooting action sequences, it’s important to move the stabilizer smoothly and follow the movement of your subject. Avoid jerky or sudden movements, as they can disrupt the stability of the camera and affect the final result.
- Experiment with different angles: Don’t be afraid to try out different angles and perspectives when shooting action shots. Change your position, height, or distance from the subject to capture dynamic and visually interesting shots.
- Shoot in manual mode: To have full control over the camera settings, switch to manual mode. This will allow you to adjust the shutter speed, aperture, and ISO according to the lighting conditions and the desired effect.
- Practice and experiment: Like any skill, mastering the use of a camera stabilizer requires practice and experimentation. Take the time to familiarize yourself with the stabilizer’s features and capabilities, and try out different techniques to find what works best for your shooting style.
By following these tips and practicing regularly, you’ll be able to make the most out of your DSLR camera stabilizer for action shots. Remember to stay patient and persistent, as getting the perfect shot takes time and dedication.
Tips and Tricks for Using a DSLR Camera Stabilizer
A DSLR camera stabilizer is a tool that helps to minimize camera shake and ensure smooth and steady footage. Whether you are shooting video or capturing still images, using a stabilizer can drastically improve the overall quality of your shots. Here are some tips and tricks to help you make the most out of your DSLR camera stabilizer:
| 1. Balance the Stabilizer | Before using the stabilizer, it is important to properly balance it. The weight of your camera should be evenly distributed to ensure stability. Adjust the position of the camera plate and the counterweights until the stabilizer is perfectly balanced. |
| 2. Use Two Hands | When operating the stabilizer, it is best to use both hands for better control and stability. Hold the handle firmly with your dominant hand and use your other hand to support the bottom or side of the stabilizer. |
| 3. Practice Proper Movements | Using a DSLR camera stabilizer requires smooth and controlled movements. Avoid jerky or abrupt motions as they can create unwanted shake in your footage. Practice panning, tilting, and walking movements to achieve professional-looking shots. |
| 4. Adjust the Camera Settings | Make sure to adjust your camera settings to match the shooting conditions and desired look. Use a fast shutter speed to minimize motion blur, a lower ISO to reduce noise, and consider using manual focus for more precise control. |
| 5. Experiment with Different Angles and Perspectives | A DSLR camera stabilizer opens up endless possibilities for creative shots. Experiment with different angles, perspectives, and heights to add variety and visual interest to your footage. Try shooting from low angles or capturing smooth tracking shots. |
| 6. Use Image Stabilization Features | Many DSLR cameras have built-in image stabilization features. Enable this feature to further enhance the stability of your footage. However, it is important to note that using both the camera’s stabilization and the stabilizer simultaneously may result in an unstable image. |
| 7. Take Breaks and Rest | Using a DSLR camera stabilizer requires physical effort and can be tiring over extended periods of use. Take breaks and rest your arms to avoid fatigue and ensure consistent and steady shots throughout your shoot. |
| 8. Practice and Patience | Using a DSLR camera stabilizer is a skill that takes time and practice to master. Be patient and keep practicing to improve your stability and control. With time, you’ll be able to achieve professional-level shots with ease. |
By following these tips and tricks, you can maximize the potential of your DSLR camera stabilizer and elevate the quality of your footage. Remember to experiment and have fun with your stabilizer to create unique and captivating visuals.
Maintaining Your DSLR Camera Stabilizer
Once you’ve invested in a DSLR camera stabilizer, it’s important to properly maintain it to ensure optimal performance and longevity. Here are some tips to help you take care of your stabilizer:
1. Clean it regularly: Dust, dirt, and debris can accumulate on your stabilizer over time, affecting its functionality. Use a soft cloth or brush to gently wipe down the stabilizer after each use. Avoid using harsh chemicals or solvents that may damage the materials.
2. Check for loose parts: Regularly inspect your stabilizer for any loose screws, bolts, or other parts. Tighten them as necessary to prevent any potential issues during use. Pay special attention to the joints and connectors, as they are often prone to loosening over time.
3. Lubricate moving parts: Some stabilizer models have moving parts that may benefit from lubrication. Refer to your stabilizer’s user manual to determine if lubrication is required and what type of lubricant to use. Apply the lubricant sparingly and wipe off any excess to prevent buildup.
4. Store it properly: When you’re not using your stabilizer, store it in a cool, dry place away from extreme temperatures and humidity. Consider investing in a protective case or bag to prevent any accidental damage during transport or storage.
5. Avoid rough handling: While stabilizers are designed to withstand some level of impact, avoid subjecting your stabilizer to rough handling or dropping it. Mishandling can lead to internal damage, affecting its stability and performance.
6. Follow manufacturer’s instructions: Every stabilizer model may have specific maintenance instructions provided by the manufacturer. Be sure to read and follow these instructions carefully to ensure you’re taking the necessary steps to maintain your stabilizer properly.
By following these maintenance tips, your DSLR camera stabilizer will continue to provide smooth and stable footage for years to come. Remember to always handle your stabilizer with care and take the time to clean and inspect it regularly.
Question-answer:
What is a DSLR camera stabilizer and why do I need it?
A DSLR camera stabilizer is a device that helps reduce camera shake while shooting. It provides stability and smoother footage, especially when recording videos or capturing fast-moving subjects. It is necessary to use a stabilizer to improve the overall quality of your photos and videos.
How does a DSLR camera stabilizer work?
A DSLR camera stabilizer typically uses a combination of gyroscopes, accelerometers, and motors to counteract any unwanted motion or shake. These sensors detect movement and instruct the motors to make counter-adjustments, keeping the camera steady during shooting.