When it comes to capturing high-quality photographs and videos, using a DSLR camera stabilizer can make all the difference. A stabilizer is a device that helps to eliminate unwanted movements and vibrations, allowing you to achieve smooth and steady shots. Whether you are shooting a wedding, documentary, or simply want to improve your photography skills, learning how to properly use a DSLR camera stabilizer is essential.
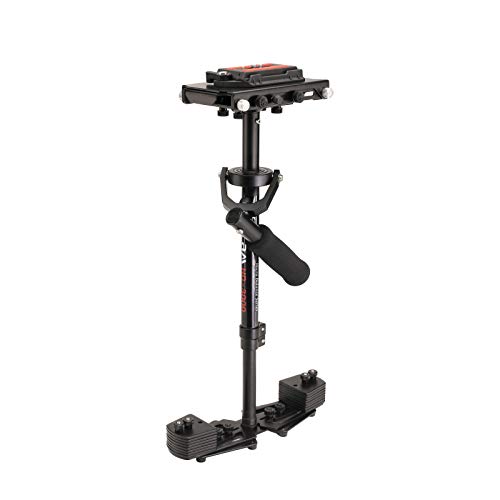
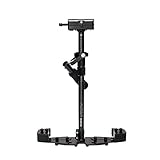
First and foremost, it is important to familiarize yourself with the different types of DSLR camera stabilizers available. There are handheld stabilizers, which provide freedom of movement and are ideal for capturing action shots or walking shots. Then, there are shoulder-mounted stabilizers, designed to distribute the weight of the camera across your shoulder, reducing strain and allowing for longer shooting periods. Lastly, there are tripod-based stabilizers, which provide stability and are great for stationary shots.
Once you have chosen the right stabilizer for your needs, it is crucial to balance it properly. Start by attaching your DSLR camera to the stabilizer and adjusting the position so that the camera is centered and level. Make sure to secure it firmly to avoid any accidents or damage. Next, adjust the stabilizer’s counterweights to ensure that the camera remains balanced and easy to maneuver. This will help to reduce strain on your arm and improve stability while shooting.
Choosing the right stabilizer for your DSLR
When it comes to using a DSLR camera stabilizer, choosing the right one is essential for getting smooth and steady shots. Here are some factors to consider when looking for the perfect stabilizer:
- Type: There are various types of stabilizers available, such as handheld gimbal stabilizers, shoulder rigs, and steadicams. Each type has its advantages and disadvantages, so think about your shooting style and the type of shots you want to capture.
- Weight capacity: Make sure to check the weight capacity of the stabilizer. Your DSLR camera and any additional accessories, such as lenses or microphones, should not exceed this limit.
- Size and portability: Consider the size and portability of the stabilizer, especially if you plan to use it for outdoor or travel photography. Look for a compact and lightweight option that is easy to transport.
- Stability control: Some stabilizers come with built-in stabilization control systems, allowing you to adjust the level of stability according to your needs. Look for stabilizers with features like pan, tilt, and roll control for more precise shots.
- Mounting options: Check if the stabilizer is compatible with your DSLR camera’s mounting system. Most stabilizers come with standard tripod mounts, but it’s always a good idea to double-check.
- Battery life: If you plan to use the stabilizer for extended periods, pay attention to the battery life. Look for stabilizers with long-lasting batteries or the option to use external power sources.
Remember to consider your budget and read reviews from other photographers before making a final decision. By choosing the right stabilizer for your DSLR, you can elevate your photography and capture stunning, professional-looking footage.

Setting up your DSLR camera on the stabilizer
Using a DSLR camera stabilizer can greatly improve the quality of your videos by reducing camera shake and providing smoother footage. However, to get the most out of your stabilizer, it’s important to properly set up your DSLR camera on the stabilizer. Here are some steps to help you get started:
1. Mount your camera on the stabilizer
Begin by mounting your DSLR camera securely onto the stabilizer. Most stabilizers have a mounting plate or a camera mount that allows you to attach your camera. Make sure the camera is firmly secured and balanced on the stabilizer to prevent any wobbling or instability during use.
2. Balance the camera
Properly balancing your camera is crucial for effective stabilization. Make sure the center of gravity of your camera is aligned with the stabilizer’s pivot point. Adjust the balance by moving the camera forwards or backward on the stabilizer until it rests evenly without tilting in any direction.
3. Adjust the camera settings
Before using your DSLR camera with the stabilizer, you may need to adjust some of its settings for optimal performance. Consider using manual focus and exposure settings to have greater control over the image. It’s also recommended to set the camera’s image stabilization function to off, as the stabilizer will already be providing stabilization.
4. Test and fine-tune
Once your DSLR camera is set up on the stabilizer, it’s important to test and fine-tune the balance and settings. Take some test shots or record a short video to see if there are any adjustments necessary. If you notice any instability or unwanted movements, make small adjustments to the camera’s position or balance until you achieve the desired results.
By following these steps, you’ll be able to effectively set up your DSLR camera on the stabilizer and capture smooth, professional-looking footage. Remember to take your time during the setup process and experiment with different settings to find what works best for you and your camera.
Adjusting the balance of your DSLR on the stabilizer
Using a DSLR camera stabilizer can greatly improve the quality of your footage by reducing shakiness and providing smoother, more professional-looking shots. However, to achieve optimum results, it is important to properly balance your DSLR camera on the stabilizer.
Step 1: Mounting your DSLR
First, securely mount your DSLR camera onto the quick release plate of the stabilizer. Make sure that it is tightly attached, but be cautious not to overtighten it, as it may cause damage to the camera or stabilizer.
Step 2: Adjusting the fore-aft balance
Start by adjusting the fore-aft balance, which refers to the balance from front to back. Begin by loosening the fore-aft knob on the stabilizer. Next, hold the stabilizer by the handle and try to find the center of gravity by tilting it forward and backward. Once you have located the center, tighten the fore-aft knob to secure the position.
Step 3: Adjusting the left-right balance
The left-right balance of the stabilizer is equally important. To achieve proper balance, loosen the left-right knob and adjust the position of the camera until it remains level without tilting to either side. Once you have found the correct position, tighten the left-right knob to secure it.

Step 4: Fine-tuning the balance
After adjusting the fore-aft and left-right balance, you may still need to fine-tune the overall balance of your DSLR camera on the stabilizer. This can be done by slightly loosening the fore-aft and left-right knobs and making small adjustments until you achieve the perfect balance.
Remember, the key to a well-balanced stabilizer is finding the center of gravity of your camera and ensuring that it remains steady throughout your shots. Proper balance will not only result in smoother footage but also prevent unnecessary strain on your wrists and arms, allowing you to comfortably operate the stabilizer for extended periods of time.
Basic techniques for using a DSLR camera stabilizer
Using a DSLR camera stabilizer can greatly improve the quality of your footage by reducing camera shake and providing smooth, steady shots. Here are some basic techniques to help you get the most out of your stabilizer:
1. Balance your camera: Before you start using a stabilizer, it’s important to properly balance your camera. This involves adjusting the position of the camera on the stabilizer so that it is evenly distributed and doesn’t tilt to one side. This will ensure that the stabilizer can effectively counterbalance any movements.
2. Grip the stabilizer correctly: Hold the stabilizer with both hands, one on the handle and the other supporting the bottom. Keep your arms close to your body to maintain stability. It’s also important to use smooth, controlled movements when operating the stabilizer to prevent jerky footage.
3. Start with small movements: When using a stabilizer for the first time, start with small movements to get used to the balance and control. Gradually increase the complexity of your shots as you gain confidence and experience with the stabilizer.
4. Maintain proper posture: Stand with your feet shoulder-width apart and keep your body relaxed while operating the stabilizer. This will help you maintain stability and prevent fatigue during longer shooting sessions.
5. Experiment with different shooting modes: Many DSLR camera stabilizers come with different shooting modes, such as follow mode, lock mode, and pan mode. Experiment with these modes to find the one that suits your shot best and enhances stability.
6. Use additional accessories: To further enhance the stability of your shots, consider using additional accessories such as a tripod, monopod, or shoulder rig. These can provide additional support and help you achieve even better results.
7. Practice, practice, practice: Like any skill, using a DSLR camera stabilizer takes practice. Spend time familiarizing yourself with the stabilizer’s controls and experimenting with different techniques to master the art of stabilizing your shots.

By following these basic techniques, you can effectively use a DSLR camera stabilizer to capture smooth, professional-looking footage. Remember to remain patient and persistent, as mastering stabilizer techniques may take time.
Tips and tricks for getting smooth shots with a stabilizer
Using a DSLR camera stabilizer can greatly improve the quality of your footage by reducing camera shake and creating smoother, more professional-looking shots. Here are some tips and tricks to help you get the most out of your stabilizer:
1. Balancing the stabilizer
In order for the stabilizer to work effectively, it needs to be properly balanced. Start by attaching your camera to the stabilizer and adjusting the position of the mounting plate until the camera is level. Then, adjust the position of the counterweights or the gimbal until the stabilizer is balanced and can hold the camera without tilting in any direction.
2. Mastering your movements
One key aspect of using a stabilizer is learning how to move with it smoothly. Avoid jerky or sudden movements, and instead, focus on slow, steady motions. Practice walking with the stabilizer and experiment with different paces to find the right speed for your shots. Keeping your arms close to your body can also help reduce fatigue and improve stability.
Pro Tip: To achieve even smoother shots, try using a two-handed grip on the stabilizer, using your non-dominant hand to support the weight and control the movements while your dominant hand operates the camera.
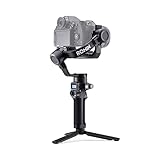
![FeiyuTech SCORP-C [Official] Camera Stabilizer 3-Axis Handheld Gimbal Stabilizer for Mirrorless/DSLR Camera,for Sony a7IV a7s Canon R5 R6 M50 Panasonic Nikon Fujifilm,Max5.5lb,Cable Control Camera](https://m.media-amazon.com/images/I/41xIubw-rZL._SL160_.jpg)
3. Using the right settings
Adjusting your camera’s settings can also improve the outcome of your stabilized shots. Consider using a higher shutter speed, such as 1/125 or faster, to minimize motion blur. Opening up the aperture can also help create a shallower depth of field, which can further enhance the cinematic look of your footage.
Pro Tip: When shooting in low light conditions, you may need to increase your ISO to maintain a proper exposure. However, be mindful of noise, as higher ISO settings can introduce unwanted grain to your footage.
4. Adding weight for better stability
If your stabilizer still feels unstable or shaky, you can add additional weights to improve its stability. Some stabilizers have built-in weight holders where you can attach small bags filled with sand or other heavy materials. Experiment with different amounts of weight until you find the right balance that works for you.
Pro Tip: You can also try using a monopod or tripod in combination with your stabilizer to further enhance stability, especially for longer shots or when you need to keep the camera in a fixed position.
Remember, practice makes perfect when it comes to using a DSLR camera stabilizer. Take the time to experiment with different techniques and settings to find what works best for your specific shooting style and needs. With patience and persistence, you’ll soon be capturing incredibly smooth and professional-looking footage.
Maintaining and storing your DSLR camera stabilizer
Maintaining your DSLR camera stabilizer is important to ensure its longevity and optimal performance. By following some simple maintenance and storage tips, you can keep your stabilizer in great condition for years to come.
Cleaning
Regularly cleaning your DSLR camera stabilizer is essential to remove any dust, dirt, or debris that can accumulate on its surface. Use a soft cloth or a microfiber cleaning cloth to gently wipe down the stabilizer, paying close attention to the joints and moving parts.
Avoid using harsh cleaning chemicals, as they can damage the stabilizer’s components. Instead, dampen the cloth with water or a mild cleaning solution specially formulated for camera equipment.
Inspecting for damage
After each use, take a few minutes to inspect your DSLR camera stabilizer for any signs of damage or wear and tear. Check the joints, knobs, and screws to ensure they are tightened securely and functioning properly.
If you notice any loose or damaged parts, address them promptly to prevent further issues. Consult the user manual or contact the manufacturer for guidance on how to repair or replace damaged components.
Proper storage
When not in use, always store your DSLR camera stabilizer in a clean, dry, and temperature-controlled environment. Avoid exposing it to extreme heat or cold, as this can affect its performance and lifespan.
It is recommended to store the stabilizer in a padded carrying case or a dedicated storage bag to protect it from dust, scratches, and accidental impact. Make sure to remove the batteries and any other detachable accessories before storing.
By following these simple maintenance and storage practices, you can ensure that your DSLR camera stabilizer stays in excellent condition and provides smooth and stable footage every time you use it.
Question-answer:
What is a DSLR camera stabilizer and why should I use it?
A DSLR camera stabilizer is a device used to reduce unwanted camera movements and create smooth and stable shots. It is particularly useful for capturing professional-quality videos and avoiding shaky footage. By using a stabilizer, you can improve the overall quality of your footage and make it more visually pleasing.
How does a DSLR camera stabilizer work?
A DSLR camera stabilizer works by counteracting the movements of the camera operator, whether it’s shaking hands or walking. Most stabilizers use a combination of weights and gyroscopes to achieve balance and reduce vibrations. This allows the camera to stay steady while the operator moves, resulting in smoother footage.
Are there different types of DSLR camera stabilizers available?
Yes, there are several types of DSLR camera stabilizers available on the market. The most common types include handheld stabilizers, shoulder mounts, and gimbal stabilizers. Handheld stabilizers are lightweight and portable, making them ideal for on-the-go shooting. Shoulder mounts provide stability by resting on the shoulder, while gimbal stabilizers use motorized movements to keep the camera steady.


