If you are a photographer or videographer using a DSLR Canon camera, you may have noticed that the built-in microphone doesn’t always capture the best audio quality. To improve the audio of your videos and recordings, it is recommended to use an external microphone. In this article, we will guide you through the process of using a microphone on your DSLR Canon camera.
Firstly, it is important to select the right microphone for your needs. There are various types of microphones available, such as shotgun microphones, lavalier microphones, and stereo microphones. Consider the type of content you will be creating and the environment in which you will be recording to determine the best microphone for you.
Once you have chosen a microphone, you will need to connect it to your DSLR Canon camera. Most DSLR cameras have a microphone input port where you can plug in your external microphone. This port is usually located on the side or front of the camera. Make sure to check your camera’s manual to locate the microphone input port.
After connecting the microphone, you will need to adjust the camera’s audio settings. Access the camera’s menu and navigate to the audio settings. Here, you can adjust the microphone input level, choose the type of microphone you are using, and enable any additional features like wind noise reduction or low-cut filters. It is recommended to set the microphone input level to a moderate level to avoid distorting the audio.
Finally, it is important to do a test recording to ensure that the microphone is properly connected and working. Connect a pair of headphones to your camera to monitor the audio while recording. Check the audio levels and listen for any background noise or distortions. If needed, make further adjustments to the microphone placement and audio settings to achieve the desired audio quality.

Using an external microphone on your DSLR Canon camera can greatly improve the audio quality of your videos and recordings. By selecting the right microphone, connecting it properly, and adjusting the camera’s audio settings, you can achieve professional-level sound. Experiment with different microphones and settings to find the setup that works best for your specific needs and recording environment.
Step-by-step guide on connecting a microphone to your DSLR Canon camera
Using a microphone with your DSLR Canon camera can significantly improve the audio quality of your videos. To ensure clear and professional sound, follow these steps to connect a microphone to your camera:
Step 1: Check your camera’s compatibility
Before purchasing a microphone, make sure it is compatible with your DSLR Canon camera. Consult the camera’s user manual or the manufacturer’s website to find a list of compatible microphones.
Step 2: Choose the right microphone
Select a microphone that suits your needs. There are various types of microphones available, such as shotgun microphones, lavalier microphones, and handheld microphones. Consider the purpose of your recordings and the environment in which you’ll be filming to determine the most suitable microphone for your needs.
Step 3: Connect the microphone to your camera
Locate the microphone input on your DSLR Canon camera. This is usually located on the side of the camera body. It commonly uses a 3.5mm input jack. Check your camera’s user manual to find the exact location and specifications of the microphone input.
Once you’ve found the microphone input, connect the microphone to the camera using the appropriate cable. Usually, this will be a 3.5mm to 3.5mm audio cable. Some microphones may require an adapter or an XLR cable, depending on the connection type.
Step 4: Adjust the audio settings

After connecting the microphone, adjust the audio settings on your DSLR Canon camera to ensure optimal recording quality. These settings may vary depending on the camera model, but typically you can access them through the camera’s menu or settings section.
Set the audio input to “External Mic” or “Line-in” to prioritize the microphone’s input over the camera’s built-in microphone. Adjust the microphone’s audio levels according to your preferences and test the sound quality by recording a short sample video.
Step 5: Test and monitor the audio
Before starting your recording, test the audio to ensure it is capturing sound properly. Monitor the audio levels using the camera’s built-in audio meter or wear headphones to listen to the audio in real-time. Adjust the microphone’s position and settings if needed to achieve the desired audio quality.
Step 6: Start recording

Once you’re satisfied with the audio setup, you’re ready to start recording. Press the record button on your DSLR Canon camera and begin capturing your video footage with enhanced audio quality.
Remember to regularly check the audio during recordings to ensure consistent sound quality. With proper equipment and careful attention to audio settings, you can greatly improve the audio capabilities of your DSLR Canon camera.
Choosing the right microphone for your DSLR Canon camera
When it comes to capturing high-quality audio with your DSLR Canon camera, choosing the right microphone is crucial. The built-in microphone on most DSLR cameras is not sufficient for professional-level recording, as it tends to pick up a lot of background noise and lacks clarity. Fortunately, there are various external microphones available that can greatly enhance the audio quality of your DSLR Canon camera recordings.
Types of microphones
There are several types of microphones that can be used with DSLR Canon cameras:
- Shotgun microphones: These highly directional microphones are ideal for capturing audio from a specific source, such as an interviewee or a subject in a controlled environment. They are commonly used for filmmaking and other professional video productions.
- Lavalier microphones: Also known as lapel microphones, lavalier mics are small, clip-on microphones that can be attached to the clothing of the person speaking. They are commonly used in interviews and presentations to ensure clear and consistent audio.
- Condenser microphones: These sensitive microphones are suitable for capturing high-quality audio in controlled environments, such as studios or quiet indoor settings. They require a power source, usually from an external battery or the camera itself.
Considerations when choosing a microphone
When choosing a microphone for your DSLR Canon camera, there are a few important factors to consider:
- Purpose: Determine the primary use of the microphone. Are you recording interviews, vlogs, or professional video productions? This will help you determine the type of microphone that suits your needs.
- Audio quality: Look for a microphone that provides excellent sound quality with minimal background noise and distortion. Check reviews and specifications to ensure it meets your requirements.
- Connectivity: Check if the microphone is compatible with your DSLR Canon camera. Look for microphones with standard 3.5mm audio jacks or those that connect via a hot shoe mount.
- Budget: Set a budget for your microphone purchase. While there are microphones available at various price points, bear in mind that higher-priced options usually offer better audio quality and durability.
By considering these factors and doing thorough research, you can find the perfect microphone for your DSLR Canon camera that will enhance your audio recordings and take your videography to the next level.
Understanding the different types of microphones for DSLR Canon cameras
When it comes to capturing high-quality audio for your DSLR Canon camera, it’s important to understand the different types of microphones available. Choosing the right microphone can make a big difference in the sound quality of your recordings.
1. Shotgun Microphones
Shotgun microphones are popular among filmmakers and videographers due to their ability to capture sound from a distance. These microphones are highly directional, focusing on the audio in front of the camera while minimizing background noise. They are great for capturing dialogue or distant sounds, making them ideal for interviews, documentaries, and outdoor filming.
2. Lavalier Microphones
Lavalier microphones, also known as lapel microphones, are small, portable microphones that can be clipped to clothing. They are commonly used in situations where the microphone needs to be discreet or when capturing audio from a specific person, such as interviews or presentations. Lavalier microphones are omnidirectional, meaning they capture sound from all directions, making them great for recording multiple speakers or group conversations.
3. Dual-system Audio Setup
A dual-system audio setup involves using an external audio recorder in conjunction with your DSLR camera. This setup allows you to record high-quality audio separately from the camera and later synchronize it during the editing process. This method is commonly used in professional filmmaking or situations where the audio quality needs to be top-notch.

When choosing a microphone for your DSLR Canon camera, consider the type of recordings you will be making and the environment in which you will be filming. It’s also important to invest in a good-quality microphone and any necessary adapters or cables to ensure compatibility with your camera.
Overall, understanding the different types of microphones for DSLR Canon cameras can help you make an informed decision and capture high-quality audio for your videos. Whether you choose a shotgun microphone, lavalier microphone, or opt for a dual-system audio setup, the right microphone can greatly enhance the overall production value of your videos.
Tips for improving audio quality when using a microphone on your DSLR Canon camera
Using a microphone with your DSLR Canon camera can greatly enhance the audio quality of your recordings. Here are some tips to help you improve the audio when using a microphone with your camera:
- Select the right microphone: There are different types of microphones available, such as shotgun, lavalier, and condenser microphones. Each microphone has its own strengths and weaknesses, so choose one that suits your needs and the type of recording you plan to do.
- Position the microphone correctly: Proper positioning of the microphone is crucial for capturing clear audio. For a shotgun microphone, aim it towards the sound source and make sure it is close enough to capture the audio effectively. If using a lavalier microphone, clip it to the subject’s clothing close to their mouth.
- Use a windscreen or deadcat: Wind noise can be a common issue when recording outdoors. To combat this, use a windscreen or a deadcat on your microphone to reduce the impact of wind noise on your recordings.
- Monitor audio levels: Keep an eye on the audio levels while recording to ensure they don’t peak or drop too low. Adjust the microphone’s sensitivity and the camera’s input levels accordingly to get the best audio quality.
- Consider using an external audio recorder: If the built-in microphone preamps of your camera are not up to par, consider using an external audio recorder. This can give you better control over the audio recording process and result in higher quality sound.
- Reduce background noise: To minimize unwanted background noise in your recordings, try to find a quiet location or use soundproofing techniques. Additionally, you can use audio editing software to further clean up your audio in post-production.
- Test and experiment: Take the time to test different microphone setups, positions, and settings to find what works best for your specific situation. Experimenting with different techniques can lead to improved audio quality and better overall results.
By following these tips, you can greatly enhance the audio quality when using a microphone with your DSLR Canon camera. Remember to regularly monitor and adjust your audio settings to ensure the best recording experience possible.
Adjusting the audio settings on your DSLR Canon camera for optimal microphone performance
When using a microphone with your DSLR Canon camera, it is essential to adjust the audio settings properly to ensure optimal performance. The following steps will guide you through the process:

- Access the camera menu by pressing the Menu button on your camera.
- Navigate to the ‘Sound Recording’ or ‘Audio’ section in the menu using the arrow buttons on your camera.
- Select the microphone input option. You will likely have two options: the built-in camera microphone and an external microphone if one is connected.
- If you are using an external microphone, select the ‘external microphone’ option. This ensures that the camera uses the audio input from the external microphone rather than the built-in camera microphone.
- Adjust the microphone input level. This option allows you to control the volume at which the microphone records audio. It is essential to set the level correctly to avoid distortion or low sound levels. Experiment with different levels and make test recordings to find the optimal setting for your desired sound quality.
- Monitor the audio levels using the camera’s audio level meter. This feature displays the audio input levels in real-time. Aim to keep the levels within the acceptable range and avoid peaking or clipping, which can result in distorted audio.
- Consider using a windscreen or deadcat on your microphone if you are shooting outdoors or in windy conditions. This helps to reduce wind noise and ensures clearer audio recordings.
- Regularly check your audio recordings while shooting to ensure everything is working correctly. It is better to make adjustments during the shoot than discovering audio issues later.
By properly adjusting the audio settings on your DSLR Canon camera and using an external microphone when possible, you can significantly improve the audio quality of your recordings. Remember to always test your setup before important shoots to make any necessary adjustments and ensure optimal audio performance.
Troubleshooting common issues when using a microphone with your DSLR Canon camera
Using a microphone with your DSLR Canon camera can greatly enhance the audio quality of your videos. However, there are some common issues that may arise when using a microphone. Here are some troubleshooting tips to help you resolve these issues:
No sound recorded:
If you are not getting any sound recorded when using a microphone with your DSLR Canon camera, there are several things you can check:
- Make sure the microphone is properly plugged into the camera’s microphone input.
- Check the microphone’s battery to ensure it has enough power.
- Ensure that the camera’s microphone input is selected as the audio input source in the camera’s settings.
- Try connecting a different microphone to the camera to determine if the issue is with the microphone or the camera.
Low audio levels:
If you are getting low audio levels when using a microphone, you can try the following troubleshooting steps:
- Check if the microphone has its own volume control and adjust it to a higher level.
- Ensure that the camera’s audio levels are set to an appropriate level and not too low.
- Consider using an external audio recorder with a higher quality microphone for better audio capture.
Background noise or interference:
If you are experiencing background noise or interference when using a microphone, here are some potential solutions:
- Check if there are any nearby electronic devices that may be causing interference, such as cell phones or Wi-Fi routers. Move away from these devices if possible.
- Use a microphone with a built-in noise-canceling feature to reduce background noise.
- Consider using a microphone with a directional pickup pattern to focus on capturing the desired sound and minimize background noise.
Distorted audio:
If the audio recorded with your microphone is distorted, try the following troubleshooting steps:
- Ensure that the microphone is not too close to the sound source, as this can cause distortion. Maintain an appropriate distance from the subject.
- Check if the microphone has a pad switch or attenuator that can reduce the audio input level.
- Test the microphone with a different camera or audio recording device to determine if the issue is with the microphone or the camera.
By following these troubleshooting tips, you should be able to resolve common issues when using a microphone with your DSLR Canon camera and achieve high-quality audio for your videos.
Using a shotgun microphone with your DSLR Canon camera for better audio recording
When it comes to recording high-quality audio with your DSLR Canon camera, using a shotgun microphone can make a significant difference. A shotgun microphone is a highly directional microphone that is designed to pick up sound directly in front of it while minimizing background noise. This makes it ideal for capturing clear and focused audio, especially in noisy environments.
To use a shotgun microphone with your DSLR Canon camera, follow these steps:
- Choose the right shotgun microphone: There are various shotgun microphones available in the market, so make sure to choose one that is compatible with your DSLR Canon camera. Look for a shotgun microphone with a standard 3.5mm audio output to connect it to your camera’s microphone input.
- Mount the shotgun microphone: Once you have chosen the right shotgun microphone, mount it securely on your camera. Most DSLR Canon cameras have a hot shoe mount on top, which is designed to hold accessories like microphones. Attach the shotgun microphone to the hot shoe mount and ensure it is firmly secured in place.
- Connect the shotgun microphone to your camera: After mounting the shotgun microphone, connect it to your DSLR Canon camera using a compatible audio cable. Plug one end of the audio cable into the microphone’s audio output and the other end into your camera’s microphone input. Make sure the cable is plugged in securely to avoid any audio interference or loose connections.
- Adjust the microphone settings: Once the shotgun microphone is connected to your camera, adjust the audio settings accordingly. Access the camera’s menu and locate the audio settings. You may need to enable the external microphone input and adjust the microphone levels to achieve the desired audio quality. Experiment with different settings to find the optimal configuration for your specific shooting conditions.
- Test and monitor the audio: Before starting your recording, it is essential to test and monitor the audio to ensure everything is working correctly. Play back a few seconds of audio and check if the shotgun microphone is capturing the sound clearly and without any distortion or background noise. Use headphones to monitor the audio while recording to make real-time adjustments if necessary.
By following these steps and using a shotgun microphone with your DSLR Canon camera, you can significantly improve the audio quality of your recordings. Whether you are recording interviews, vlogs, or any other content, clear and focused audio is crucial for delivering a professional result.
Exploring external audio recorders as an alternative to using a microphone on your DSLR Canon camera
While built-in microphones on DSLR cameras have improved over the years, they still have some limitations when it comes to capturing high-quality audio. External audio recorders can serve as a great alternative to enhance the audio recording capabilities of your DSLR Canon camera. In this article, we will explore the benefits and advantages of using external audio recorders.
Enhanced audio quality
One of the main advantages of using an external audio recorder is the improved audio quality it provides. Most DSLR cameras have small built-in microphones that may not capture sound with the clarity and richness that is desired. External audio recorders, on the other hand, are designed to capture audio in a more professional and detailed manner. They often have better preamps, allowing for cleaner audio recordings with less noise and interference.
Greater control over audio settings
Using an external audio recorder gives you greater control over audio settings compared to relying solely on your camera’s built-in microphone. Many external audio recorders offer features like adjustable gain control, filters, and equalizers, allowing you to tailor the audio recording to your specific needs. This level of control can make a significant difference in the overall audio quality of your recordings.
Flexible microphone placement
Another advantage of using external audio recorders is the flexibility it provides in terms of microphone placement. With a built-in microphone, you are limited to the microphone’s position on the camera body, which may not always be ideal for capturing the best sound. External audio recorders allow you to position the microphone closer to the source of the sound, resulting in cleaner and clearer audio recordings.
Reduction of camera handling noise
DSLR cameras can produce handling noise when using the built-in microphone due to the physical interaction between the user and the camera. With an external audio recorder, you can eliminate or significantly reduce camera handling noise. By placing the external audio recorder away from the camera body, you can prevent any unwanted noise caused by handling the camera.
Backup audio recording
Using an external audio recorder also serves as a backup audio recording solution. In case there are any issues with the audio recorded by the camera’s built-in microphone, you will have an additional audio source to rely on. This can be especially useful in situations where audio quality is critical, such as interviews or professional video productions.
In conclusion, using external audio recorders can greatly enhance the audio quality and flexibility of your DSLR Canon camera. Whether you are a professional videographer or a hobbyist filmmaker, investing in a good external audio recorder is worth considering to take your audio recordings to the next level.
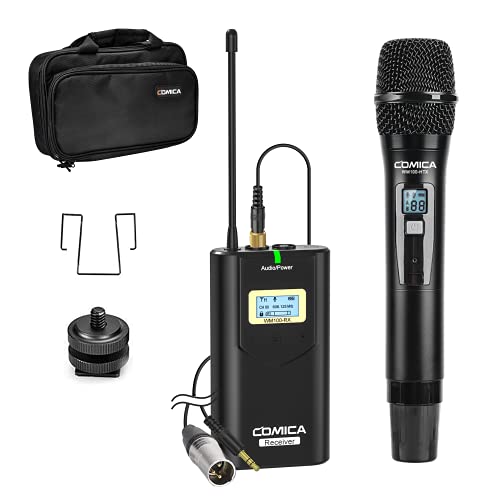
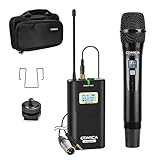
Using a wireless microphone with your DSLR Canon camera for freedom of movement
When it comes to recording audio for your DSLR Canon camera, using a wireless microphone can provide you with the freedom of movement you need to capture audio from various angles without the hassle of cables getting in your way. With a wireless microphone setup, you can move around more freely and achieve professional-quality audio for your video recordings.
Why use a wireless microphone?
Using a wireless microphone with your DSLR Canon camera offers several advantages. First and foremost, it allows you to separate the microphone from the camera, giving you the flexibility to position the microphone closer to the audio source. This ensures improved audio quality and eliminates unwanted background noise.
A wireless microphone also gives you the freedom to move around without being restricted by cables. This is especially beneficial when filming events or interviews, as you can easily walk around and capture audio from different angles. It provides you with a more dynamic and engaging video recording experience.
Setting up a wireless microphone with your DSLR Canon camera
To use a wireless microphone with your DSLR Canon camera, you will need a wireless microphone system that consists of a transmitter and a receiver. Here are the steps to set it up:
- Attach the wireless microphone transmitter to the audio source, such as a lapel or handheld microphone.
- Connect the receiver to your DSLR Canon camera using a compatible cable.
- Turn on both the transmitter and receiver, making sure they are on the same frequency channel.
- Adjust the audio levels on your camera and receiver to ensure optimal sound quality.
- Once everything is set up, you can start recording with your DSLR Canon camera while enjoying the freedom of movement provided by the wireless microphone system.
Note: It is essential to choose a wireless microphone system that is compatible with your DSLR Canon camera and offers reliable signal transmission. Consider factors such as frequency range, audio quality, and battery life when selecting a wireless microphone system.
In conclusion, using a wireless microphone with your DSLR Canon camera can greatly enhance your video recording capabilities. It allows you to capture high-quality audio from different angles and be more mobile during filming. By following the setup instructions and selecting a suitable wireless microphone system, you can enjoy the freedom of movement and achieve professional-grade audio for your DSLR Canon camera recordings.
Final thoughts and considerations when using a microphone on your DSLR Canon camera
Using a microphone on your DSLR Canon camera can greatly enhance the audio quality of your videos, but there are a few important considerations to keep in mind.
Firstly, it’s important to choose the right microphone for your needs. There are several types of microphones available, including shotgun, lavalier, and handheld microphones. Consider the type of videos you will be shooting and the environment you will be filming in to determine which microphone is best suited for you.
Once you have chosen a microphone, it’s important to properly set it up and position it correctly. Make sure the microphone is securely attached to your camera or mounted on a boom pole if using a shotgun microphone. Place the microphone close to the sound source for clear and crisp audio.
Another consideration is the audio levels and settings on your camera. DSLR cameras typically have manual audio controls, allowing you to adjust the input levels. Experiment with different levels to find the optimal setting for your microphone and recording environment. It’s also a good idea to use headphones to monitor the audio as you record to ensure there are no issues or unwanted noise.
Additionally, it’s worth noting that using an external audio recorder can provide even better audio quality. This allows you to separate the audio recording from the camera and capture higher quality audio with less interference. You can then synchronize the audio with the video in post-production.
Finally, always be mindful of the directionality of your microphone. Shotgun microphones are highly directional and are designed to capture sound from the front, while lavalier microphones are typically omnidirectional and capture sound from all directions. Understanding the characteristics of your microphone will help you capture the best audio possible.
In conclusion, using a microphone on your DSLR Canon camera is a great way to improve the audio quality of your videos. Consider the type of microphone, set it up correctly, adjust the audio levels, and be mindful of its directionality. With the right microphone and proper technique, you can greatly enhance the sound of your videos.
Question-answer:
What are the benefits of using a microphone on a DSLR Canon camera?
Using a microphone on a DSLR Canon camera can greatly improve the audio quality of your videos. It allows you to capture clear and crisp sounds, making your videos more professional and enjoyable to watch. Additionally, a microphone can help to reduce background noise and focus on the desired audio source, resulting in better overall audio recording.
How do I connect a microphone to my DSLR Canon camera?
Connecting a microphone to a DSLR Canon camera is a relatively simple process. First, make sure that your camera has a microphone input jack. If it does, you will need an audio cable with the appropriate connectors to connect the microphone to the camera. Plug one end of the cable into the microphone and the other end into the camera’s microphone input jack. Once connected, adjust the camera’s audio settings to use the external microphone as the audio input source. Finally, perform a quick audio test to ensure that the microphone is correctly connected and functioning.


