Facebook Live is a powerful tool that allows you to connect with your audience in real-time through live video broadcasting. While many people use their smartphones to go live on Facebook, using a digital camera can give you better video quality and more control over your broadcast.
So, how can you use a digital camera for Facebook Live?
Step 1: Check Camera Compatibility
First, you need to make sure that your digital camera is compatible with live streaming. Check the camera’s specifications or do some research online to see if your camera has a built-in live streaming feature or if you need to use an external device or software.
Step 2: Connect Camera to Computer or Streaming Device

If your camera supports live streaming, you will need to connect it to your computer or a dedicated streaming device. Depending on your camera and equipment, you may need an HDMI cable, a USB connection, or wireless connectivity.
Step 3: Set Up Streaming Software
Next, you will need to set up streaming software on your computer. There are various options available, both free and paid. Some popular streaming software options include OBS Studio, Wirecast, and XSplit. Install and configure the software according to your camera and streaming preferences.
Step 4: Configure Camera Settings
Once your software is set up, you will need to configure the camera settings. This includes adjusting the video resolution, frame rate, and audio input. Make sure to test the settings and do some trial broadcasts to ensure the video and audio quality are optimal.

Step 5: Go Live on Facebook
Now that everything is set up, you can go live on Facebook. Open your Facebook page or profile, and click on the “Live” button. Follow the prompts to authorize the streaming software to access your camera and microphone. Customize your broadcast title, description, and privacy settings, and then click “Go Live” to start your broadcast with your digital camera.
By using a digital camera for Facebook Live, you can elevate the quality of your live broadcasts and engage with your audience in a more professional way. Experiment with different camera angles, lighting, and settings to create a visually appealing and captivating live stream.
What is a digital camera?
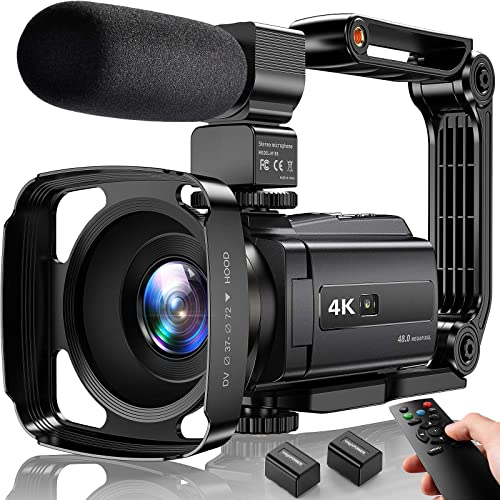
A digital camera is a device that captures and stores images and videos in a digital format. Unlike film cameras, which use photographic film to record images, digital cameras use electronic sensors to capture light and convert it into digital signals.
Digital cameras have revolutionized the way we take and share photos. They offer numerous advantages over traditional film cameras, including the ability to review and delete images instantly, adjust settings for different lighting conditions, and easily share photos online. With a digital camera, you can take high-quality photos and videos and immediately transfer them to your computer or mobile device for editing and sharing.

Modern digital cameras come in a variety of designs and sizes, ranging from compact point-and-shoot cameras to advanced DSLR (Digital Single Lens Reflex) cameras used by professional photographers. They offer a wide range of features and capabilities, such as optical zoom, image stabilization, face detection, and various shooting modes.
Benefits of using a digital camera
- Instant preview: With a digital camera, you can instantly preview the photos you have taken on the camera’s LCD screen. This allows you to review and delete unwanted photos, ensuring you only keep the best shots.
- Easy sharing: Digital cameras make it effortless to share your photos with others. You can easily transfer your images to a computer, smartphone, or tablet, and then share them via social media platforms like Facebook, Instagram, or Twitter.
- Flexible storage options: Digital cameras use memory cards to store photos and videos. These cards can be easily removed and replaced, allowing you to have multiple cards to expand your storage capacity. You can also back up your files to a computer or external hard drive for added peace of mind.
Tips for using a digital camera
- Read the manual: Familiarize yourself with your camera’s features and settings by reading the user manual. This will help you understand how to get the best results from your camera.
- Experiment with settings: Don’t be afraid to try different camera settings and shooting modes. Experimenting will help you understand how changes in aperture, shutter speed, ISO, and other settings affect your photos.
- Use proper lighting: Lighting plays a crucial role in photography. Try to shoot in natural light whenever possible, and avoid using the camera’s flash unless necessary.
- Keep your camera clean: Dust and dirt can affect the quality of your photos. Clean your camera regularly using a soft, lint-free cloth to remove any smudges or fingerprints on the lens or LCD screen.
Overall, a digital camera is a versatile tool that allows you to capture and preserve memories in a digital format. Whether you’re a photography enthusiast or simply want to document special moments, using a digital camera can greatly enhance your photography experience.
Advantages of using a digital camera
A digital camera offers several advantages over traditional film cameras when it comes to capturing and sharing images. Whether you are a professional photographer or just a casual user, digital cameras provide a range of benefits that make them a popular choice.
1. Instant preview
One of the biggest advantages of using a digital camera is the ability to instantly preview the photos you have taken. With a traditional film camera, you would have to wait until the film is developed to see the results. With a digital camera, you can review and delete unwanted photos right away, ensuring that you capture the perfect shot every time.
2. Easy sharing
Another advantage of digital cameras is the ease of sharing your photos with others. With social media platforms like Facebook, it is now easier than ever to upload and share your images with friends and family around the world. You can also use online photo sharing platforms to create albums and showcase your photography skills.

3. Memory capacity
Digital cameras offer a large storage capacity compared to film cameras. Memory cards can store hundreds or even thousands of photos, allowing you to capture and store a vast collection of images. This enables you to take photos without worrying about running out of film or constantly changing rolls.
4. Editing and enhancement
Digital cameras allow you to edit and enhance your photos directly on the device. With various image editing software and apps available, you can easily crop, adjust exposure, and add filters to make your photos even more stunning. This level of control and flexibility is not possible with traditional film cameras.
5. Cost-effective
While the upfront cost of a digital camera may be higher than a film camera, it is more cost-effective in the long run. With a digital camera, you don’t have to spend money on buying films, developing them, and printing physical copies. You can simply save your photos on a computer or cloud storage and print only the ones you want.
In conclusion, using a digital camera offers numerous advantages in terms of convenience, sharing, editing capabilities, and cost-effectiveness. If you are looking to capture and share high-quality images, a digital camera is a worthwhile investment.
Preparing for a Facebook Live video
Before you start broadcasting your video on Facebook Live, it’s important to make some preparations to ensure a smooth and successful live stream.
1. Check your equipment:
Make sure you have a digital camera that is compatible with Facebook Live. Check the camera’s settings to ensure it is set up for live streaming. Also, check the audio settings to ensure clear sound for your viewers.
2. Choose a suitable location:
Select a location that is well-lit and free from distractions. Consider the acoustics of the environment to ensure good audio quality. Make sure the background is clean and visually appealing.
Furthermore, check your internet connection to ensure stable and high-speed internet access. A poor internet connection can result in buffering and interrupted live streams.
Once you have completed these preparations, you’ll be ready to start your Facebook Live video with your digital camera and engage with your audience in real-time.
Setting up your digital camera
Before you can start using your digital camera for Facebook Live, you need to ensure it is properly set up. Follow these steps to get your camera ready for live streaming:

1. Check for compatibility: Make sure your digital camera is compatible with live streaming on Facebook. Check the manufacturer’s website or product manual to confirm if your camera supports this feature.
2. Connect to your computer: Connect your digital camera to your computer using the appropriate USB cable. Ensure that both ends of the cable are securely plugged in.
3. Install necessary software: Some cameras require specific software to be installed on your computer to enable live streaming. Check the manufacturer’s website for any software updates or downloads required for your camera model.
4. Configure camera settings: Access the settings menu on your camera and adjust the necessary parameters for live streaming. This may include setting the video quality, audio settings, and any other preferences you may have.
5. Test the connection: Once your camera is connected and configured, test the connection by opening a live streaming platform or application on your computer and check if the camera is recognized. You can also use a broadcasting software such as OBS or XSplit to test your camera’s connection and settings.

6. Set up your streaming platform: If you haven’t already, create an account on the streaming platform you wish to use for Facebook Live. Follow their instructions for setting up and linking your camera to the platform.
7. Practice and adjust: Take some time to familiarize yourself with the camera’s features and experiment with different settings. Practice streaming to a test account or a private mode to ensure everything is working as expected.
By following these steps, you can set up your digital camera for Facebook Live and start sharing your experiences with your friends and followers in a higher quality and more controlled environment.
Adjusting camera settings
Before you start your Facebook Live broadcast with a digital camera, it’s important to adjust the camera settings to ensure optimal video quality and performance. Here are some key settings you should consider:
- Resolution: Set the resolution of your camera to the highest available option for better video quality. This will make your live stream clearer and more engaging for your audience.
- Frame rate: Choose a higher frame rate if your camera supports it. Higher frame rates will result in smoother motion and reduce motion blur in your live stream.
- Exposure: Adjust the exposure settings to ensure proper lighting in your video. If the lighting conditions are too bright or too dark, manually adjusting the exposure can help you achieve a well-lit and balanced video.
- White balance: Set the white balance according to the lighting conditions. Different lighting environments can have different color temperatures, and adjusting the white balance will help your camera capture accurate colors.
- Focus: Ensure that your camera is focused on the subject. Use autofocus or manual focus to achieve a clear and sharp image. A blurry or out-of-focus video can be distracting for viewers.
By taking the time to adjust these camera settings, you can enhance the quality of your Facebook Live broadcast and make it more enjoyable for your audience.
Tips for shooting a Facebook Live video with a digital camera
Facebook Live has become a popular way for people to share their experiences and engage with their audience in real time. While smartphones are commonly used for this purpose, using a digital camera can offer some advantages in terms of image quality and control over settings. Here are some tips to help you shoot a successful Facebook Live video with your digital camera:
1. Choose a camera with Live Streaming capabilities: Not all digital cameras have the ability to live stream directly to Facebook. Make sure your camera supports this feature before attempting to go live.
2. Make use of a stable tripod: To avoid shaky footage, use a tripod or any other stable mounting option for your camera. This will help keep your video steady and professional-looking.
3. Check your audio: Clear and high-quality audio is crucial for a good Facebook Live video. Consider investing in an external microphone to capture better sound, especially if you’re shooting in a noisy environment.
4. Plan your content: Before going live, think about what you want to share with your audience. Create an outline or script to guide you through the video and help keep the flow of information smooth.
5. Prepare your surroundings: Pay attention to your background and lighting. Choose a well-lit area and make sure the background is appropriate and free from distractions.
6. Test your internet connection: A stable and reliable internet connection is essential for a successful Facebook Live video. Check your connection strength before going live to ensure a smooth streaming experience.
7. Interact with your audience: Facebook Live allows you to interact with your viewers in real time through comments and reactions. Encourage viewers to comment and ask questions, and respond to them during the broadcast to keep them engaged.
8. Promote your Live video in advance: Build excitement by promoting your Facebook Live video ahead of time. Let your followers know when you’ll be going live and what to expect, so they can plan to tune in.
9. Experiment with different angles and perspectives: Use the flexibility of your digital camera to try out different angles and perspectives. This can add visual interest to your Facebook Live video and help keep viewers engaged.
10. Practice before going live: If you’re new to shooting live videos, practice beforehand to become familiar with your camera’s settings and features. This will give you more confidence and help you deliver a smoother performance.
By following these tips, you’ll be well-prepared to shoot a successful Facebook Live video with your digital camera. Remember to engage with your audience, experiment with different techniques, and most importantly, have fun!
Interacting with viewers during the live video
One of the key benefits of using a digital camera for Facebook Live is the ability to interact with your viewers in real-time. Here are a few tips on how to engage and interact with your audience during your live video:
1. Respond to comments
Make sure to keep an eye on the comment section and respond to as many comments as possible. Engaging with your viewers by answering their questions or acknowledging their comments can help create a sense of community and connection. It also shows your audience that you value their presence and input.
2. Ask for feedback
During your live video, it’s a great idea to ask your viewers for feedback or suggestions. This not only encourages interaction but also allows you to tailor your content to better suit your audience’s preferences. Consider asking questions like, “What topics would you like me to cover in future videos?” or “Any suggestions for improvement?”
Furthermore, you can use polling features available on some streaming platforms to gather instant feedback from your viewers. You can ask them to vote on certain topics or preferences, and then discuss the results during the live video.
3. Give shoutouts
Show appreciation for your viewers by giving shoutouts during your live video. You can mention their names and thank them for their support, comments, or questions. This personal touch helps build a stronger connection with your audience and makes them feel involved in the conversation.
In addition to shoutouts, you can also acknowledge any contributions made by your viewers, such as donations or sharing your video. This encourages further engagement and motivates others to participate.
Remember, the key to successful live videos is creating a two-way conversation with your viewers. By engaging with your audience during the live video, you can build a loyal following and create a more enjoyable experience for everyone involved.
Wrapping up
In conclusion, using a digital camera for Facebook Live can greatly enhance the quality of your live streams and engage your audience in a more professional manner. By following the steps outlined in this guide, you can easily connect your digital camera to your computer or smartphone and start streaming on Facebook Live.
Remember to check your camera’s specifications and make sure it supports live streaming. Additionally, consider investing in a stable tripod or mount to keep your camera steady during broadcasts.
Once you have everything set up, experiment with different camera settings, angles, and lighting to find the best setup for your broadcasts. Don’t be afraid to get creative and try new things!
By using a digital camera for Facebook Live, you can take your live streams to the next level and provide your audience with high-quality content that will keep them coming back for more.
Question-answer:
What is Facebook Live?
Facebook Live is a feature on the social media platform Facebook that allows users to broadcast live video to their friends, followers, or the general public. It allows for real-time interaction and engagement with viewers.
Can I use a digital camera for Facebook Live?
Yes, you can use a digital camera for Facebook Live, but you will need additional equipment and software to connect your camera to your computer or mobile device for streaming. This will typically involve using a capture card or a HDMI-to-USB converter to connect the camera to your device, and using streaming software or apps to broadcast the video to Facebook Live.


