
Zoom meetings have become a way of life for many people, whether it’s for work, school, or staying connected with friends and family. While the built-in webcams on laptops and desktop computers can suffice, they often lack the quality and versatility that a DSLR camera can offer. If you have a DSLR camera lying around, you can easily transform it into a high-quality webcam for your Zoom meetings.
Using a DSLR camera as a webcam allows you to take advantage of its superior image quality, depth of field control, and various lenses to enhance your video appearance. With the right software and equipment, you can achieve a more professional and visually appealing look during your Zoom calls.
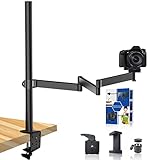
Before you start, make sure you have the necessary equipment: a DSLR camera with an HDMI output, an HDMI cable, a USB video capture device, and the appropriate USB cable to connect it to your computer. Additionally, you’ll need to download and install webcam software that is compatible with your operating system.
Once you have everything set up, you can connect your DSLR camera to your computer using the USB video capture device. Open the webcam software and select your DSLR camera as the video source. Adjust the settings according to your preferences, such as resolution, frame rate, and white balance.
Now, when you join a Zoom meeting, select your DSLR camera as the video input instead of the default webcam. You’ll notice a significant improvement in image quality, crispness, and overall visual appeal. Remember to position your camera properly, ensure proper lighting, and frame your shots effectively to make the most of your DSLR camera as a webcam.

In conclusion, using a DSLR camera as a webcam for Zoom can greatly enhance your video conferencing experience. With superior image quality and control, you can project a more professional and visually appealing presence during your meetings. So, dust off that old DSLR camera and put it to good use in your next Zoom call!
Use DSLR Camera as Webcam for Zoom
If you own a DSLR camera and want to enhance the quality of your video conferences on Zoom, you can use your camera as a webcam. By using your DSLR camera, you’ll be able to enjoy the superior image quality that it offers compared to most built-in webcams on laptops or desktops.
Requirements:
To use your DSLR camera as a webcam for Zoom, you’ll need the following:
- A DSLR camera with a built-in HDMI output or a compatible HDMI output adapter
- An HDMI cable
- A computer or laptop with an HDMI input port or a USB capture card
- The necessary cables to connect your camera to your computer
- The latest version of Zoom installed on your computer
Steps to set up your DSLR camera as a webcam:
Follow these steps to use your DSLR camera as a webcam for Zoom:
- Check if your DSLR camera has a clean HDMI output option. If it does, enable it in the camera settings. If not, you’ll need an HDMI output adapter that is compatible with your camera.
- Connect one end of the HDMI cable to your DSLR camera’s HDMI output or the HDMI output adapter.
- Connect the other end of the HDMI cable to your computer’s HDMI input port or the USB capture card.
- Open Zoom on your computer and go to the settings menu.
- Click on the “Video” tab and select your DSLR camera as the video source.
- You should now see the live video feed from your DSLR camera in Zoom. Adjust the frame and position as needed.
- Start or join a Zoom meeting and enjoy the improved video quality from your DSLR camera.
Using your DSLR camera as a webcam for Zoom can significantly enhance your video conferencing experience by providing higher resolution and better image quality. However, keep in mind that prolonged use of your DSLR camera as a webcam may drain the camera’s battery faster. It is also recommended to use a tripod or a stable surface to mount your camera for a steady video feed during your Zoom meetings.

Connect Your DSLR Camera to Your Computer
If you want to use your DSLR camera as a webcam for Zoom meetings or other video conferencing platforms, you’ll need to connect it to your computer. Below are the steps to connect your DSLR camera to your computer:
Step 1: Choose the Right Cable
The first step is to make sure you have the right cable to connect your camera to your computer. Most DSLR cameras have a USB cable that allows you to connect it to your computer. Check the ports on your camera and computer to see if you need a USB Type-A to Type-B or a USB Type-C to Type-B cable.
Step 2: Install the Camera Software
Before connecting your camera to your computer, you’ll need to install the necessary camera software. This software will allow your computer to recognize and interact with your camera. Visit the manufacturer’s website to download and install the latest version of the software for your camera model.
Step 3: Connect the Camera to Your Computer
Once you have the right cable and the camera software installed, you can connect your camera to your computer. Plug one end of the USB cable into your camera and the other end into an available USB port on your computer.
Step 4: Turn on Your Camera and Set the Mode
After connecting your camera to your computer, turn on your camera and set it to the appropriate mode for video streaming. This mode is usually called “PC” or “Webcam” mode. Refer to your camera’s manual for specific instructions on changing the mode settings.

Step 5: Configure Your Video Conferencing Software
Once your camera is connected and turned on, open your video conferencing software, such as Zoom. Go to the settings or preferences menu and select your camera as the video input device. You should now see the feed from your DSLR camera in your video conferencing software.
By following these steps, you can easily connect your DSLR camera to your computer and use it as a high-quality webcam for your Zoom meetings or other video conferencing needs. Enjoy the enhanced video and image quality that a DSLR camera can provide!
Install the Necessary Software
To use your DSLR camera as a webcam for Zoom, you will need to install some software. Follow the steps below to get started:
Step 1: Download the necessary software for your camera model. Check the manufacturer’s website for the latest drivers and software. Most camera manufacturers provide software that allows you to use your DSLR as a webcam.
Step 2: Install the downloaded software on your computer. Follow the on-screen instructions to complete the installation process. Make sure to select the correct options for your camera model.

Step 3: Connect your DSLR camera to your computer using a USB cable. Ensure that your camera is in “Live View” mode.
Step 4: Open Zoom or your preferred video conferencing application on your computer.
Step 5: In Zoom, go to “Settings” and select the “Video” tab. Under the “Camera” dropdown menu, choose the option that corresponds to your DSLR camera. You may need to configure the camera settings within the software to ensure optimal performance.
Step 6: Test your camera by starting a video call or joining a meeting. Make sure that your DSLR camera is capturing the desired image and that the video quality is satisfactory.
Note: It is recommended to use a tripod or a stable surface to position your DSLR camera for better stability during video calls.
By following these steps and installing the necessary software, you can easily use your DSLR camera as a webcam for Zoom and enhance the quality of your video calls.
Adjust Camera Settings
In order to use your DSLR camera as a webcam for Zoom, you will need to make some adjustments to the camera settings. Below are the steps to follow:
Step 1: Connect your DSLR camera to a computer
Use a USB cable to connect your DSLR camera to your computer. Make sure the camera is turned on.
Step 2: Set your camera mode to “Movie” or “Video”
Most DSLR cameras have different shooting modes, including “Movie” or “Video” mode. Set your camera to one of these modes in order to use it for video conferencing.
Step 3: Adjust camera settings for video
Access the camera settings menu and make the following adjustments:

| Setting | Adjustment |
|---|---|
| Resolution | Select a suitable video resolution, such as 1080p or 720p, depending on your camera’s capabilities. |
| Frame Rate | Choose a frame rate that matches with the requirements of your video conferencing platform, typically between 24-30 frames per second. |
| Exposure | Set the exposure level to ensure your video is well-lit. You may need to adjust the ISO, shutter speed, or aperture settings accordingly. |
| Focusing | Enable continuous autofocus or manual focus, depending on your preference. Make sure your subject is in focus at all times. |
Step 4: Test your camera in Zoom
Launch Zoom and go to the settings. Under the “Video” tab, select your DSLR camera as the video source. Start a test meeting or join a meeting to check if your camera is working properly.
Remember to adjust the camera settings as needed for optimal video quality and performance. Enjoy using your DSLR camera as a high-quality webcam for Zoom!
Set Your DSLR Camera as the Default Webcam
With the increasing popularity of video conferencing tools like Zoom, having a high-quality webcam is essential. If you own a DSLR camera, you can easily use it as your default webcam for Zoom meetings or any other video conferencing application. This will allow you to have superior video quality and take advantage of the advanced features of your DSLR camera.
1. Check Camera Compatibility
Before getting started, it is important to ensure that your DSLR camera is compatible with being used as a webcam. Not all DSLR cameras have this capability, so make sure to check your camera’s manual or visit the manufacturer’s website to see if it supports webcam functionality. If your camera is compatible, continue to the next steps.
2. Install Required Software
To use your DSLR camera as a webcam, you will need to install specific software that allows your computer to recognize it as a webcam. There are various software options available, such as SparkoCam, Canon EOS Webcam Utility, and Nikon Webcam Utility. Download and install the software that is compatible with your camera model and operating system.

3. Connect your Camera to your Computer
Connect your DSLR camera to your computer using the appropriate USB cable. Make sure that your camera is powered on before connecting it. Once connected, your computer should detect the camera as a webcam device.
4. Configure Settings
Open the software you installed in step 2 and navigate to the settings or preferences menu. From there, you should be able to select your DSLR camera as the default webcam device. Adjust any settings such as resolution, frame rate, and focus to your desired preferences.
Note: Some software may require additional configuration or settings adjustments, so make sure to follow the instructions provided by the software developer.
5. Test Your Webcam
Now that you have set up your DSLR camera as the default webcam, it is time to test it. Open Zoom or any other video conferencing application and go to the settings menu. Under the video settings, select your DSLR camera as the default webcam. Make a test call or join a meeting to ensure that your camera is working correctly and that the video quality is improved compared to a standard webcam.
Remember to adjust your camera’s focus, framing, and lighting to achieve the best video quality.
By using your DSLR camera as your default webcam, you can elevate your video conferencing experience and stand out with high-quality video. Enjoy the enhanced features and superior image quality that your DSLR camera has to offer during your Zoom meetings or any other video calls you participate in.
Test Your DSLR Camera as a Webcam
If you want to use your DSLR camera as a webcam for Zoom meetings or other video conferencing platforms, it’s important to test the setup before going live. This way, you can ensure that everything is working smoothly and troubleshoot any potential issues before your important meeting or presentation.
Here are some steps to help you test your DSLR camera as a webcam:
- Connect your camera: Ensure that your DSLR camera is connected to your computer using a compatible USB cable. Make sure the camera is turned on and in the correct mode for using it as a webcam.
- Install drivers: If necessary, install any required drivers or software for your camera to function as a webcam. This information can usually be found on the manufacturer’s website.
- Open video conferencing software: Open your preferred video conferencing software, such as Zoom, and go to the settings or preferences menu. Look for the camera settings and select your DSLR camera as the video input device.
- Check video preview: Within the video conferencing software, look for a video preview option. This will allow you to check if your DSLR camera is working correctly and if the video quality meets your expectations.
- Adjust camera settings: If necessary, adjust the camera settings such as white balance, exposure, and focus to ensure optimal video quality. This can usually be done through the camera’s menu options.
- Test audio: Along with video, it’s important to test the audio. Make sure your DSLR camera’s microphone is enabled or use an external microphone connected to your computer for better audio quality.
By following these steps and testing your DSLR camera as a webcam, you can avoid any potential technical issues during important meetings or presentations. It’s always a good idea to test everything in advance to ensure a smooth and professional video conferencing experience.
Optimize Camera Position and Lighting
When using a DSLR camera as a webcam for Zoom, it’s important to optimize the camera position and lighting for the best video quality. Here are some tips to help you achieve this:
Camera Position:
1. Place the camera at eye level or slightly above. This will create a more flattering angle and ensure that you are centered in the frame.
2. Make sure the camera is stable and secure. Use a tripod or mount to prevent any shaky video footage.
3. Position the camera at an appropriate distance from you. You want to be clearly visible without being too close or too far away.
Lighting:
1. Use natural or soft lighting whenever possible. Avoid harsh direct sunlight or overhead lighting that can cause shadows and glare.
2. Position yourself facing the light source, such as a window, to ensure even lighting on your face.
3. Consider using additional lighting options, such as a ring light or desk lamp, to enhance your visibility if needed.
By optimizing your camera position and lighting, you can ensure that you look your best during Zoom meetings or online video conferences. Experiment with different setups to find the one that works best for you.
Enjoy High-Quality Video in Zoom Meetings
If you want to enhance your video quality in Zoom meetings, using a DSLR camera as a webcam is a great option. By following a few simple steps, you can enjoy high-quality video and impress your colleagues or friends with a professional look.
To use your DSLR camera as a webcam for Zoom, you need to connect it to your computer using either a USB cable or an HDMI cable. Once connected, you can set it up as your default video input device in the Zoom settings.
Here is a step-by-step guide on how to set up your DSLR camera as a webcam for Zoom:
| Step 1: | Connect your DSLR camera to your computer using a USB cable or an HDMI cable. Make sure your camera is set to video mode. |
| Step 2: | Install the necessary drivers or software for your camera if required. Check the camera manufacturer’s website for any available software updates. |
| Step 3: | Open the Zoom desktop client on your computer and sign in to your account. |
| Step 4: | Click on the profile picture or initials in the top-right corner of the Zoom window, then select “Settings” from the dropdown menu. |
| Step 5: | In the settings menu, click on the “Video” tab on the left-hand side. |
| Step 6: | Under the “Camera” section, select your DSLR camera from the drop-down menu. |
| Step 7: | You can further customize the video settings, such as resolution and frame rate, by clicking on the “Advanced” button. |
| Step 8: | Close the settings window and start or join a Zoom meeting. Your DSLR camera will now be used as your webcam and provide high-quality video. |
Remember to position your camera properly, choose a suitable background, and adjust the lighting to ensure the best video quality. With your DSLR camera as a webcam, you can enjoy a professional-looking video feed and make a lasting impression in your Zoom meetings.
Question-answer:
Can I use my DSLR camera as a webcam for Zoom?
Yes, you can use your DSLR camera as a webcam for Zoom. However, you will need to connect your camera to your computer using a USB cable and install the necessary software. There are a few different methods and software options available, so you will need to find the one that is compatible with your specific camera model and computer operating system.
What software do I need to use my DSLR camera as a webcam for Zoom?
The software you will need to use your DSLR camera as a webcam for Zoom depends on your camera model and computer operating system. Some popular options include Canon’s EOS Webcam Utility, Nikon’s Webcam Utility, and Sony’s Imaging Edge Webcam. These software options allow you to connect your camera to your computer via USB and use it as a high-quality webcam for Zoom and other video conferencing platforms.
Will using my DSLR camera as a webcam improve the video quality on Zoom?
Yes, using your DSLR camera as a webcam can significantly improve the video quality on Zoom. DSLR cameras are designed to capture high-resolution images and videos with superior quality compared to most built-in webcams. By using your DSLR camera as a webcam, you can take advantage of its advanced features, such as interchangeable lenses, larger image sensors, and manual settings, to achieve professional-looking video footage during your Zoom meetings.
Are there any limitations or drawbacks to using a DSLR camera as a webcam for Zoom?
While using a DSLR camera as a webcam for Zoom offers numerous benefits, there are a few limitations and drawbacks to consider. Firstly, not all DSLR models are compatible with webcam software, so it’s essential to check if your camera is supported. Secondly, using a DSLR camera as a webcam may require additional accessories, such as a USB cable and a tripod or camera mount. Lastly, using a DSLR camera as a webcam may consume more power compared to a regular webcam, so you may need to have your camera connected to a power source or use a battery grip for extended use.


