
Introduction:
Ever wondered how to use the inverted camera on your iPhone? Look no further, as we have all the information you need to get started! The inverted camera feature allows you to take photos and videos with the front-facing camera, giving you a whole new perspective on your captures.
Step 1: Access the Camera:
To begin using the inverted camera on your iPhone, first, locate the Camera app on your home screen and tap on it. This will open up the camera interface. Alternatively, you can quickly access the camera by swiping left on your lock screen, accessing the Control Center, and tapping on the camera icon.
Step 2: Switch to the Front-Facing Camera:

Once the camera interface is open, you will notice a camera flipping icon in the top-right corner. Tap on this icon to switch to the front-facing camera. You will now be able to see yourself on the screen as you take photos or record videos.
Step 3: Adjust Camera Settings:
Prior to capturing your photos or videos, you can adjust various camera settings to enhance your captures. Simply tap on the screen to bring up the camera settings menu, where you can adjust exposure, focus, and other features to your liking.
Step 4: Capture Your Moments:
Now that you have your inverted camera set up and adjusted to your liking, it’s time to start capturing your precious moments. Simply tap the white shutter button to take a photo, or hold it down to record a video. You can also use the volume buttons on the side of your iPhone as an alternative way to capture photos or videos.

Conclusion:
Using the inverted camera on your iPhone provides a fun and unique way to take photos and record videos. Whether you want to capture a selfie, vlog, or simply switch up your perspective, this feature is easy to use and can yield fantastic results. So go ahead and start using the inverted camera on your iPhone today!
Benefits of using inverted camera on iPhone
The inverted camera feature on iPhone offers several benefits that can enhance your photography and improve your overall experience with your device. Here are some advantages of using the inverted camera:
1. Better Selfies and Group Photos
Using the inverted camera allows you to easily take selfies and group photos with the high-quality rear camera of your iPhone. This means that you can capture sharp and detailed images without compromising the quality. Additionally, the inverted camera gives you a better view of the composition, ensuring that everyone is properly framed in the shot.
2. Enhanced Stability and Control
By using the inverted camera, you can rest the back of your iPhone on a surface, which provides more stability and control while capturing photos or recording videos. This can be especially useful in low-light situations or when you need to take long exposure shots. The stability offered by the inverted camera helps reduce camera shake, resulting in clearer and sharper images.

Moreover, the inverted camera allows you to use the volume buttons as a shutter release, making it easier to capture images without having to tap on the screen. This can be beneficial when you want to minimize the chance of camera shake or capture shots from awkward angles.
3. Different Perspectives and Creative Shots
The inverted camera opens up new possibilities for capturing unique perspectives and creative shots. You can explore different angles and experiment with different compositions by positioning your iPhone in unconventional ways. This can add variety and interest to your photography, making your images stand out from the crowd.
Furthermore, the inverted camera allows you to observe and capture scenes without obstructing the view. This can be particularly useful in situations where you want to document something without drawing attention, such as in street photography or candid shots.
In conclusion, utilizing the inverted camera on your iPhone can enhance your photography skills, provide stability and control, and enable you to capture unique perspectives and creative shots. So don’t hesitate to take advantage of this feature and take your photography to the next level!
Discover the advantages and features of inverted camera on iPhone
The inverted camera feature on iPhone offers several advantages and unique features that can enhance your photography experience. This feature allows you to flip the camera view horizontally, providing a different perspective and allowing you to capture creative and unique photos and videos.
Advantages of using the inverted camera on iPhone:
1. Enhanced Selfie Experience: The inverted camera allows you to capture stunning selfies with a different look. By flipping the camera view horizontally, you can experiment with different angles and compositions, resulting in more flattering and interesting selfies.
2. A New Perspective: Inverting the camera view provides a fresh perspective on your surroundings. It allows you to see the world from a different angle and capture images that stand out. This can be particularly useful for landscape or architectural photography, as it adds a unique touch to your compositions.
Features of the inverted camera on iPhone:
1. Real-time Flipping: The inverted camera feature on iPhone provides real-time flipping, allowing you to see the flipped view on your screen as you capture photos or record videos. This enables you to compose your shots more accurately and make necessary adjustments on the spot.
2. Easy Access: The inverted camera feature is easily accessible from the camera app on your iPhone. You can quickly switch to the inverted camera mode with just a few taps, making it convenient to use whenever you want to experiment with different perspectives and compositions.
3. Compatible with Various Camera Modes: You can use the inverted camera feature with various camera modes on your iPhone, including photo mode, video mode, panorama, and slow-motion. This allows you to explore different creative possibilities and capture stunning visuals in different scenarios.

In conclusion, the inverted camera feature on iPhone offers unique advantages and features that can elevate your photography experience. Whether you want to capture intriguing selfies from a new perspective or experiment with different compositions in your photography, the inverted camera on iPhone provides a valuable tool to enhance your creativity.
Step-by-step guide for using inverted camera on iPhone
Using the inverted camera on your iPhone can be useful in a variety of situations. Whether you want to take a selfie or capture a moment from a unique perspective, the inverted camera feature allows you to do just that.
Step 1: Access the Camera app
To begin using the inverted camera on your iPhone, open the Camera app. You can find this app on your home screen or by swiping left from the lock screen.
Step 2: Switch to the front-facing camera
By default, the Camera app opens with the rear-facing camera. To use the inverted camera, switch to the front-facing camera by tapping the icon located in the top-right corner of the screen. This icon resembles a camera with two arrows forming a circle.
Step 3: Enable the inverted camera
Once you have switched to the front-facing camera, you can enable the inverted camera feature. To do this, tap the icon in the bottom-right corner of the screen. This icon resembles a camera with a curved arrow pointing downwards.

Note: If you have previously disabled the inverted camera, you may need to enable it in the camera settings. To access the camera settings, tap the arrow icon located in the top-right corner of the screen and select “Settings”. From there, navigate to “Photos & Camera” and toggle the “Mirror Front Camera” switch to the ON position.
Step 4: Capture photos or videos
With the inverted camera now enabled, you can start capturing photos or recording videos. Simply tap the shutter button located at the bottom of the screen to take a photo, or hold it down to record a video. You can also use the volume buttons on the side of your iPhone to take photos or start/stop video recording.
Tip: If you prefer, you can use the volume buttons on compatible headphones as a remote shutter release.
That’s it! You’ve successfully used the inverted camera on your iPhone. Remember to disable the inverted camera feature if you no longer need it, as this will revert the camera to its normal configuration.
Learn how to enable and utilize the inverted camera feature on your iPhone
Do you sometimes find it difficult to take selfies or capture images on your iPhone? If so, you’ll be glad to know that your iPhone comes with a built-in inverted camera feature that can help you with this. In this guide, we will show you how to enable and use the inverted camera on your iPhone.

Enabling the inverted camera feature:
To enable the inverted camera feature on your iPhone, follow these simple steps:
- Open the “Settings” app on your iPhone.
- Scroll down and tap on “General”.
- Tap on “Accessibility”.
- Under the “Vision” section, tap on “Display & Text Size”.
- Toggle on the “Invert Colors” option.
Once you have enabled the inverted camera feature, the colors on your screen will be inverted, making it easier for you to take selfies or capture images.
Utilizing the inverted camera feature:
Now that you have enabled the inverted camera feature on your iPhone, here’s how you can use it:
- Open the “Camera” app on your iPhone.
- Position your iPhone as you normally would to take a photo or video.
- The inverted camera feature will automatically flip the image, so you can see yourself or the subject correctly.
- Take your photo or record your video as you normally would.
That’s it! By enabling and utilizing the inverted camera feature on your iPhone, you can easily take selfies or capture images without any hassle. Give it a try and see how it enhances your photography experience!
Note: The inverted camera feature may not be available on all iPhone models or iOS versions. Make sure your device is up to date to access this feature.
Tips for getting the best results with inverted camera on iPhone
Using the inverted camera feature on your iPhone can provide a unique perspective when taking photos or videos. Here are some tips to help you get the best results:
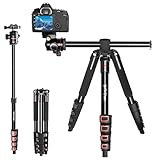
1. Use a tripod or stabilizer
When using the inverted camera, stability is key to prevent shaky shots. Consider using a tripod or stabilizer to keep your iPhone steady and reduce camera shake. This will result in clearer and more professional-looking footage.
2. Experiment with angles
One of the advantages of using the inverted camera is that it allows you to capture shots from unique angles. Experiment with different heights and perspectives to add creativity to your photos or videos. Try shooting from a low angle or overhead for interesting and engaging visuals.
3. Pay attention to lighting
Lighting is an important factor in photography, and it applies to inverted camera shots as well. Be mindful of the lighting conditions and adjust accordingly. Avoid shooting directly into bright sources like the sun, as it can result in overexposed footage. Instead, position yourself and your subject in a way that utilizes the available light to enhance the visual appeal of your shots.
4. Use the gridlines
The gridlines on your iPhone camera can be a useful guide for composition. Enable the gridlines in your camera settings and use them to align your shots. This helps in achieving symmetrical and well-balanced photos or videos.
5. Edit and enhance
Don’t be afraid to edit and enhance your inverted camera shots. Use photo or video editing apps to fine-tune the exposure, colors, and other aspects of your footage. This can greatly improve the overall quality and aesthetic appeal of your content.
| Pros | Cons |
|---|---|
| Provides a unique perspective | Requires additional stability measures |
| Allows for creative angles | Challenging lighting conditions |
| Can result in visually appealing shots | May require post-processing |
By following these tips, you can make the most of the inverted camera feature on your iPhone and capture stunning photos or videos from a different point of view.
Optimize your usage of inverted camera to capture stunning photos and videos
The inverted camera feature on your iPhone opens up a whole new world of possibilities when it comes to capturing photos and videos. By flipping the camera view, you can take unique and creative shots that you wouldn’t be able to achieve with the regular camera mode. Here are some tips to help you optimize your usage of the inverted camera and capture stunning visuals.
1. Experiment with angles: With the inverted camera, you can experiment with different angles and perspectives. Try shooting from unusual angles, such as from the ground or from above. This can add depth and interest to your photos and videos.
2. Use the grid mode: Enable the grid mode on your iPhone to help you compose your shots more effectively. The grid can help you align your subjects and create a more balanced composition.
3. Take advantage of natural lighting: Natural lighting can make a huge difference in the quality of your photos and videos. When using the inverted camera, pay attention to the direction and intensity of the light source. Adjust your position and capture the subject in the most flattering natural light.
4. Explore the manual controls: The inverted camera allows you to manually adjust exposure, focus, and white balance. Take advantage of these manual controls to achieve the desired look and feel for your photos and videos. Experiment with different settings to find what works best in different lighting conditions.
5. Capture movement: The inverted camera can be great for capturing fast-paced action and movement. Whether it’s sports, dancing, or any other dynamic activity, the inverted camera allows you to capture the movement in a unique and dynamic way.
6. Edit your shots: Don’t forget to edit your shots to enhance their visual appeal. There are various photo and video editing apps available that can help you enhance colors, adjust brightness, and add filters to give your photos and videos a professional touch.
7. Share your creations: Once you’ve captured stunning photos and videos using the inverted camera, don’t keep them to yourself. Share them on social media platforms or with friends and family to showcase your creativity and talent.
By optimizing your usage of the inverted camera on your iPhone, you can unlock a world of creative possibilities and capture stunning visuals. Experiment, explore, and have fun with this unique feature to take your photography and videography skills to the next level.
Recommended apps and accessories for inverted camera usage on iPhone
1. Camera+: This popular photography app offers an array of features that can enhance your experience of using the inverted camera on your iPhone. With Camera+, you can easily adjust exposure, focus, and use different shooting modes for capturing high-quality photos using the inverted camera.
2. ProCamera: If you’re looking for more advanced control over your inverted camera settings, ProCamera is a great option. It provides manual controls for exposure, focus, and white balance, allowing you to have more creative freedom while shooting with the inverted camera.
3. Moment lenses: Enhance your photography capabilities with Moment lenses that can be easily attached to your iPhone’s inverted camera. These high-quality lenses offer various options such as wide-angle, telephoto, and macro lenses, enabling you to capture unique and stunning photos.
4. Joby GorillaPod: When shooting with the inverted camera, stability becomes crucial. The Joby GorillaPod is a flexible tripod that can securely hold your iPhone in any position and angle, allowing you to capture steady shots using the inverted camera. Its bendable legs can be wrapped around objects, making it a versatile accessory for different shooting situations.
5. VSCO: This photography app not only has powerful editing tools but also provides a community where you can share your inverted camera shots with like-minded individuals. Explore inspiring photography work and find creative ideas to enhance your inverted camera photography skills using VSCO.
6. Halide: If you want to take full advantage of your iPhone’s inverted camera capabilities, Halide is a must-have app. It offers manual controls, RAW support, and advanced features like focus peaking, allowing you to capture professional-grade photos using the inverted camera.
Note: Make sure to check the compatibility of these apps and accessories with your specific iPhone model before purchasing or downloading.
Enhance your photography experience with these must-have apps and accessories
Are you looking to take your iPhone photography to the next level? With the inverted camera on iPhone, you already have a powerful tool in your hands. But to truly enhance your photography experience, consider downloading the following apps and investing in some essential accessories:
1. Camera+ 2
Camera+ 2 is an incredible photo editing app that allows you to take full control of your iPhone camera. With advanced manual controls, RAW shooting capabilities, and a variety of filters and editing tools, this app will help you capture and create stunning images.
2. Moment lenses
To truly expand your iPhone photography capabilities, consider investing in Moment lenses. These high-quality lenses attach to your iPhone and allow you to capture a wide range of shots, from wide-angle landscapes to telephoto zooms. With Moment lenses, you can take your iPhone photography to the next level.
3. VSCO
VSCO is a popular photography app that offers a range of editing tools and filters to enhance your iPhone photos. With its minimalist interface and unique filters inspired by classic film, VSCO is a favorite among photographers looking for a sleek editing experience.
4. Tripod
When it comes to photography, stability is key. Investing in a tripod will help you capture sharp, steady shots with your inverted camera. Look for a sturdy and portable tripod that can easily be adjusted to different heights and angles.
5. Remote shutter control
For those times when you want to be in the shot or need to take a group photo, a remote shutter control is a must-have accessory. This small device connects to your iPhone and allows you to trigger the shutter from a distance, giving you more control over your photos.
By downloading these apps and investing in these accessories, you can enhance your photography experience and unlock the full potential of your inverted camera on iPhone. So get out there and start capturing stunning images!
FAQ
What is the purpose of using the inverted camera on an iPhone?
The inverted camera feature on an iPhone can be useful for individuals with visual impairments or certain eye conditions. By inverting the colors on the camera display, it can make it easier for these individuals to see and distinguish objects, text, or images on the screen. It can also be used as a creative photography or video tool to create unique and artistic visuals.


