
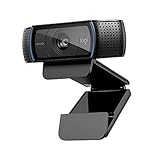
Keeping your home or workplace secure is crucial in today’s world. One innovative and cost-effective way to monitor your surroundings is by repurposing your Logitech Pro 9000 webcam as a security camera. The Logitech Pro 9000 is not only known for its exceptional video and audio quality but also for its versatility.
By following a few simple steps, you can transform your Logitech Pro 9000 into a powerful surveillance tool. Whether you want to keep an eye on your property during vacations or ensure the safety of your office premises, this guide will walk you through the process.
The Logitech Pro 9000 offers high-definition video capture and a wide-angle lens, making it an ideal choice for a security camera. Additionally, its compatibility with popular operating systems such as Windows and macOS makes it accessible to a wide range of users.
In this article, we will provide step-by-step instructions on how to set up your Logitech Pro 9000 as a security camera. We will cover everything from connecting the camera to your computer to configuring the necessary software. With the Logitech Pro 9000 and a few simple tools, you can create a reliable and affordable security solution to protect your property and loved ones.
Setting up your Logitech Pro 9000
Setting up your Logitech Pro 9000 as a security camera is a straightforward process. Follow these steps to get started:

1. Install the Logitech Webcam Software
Begin by installing the Logitech Webcam Software on your computer. This software allows you to configure and control your Logitech Pro 9000 camera. You can download the software from the Logitech website.
Once downloaded, double-click on the installation file and follow the on-screen prompts to install the software. After the installation is complete, restart your computer.
2. Connect the Logitech Pro 9000
Connect your Logitech Pro 9000 camera to your computer using the provided USB cable. Make sure to connect the USB end of the cable to an available USB port on your computer.
Once connected, the camera should be recognized by your computer automatically. If prompted, install any drivers or software necessary for the camera to function properly.
3. Configure the Camera Settings
Launch the Logitech Webcam Software that you installed in Step 1. This software allows you to access and modify various camera settings, including resolution, framerate, and video compression.
Adjust these settings according to your preferences. For security purposes, it’s recommended to set a high-resolution and framerate to capture clear and detailed video footage.
Additionally, you can set up motion detection and enable notifications to receive alerts whenever the camera detects any movement.
4. Position the Camera
Decide on the best location for your Logitech Pro 9000 camera to capture the desired area. Consider factors such as the field of view, lighting conditions, and accessibility for maintenance.
Mount the camera securely using the included mounting hardware or place it on a stable surface. Ensure that the camera is positioned to capture the intended area and adjust the angle as needed.
Once the camera is positioned, you can start using it as a security camera to monitor your home, office, or any other desired location.
Note: Make sure to comply with all applicable laws and regulations regarding privacy and surveillance when using your Logitech Pro 9000 as a security camera.
Installing the necessary software
To start using your Logitech Pro 9000 as a security camera, you will need to install the necessary software on your computer. The software enables you to manage and control your camera’s settings, as well as view and record footage.
Follow these steps to install the software:
| Step 1: | Insert the installation CD that came with your Logitech Pro 9000 into your computer’s CD drive. |
| Step 2: | If the installation process does not automatically start, navigate to the CD drive on your computer and double-click on the setup.exe file to begin the installation. |
| Step 3: | Follow the on-screen instructions to proceed with the installation. You may need to accept the terms and conditions, choose the installation location, and select additional software components. |
| Step 4: | Once the installation is complete, restart your computer to ensure all software components are properly configured. |
| Step 5: | After rebooting, connect your Logitech Pro 9000 to your computer using the provided USB cable. |
| Step 6: | Launch the installed software and follow the on-screen instructions to set up your camera and configure its security features. |
Once you have completed these steps, you will have successfully installed the necessary software for your Logitech Pro 9000 security camera and can begin using it to monitor your desired area.
Connecting the camera to your computer
To use your Logitech Pro 9000 as a security camera, you will need to connect it to your computer. Follow these steps to establish the connection:

1. Start by locating the USB cable that came with your Logitech Pro 9000 camera.
2. Plug one end of the USB cable into the USB port on the back of the camera.
3. Connect the other end of the USB cable to an available USB port on your computer.
4. Once connected, wait for your computer to recognize the camera. You may see a notification or prompt indicating that a new device has been detected.
5. Install any necessary drivers or software for the camera. You can usually find these on the Logitech website or on the CD that came with your camera.
6. After the drivers or software have been installed, open your preferred security camera software or app on your computer.
7. In the software or app, locate the camera settings or device settings section.
8. Look for an option to select your camera. It may be listed as the Logitech Pro 9000 or a similar name.
9. Select your camera from the list of available devices.
10. Once your camera is selected, you should see a live video feed from the Logitech Pro 9000 on your computer screen.
11. You can now configure the camera settings and set up any desired security features, such as motion detection or recording.
12. Make sure to position your Logitech Pro 9000 camera in a suitable location for monitoring the desired area.
By following these steps, you should be able to successfully connect your Logitech Pro 9000 camera to your computer and use it as a security camera. Remember to consult the camera’s manual or contact Logitech support if you encounter any issues during the setup process.
Configuring the camera settings
Once you have set up your Logitech Pro 9000 camera as a security camera, you may want to configure its settings to optimize its functionality. Here are some steps to help you get started:
1. Install the necessary software
To access and configure the camera settings, you will need to install the Logitech Webcam Software on your computer. You can download it from the Logitech website.

2. Launch the software
After installing the software, launch it by locating the Logitech Webcam Software icon on your desktop or in the Start menu. Double-click on the icon to open the software.
3. Access the camera settings
Once the software is open, you can access the camera settings by clicking on the “Settings” or “Options” button, usually located in the top or side menu of the software interface.
4. Adjust the video settings
Within the camera settings, you will find various options to adjust the video settings of your Logitech Pro 9000 camera. These settings may include resolution, frame rate, brightness, contrast, and more. Experiment with these settings to achieve the desired image quality and clarity for your security camera setup.
5. Configure motion detection
If you want your Logitech Pro 9000 camera to detect motion and trigger recordings or alerts, you can enable the motion detection feature in the camera settings. Look for options related to motion detection and configure them according to your preferences.
6. Set up audio settings (optional)
If your Logitech Pro 9000 camera has a built-in microphone, you can configure the audio settings to optimize the sound quality for recording purposes. Check for options related to audio settings and adjust them as needed.
Once you have configured the camera settings to your satisfaction, you can save the changes and start using your Logitech Pro 9000 camera as a security camera.
Adjusting image quality and resolution
If you want to use your Logitech Pro 9000 as a security camera, it’s important to adjust the image quality and resolution to ensure that you capture clear and detailed footage. Here are some steps to help you achieve the best results:
Step 1: Install Logitech Webcam Software
Before adjusting the image quality and resolution, make sure you have installed the Logitech Webcam Software on your computer. This software allows you to access and modify the camera settings easily.
Step 2: Open the Logitech Webcam Software
Launch the Logitech Webcam Software by double-clicking on the application icon on your desktop or finding it in the start menu. Once opened, you should see the camera feed on your screen.
Step 3: Access camera settings
Click on the settings icon or navigate to the settings tab in the Logitech Webcam Software. This will allow you to access and adjust various camera settings, including image quality and resolution.
Step 4: Adjust image quality
In the camera settings, look for the option to adjust image quality. This may be listed as “Quality”, “Video Quality”, or similar. Increase the quality to ensure a sharper image. Be mindful that higher quality settings may result in larger file sizes.
Step 5: Modify image resolution
Next, look for the option to modify the image resolution. This may be listed as “Resolution”, “Video Resolution”, or similar. Choose a higher resolution for more detailed footage. Keep in mind that higher resolutions may require more computing power and storage space.
Step 6: Test and finetune
After adjusting the image quality and resolution, it’s important to test the camera and make any necessary finetuning. Capture a sample video or image and review it to ensure the desired quality and clarity. If needed, go back to the camera settings and make further adjustments until you are satisfied with the results.
| Setting | Adjustment |
|---|---|
| Image Quality | Increase for sharper image |
| Image Resolution | Choose higher resolution for more detail |
Setting up motion detection
Using your Logitech Pro 9000 as a security camera involves setting up motion detection. This feature allows the camera to detect any movement within its field of view and automatically start recording or trigger an alert.
Step 1: Installing the necessary software
To enable motion detection on your Logitech Pro 9000, you need to install the appropriate software. Logitech provides its own software called Logitech Webcam Software, which offers advanced settings and features including motion detection.
You can download the software from the official Logitech website. Once downloaded, run the setup file and follow the on-screen instructions to install it on your computer.
Step 2: Configuring motion detection settings
After installing the Logitech Webcam Software, launch the application and open the settings menu. Look for the motion detection options, which may be located in a separate tab or under the “Advanced settings” section.
Within the motion detection settings, you can adjust various parameters to customize the behavior of your Logitech Pro 9000 as a security camera. These parameters may include sensitivity, detection area, and actions triggered by motion.
Sensitivity: Adjust the sensitivity level to determine how sensitive the camera is to motion. Higher sensitivity may result in more false positives, while lower sensitivity may cause the camera to miss some movements.
Detection area: Define the specific area within the camera’s field of view where you want motion to be detected. This can help to avoid false alarms triggered by irrelevant movements outside the designated area.
Actions triggered by motion: Choose what actions should be taken when motion is detected. You can opt to start recording, send email notifications, or trigger an alarm, depending on the capabilities of your software and hardware setup.
Step 3: Testing and fine-tuning
After configuring the motion detection settings, it is important to test and fine-tune them to ensure optimal performance. Walk around the monitored area and observe how the camera detects and reacts to your movements.
If the camera is too sensitive and triggers false alarms, try adjusting the sensitivity level or reducing the detection area. Conversely, if the camera fails to detect certain movements, consider increasing the sensitivity or expanding the detection area.
Repeat the testing and adjustment process until you are satisfied with the camera’s motion detection capabilities. Remember to periodically check and update your settings as needed to adapt to changing lighting conditions or any other factors that may affect motion detection.
To conclude, setting up motion detection on your Logitech Pro 9000 is an essential step in utilizing it as a security camera. With the right software and proper configuration, you can enhance the surveillance capabilities of your device and ensure effective monitoring of your desired area.
Accessing the camera remotely
If you want to access your Logitech Pro 9000 security camera remotely, you will need to follow a few steps. By doing so, you will be able to monitor your camera feed from anywhere using a computer or mobile device.
Here is a step-by-step guide on how to access your camera remotely:
| Step 1: | Ensure that your Logitech Pro 9000 camera is connected to your computer and turned on. |
| Step 2: | Make sure that your computer is connected to the internet. |
| Step 3: | Download and install the Logitech Webcam Software on your computer, if you haven’t done so already. |
| Step 4: | Launch the Logitech Webcam Software and navigate to the camera settings. |
| Step 5: | Enable remote access by configuring the appropriate settings. You may need to set a username, password, and port number for remote access. |
| Step 6: | Save the settings and exit the Logitech Webcam Software. |
| Step 7: | On the device you want to use for remote viewing, open a web browser. |
| Step 8: | Enter the IP address or domain name of your computer, followed by the port number you specified in the camera settings. |
| Step 9: | Log in with the username and password you set earlier. |
| Step 10: | You should now be able to access your Logitech Pro 9000 security camera remotely and view the live feed. |
By following these steps, you can easily set up and access your Logitech Pro 9000 camera remotely, providing you with added security and peace of mind.
Configuring port forwarding on your router
One important step in using your Logitech Pro 9000 as a security camera is configuring port forwarding on your router. Port forwarding allows incoming connections from the internet to reach your camera, enabling you to access it remotely. Here’s how you can set up port forwarding on your router:
Step 1: Identify your router’s IP address
In order to access your router’s configuration settings, you need to know its IP address. Typically, you can find this information in the router’s user manual or on a sticker at the back of the device. Note down the IP address as you will need it for the next steps.
Step 2: Access your router’s web interface
Open your web browser and enter your router’s IP address in the address bar. Press Enter to access your router’s configuration page.
Step 3: Login to your router
Enter the username and password for your router. If you haven’t changed these credentials, you can usually find the default login information in the router’s user manual or on the manufacturer’s website.
Step 4: Navigate to the port forwarding settings
Once logged in, look for a section called “Port Forwarding” or “Virtual Server” in your router’s interface. The exact location may vary depending on the make and model of your router.
Step 5: Create a new port forwarding rule
Click on the “Add” or “Create” button to create a new port forwarding rule. You will need to provide the following information:
| Field | Description |
|---|---|
| Service Name | Enter a descriptive name for your port forwarding rule. |
| Protocol | Select the protocol used by your camera (TCP or UDP). |
| External Port Start | Enter the starting external port number. This is the port that will be accessed from the internet. |
| External Port End | Enter the ending external port number. If you only want to forward a single port, use the same value as the starting port. |
| Internal IP Address | Enter the IP address of your Logitech Pro 9000 camera. |
| Internal Port | Enter the port number used by your camera. This is typically 80 for HTTP or 554 for RTSP. |
| Enable or Disable | Choose whether to enable or disable the port forwarding rule. |
Step 6: Save and apply the changes
After filling in the required information, click the “Save” or “Apply” button to save and apply the port forwarding rule on your router. The changes may take a few moments to take effect.
Once the port forwarding is set up correctly, you should be able to access your Logitech Pro 9000 security camera remotely using the external IP address of your router and the port numbers you configured.
Remember to ensure that your camera has a fixed internal IP address to avoid any connectivity issues.
Setting up remote access software
In order to use your Logitech Pro 9000 as a security camera, you will need to set up remote access software on your computer. This will allow you to remotely view the feed from your camera and control its functions.
1. Choose the remote access software
There are several remote access software options available that are compatible with the Logitech Pro 9000 camera. Some popular choices include TeamViewer, AnyDesk, and Chrome Remote Desktop. Research and choose the software that best fits your needs and preferences.
2. Download and install the software
Once you have chosen your remote access software, visit the official website and download the appropriate version for your operating system. Follow the on-screen instructions to install the software on your computer.
3. Set up an account
After the software is installed, you will likely need to create an account. This will allow you to log in to the software from any device and access your camera feed remotely. Follow the prompts to create your account, including providing a valid email address and choosing a secure password.
4. Configure your camera settings
Before you can start using the software with your Logitech Pro 9000 camera, you will need to configure the camera settings within the software. This may include providing the software with the camera’s IP address or selecting it from a list of connected devices. Consult the software’s documentation or support resources for detailed instructions on how to do this.
Note: Make sure that your computer and camera are connected to the same network for proper configuration.
5. Access your camera remotely
Once your camera is configured correctly, you should be able to access its feed remotely through the remote access software. Log in to your account on another device using the software’s app or website and navigate to the camera section. You should now see a live feed from your Logitech Pro 9000 camera and be able to control its functions, such as zoom and pan.
Remember to keep your login credentials secure and disable remote access when not in use to ensure the privacy and security of your camera feed.
Following these steps will enable you to set up remote access software for your Logitech Pro 9000 camera and monitor your security camera feed from anywhere.
FAQ,
What is the Logitech Pro 9000?
The Logitech Pro 9000 is a webcam that was released in 2008. It is known for its high-quality video and audio capabilities.
Can I use the Logitech Pro 9000 as a security camera?
Yes, you can use the Logitech Pro 9000 as a security camera by following a few steps. First, you will need to download and install software that allows you to use the webcam as a security camera. Then, you can set up the webcam in a location where you want to monitor and configure the software to start recording when it detects motion. This way, the webcam will act as a security camera and capture video footage of any activity in the area.
Is it difficult to set up the Logitech Pro 9000 as a security camera?
Setting up the Logitech Pro 9000 as a security camera is relatively easy. You will need to download and install software that allows you to use the webcam as a security camera, but the process is usually straightforward. Once you have the software installed, you can follow the instructions provided to configure the webcam as a security camera and start recording. If you encounter any difficulties, you can refer to the user manual or seek online tutorials for guidance.
What are the advantages of using the Logitech Pro 9000 as a security camera?
Using the Logitech Pro 9000 as a security camera offers several advantages. Firstly, it is a cost-effective solution since you can repurpose an existing webcam instead of purchasing a dedicated security camera. Secondly, the Logitech Pro 9000 has high-quality video and audio capabilities, allowing you to capture clear footage of any activity. Additionally, the webcam is compact and portable, making it easy to set up in different locations. Lastly, by using software that can detect motion, the Logitech Pro 9000 can automatically start recording when it detects movement, providing you with an efficient and convenient security solution.


